How to Use Combined Lists in GDPR Compliance
-
GDPR Compliance
If you think you need more than just creating separate lists for contacts, tickets, or organizations, the Combined Lists feature is exactly what you’re looking for. It allows you to combine multiple conditions across users, tickets, and organizations to create highly targeted segments for data deletion and anonymization.
This feature is ideal for identifying data that meets specific criteria, such as users who haven't requested tickets in a while or users whose tickets are tagged with specific labels, and more. So, let’s learn how to use these powerful combined lists in a few simple steps.
To get started, open the app and go to: Settings > List Management > Combined Lists > Add a new list.
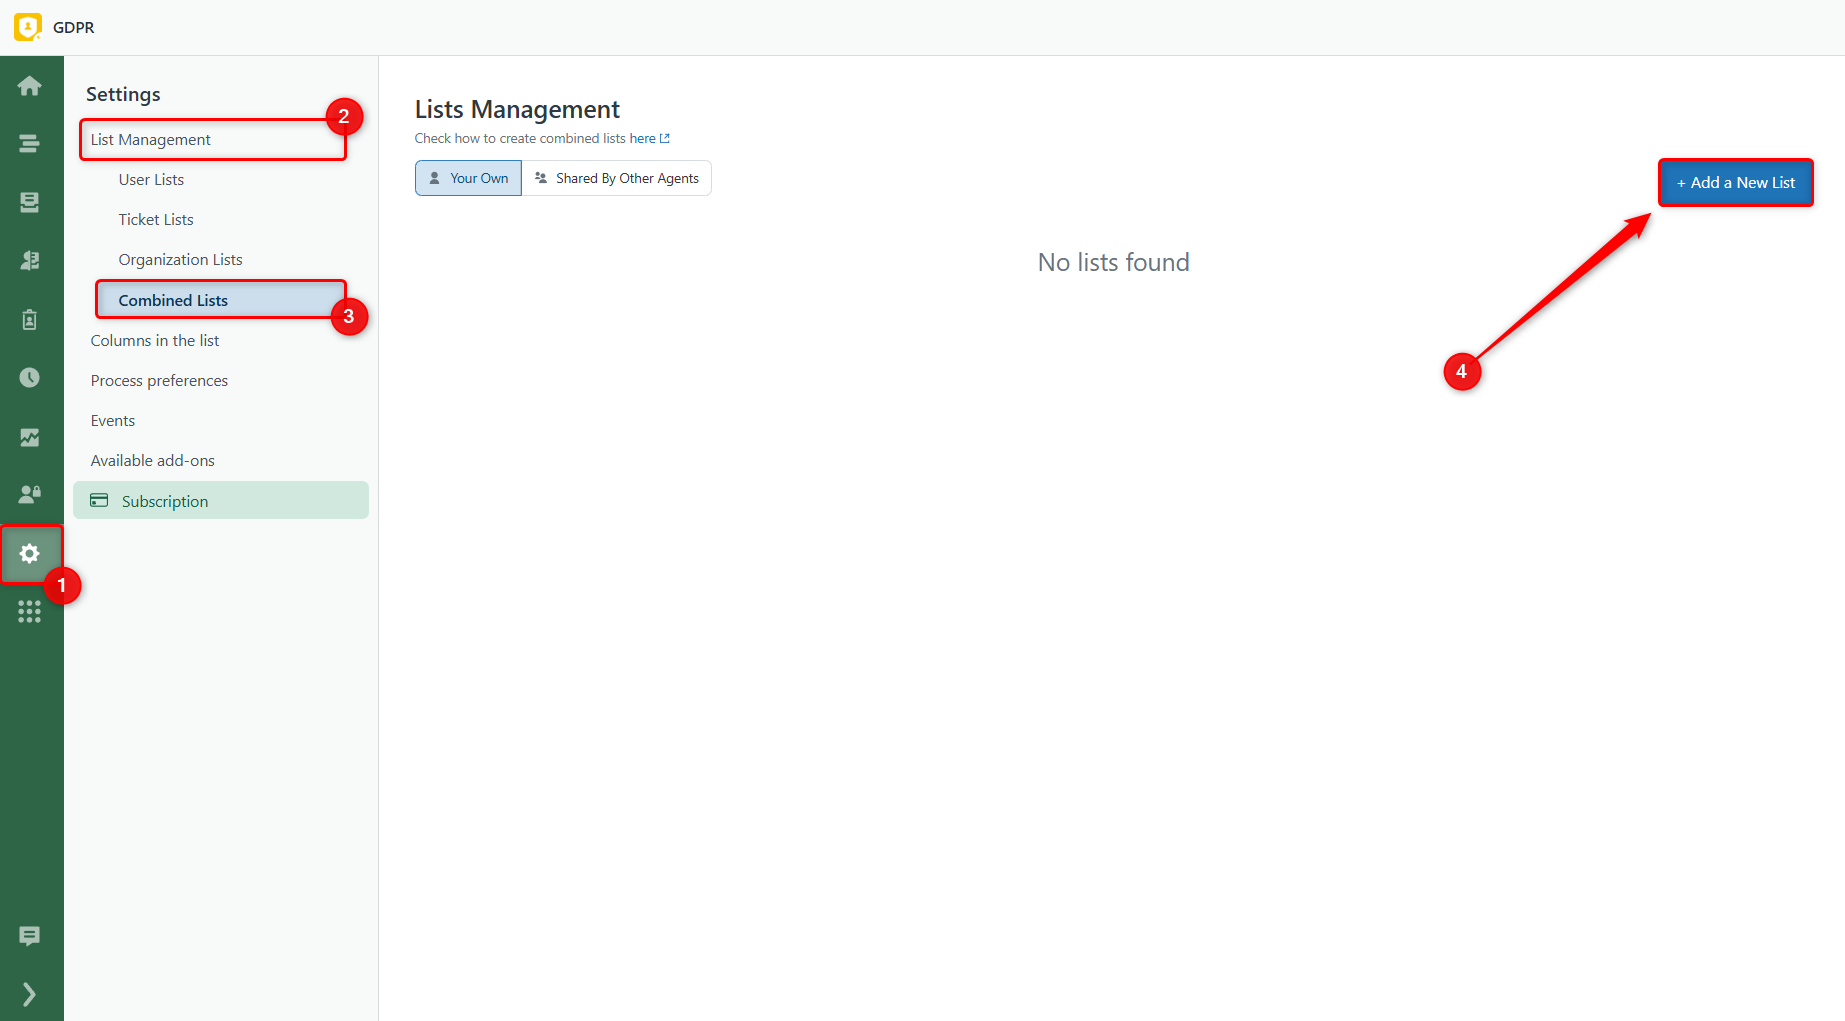
From there, you can choose between two methods:
Automatic Method
The Automatic method lets you instantly generate a combined list using built-in templates. These pre-configured use cases help you find common data cleanup targets with minimal effort. Here are a few examples:
Example 1: Users without requested tickets
This method helps you quickly find users who have no open or requested tickets.
1. To begin, locate the required list and click Select next to it.
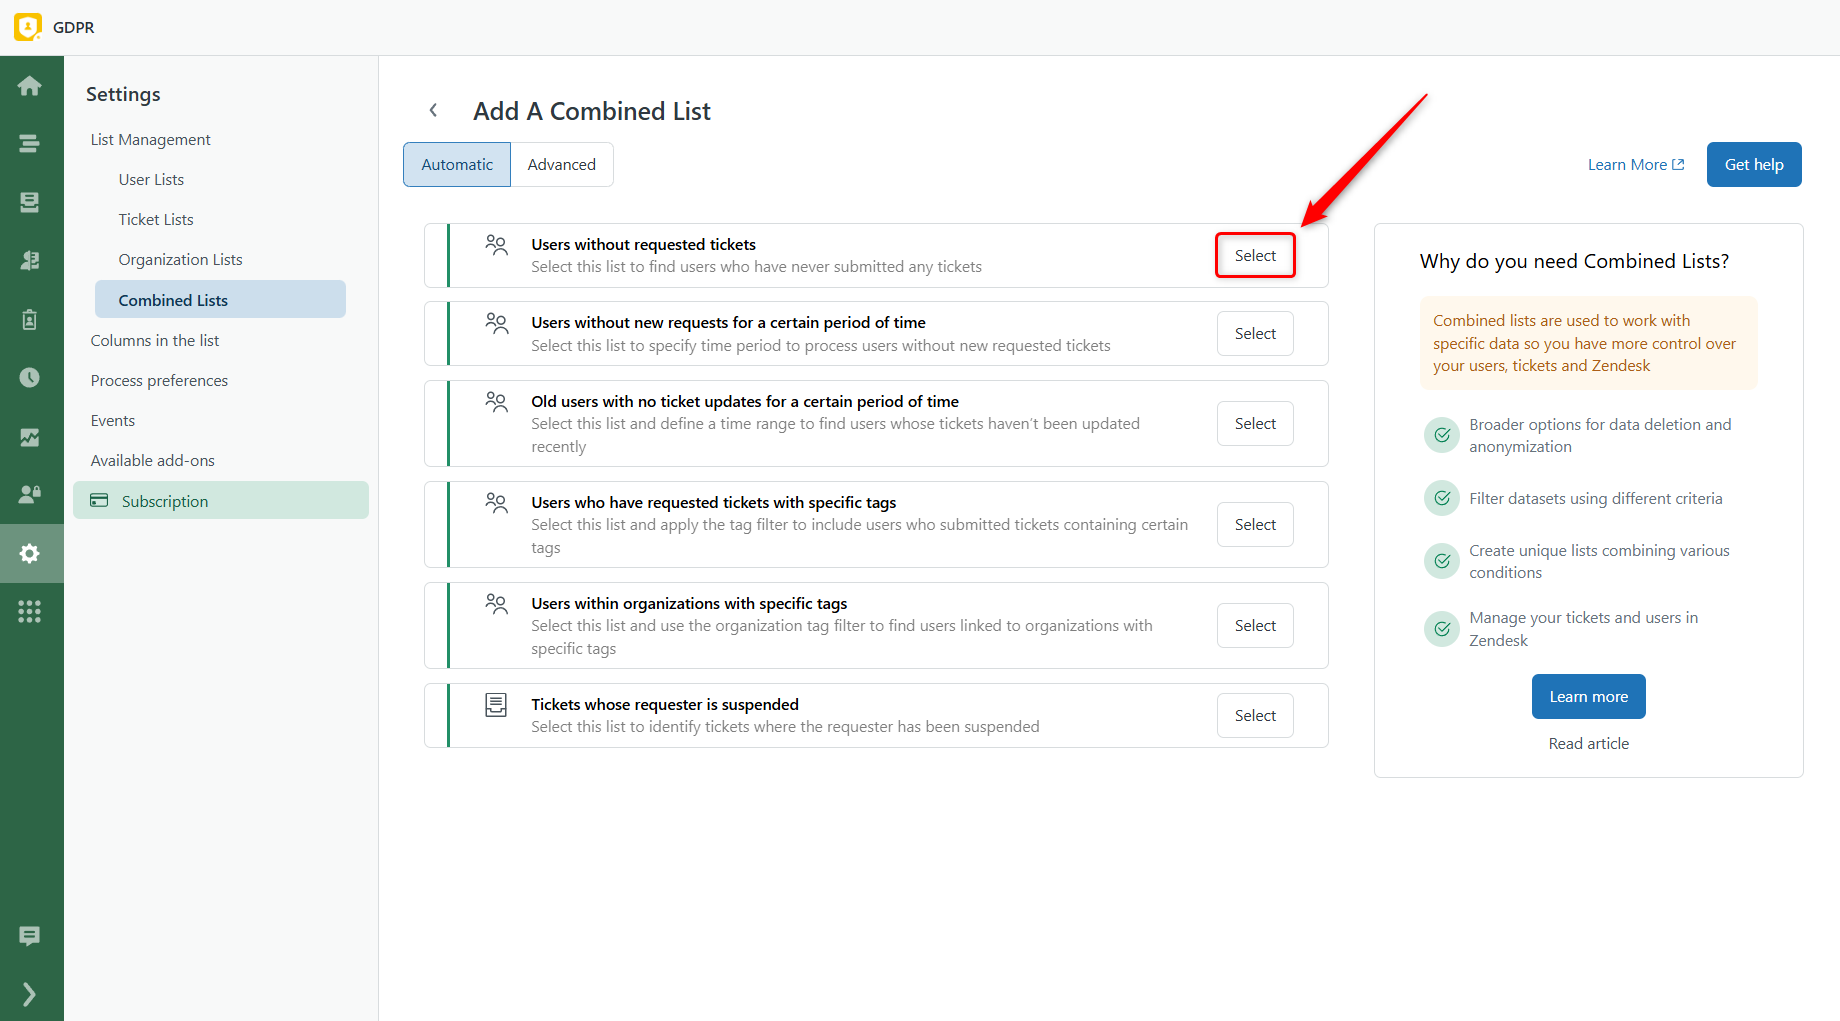
2. After, you’ll see the panel on the right with configurations, where you can:
- Change the name of the list by clicking the pen icon
- Add an optional description for easy reference
- Share it with other agents by toggling the button
- Once you’ve made your adjustments, click Load the list to generate the results
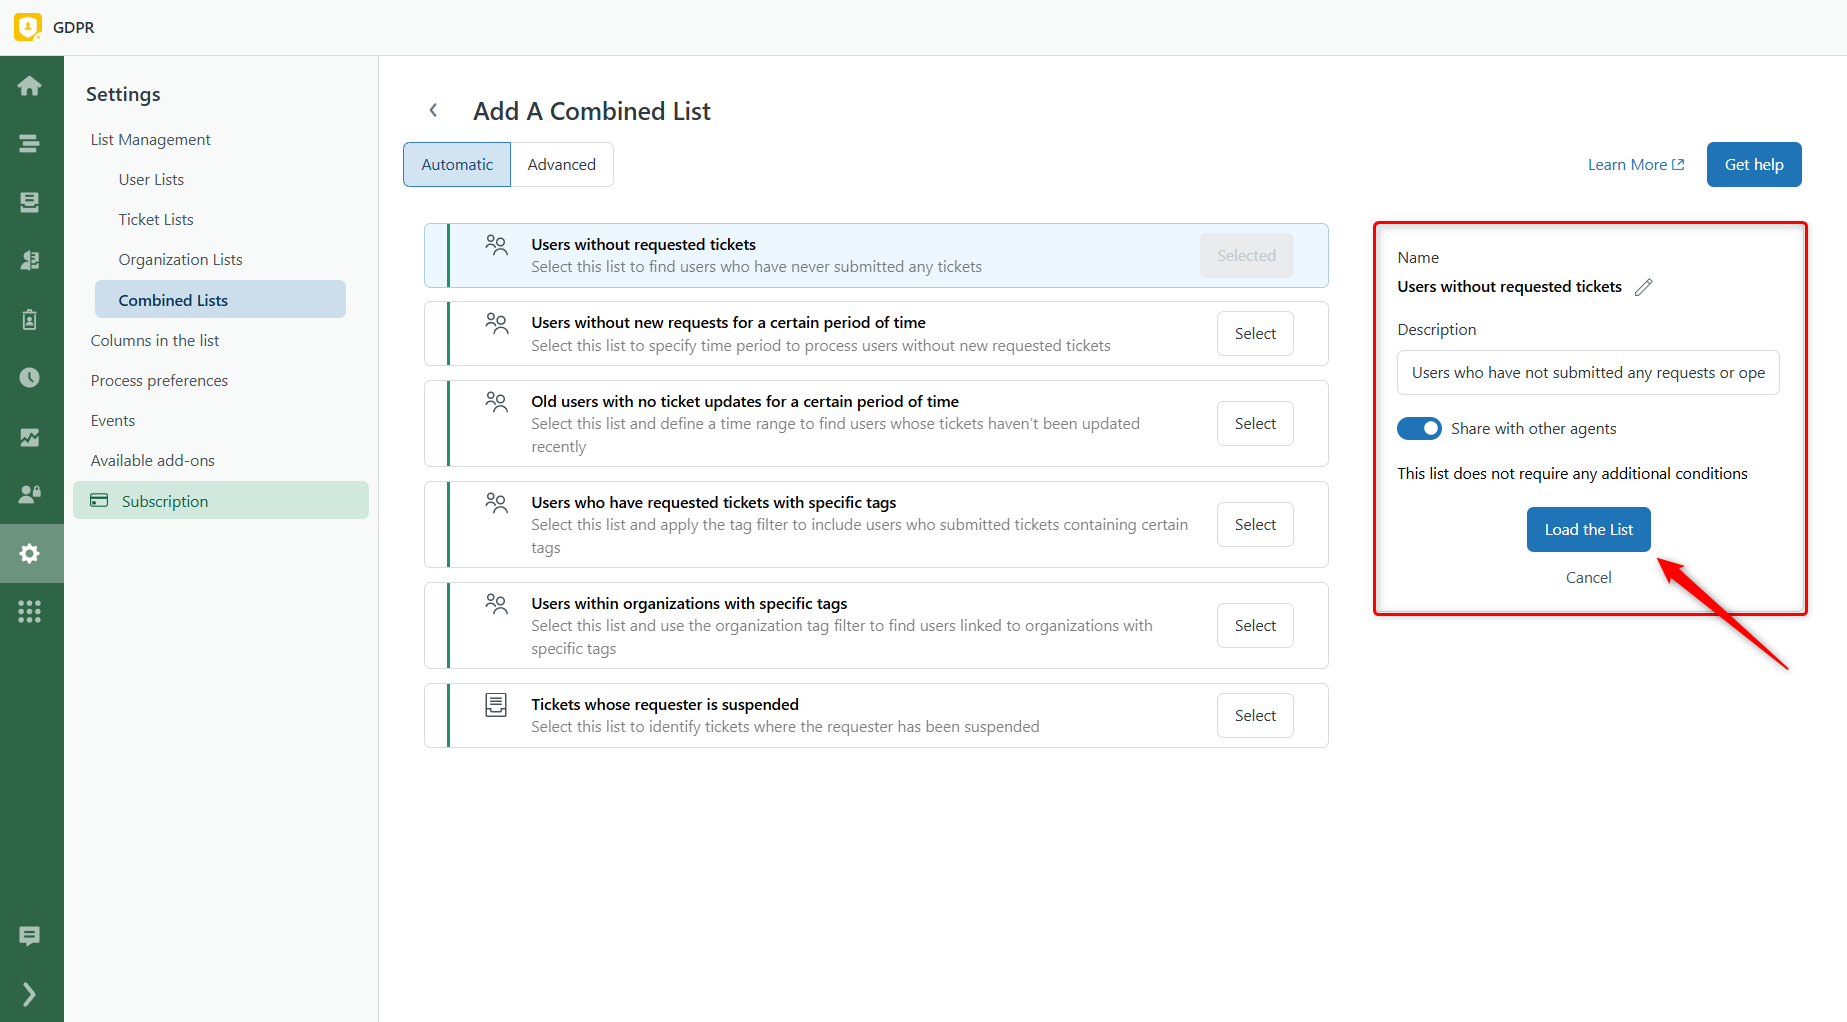
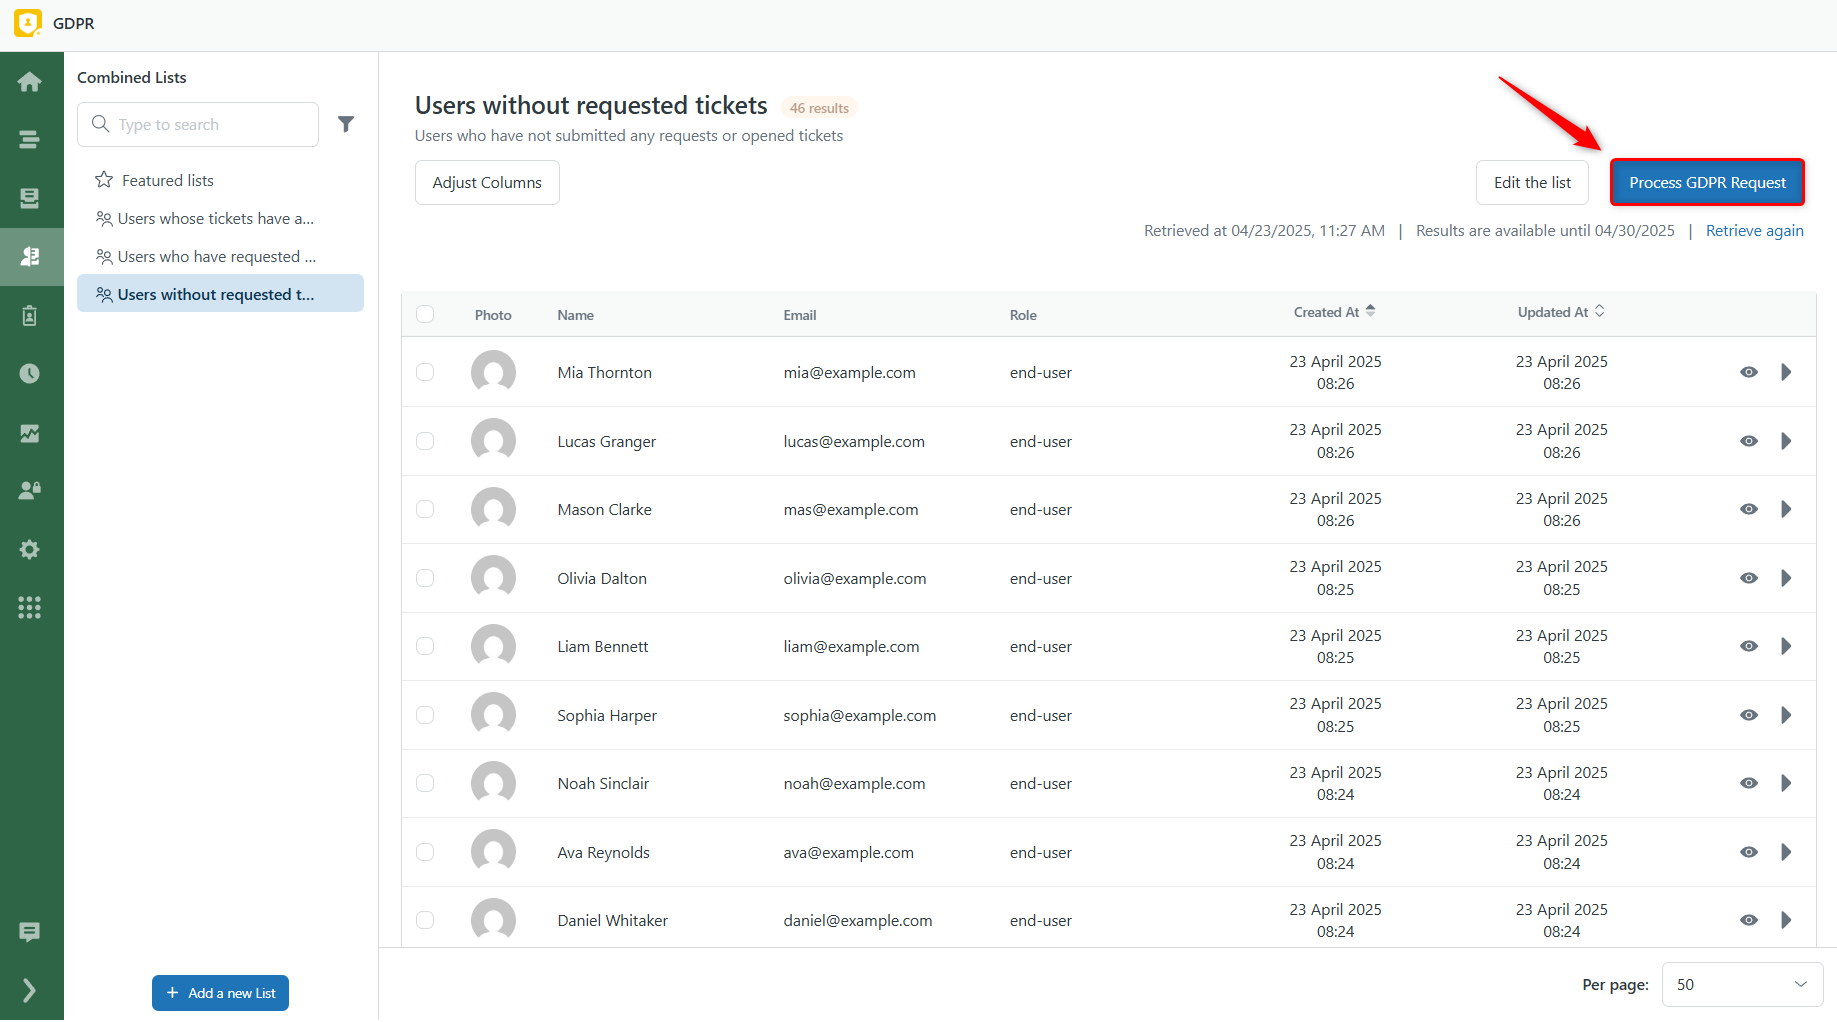
After that, you will be navigated to the Combined Lists tab with the created list, where you need to click Load the list to retrieve the filtered results.
From there, click Process GDPR Request to initiate the data cleanup process.
Example 2: Users without new requests for a certain period of time
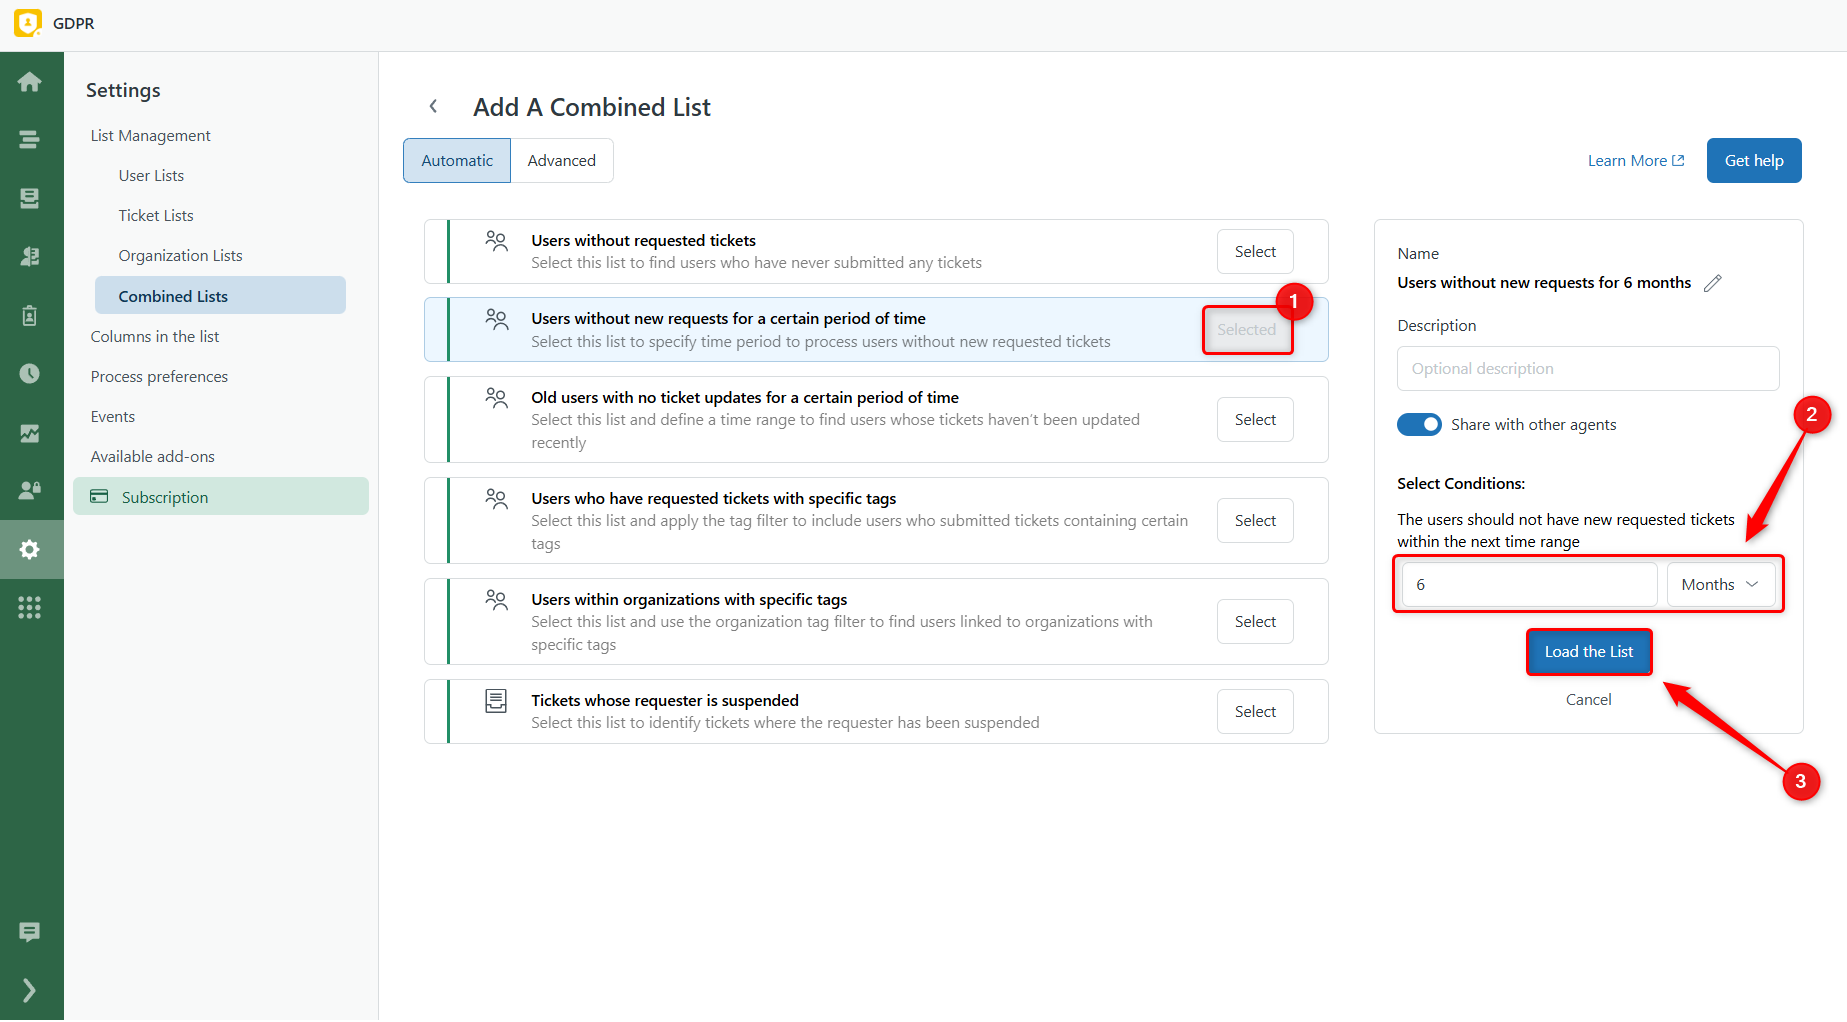
Use this method to target users who haven’t made any new requests in a certain timeframe (e.g., 30 days, 6 months, 2 years).
1. Click Select to create your combined list.
2. In the right panel, add a time frame condition:
- Type in the needed number
- Select days, weeks, months, or years from the dropdown menu
3. Once you’ve selected the correct time frame, click Load the list.
Example 3: Users who have requested tickets with specific tags
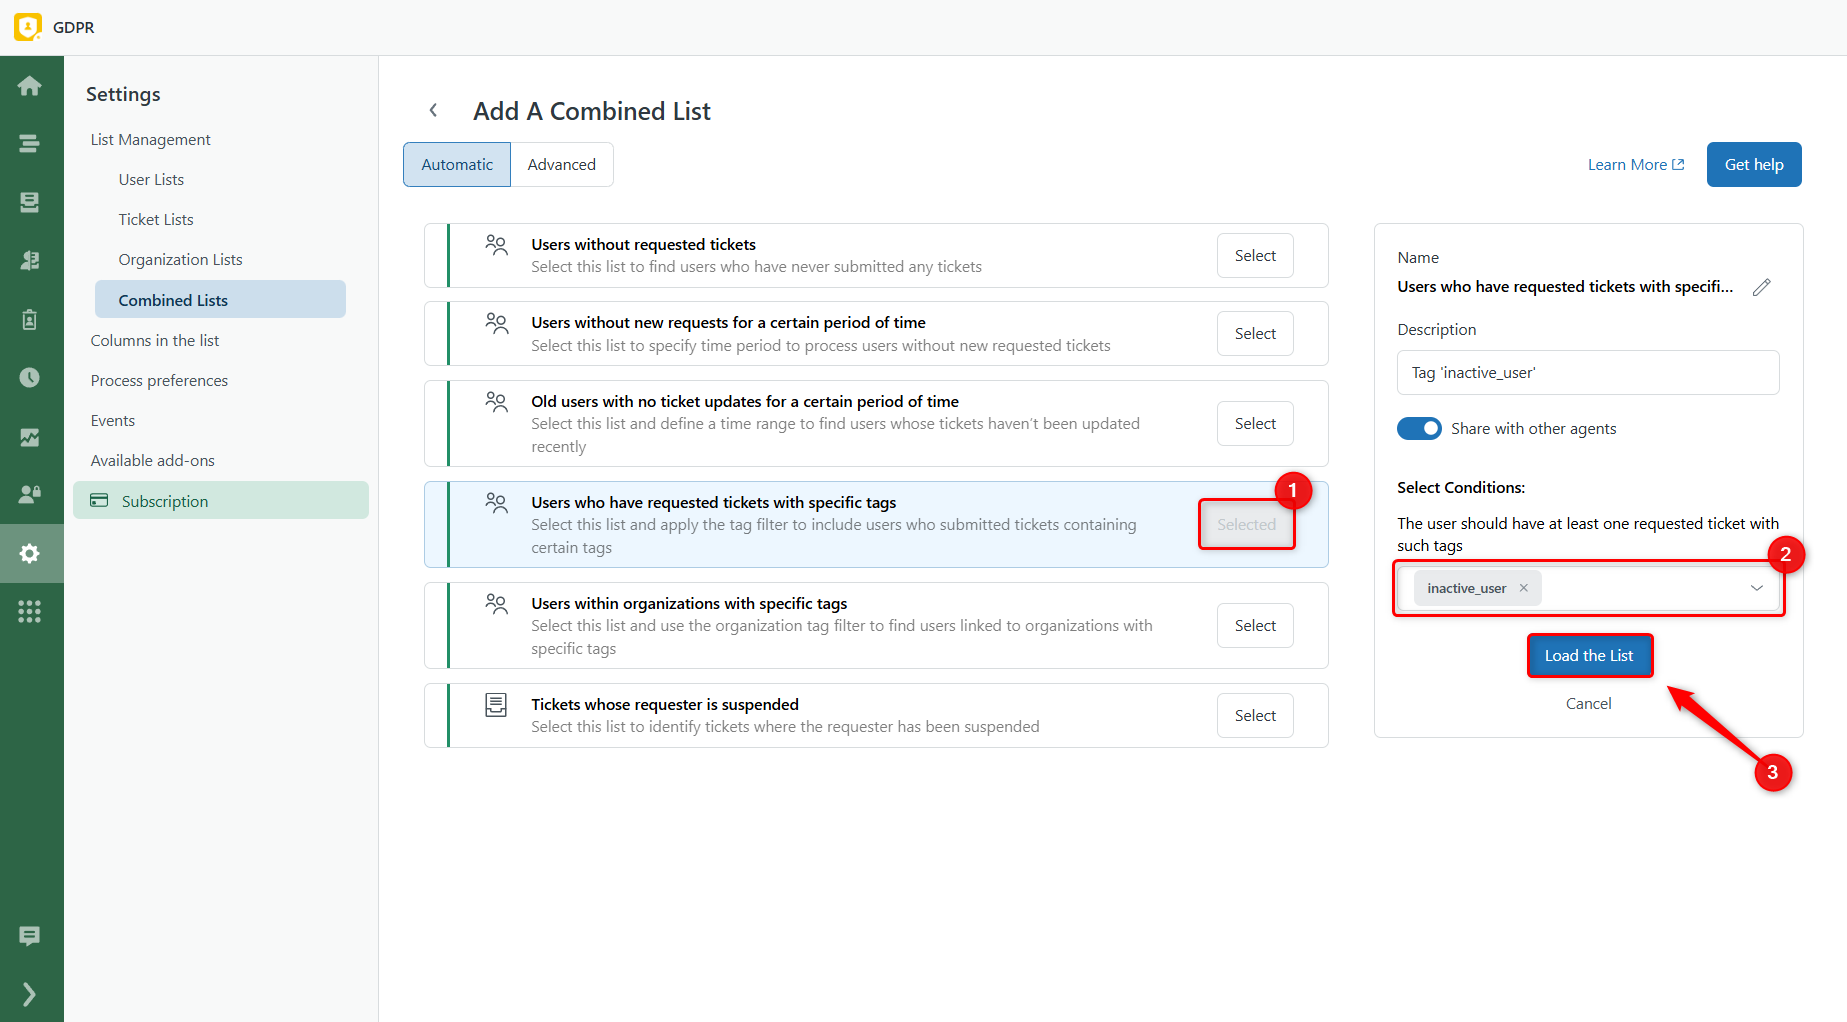
This example helps you target users based on tags associated with their tickets.
1. Click Select.
2. In the right panel, add a tag condition by typing the tag name (e.g., inactive_user, promo_opt_out, etc.).
3. Click Load the list.
Advanced Method
The Advanced method gives you complete control to build custom combined lists based on your own conditions. It's ideal when the built-in templates don't cover your specific use case, and you need to cross-filter users, tickets, or organizations in a more flexible way.
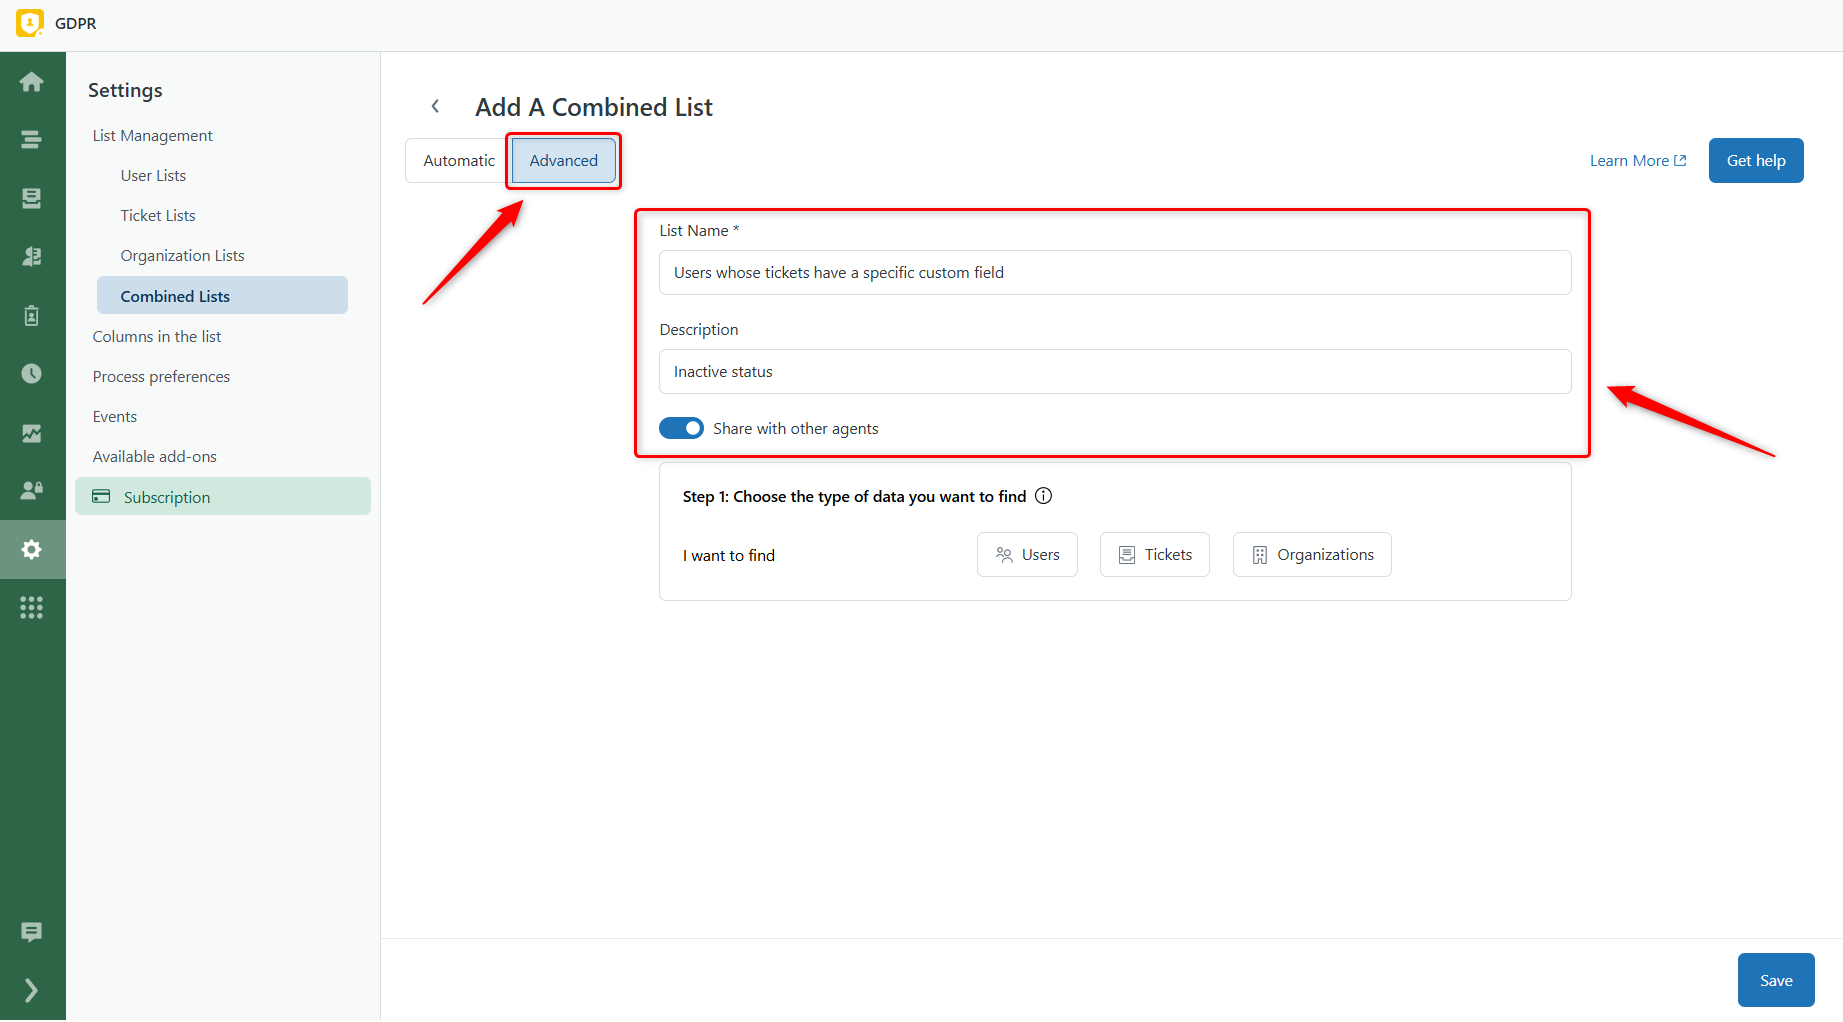
To switch, simply click Advanced at the top of the list creation screen. Then, fill in the following details:
- Give your list a name
- Add a description
- Choose to share it with other agents
How It Works
The Advanced method for creating combined lists follows such logic:
Step 1: Select the main data you want to process. This is the primary list of items (users, tickets, or organizations) you’ll be working with.
Step 2: Create a filtering list. This list won’t be directly modified, but it will act as a filter for your main data, helping refine the results.
Step 3: Choose how the main and filtering lists should work together using one of the following methods:
- Include – Finds items in the primary list that are linked to the filtering list.
- Exclude – Finds items in the primary list that are not connected to the filtering list.
Example: Users whose tickets have a specific custom field
Let’s walk through a specific use case: finding users who have requested tickets with a specific custom field value (e.g., "Status" is set to "Inactive").
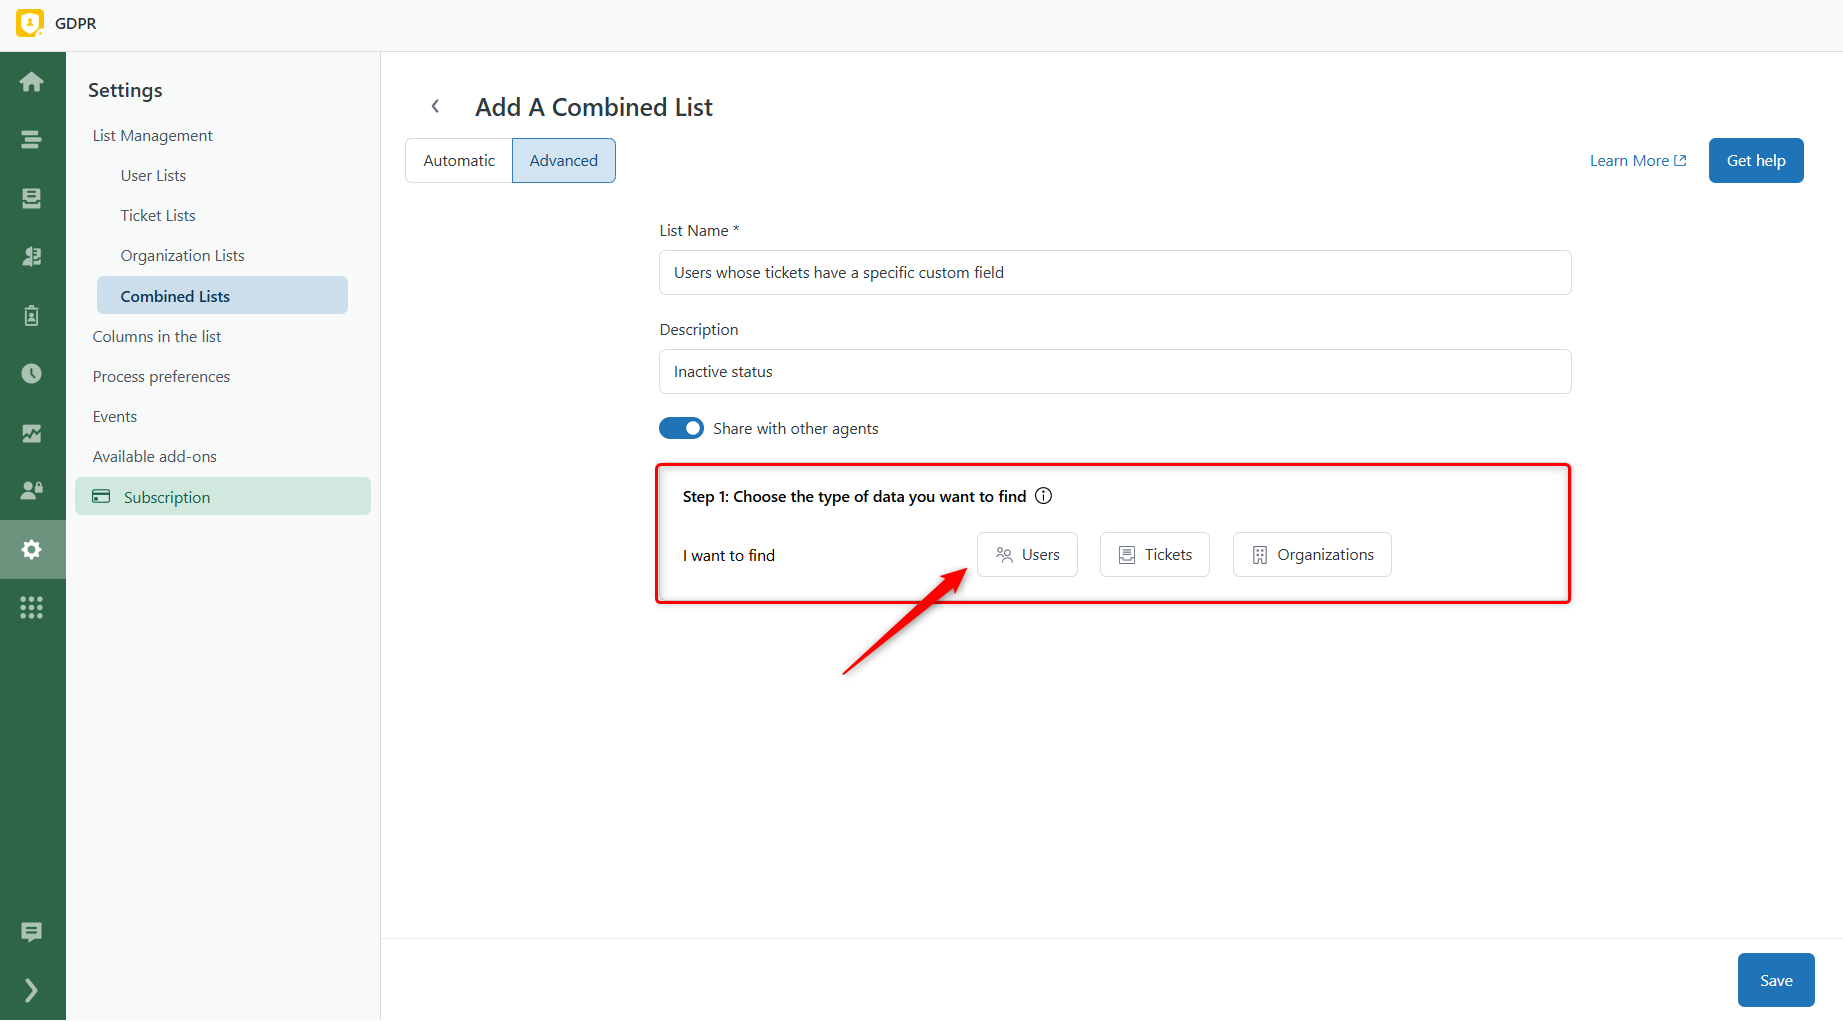
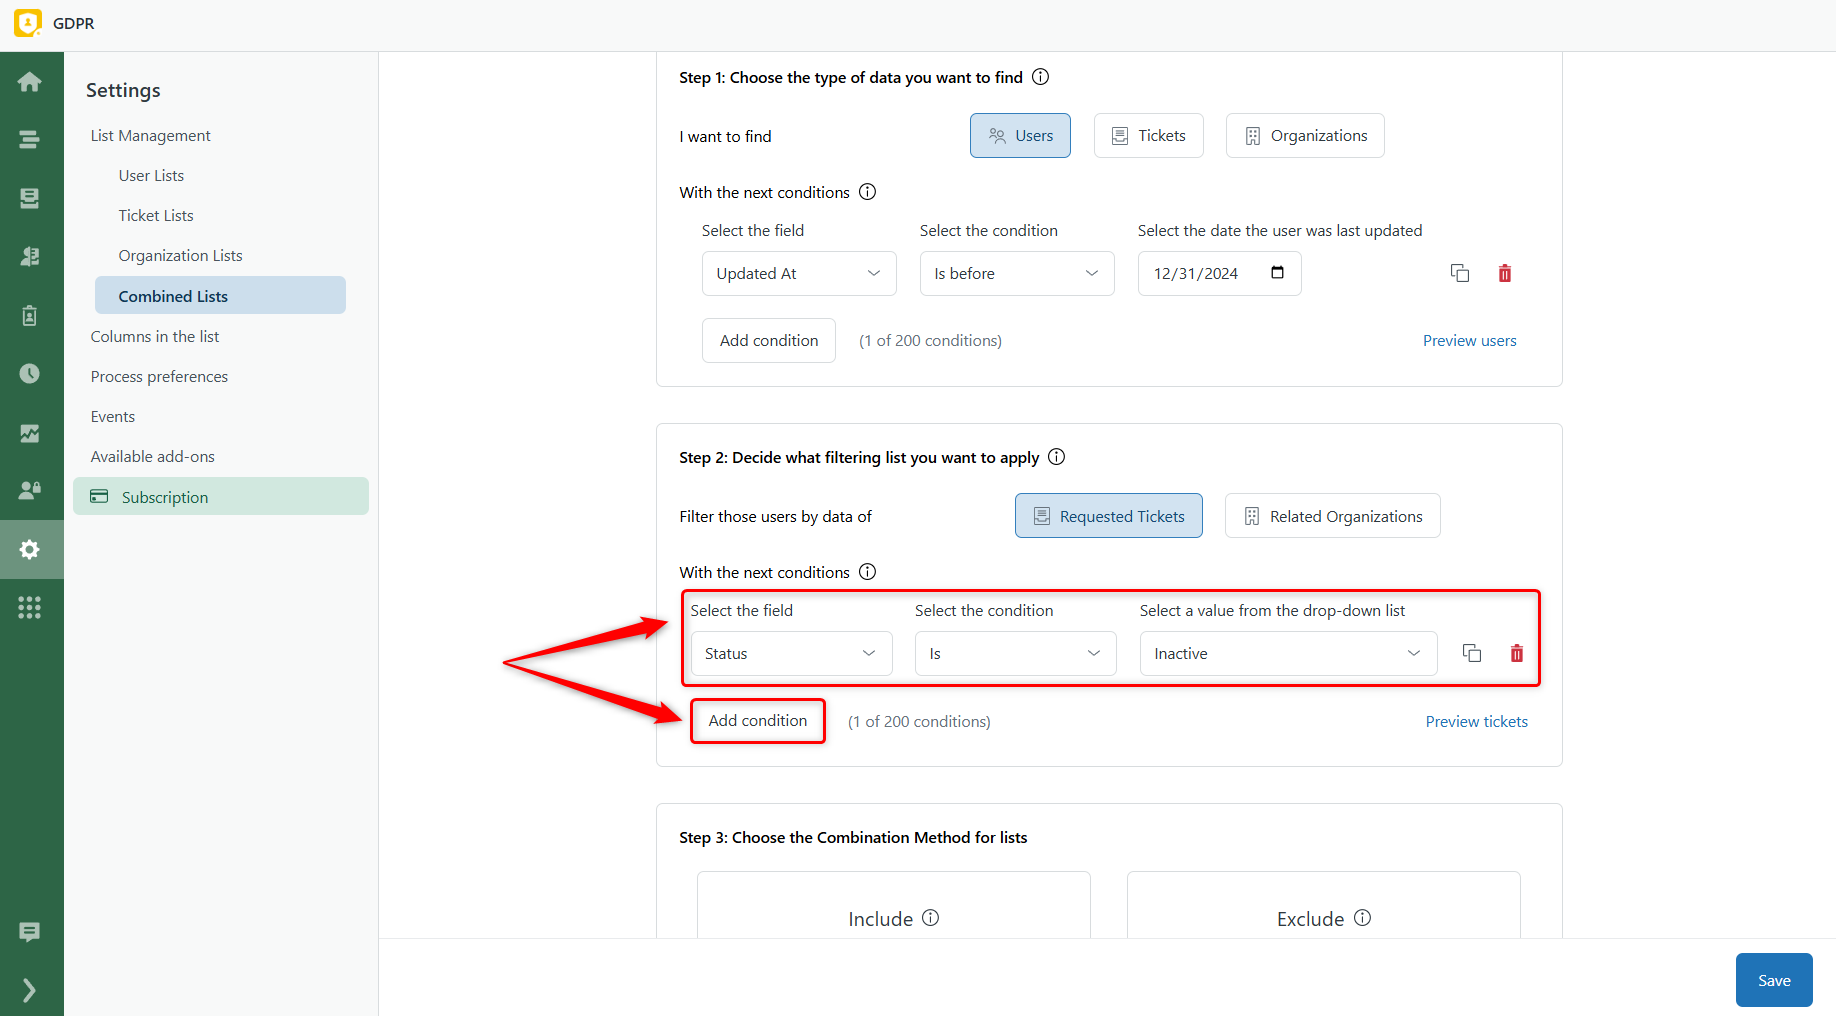
Step 1: Choose what kind of data you want to find
Start by selecting what type of data you want to find. In this case, we choose Users.
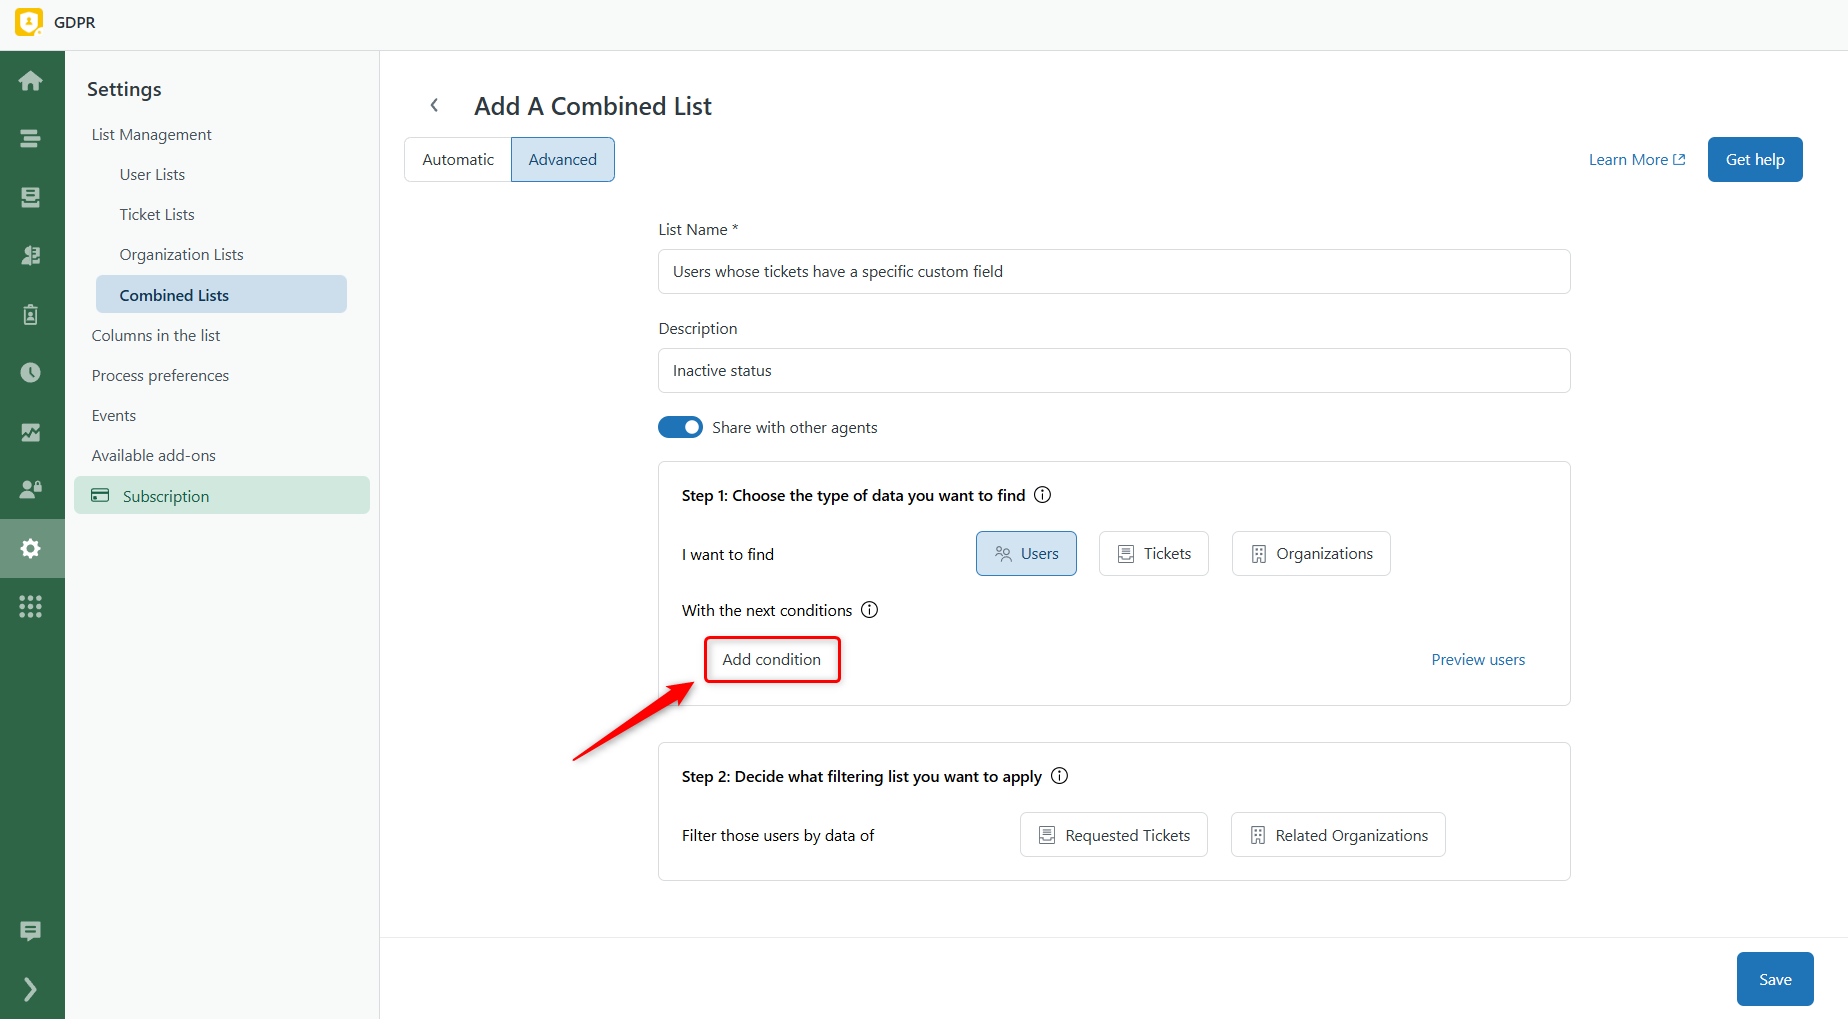
You can keep the full list of users or narrow it down by clicking Add condition.
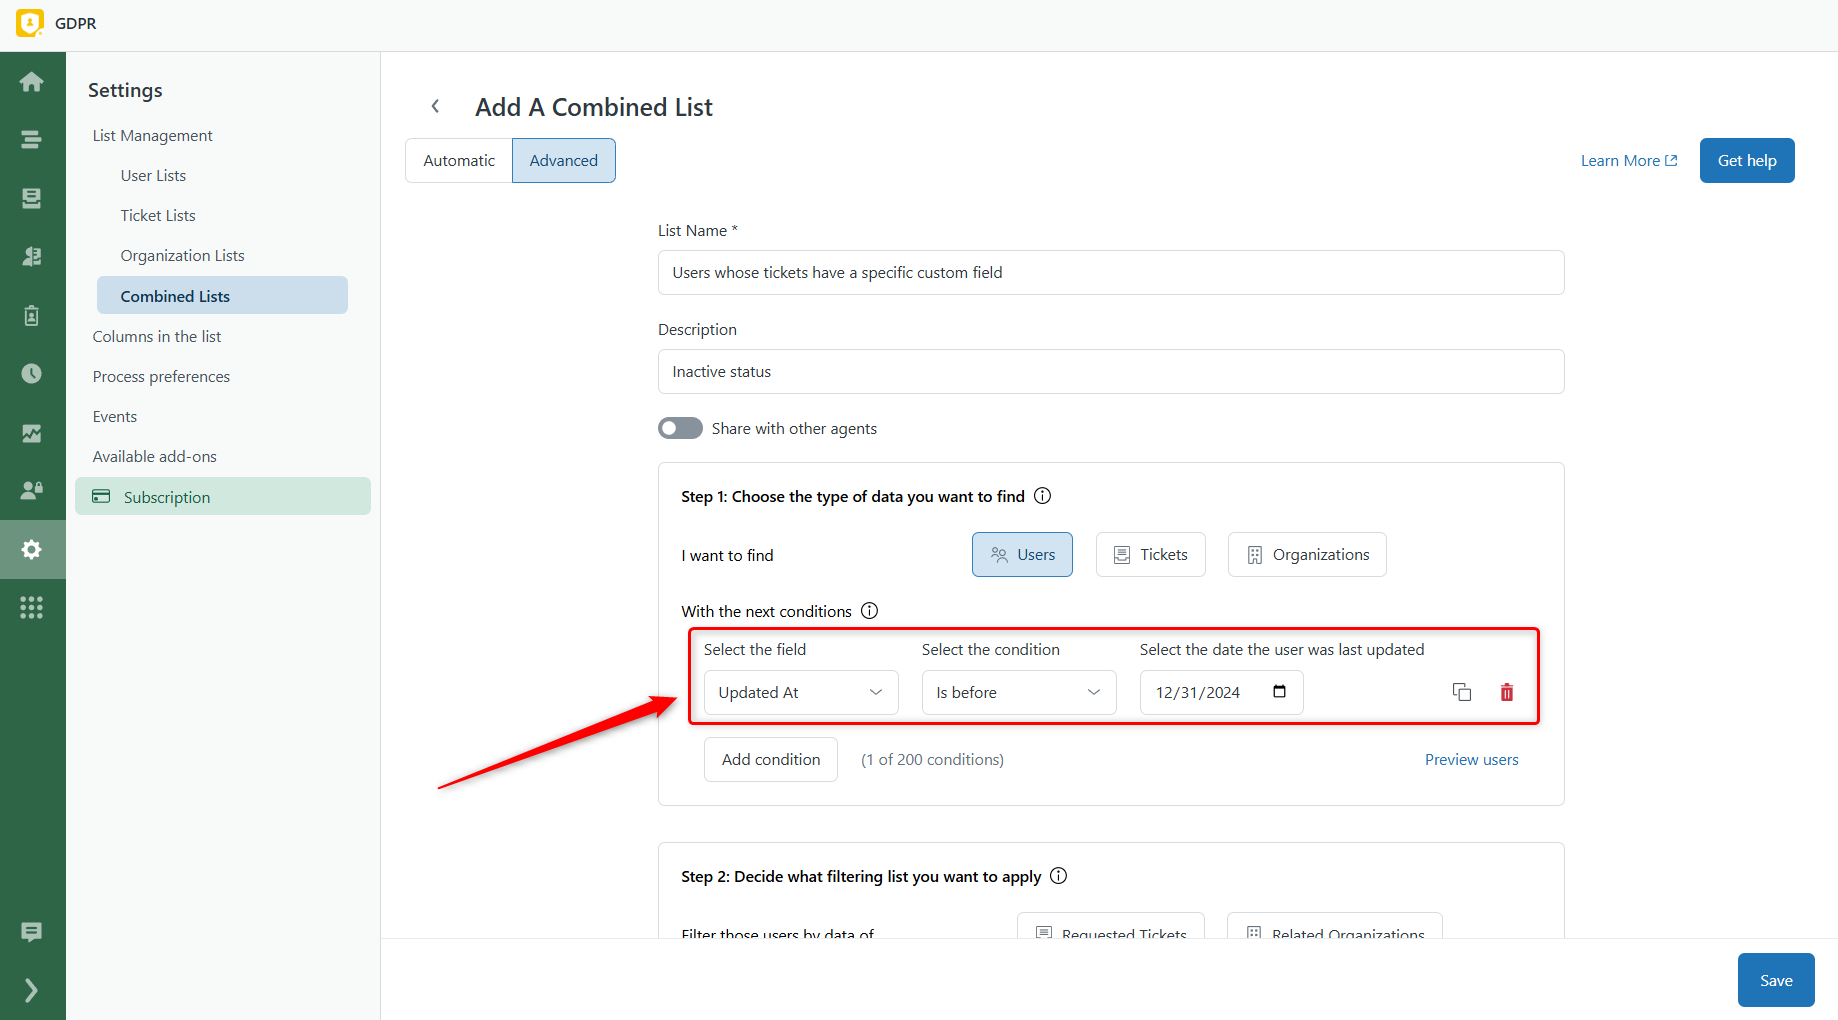
For instance, add a filter like Updated at - Is before - 12/31/2024. This will target users who haven’t had any activity in the current year.
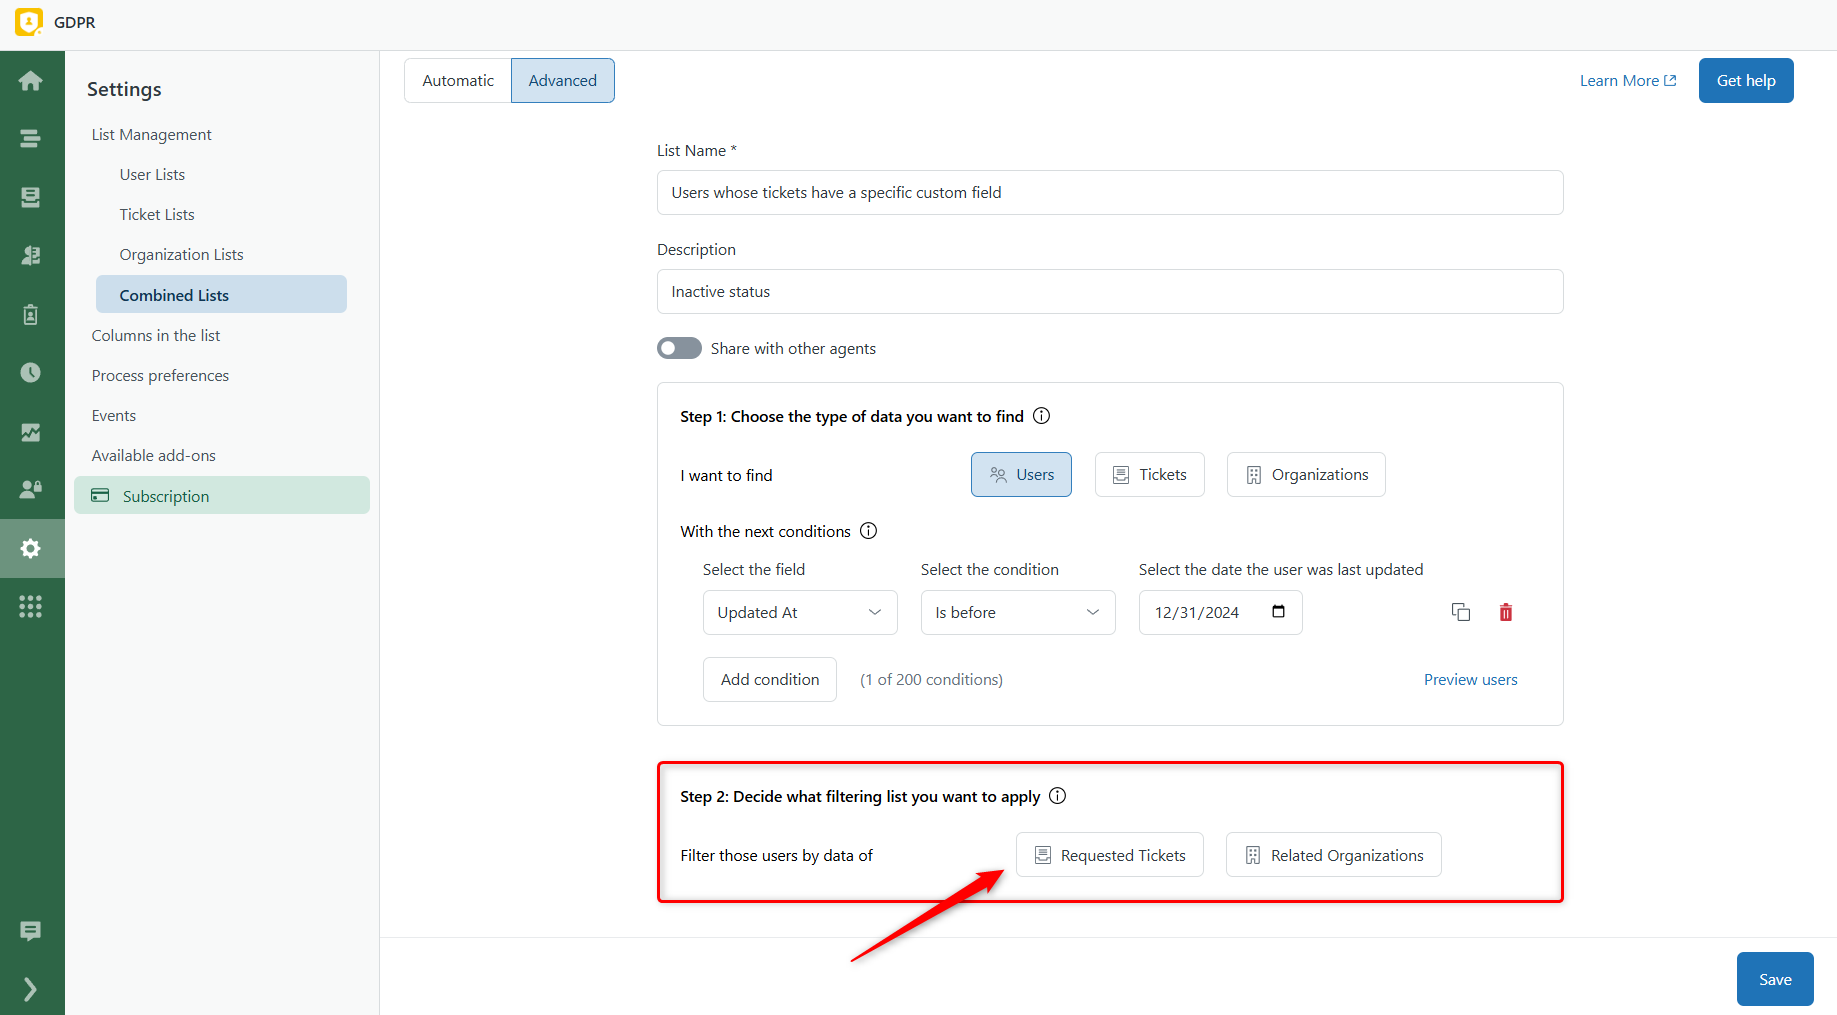
Step 2: Decide what filtering list you want to apply
Now, refine this user list based on data from related tickets. To do so, choose Requested Tickets next to 'Filter those users by data of.'
Then, click Add condition and select the relevant custom field: Status - Is - Inactive.
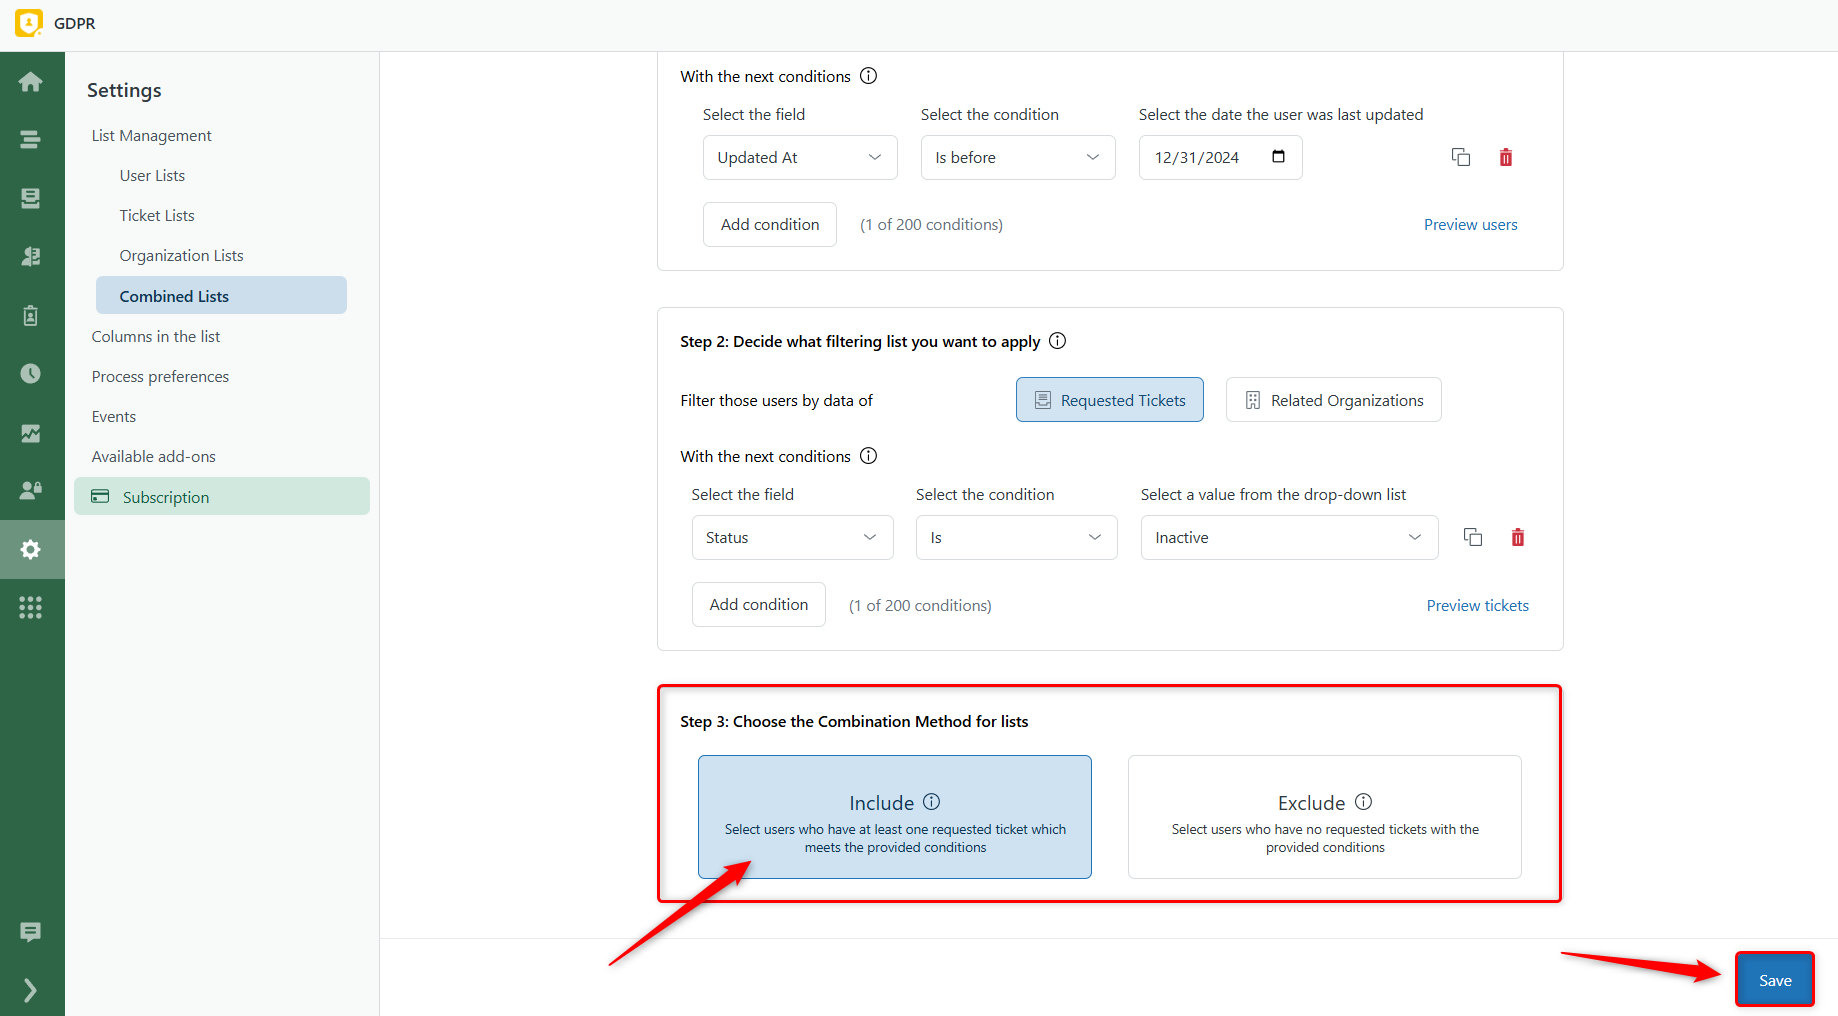
Step 3: Choose the Combination Method for lists
Finally, choose how the filter should work:
- Include – Keeps users whose tickets match the condition.
- Exclude – Removes users whose tickets match the condition.
In our case, select Include to find users with an 'Inactive' status in any of their tickets. To finish, click Save.
Once your list is ready, navigate to the Combined Lists tab, select the list from the left-hand panel, and click Load the list. After, hit the Process GDPR Request button and set up your deletion or anonymization process as usual.


