One of our clients needed to send Zendesk emails where each product name from a CSV appeared as a clickable link to its product page. Doing this manually would have taken hours and left plenty of room for mistakes.
With Proactive Campaigns for Zendesk, they were able to combine CSV imports, custom ticket fields, and dynamic placeholders to turn a complex, error-prone task into a smooth, automated workflow.
What’s the problem?
The challenge wasn’t just sending product names. It was making them clickable in the email automatically.
On the surface, it seems simple: just add the name and the link, right? However, most email systems don’t allow you to combine two separate fields into a single hyperlinked text automatically. Doing this manually for every product would be time-consuming and prone to mistakes.
The real difficulty was:
- Combining two custom fields into one clickable placeholder
- Ensuring the correct link matches the correct product name
- Maintaining automation for any CSV import size, whether it’s a few items or many
Without a solution like Proactive Campaigns, teams would need to resort to manual workarounds or complex scripts, neither of which is efficient or reliable.
How to merge product names and links in emails
The breakthrough was realizing they didn’t need to merge product names and links manually at all. Proactive Campaigns handles this by allowing you to store each value separately and then pull them together in the email using placeholders. The setup takes minutes, and after that, every campaign can include perfectly hyperlinked content.
1. Prepare your CSV
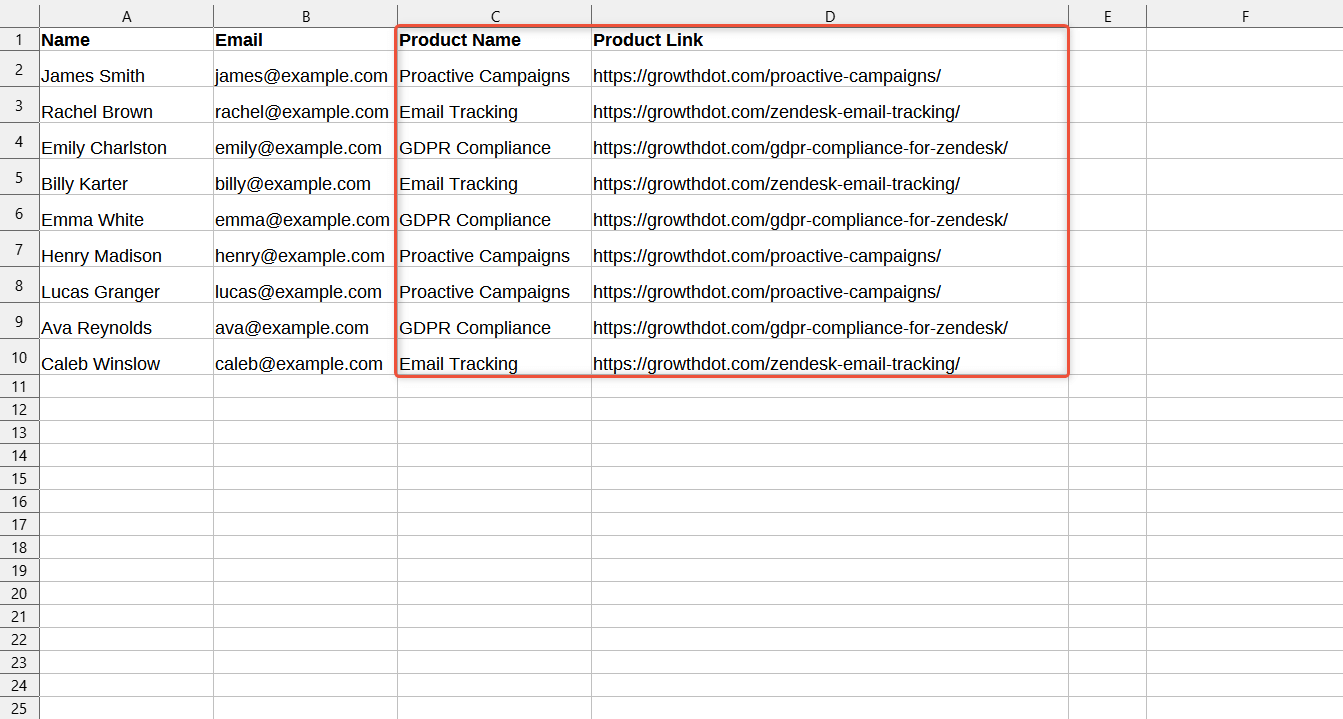
Begin by preparing a simple CSV file, including standard columns such as name and email, and two additional separate columns: one for the product name and one for the product link, as in the example below.
2. Create custom ticket fields in Zendesk
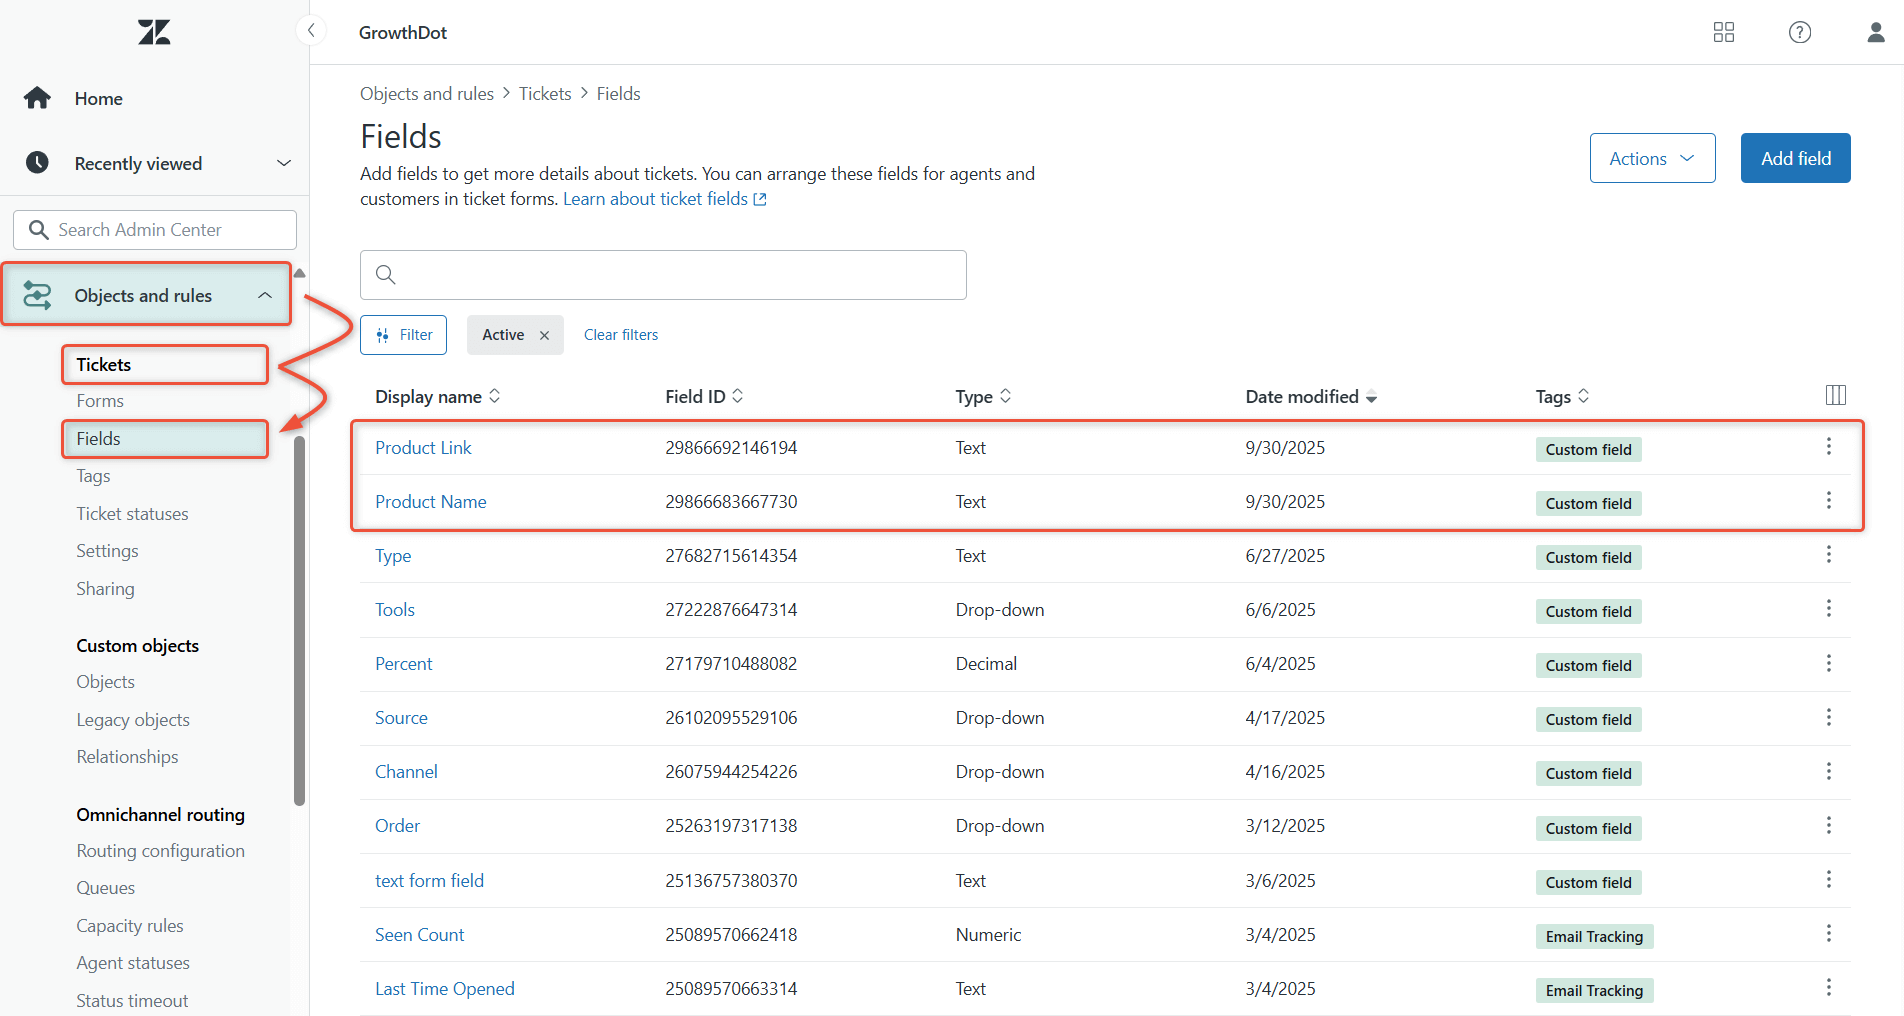
Next, in the Zendesk Admin Center, navigate to Object and rules > Tickets > Fields and add two custom text fields:
- One to store the product name
- Another to store the product link
3. Map the CSV data to the fields
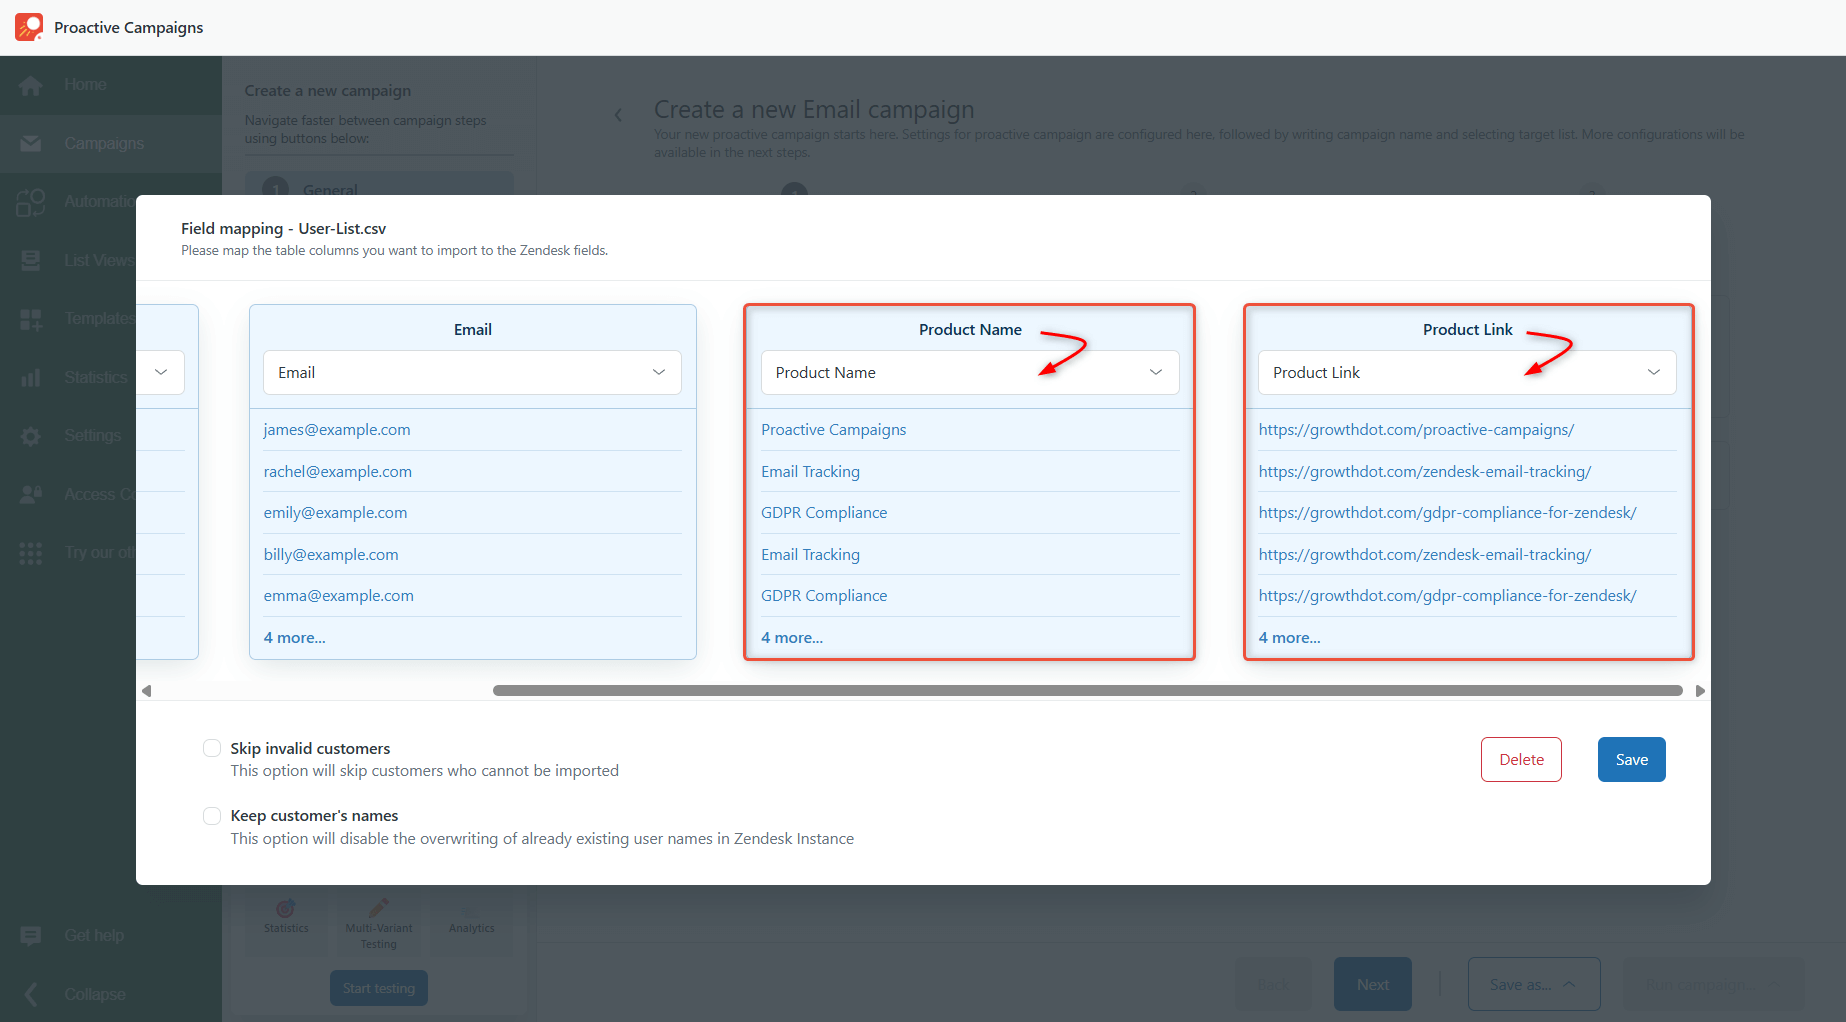
When you import the CSV into Proactive Campaigns while creating a new campaign, map each column to the matching custom field. This step tells the system: “this value goes into the name field, and this one goes into the link field.” From here on, Proactive Campaigns keeps everything aligned.
4. Prepare your placeholders
Each custom field in Zendesk has a unique identifier, called a Field ID. You’ll use this ID inside placeholders with curly braces to pull the field’s value into your email.
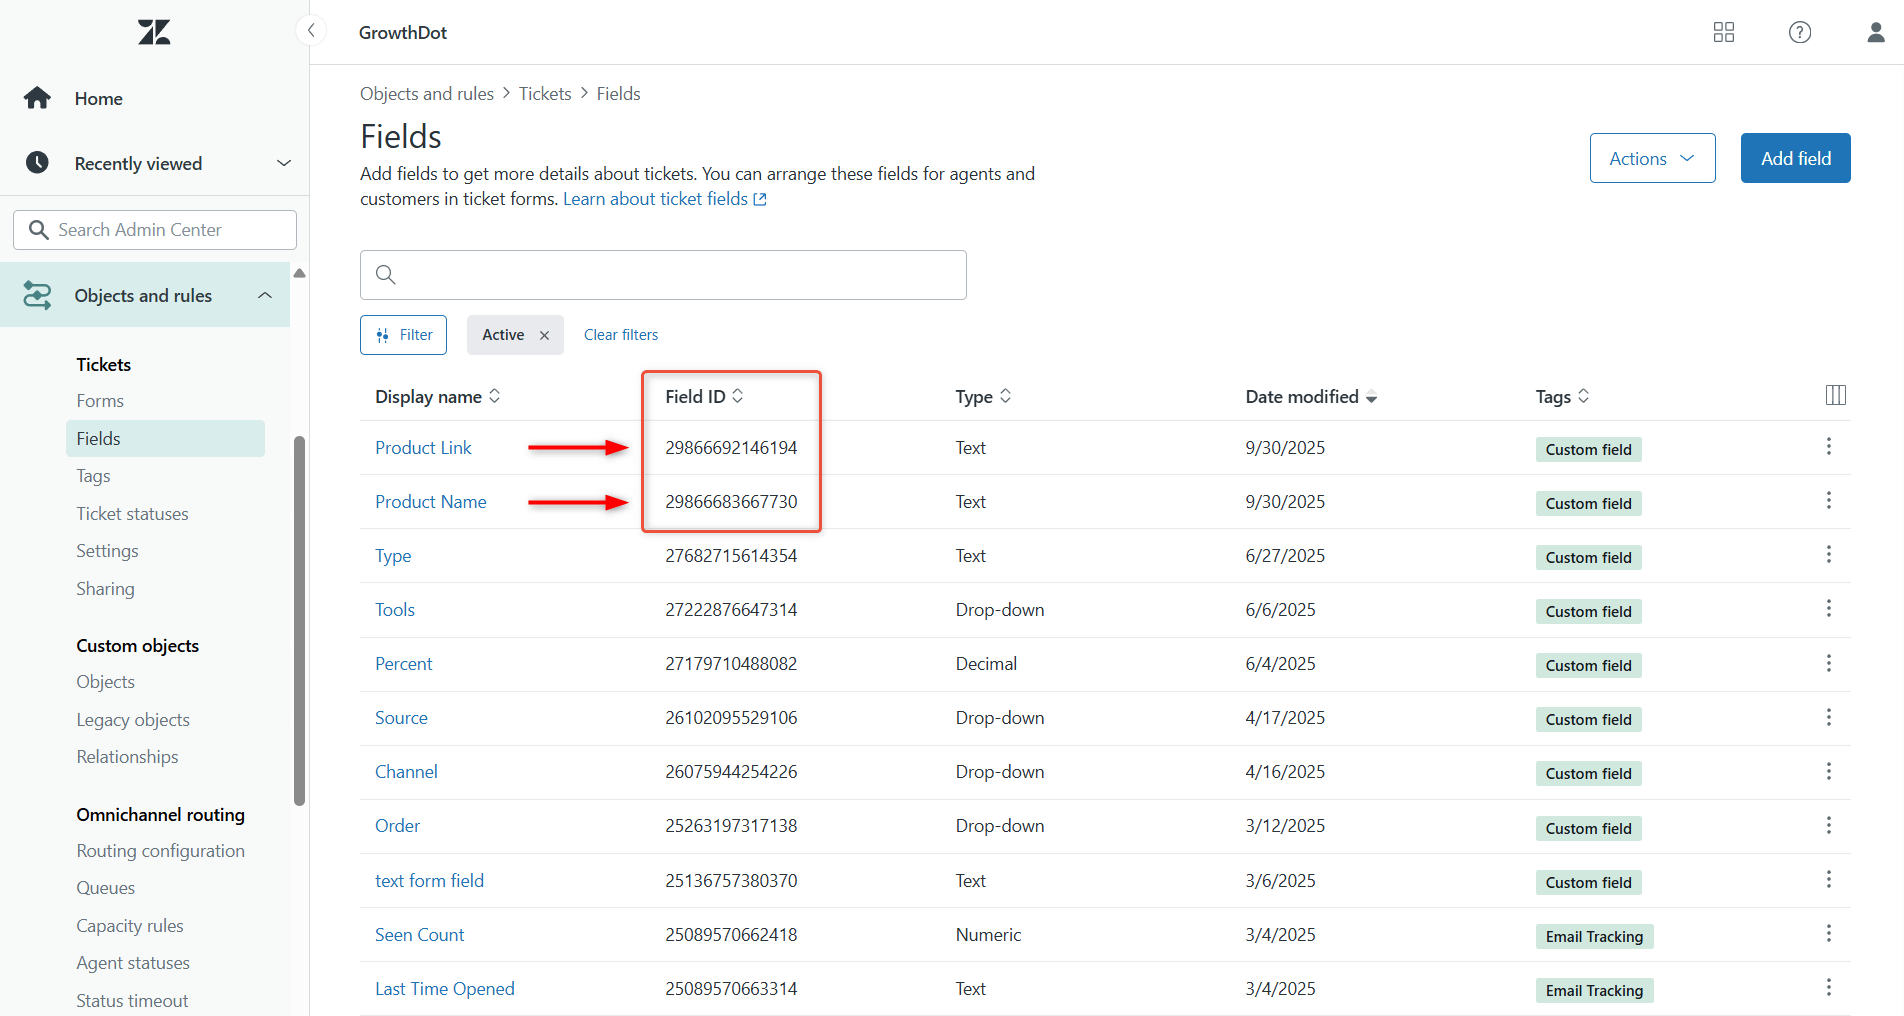
The general syntax for the needed placeholders looks like this:
{{ticket.ticket_field_field ID number}}- The part before the number (ticket.ticket_field_) is always the same
- The field ID number is the unique ID of your custom field
For example, we have such placeholders:
{{ticket.ticket_field_29866692146194}}for Product Link{{ticket.ticket_field_29866683667730}}for Product Name
5. Combine placeholders in the email template
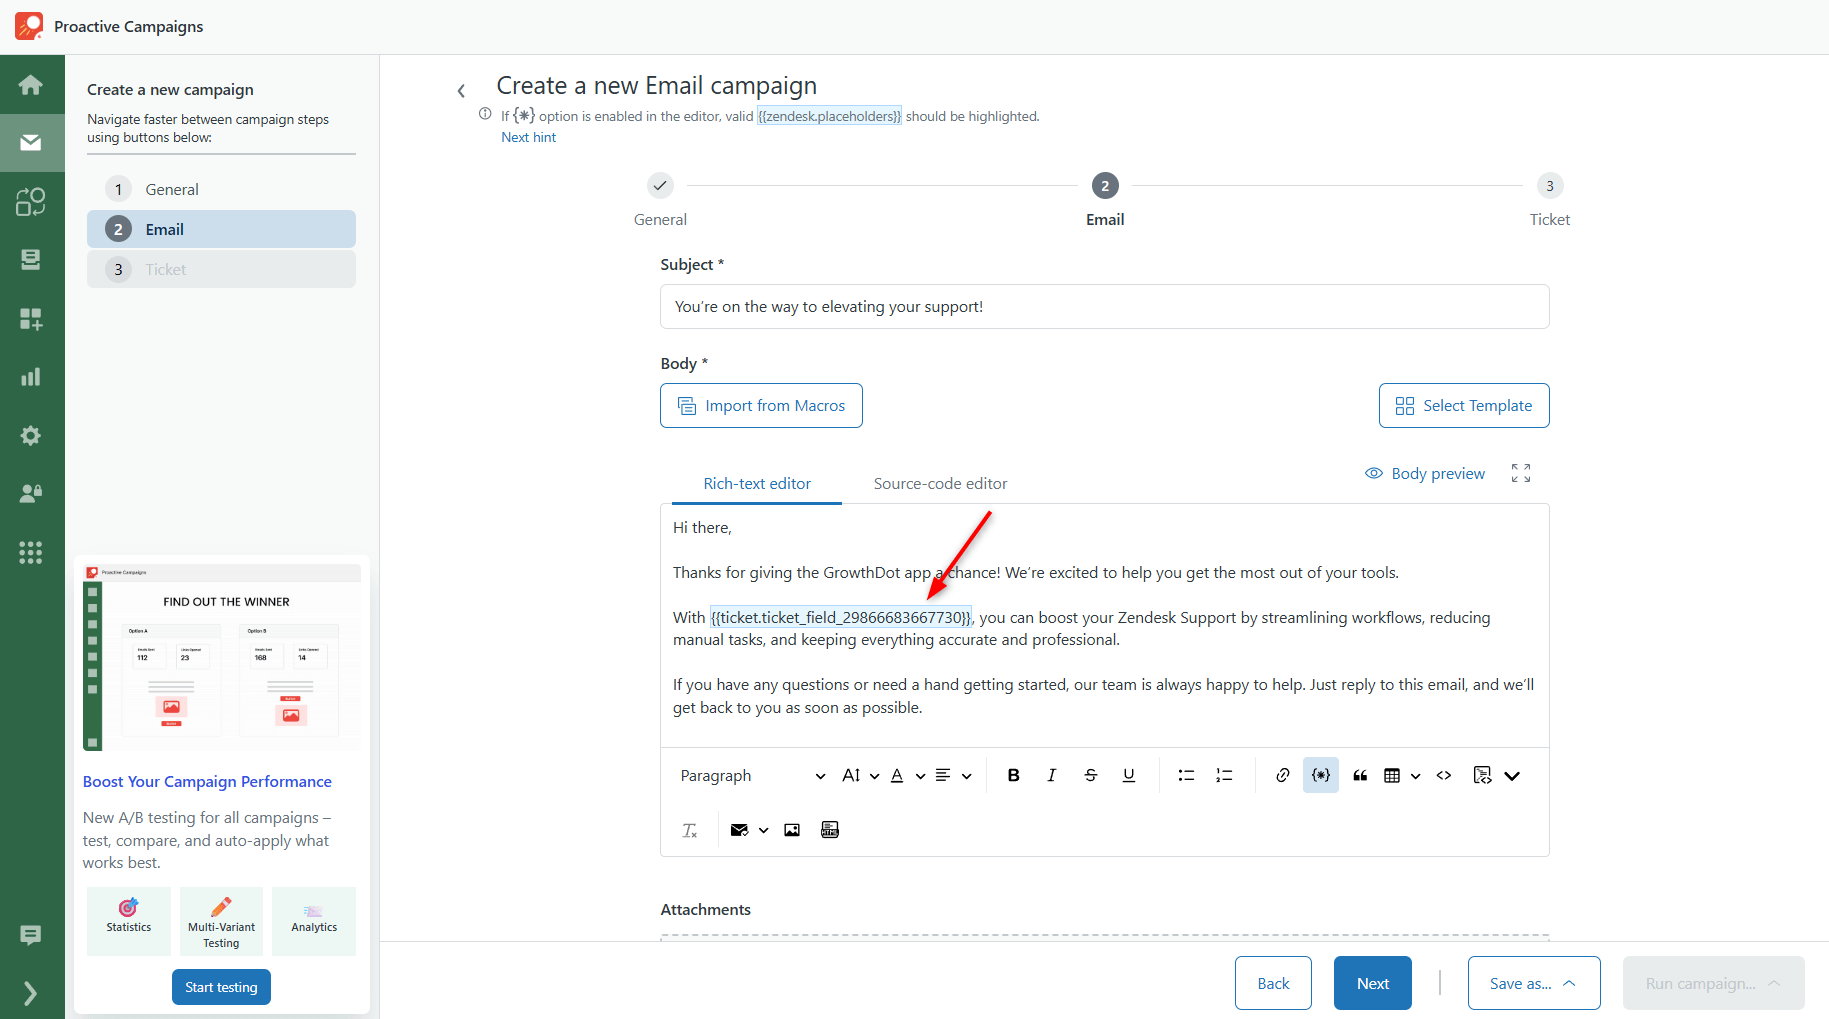
Next, move to the email composing step. Insert the placeholder for the product name wherever you want it to appear in the email, and it will be visible as text.
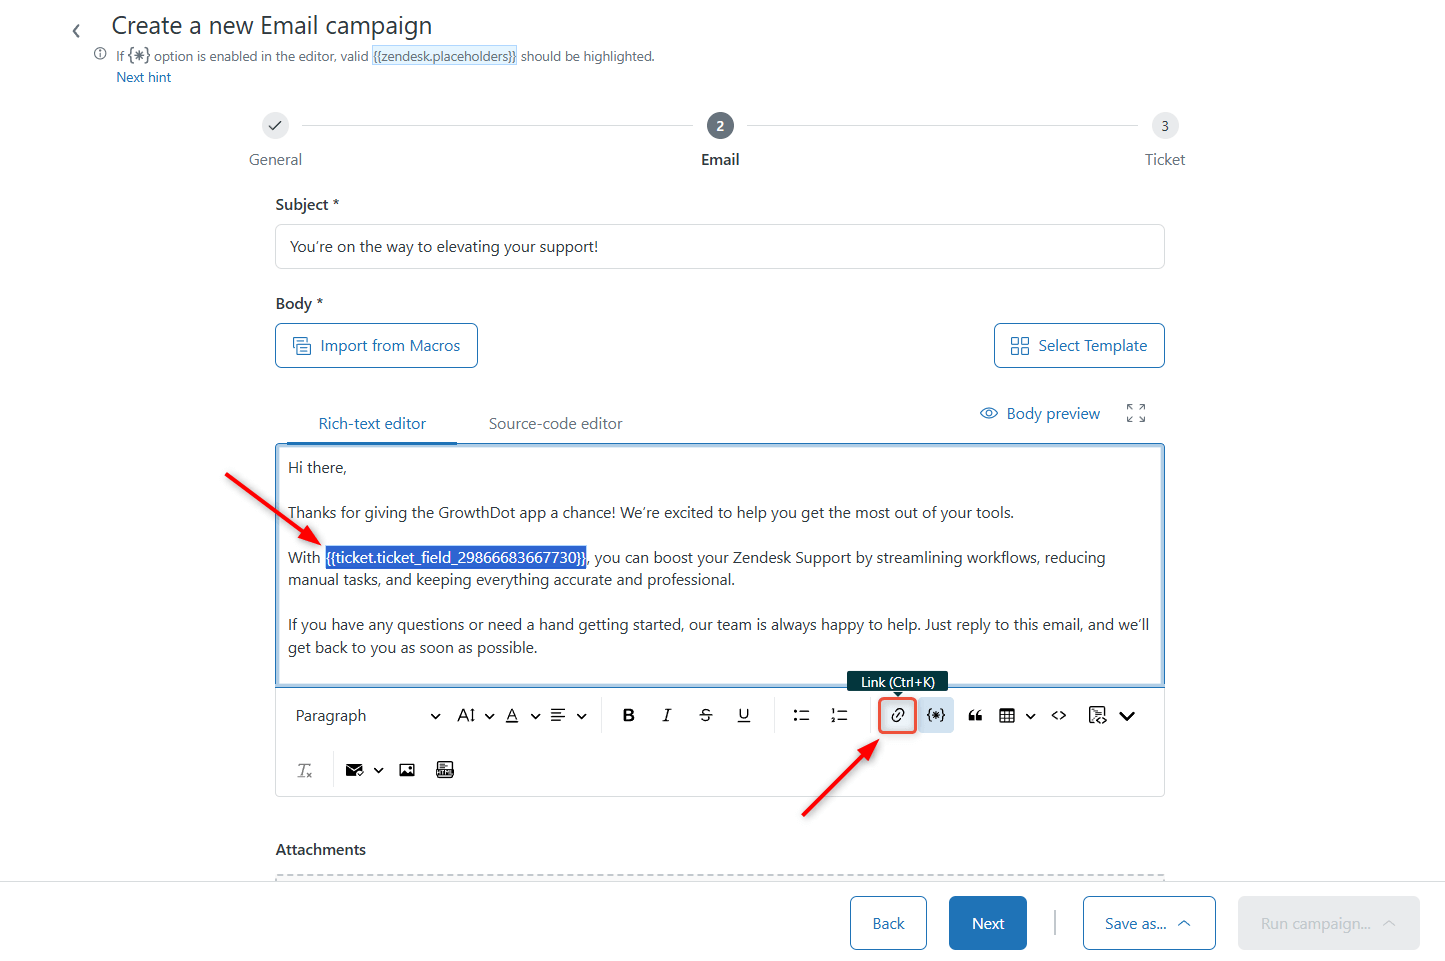
To make this text clickable, highlight the placeholder and click to add a link.
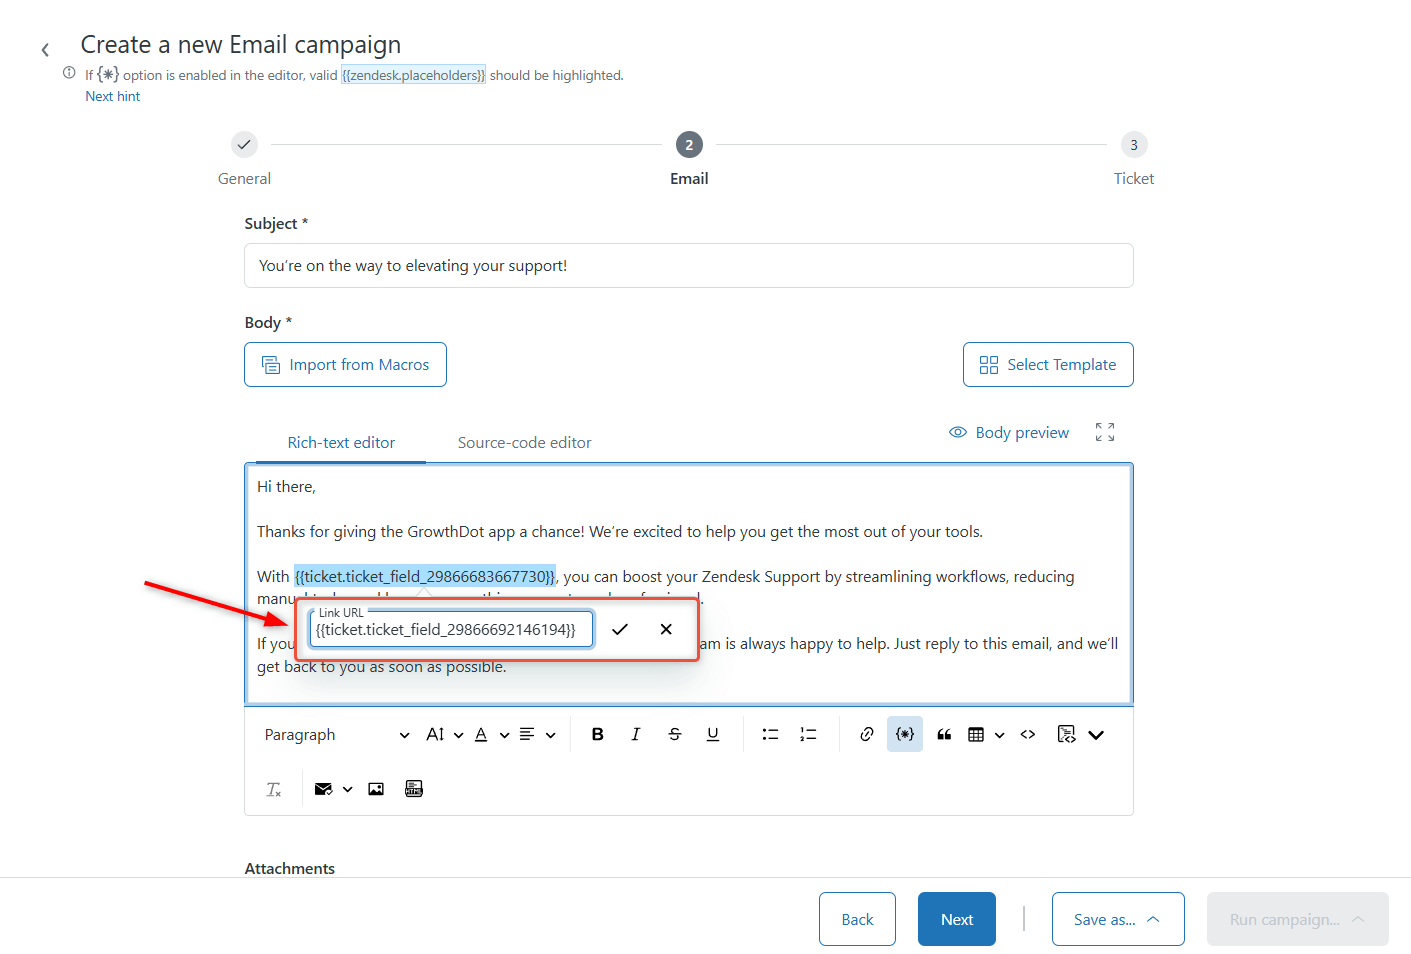
In the dialog box that appears, enter the placeholder for the product link and click Save.
From here, you can proceed with your usual campaign setup and launch it as normal.
The final results
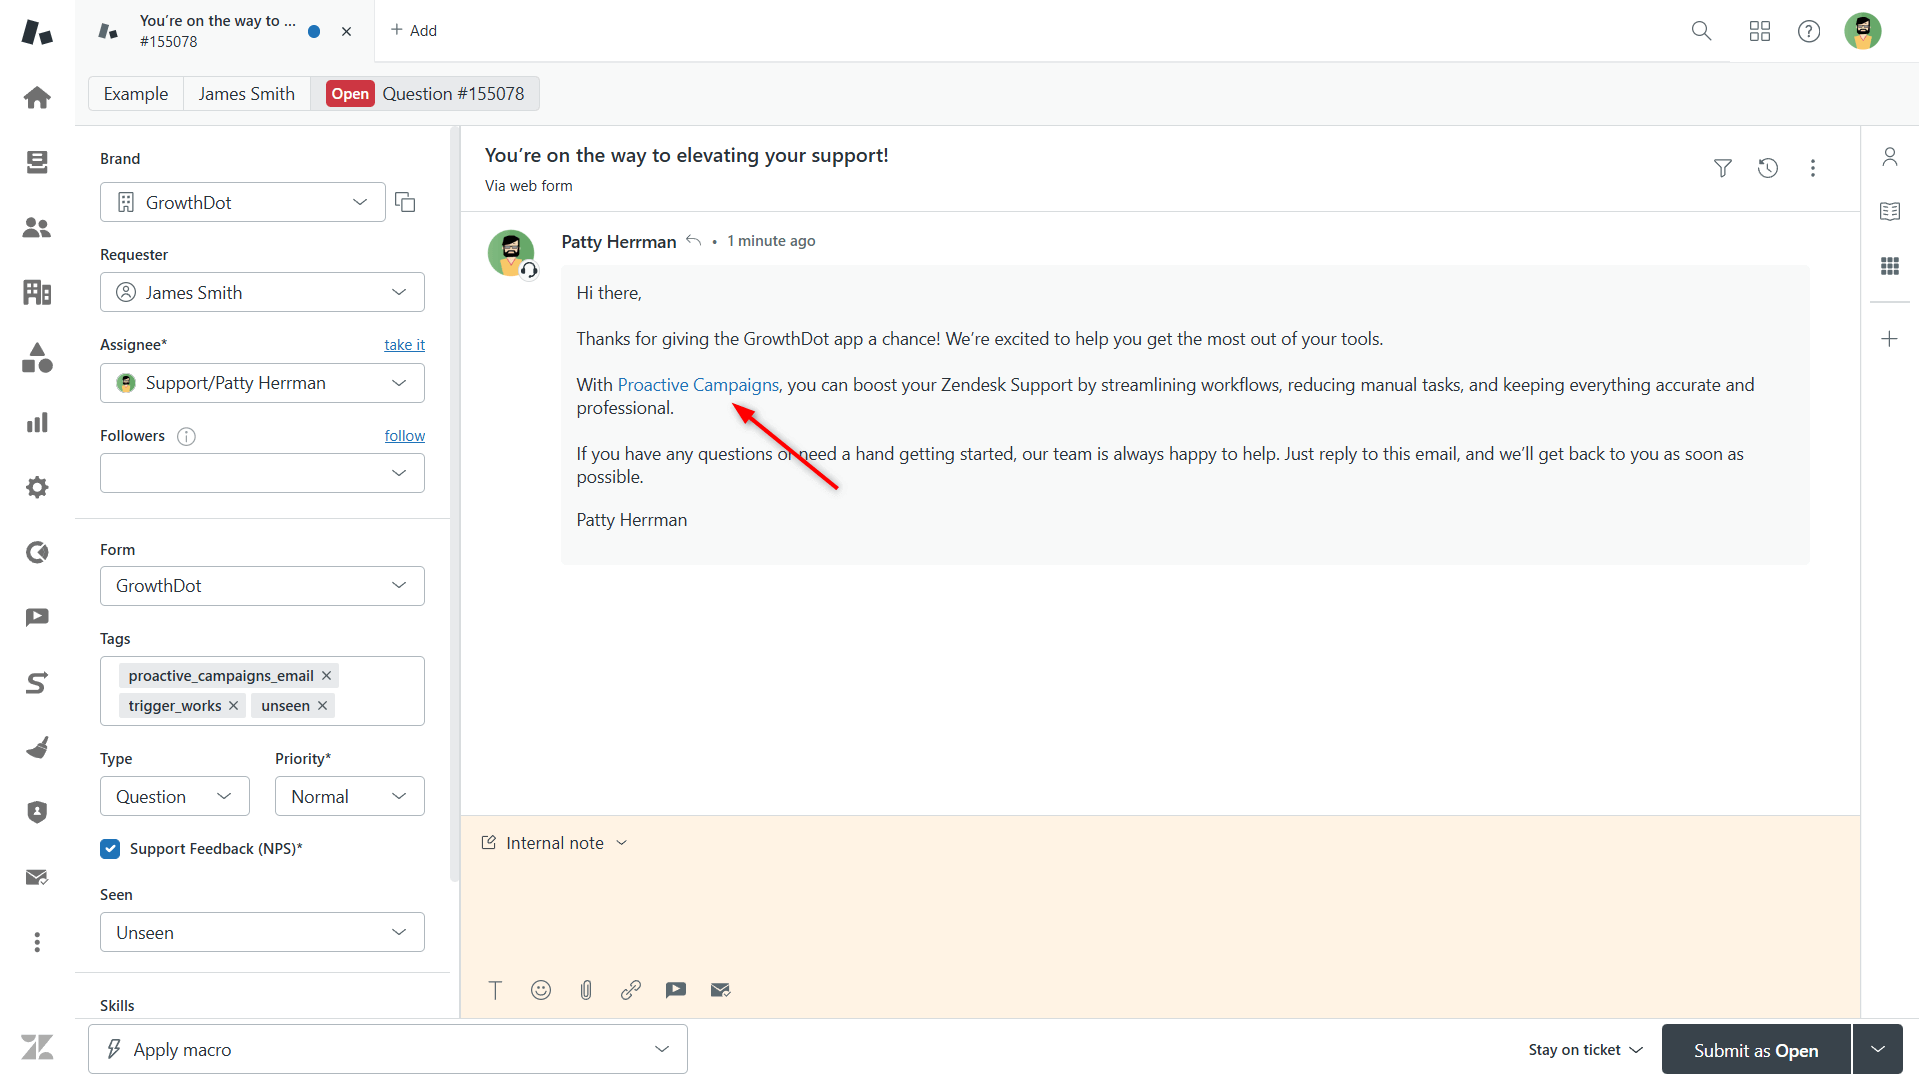
Once your campaign is live, recipients see a clean, professional email where product names appear as clickable links. Instead of raw URLs or separate text fields, each product name directs customers straight to the correct page.
This approach brings several key benefits:
- Saves time: Set it up once and reuse for any campaign, no manual linking required.
- Reduces errors: Dynamic placeholders ensure links and names always match.
- Looks professional: Clean, clickable text improves readability and customer experience.
- Scales effortlessly: Works whether your CSV has a few items or many.
- Flexible: Works for product names, services, articles, downloads (any text you want to turn into a clickable link).
Conclusion
As you can see, what seemed like a tricky, technical task becomes simple with Proactive Campaigns. By using dynamic placeholders inside the app, you can automate personalized, professional emails in just a few steps and improve your customer support.
Whether your goal is to save time, reduce errors, or make your emails look polished, this approach ensures your campaigns are accurate, scalable, and customer-friendly.
If you haven’t tried it yet, now is the perfect time to see how Proactive Campaigns can simplify your email personalization workflow.

