Email Tracking for Zendesk was conceived as a mail tracker first. However, it has gone beyond that concept from a long time ago. Now Email Tracking is a powerful software for monitoring clients' activity, tracking devices, checking statistics, creating ticket views, etc. Besides, we have recently added link tracking, and we are sure new refreshes are not far off.
So, let's dive into the details.
Tracking Auto-responses
If you have triggers that send auto-responses to your client's requests, we have exciting news for you. Previously, when an unauthorized end-user initiated a ticket, the app couldn't monitor the opening of these automated emails due to the lack of the requester's ID.
To address this issue, we've implemented a new update. Now, if an end-user without authorization triggers the notification, the app assigns the tracking of this automated email to the webhook author instead. As a result, all statistics related to this notification will be attributed to the webhook author, ensuring accurate tracking and accountability.
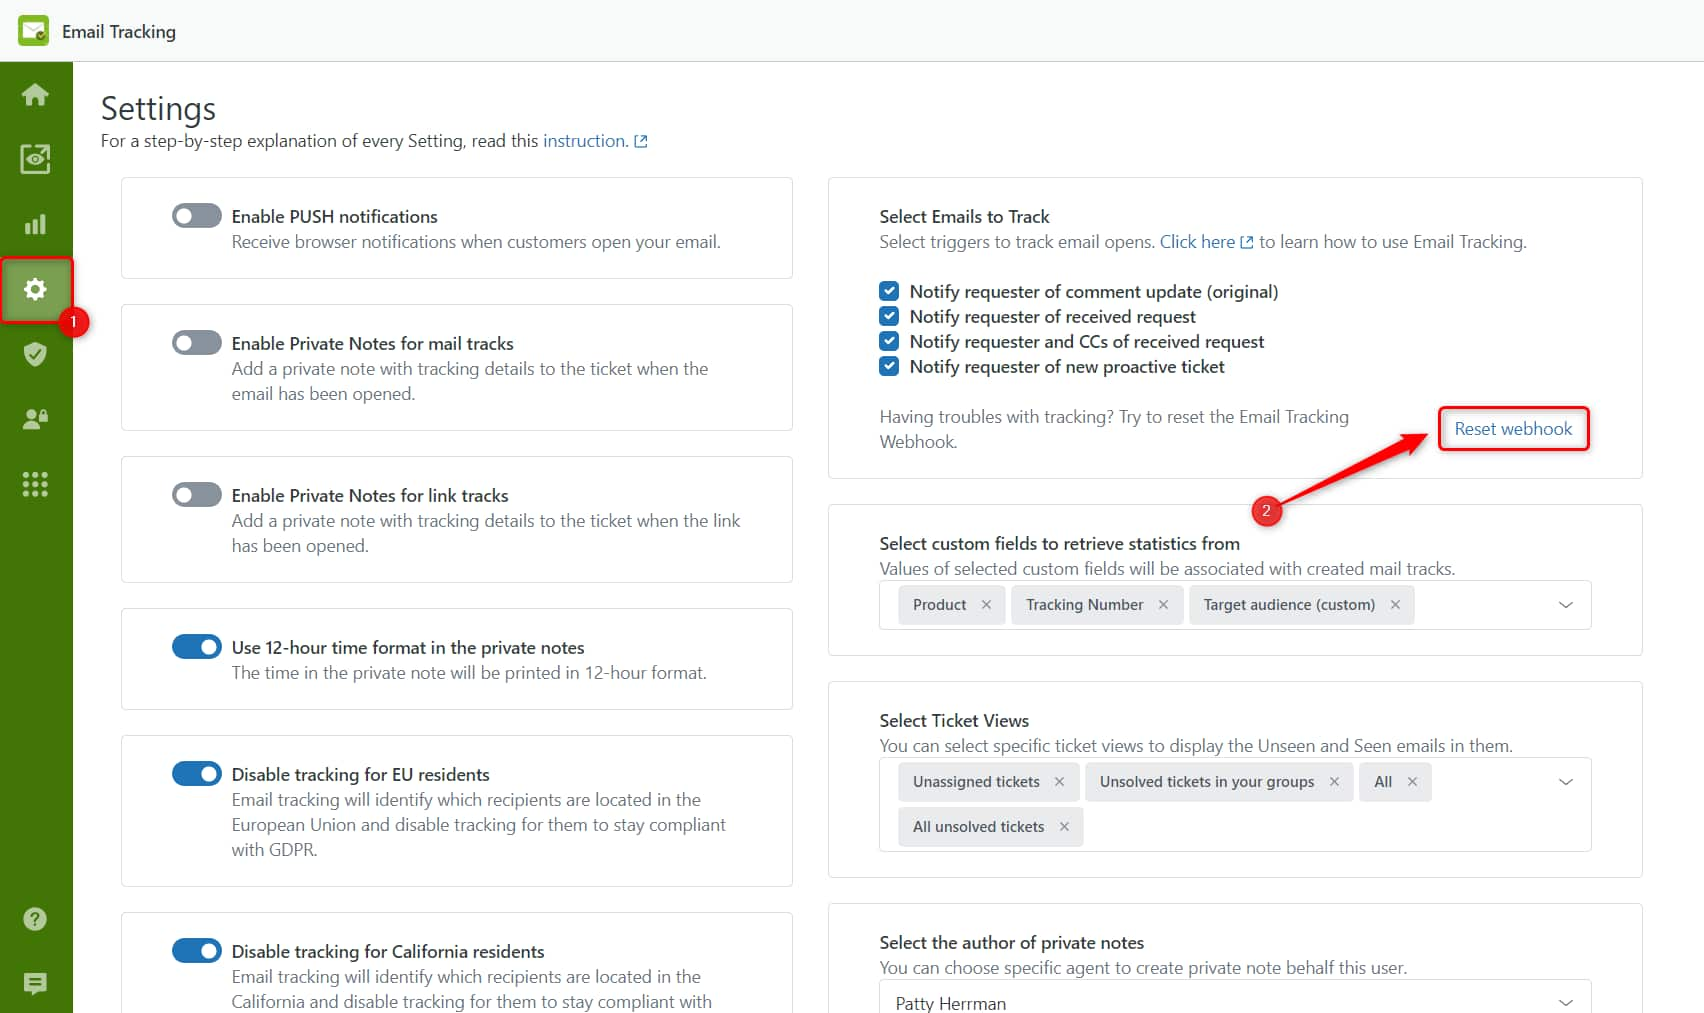
To ensure this update is active, go to the Settings tab and click Reset webhook.
Reports for replies and agent comparison (for the Pro Plan)
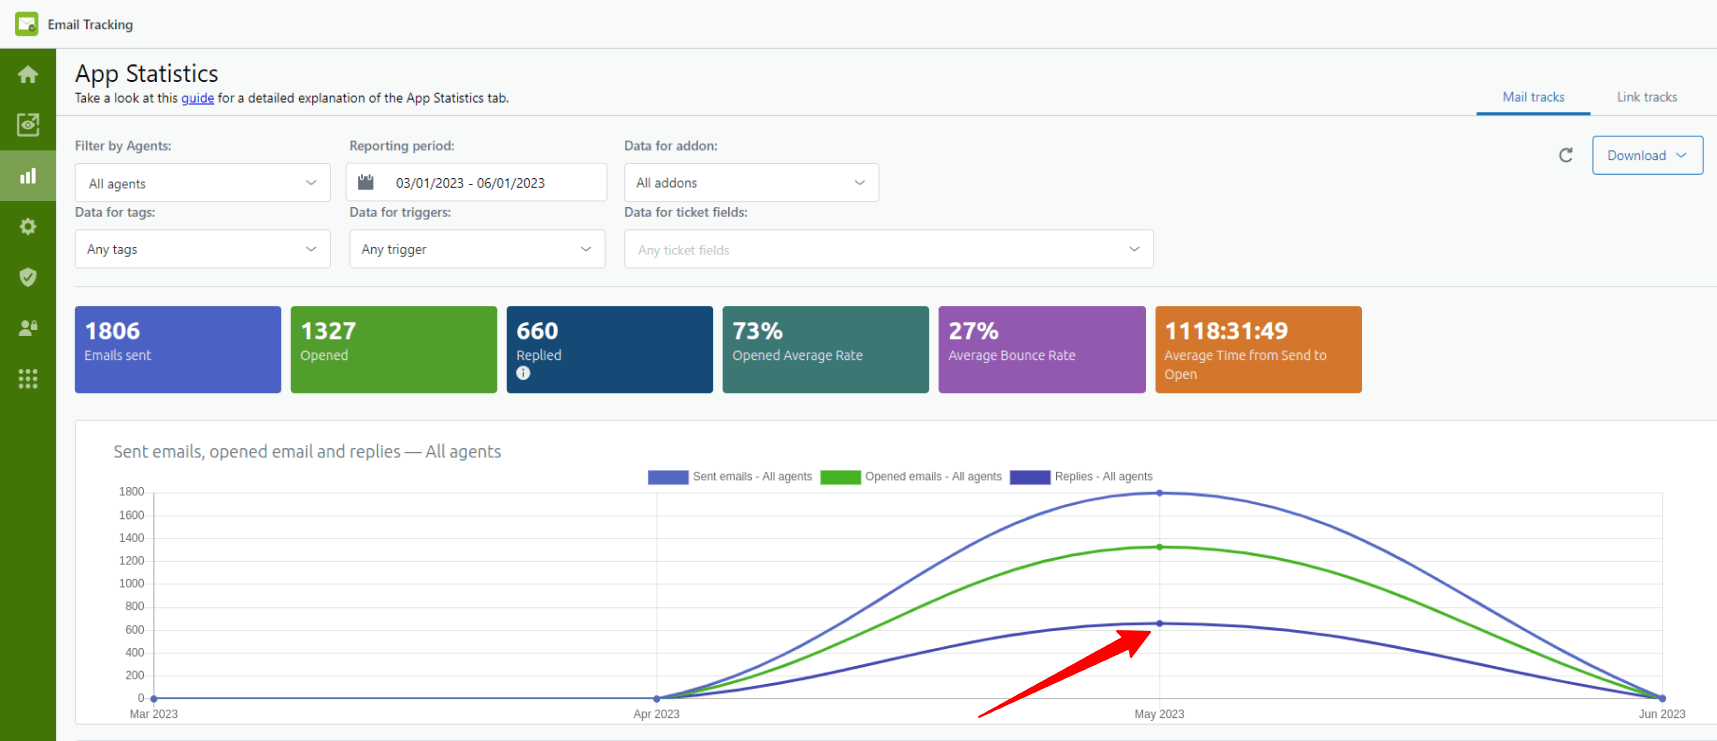
Need more visualisation for the Replied index? Now, together with Opened and Sent lines on the chart, you can see a Replied line.
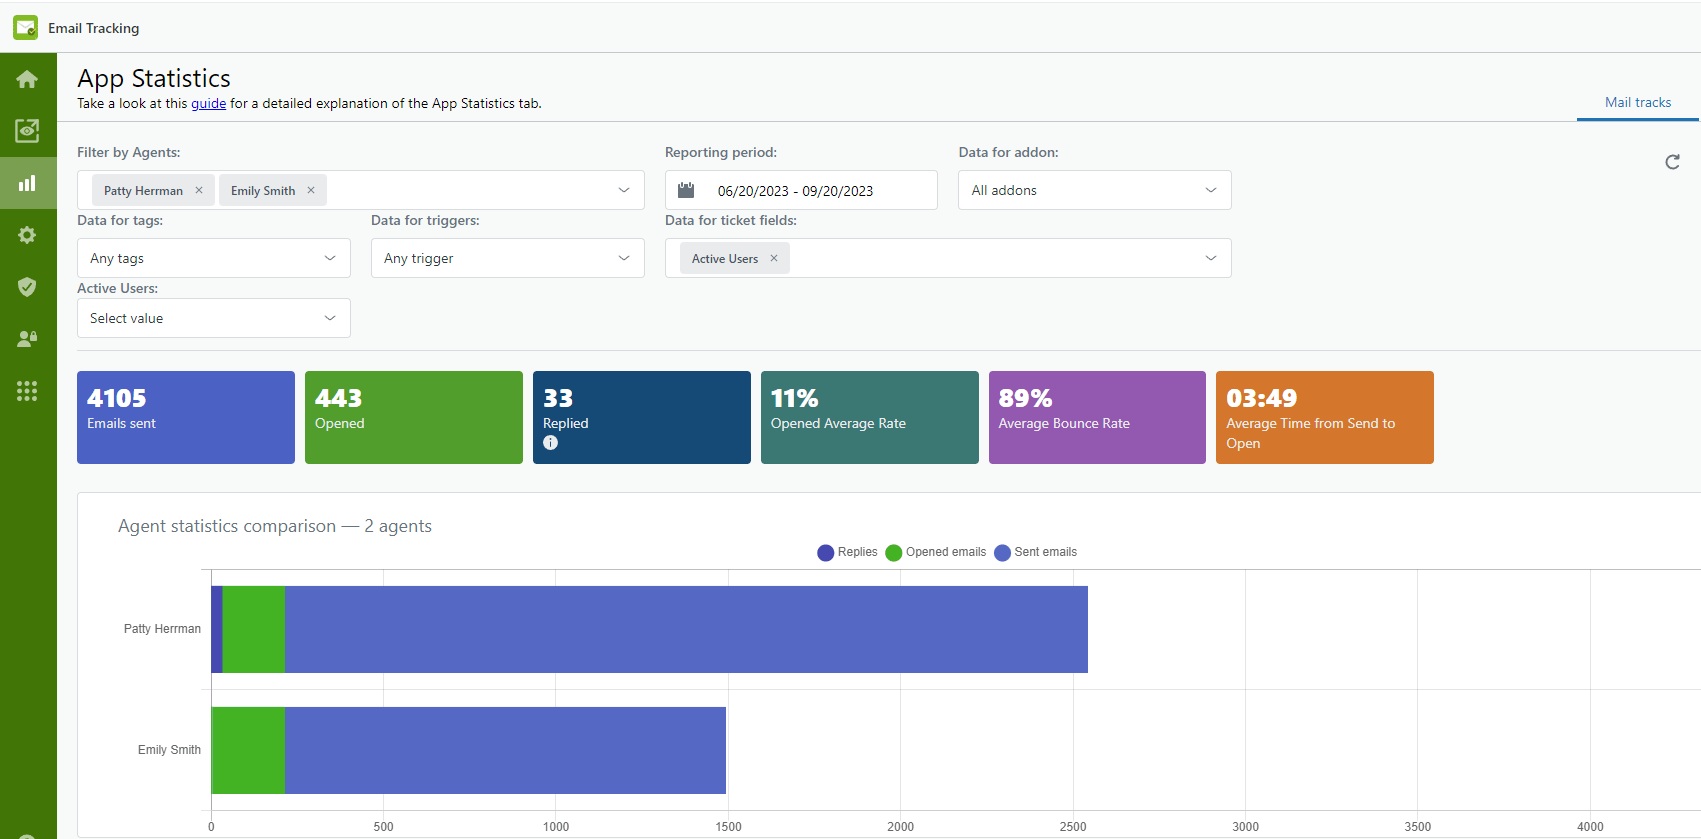
Moreover, compare agents' performance if you selected two or more agents on the Statistics tab. This update works in both the Mail tracks and the Link tracks tabs.
Disable tracking for UK recipients
Due to Brexit, starting from January 1, 2021, the United Kingdom no longer remain a member of the European Union. Consequently, the "EU-GDPR" no longer provided safeguards for the personal information rights and freedoms of UK citizens. However, the internal UK regulations are similar to the "EU-GDPR". Consequently, we've added another adjustment to the Settings page.
![]()
Free application on Sandbox
From now you can use the Email Tracking app for free! This service is for you if you have a test Zendesk platform. You can use the integration on a Sandbox account, so testing how the app tracks emails and links is easier. Just contact our support team to try this out.
Updated Homepage Interface
Your enjoyable experience is our main goal. Therefore we have the new look of the app's first page. Here you can create a demo ticket, book a call with the support team, view video tutorials, and read articles and related guides. To access the topic you want, click on the thematic box.
![]()
Filter email statistics by Shared Campaigns
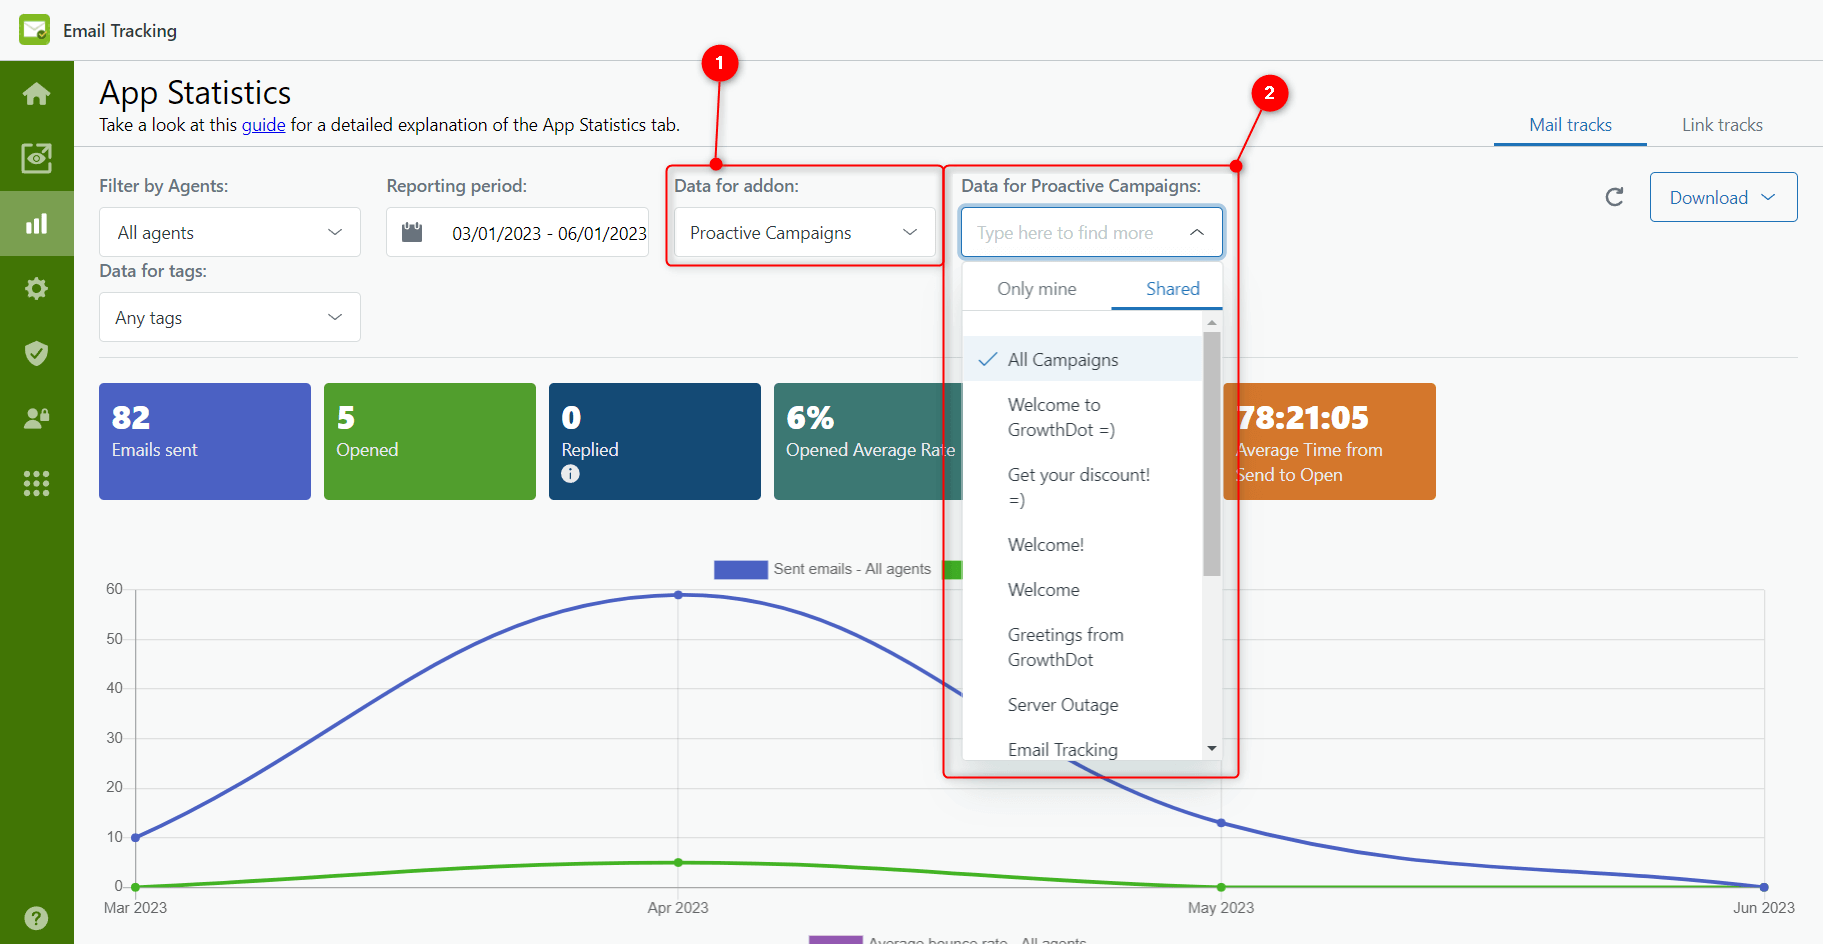
This update will be useful for those who have both Email Tracking and Proactive Campaigns integrations. We made some improvements, and now you can see the email tracking statistics for shared and your campaigns separately. To view those statistics, go to the App Statistics page > Mail Tracks tab, then select the Proactive Campaigns add-on from the ‘Data for addon’ filer. After, you will see the additional field named ‘Data for Proactive Campaigns.’ So, click on this field and choose the ‘Shared’ tab to select the necessary campaign.
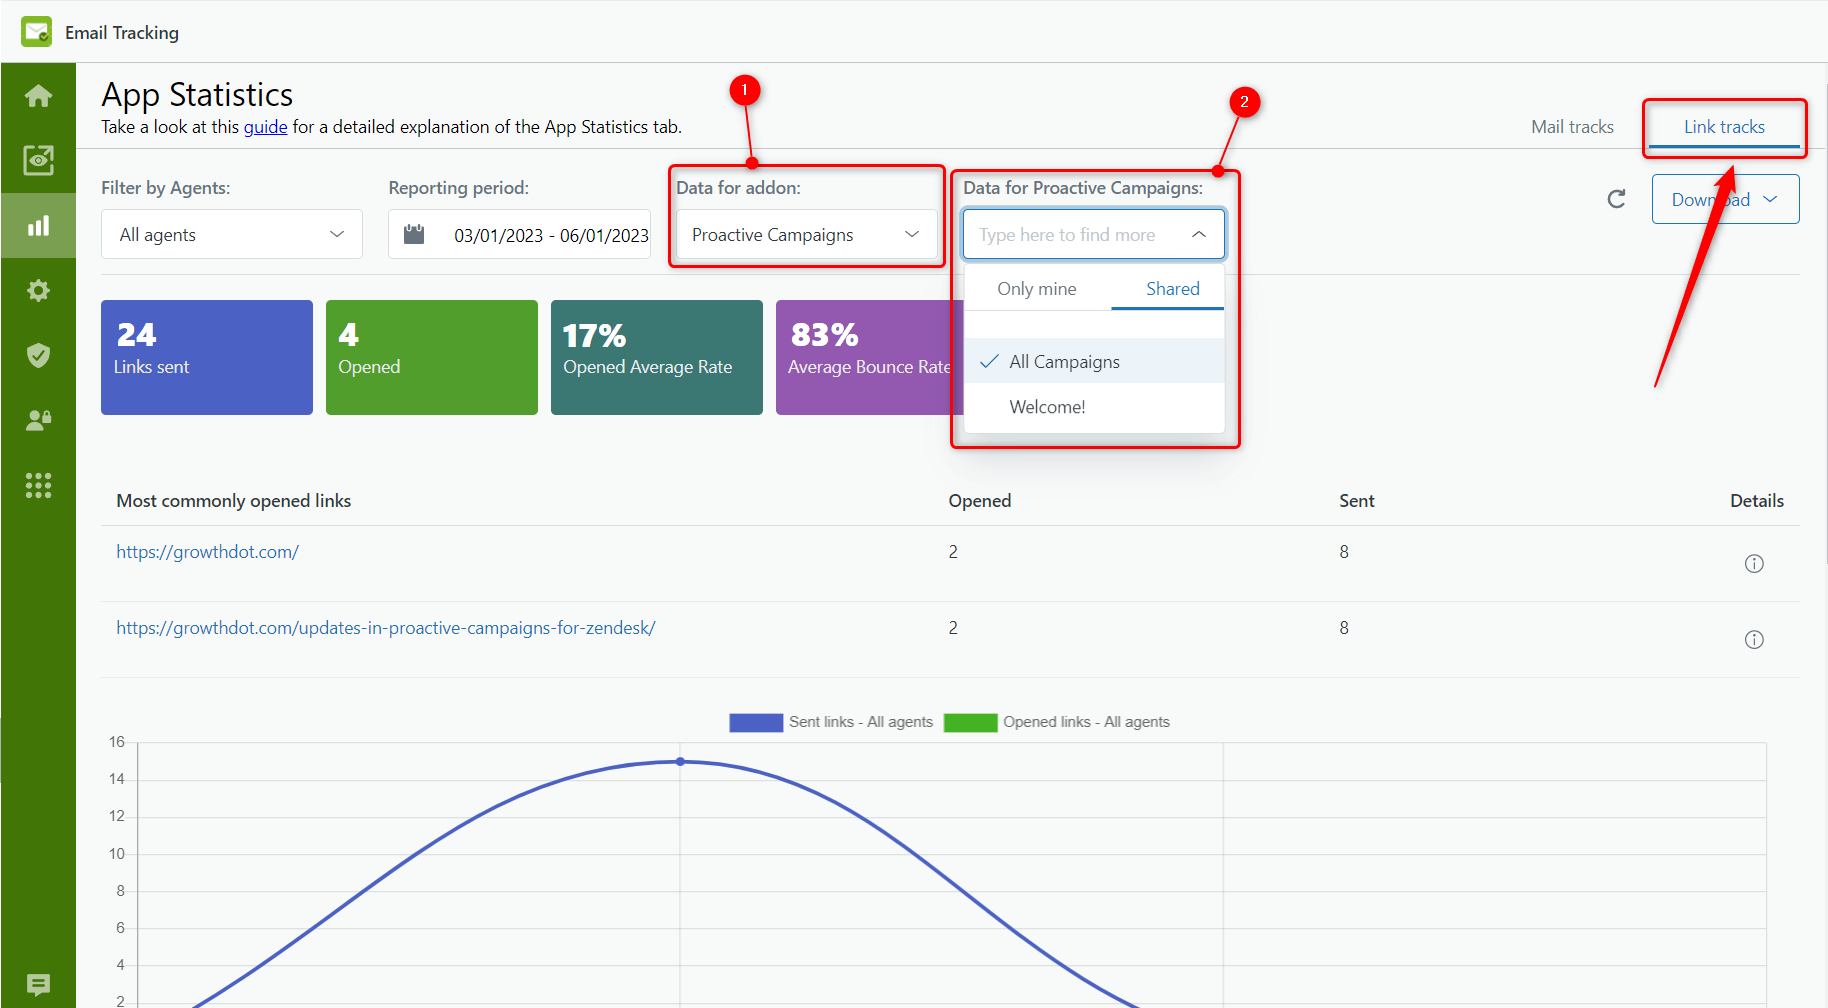
By the way, you also can use the analogical filter to see the link tracking statistics related to a particular campaign.
Use Custom Fields to Check the Statistics
The Email Tracking statistics page has filters that help analyze the information about email openings. However, we decided to improve this and added custom fields to make the statistics filtering more accurate. It is extremely useful if you use a bunch of custom fields in tickets, so now you can use values from fields to analyze open and bounce rates.
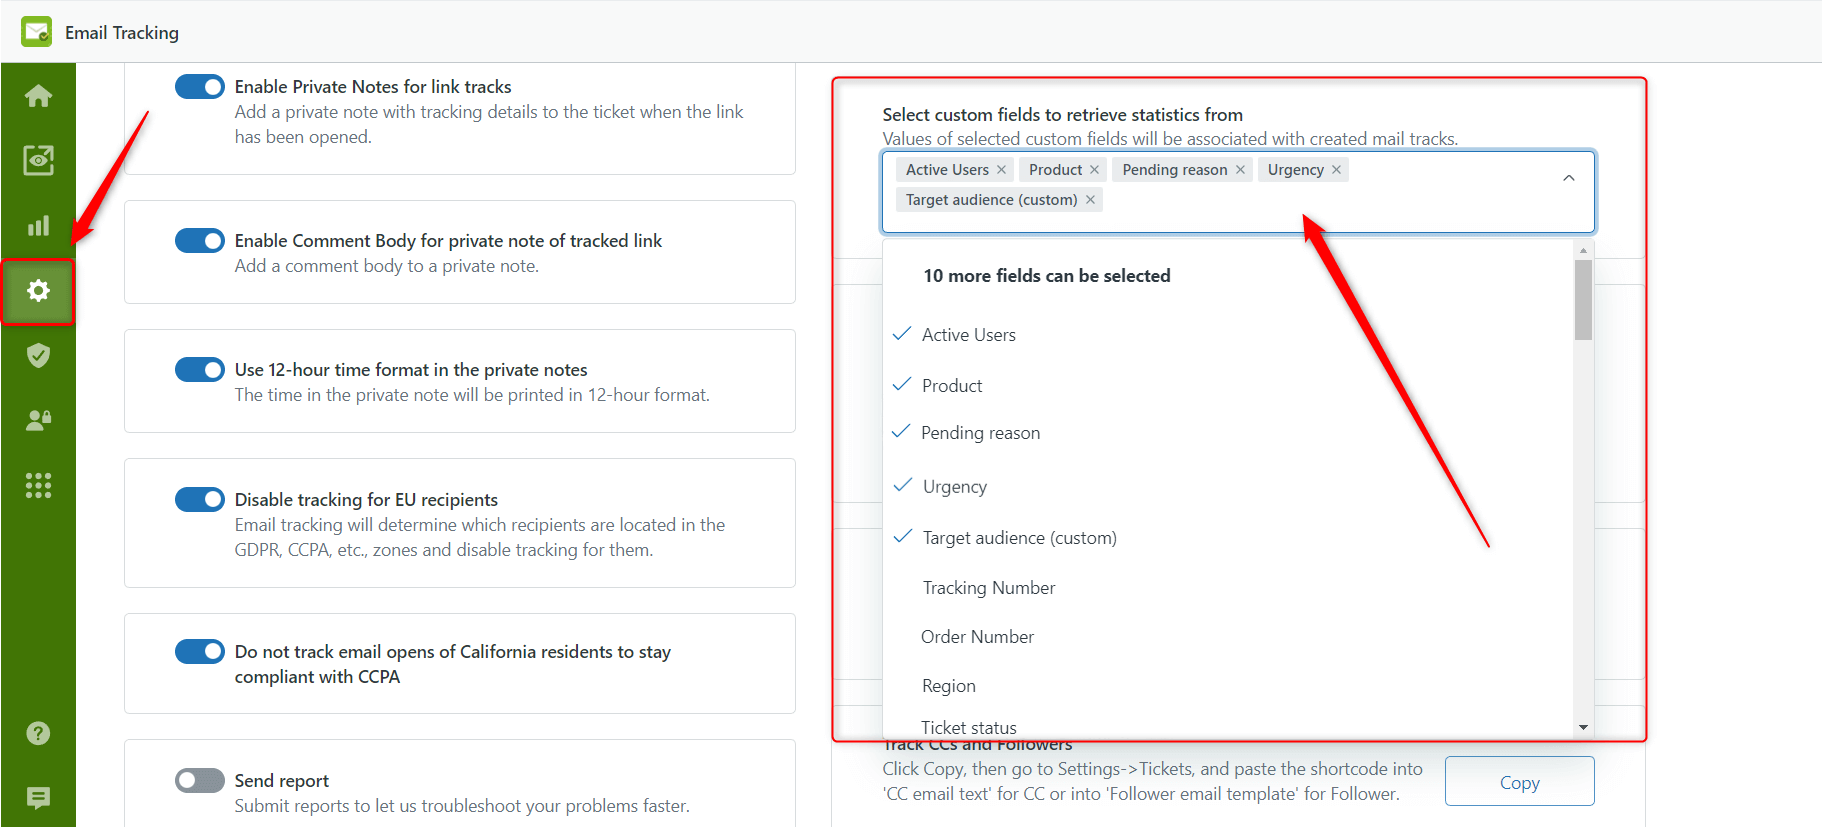
To enable this option, on the Settings page, find the ‘Select custom fields to retrieve statistics from’ section. Then, click on the field and select the needed custom fields from the drop-down list.
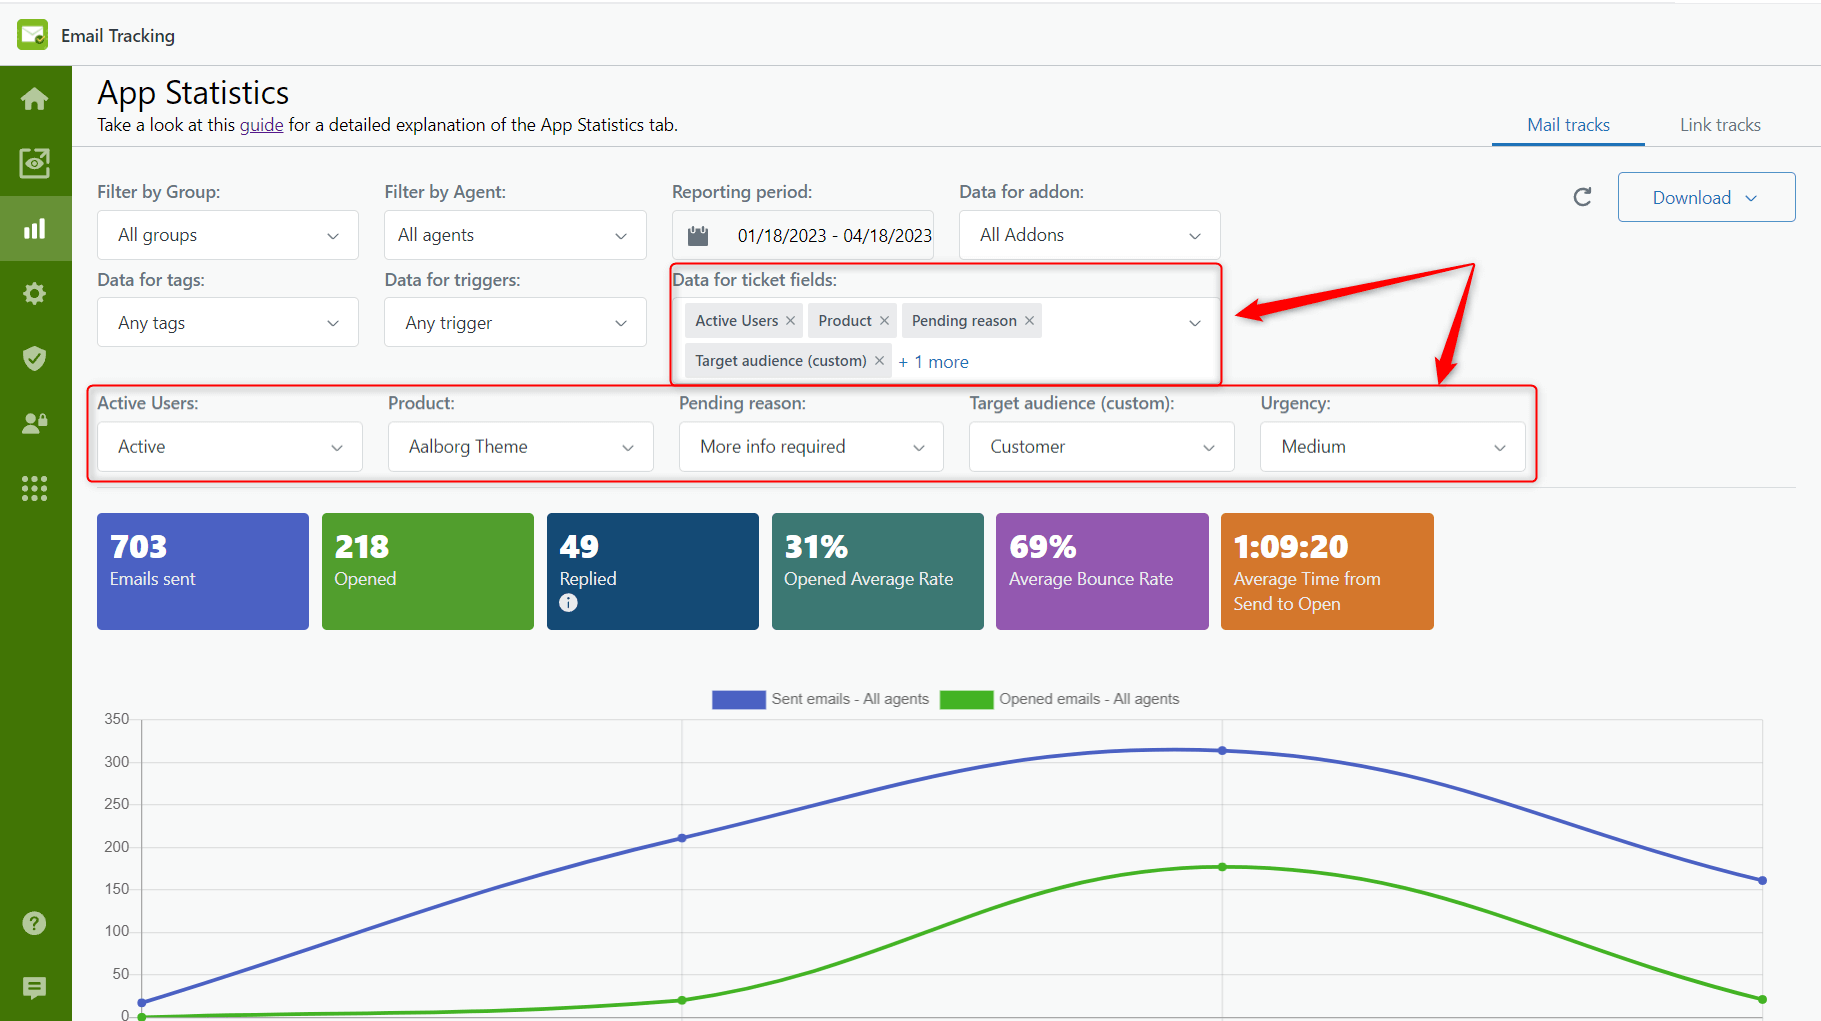
When you are done with the setting, do the following to check the statistics.
- Open the Statistics page;
- Select the fields you want to use as filters in the Data for ticket fields section (you can add or remove them);
- Set the necessary values in the custom fields.
Set app restrictions for agents
If you need to differentiate the access for each agent, use our new feature - Access Control Management. It allows agents, for example, to get full or limited access to the app's features. Besides, you can entirely restrict users from the app. To do so, click the Access Control Management icon on the Email Tracking sidebar. Further, admins can define what type of access new agents will have and change the restrictions for each agent.
![]()
Email Tracking Optimization
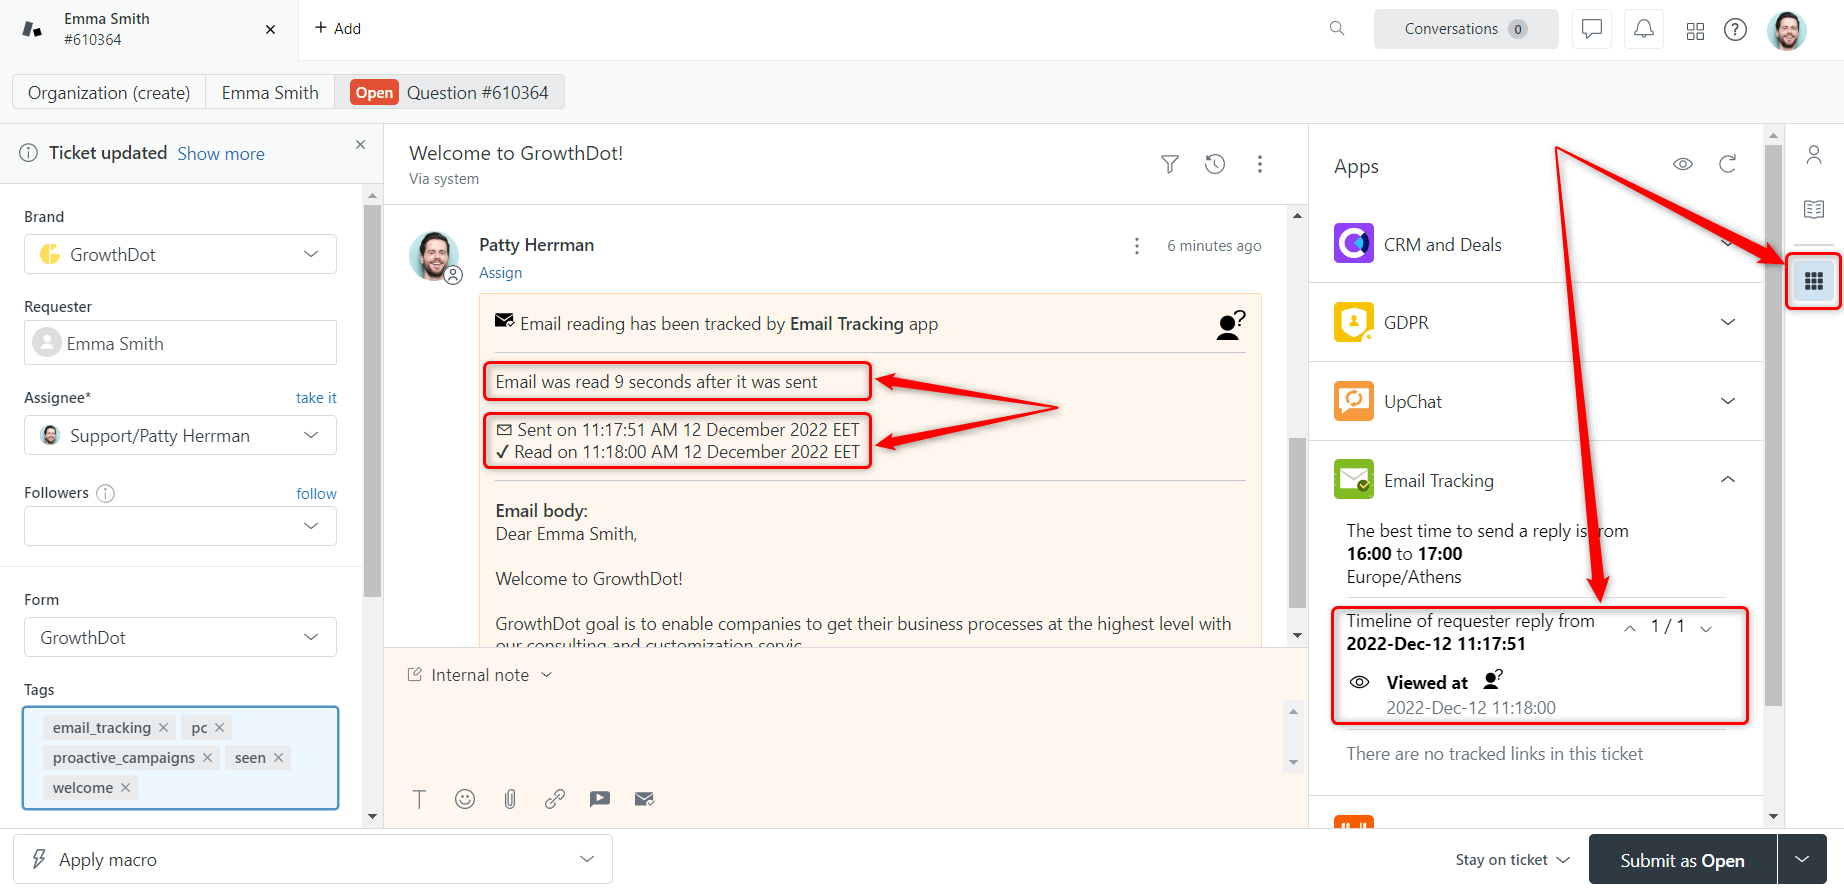
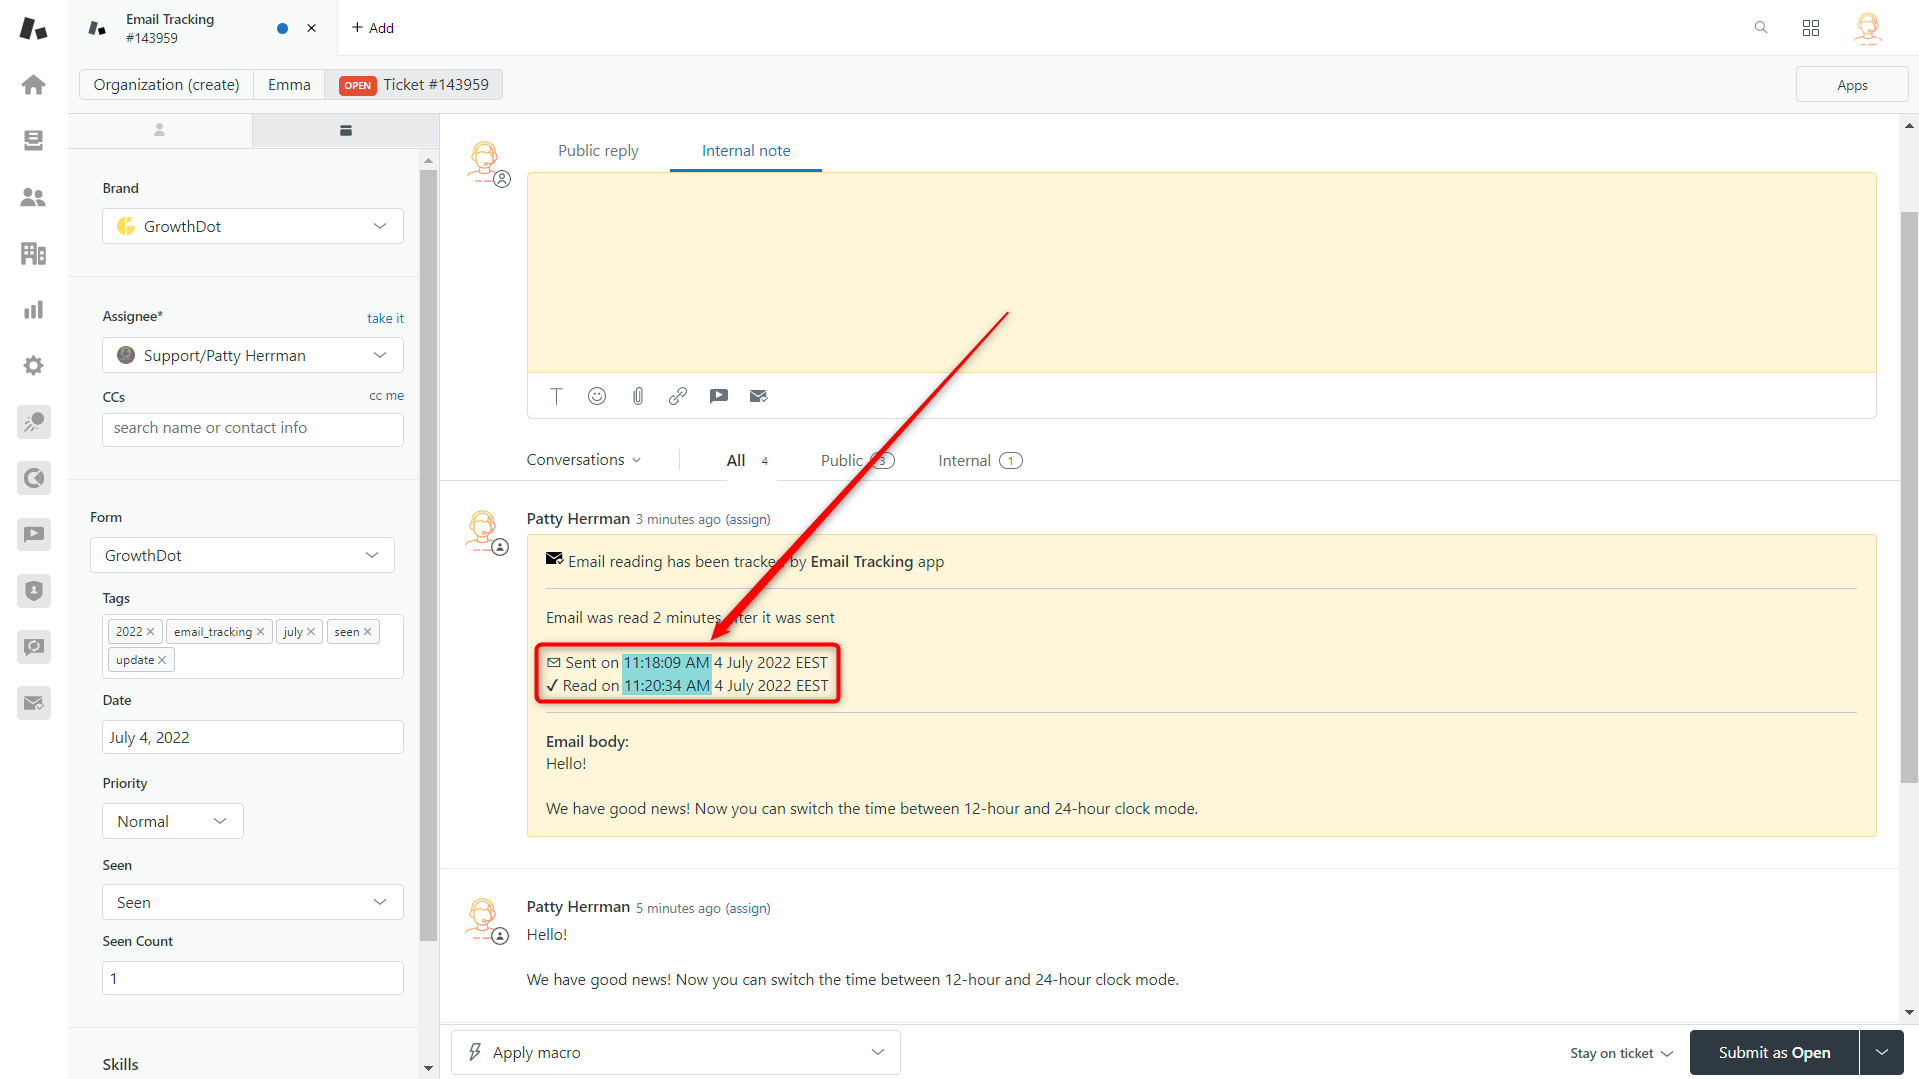
Some of our clients have probably noticed that read receipts come slightly delayed. However, there is no worry for you as it is the optimization our developers did to improve the Email Tracking work with Zendesk. We did this to avoid overloading API limits. Therefore, internal notes appear in the first five minutes after the email is opened. The time displayed in the internal note is equivalent to the time when an email was read. By the way, all information about the tracking is updated immediately in the right-hand sidebar.
In case you didn't notice this, it is also great, but now you know about this small optimization.
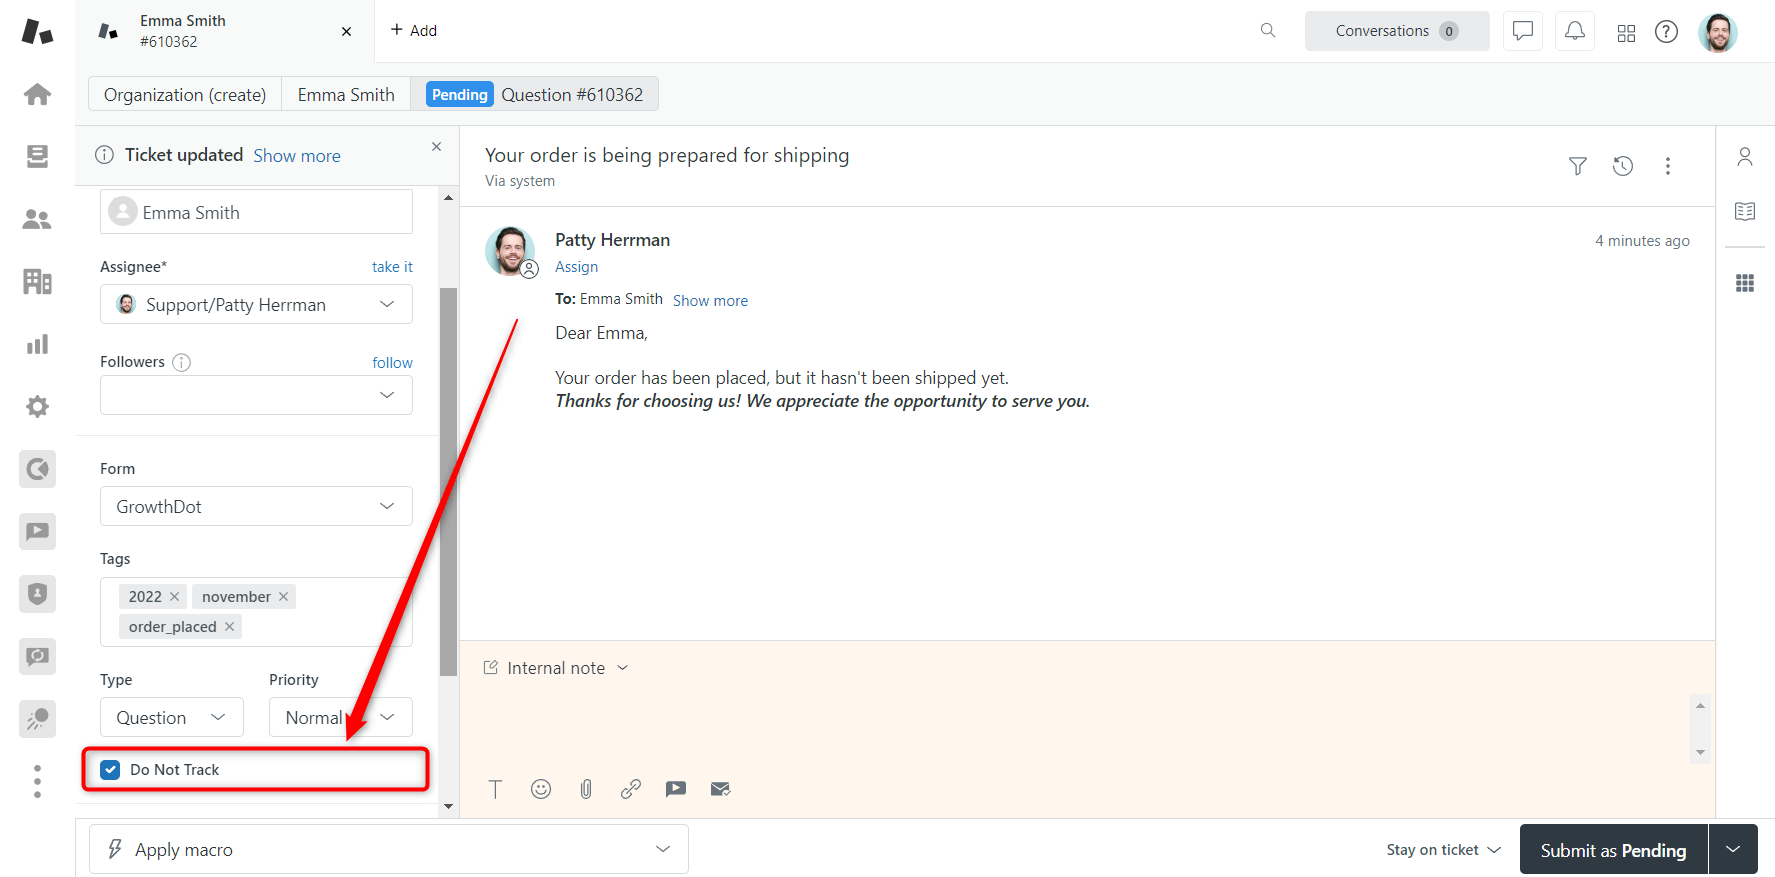
Do not track Individual tickets
Previously, you only could set the ‘Do not track’ value for individual tickets when the Agent Workspace was off. However, we decided to improve this option, and now it doesn’t matter whether it is on or off. This checkbox allows agents not to track an individual ticket.
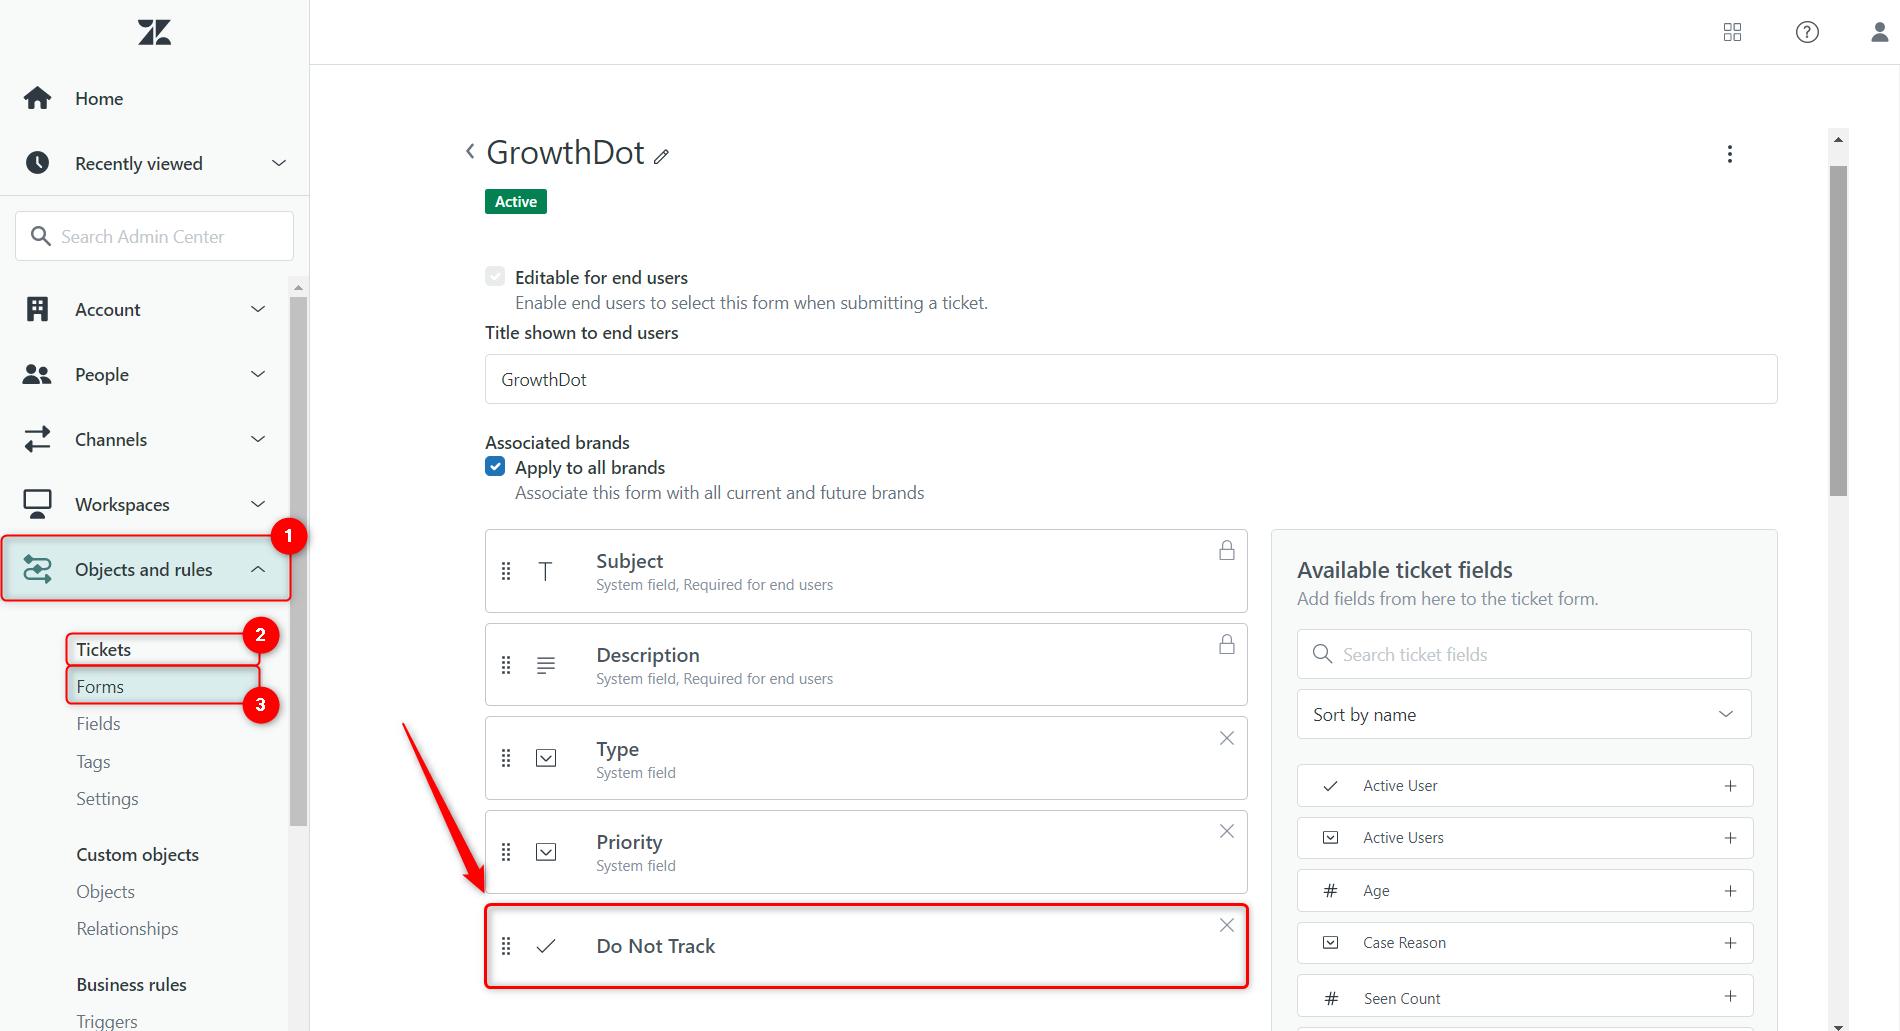
Make sure your ticket form has a ‘Do Not Track’ field. To manage it, go to Zendesk Admin Center > Object and rules > Tickets > Forms and select a necessary ticket form. Then, you can drag this field from the Available ticket fields column into the left one.
‘Do not track’ Feature for Separate Users or Organizations
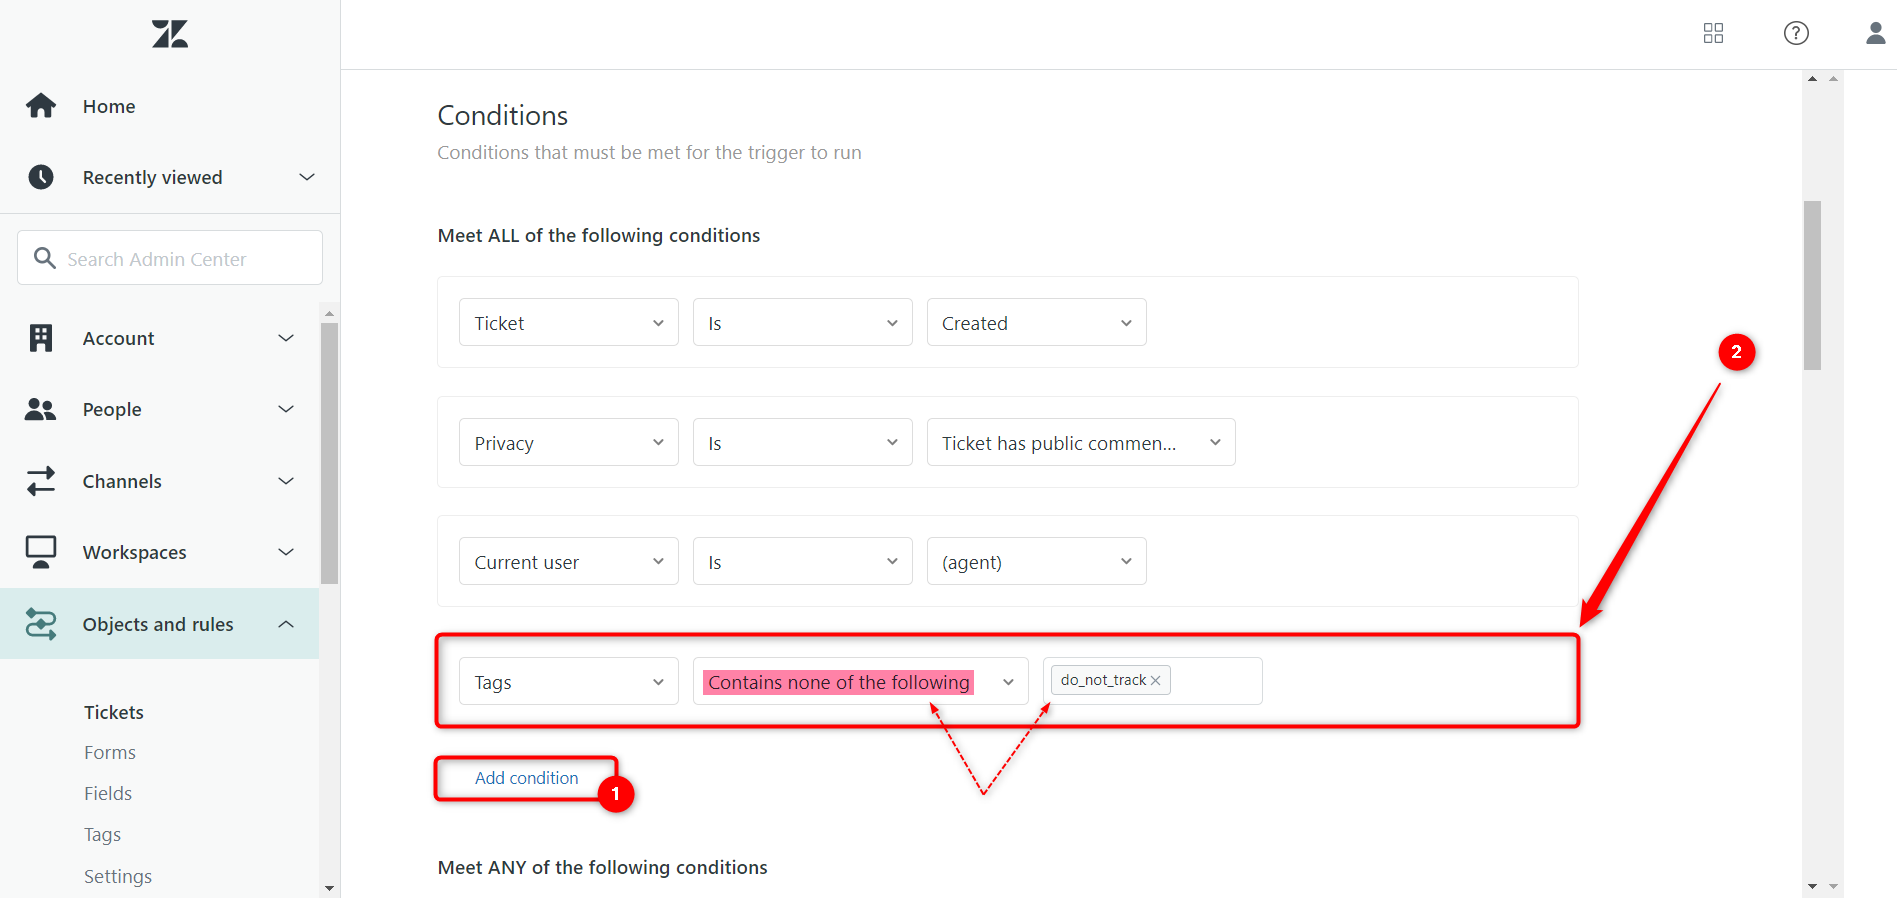
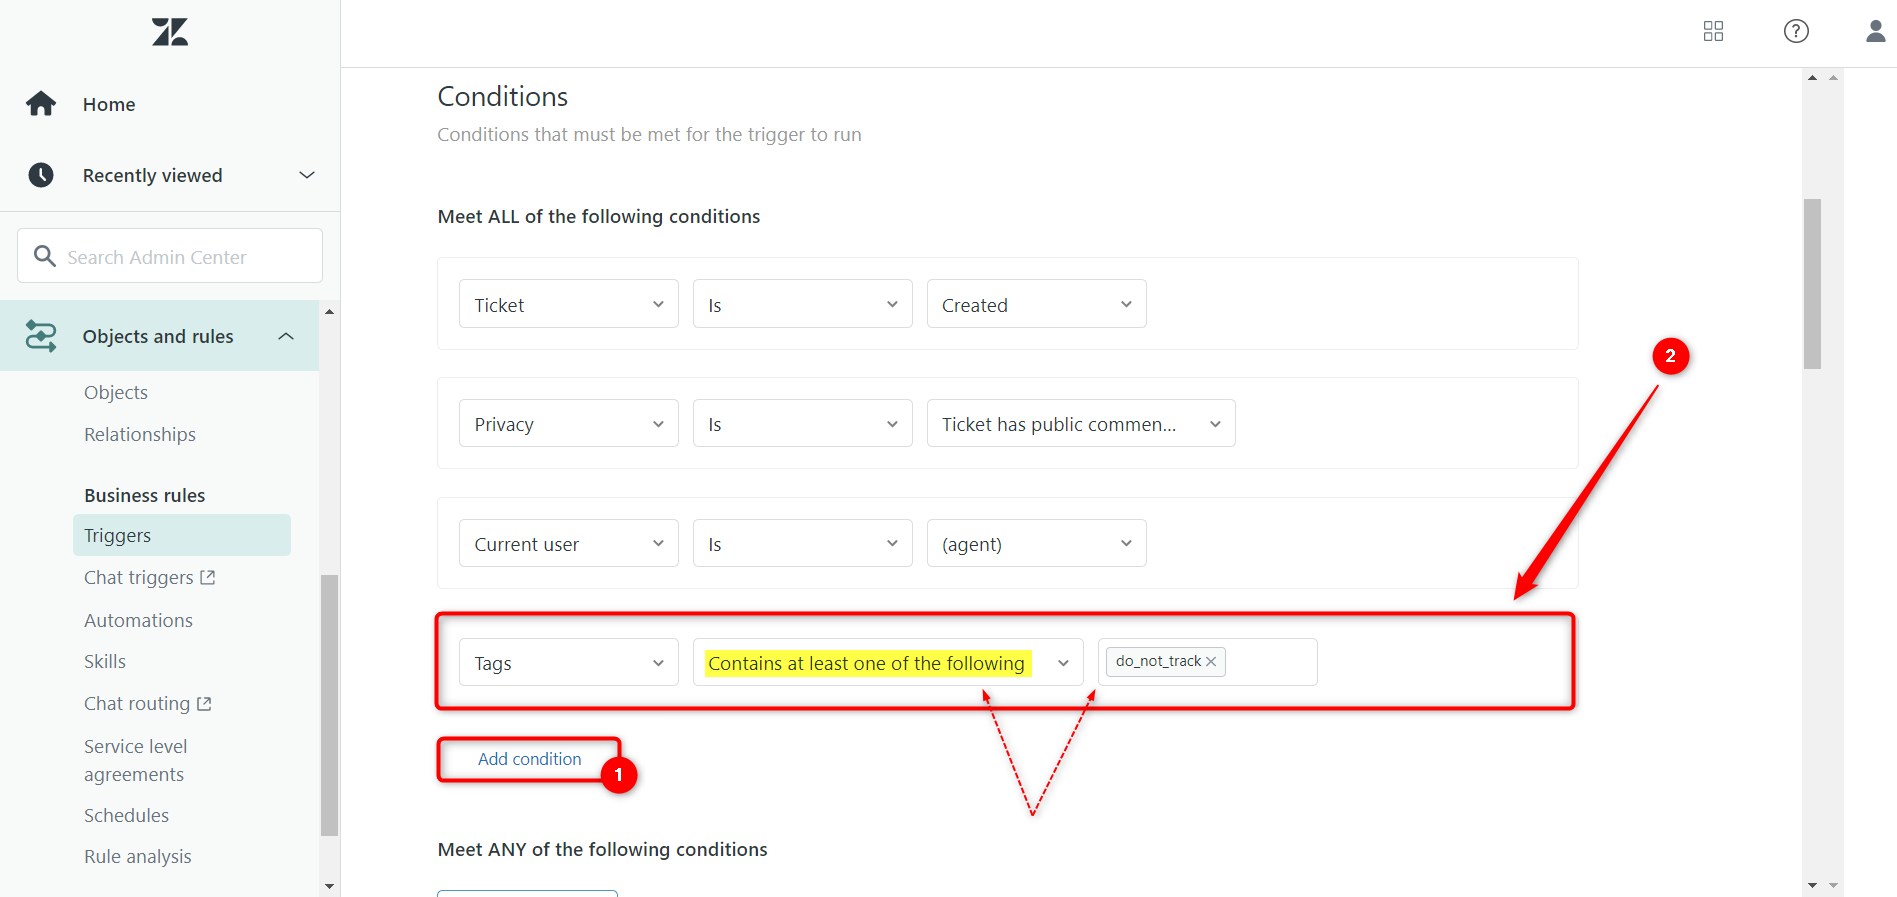
You know how not to track a ticket, but what about contacts or organizations? There is a way to apply such an option for this purpose. First, you must turn off all triggers inside the app. Second, go to the Admin Center > Objects and rules > Business rules > Triggers. Then, select and Clone the trigger you use in the Email Tracking.
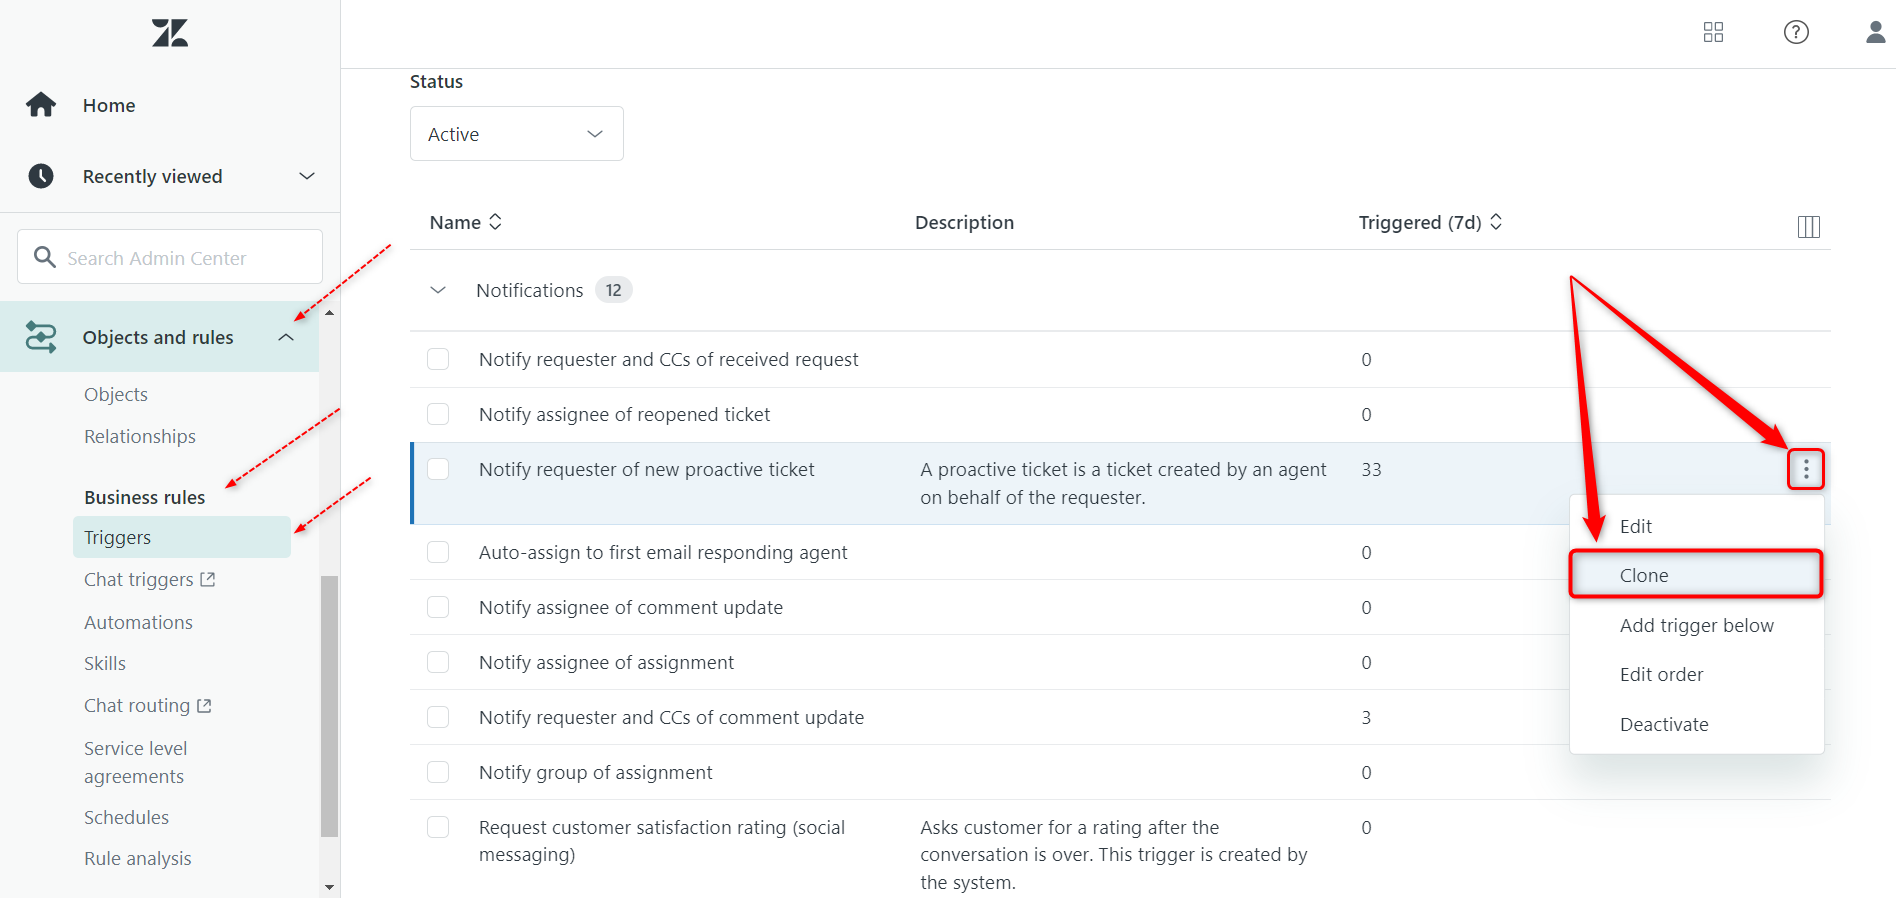
After, for the original trigger add this condition: ‘Tag’ ‘Contains none of the following’ ‘do_not_track.’
On the contrary, the cloned trigger should contain: ‘Tag’ ‘Contains at least one of the following’ ‘do_not_track.’
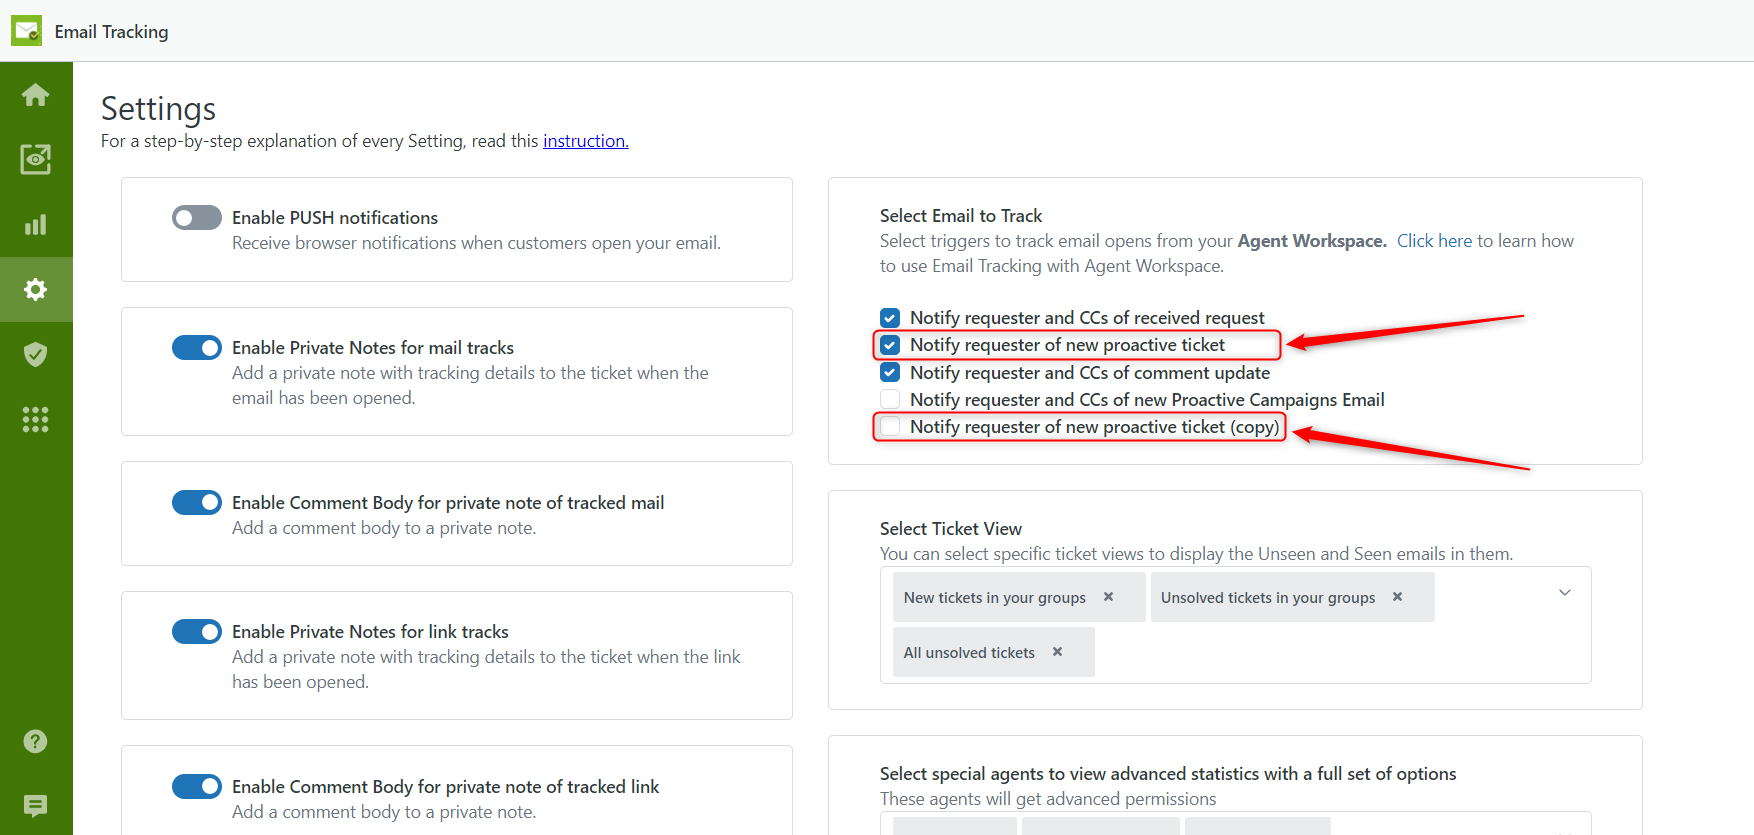
When you are ready with this part, you need to ensure that the original tag is enabled on the Email Tracking Setting page and the cloned one is not. It is important! And that's it. Now you can open the contact or organization profile and add the 'do_not_track' tag to a related field. Therefore, the app won't track users and organizations with this tag.
The 12-hour Time Format for Internal Notes
If you got used to living by a 12-hour time format, but internal notes consist of time info in a 24-time format, then you need to know how to change it.
You only need to open the Settings tab in the Email Tracking app, find the toggle button named Use 12-hour time format in the private notes, and turn it on.
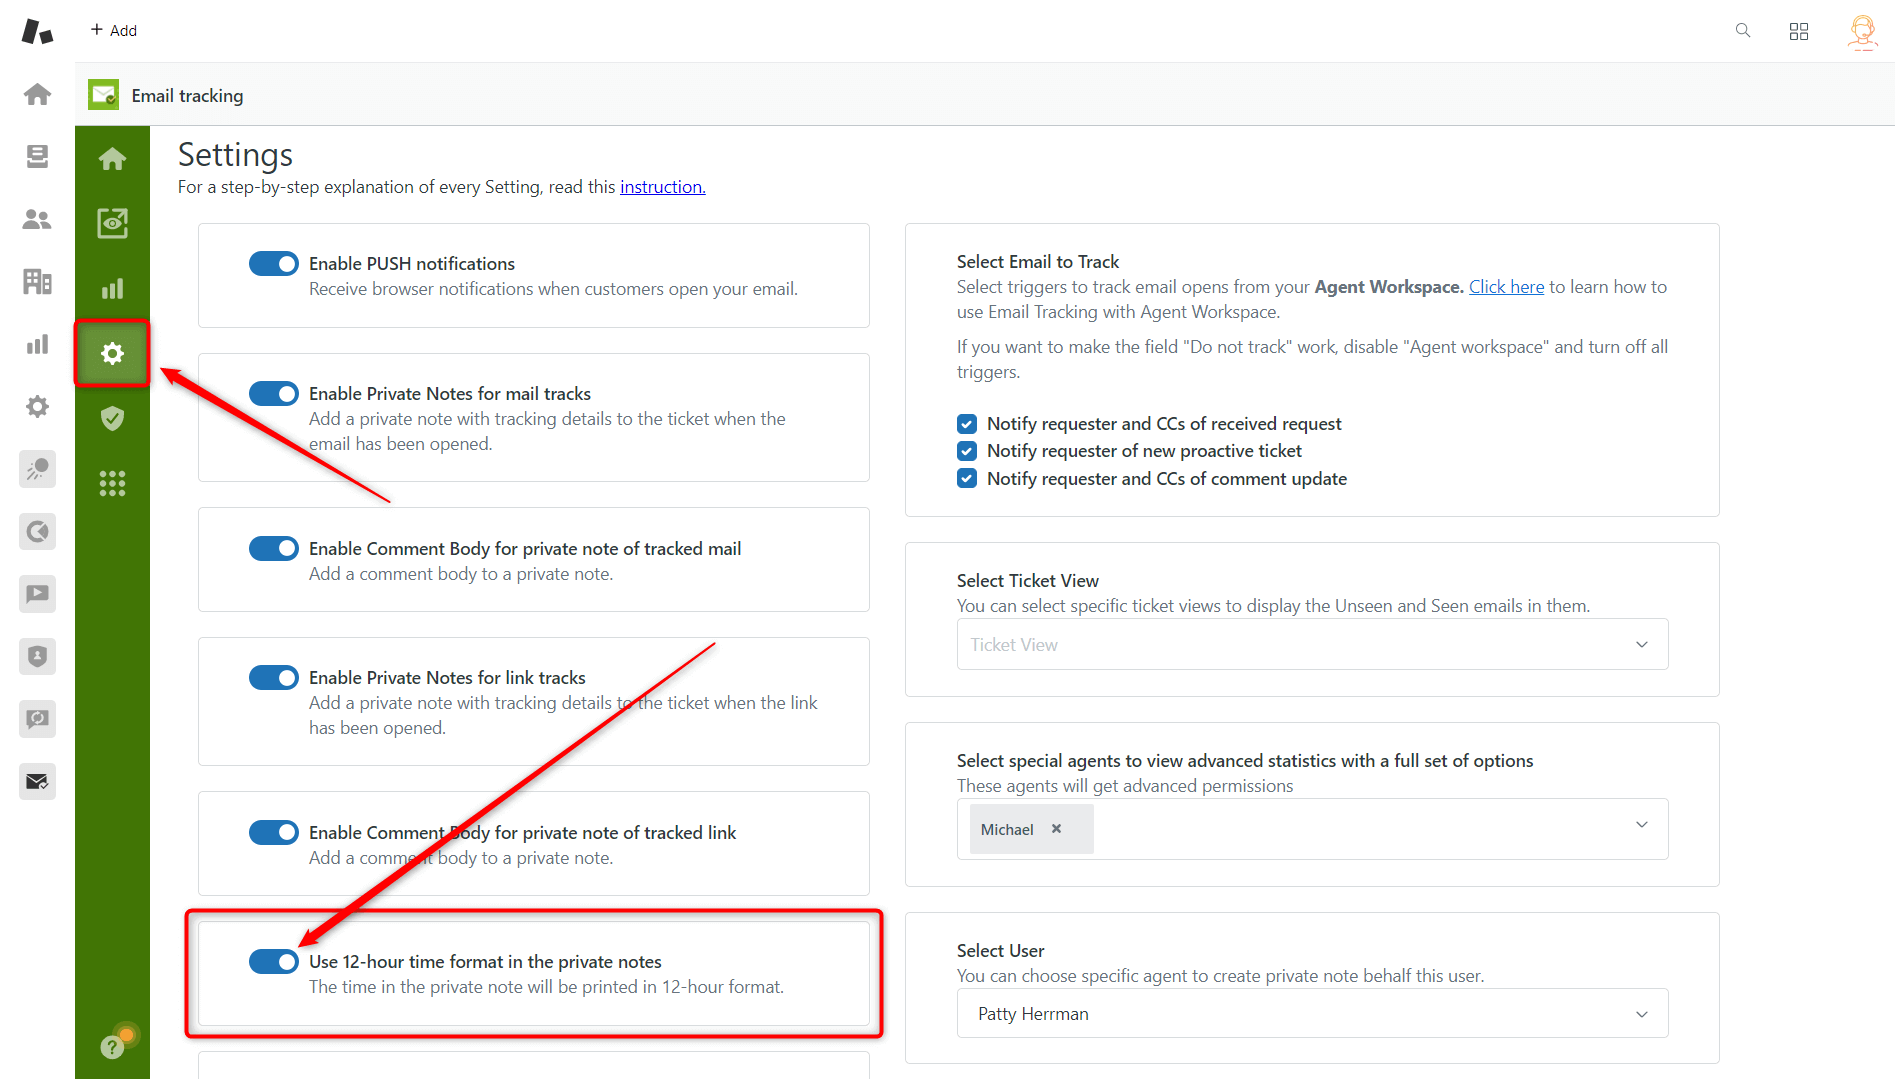
Here it is. Now your internal notes display a 12-hour time format. Hope it is helpful for you.
Link Tracking for Comprehensive Analytics
That is the option that will become your favorite one. Every agent can track any link openings inside their Zendesk without any additional analytic tools. Great, isn't it?
Besides, you can track as many specific links as you need in one ticket, as shown in the screenshot below. Just click on the Email Tracking app's icon under the email body and put the checkmark where needed and click on Apply.
![]()
After the receiver opens the link, you'll get an additional internal note only with the exact time of the link opening. Moreover, you can see the info about all tracked links on the right sidebar under the timeline. That will help you to check how many of them were opened.

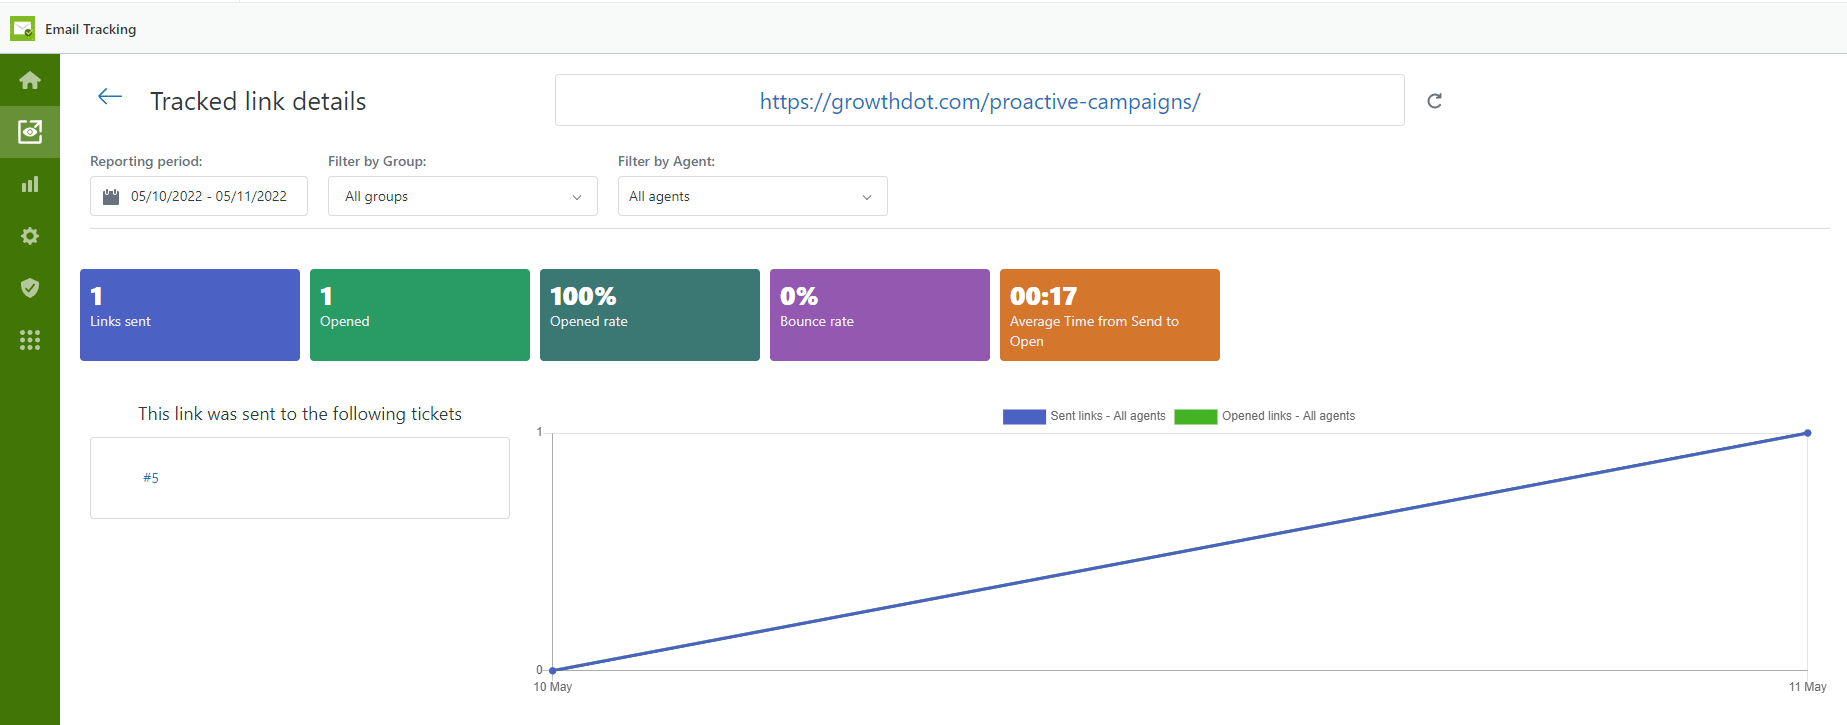
What's more, there's another specific tab named Tracked links to see the whole link list and statistics for each. Click on Details to open the statistics.

So, for example, you can select different parameters on the statistic tab and check the agent's performance during a specific period. Therefore link tracking option, which is thought-out to the details, will bring analytics closer to the customer support in Zendesk.
Try Email Tracking with Proactive Campaigns
If you are looking for a convenient mass email sender, it is worth trying Proactive Campaigns for Zendesk. Adding this app to Email Tracking will help you gain better results in your email marketing and customer support. For example, you can see who and when opened emails or if they were opened at all. So, without any doubt, contact our support team for more details.


