Zendesk is a leader among help desk software providers for a good reason. It's all because you get robust features that will help you in client assistance after setting it up. However, your workflow will increase if you know tips on how to use Zendesk. It happens even if you have been using this instance for ages.
If you're just getting started with Zendesk, then keep reading to learn 13 tips to enhance the efficiency of your support team and keep your customers happy from the get-go.
What is Zendesk?
You might have probably used Zendesk for some time as you chose to read this article and know more about its functionality. However, some readers may not fully understand what Zendesk is.
To clarify this, Zendesk is a SaaS platform for customer support work optimization. So, if you are struggling with keeping an eye on all customers' queries using an omnichannel communication approach, the software will help gather their requests over different channels in one place.
How to Use Zendesk: Tips and Tricks
Many Zendesk users usually take only half of the software capability. Indeed, one of the biggest Zendesk tricks is to pay more attention to simple functionality.
For example, you can improve branding by adding your company logo and brand name to an email template; setting agents' avatars and signatures. Moreover, it is a good idea to add type or priority to tickets in order to sort them by clicking related buttons on the Views page. Besides, you have an opportunity to set up automations to solve or close tickets that no longer need to be worked on by agents.
After you get used to making the most of Zendesk customization basics, it's time to extend your knowledge and dive deep into more settings. We will cover the most effective ones that our users face some difficulties while getting along with them. So, you will find out about macros, triggers, placeholders, CSAT, and many more. Just keep reading.
We also need to mention the Zendesk Help Center, which is extremely helpful because of its impressive knowledge base. You can find detailed guides and feature descriptions here and communicate with a support team.
1. Automate mundane actions with triggers
Zendesk triggers are such things that save your customer service team so much effort. As a result, they won't notice how a massive part of unnecessary work will vanish. It's all because this feature is an essential tool for eliminating actions that make support reps waste loads of time.
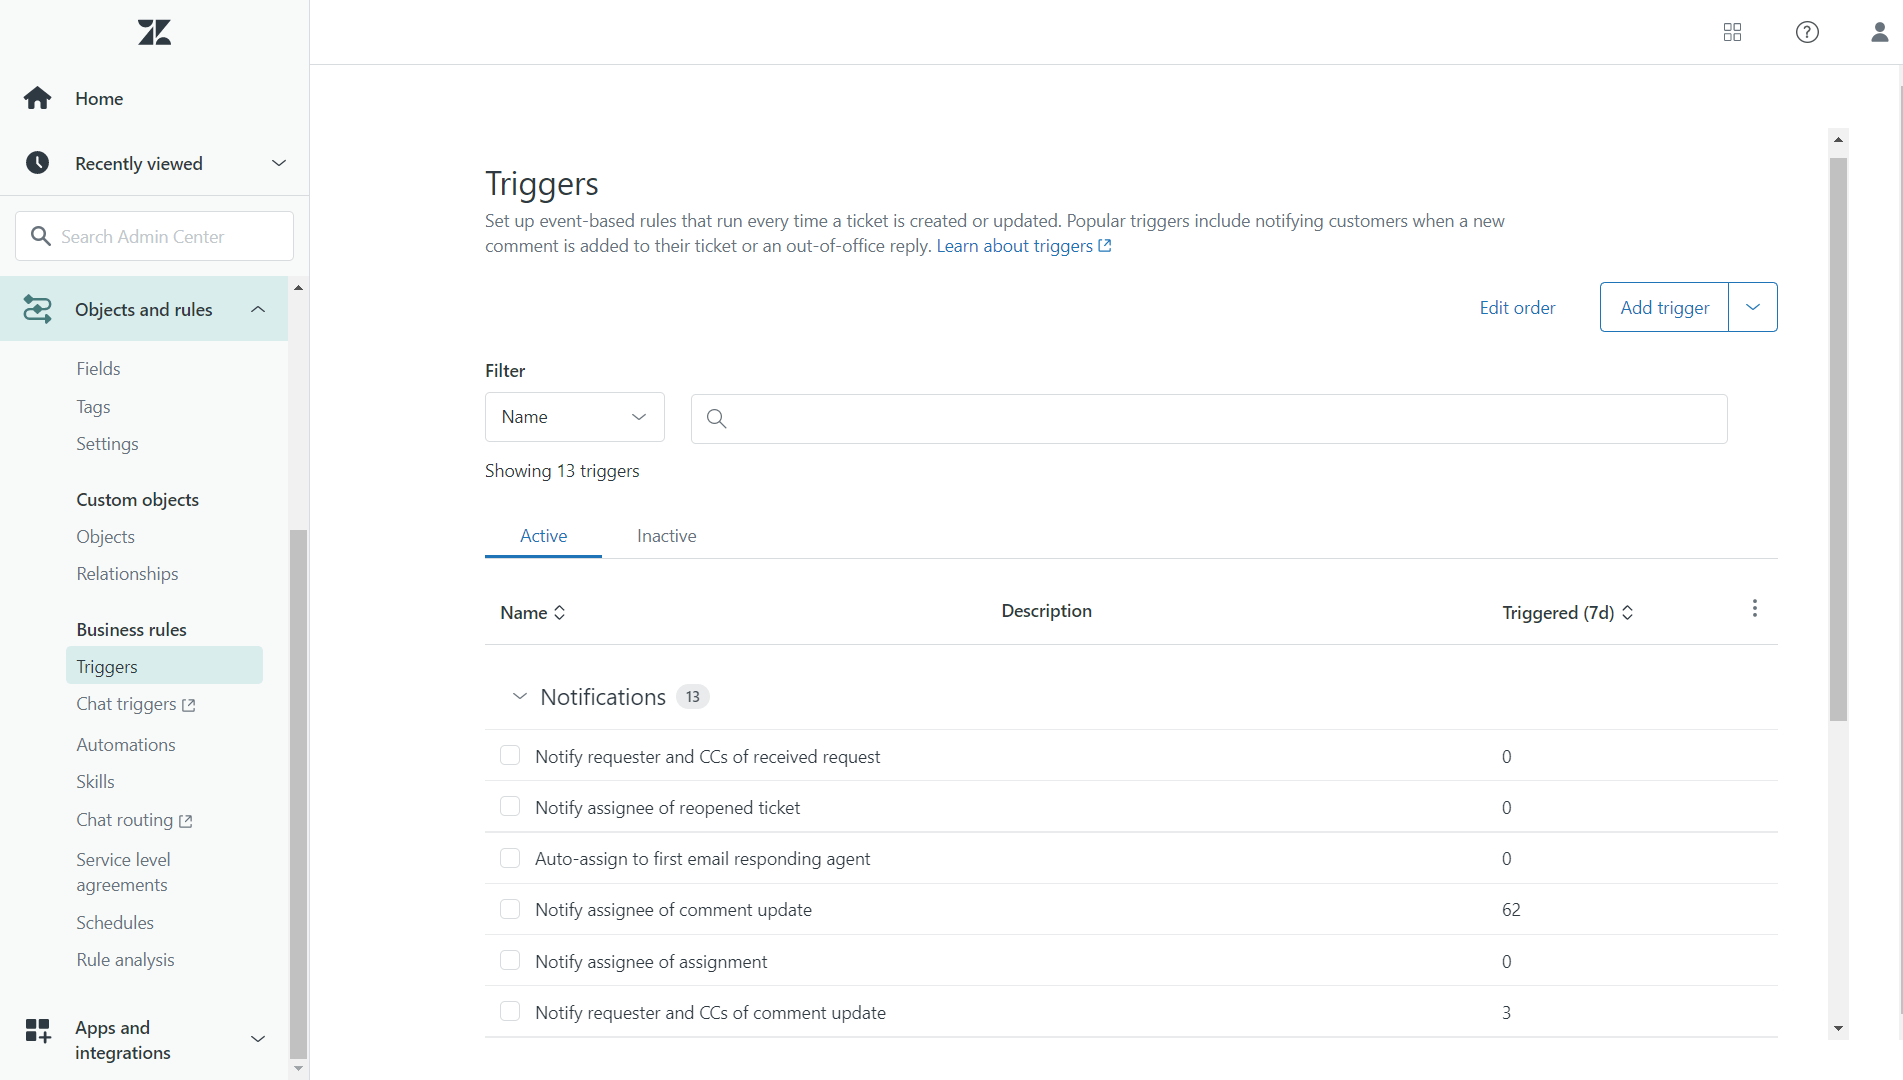
For example, if someone raises an urgent ticket that requires help from other agents or even departments, they will be able to notify any agents you choose automatically. Thus, everyone who has received the notification and is at available status will know customers need their help. This way, any issues will be resolved more promptly.
The main working principle for triggers is to check predefined conditions and fire them. In other words, if you create "if" and "then" statements and the trigger meets them, it will immediately carry out the pre-set action.
This way, your agents will be able to help each other. Also, they can jump in if someone is unavailable, automatically update the customers on their issues, escalate tickets, and much more. Everything depends on your imagination and creativity!
Zendesk trigger vs automation: The difference
We have mentioned automations in this article. So do triggers and automations the same thing?
Naturally, they start some pre-defined processes, but their mechanisms are different. Triggers demand certain actions must happen before starting the next activity. For example, we take the situation described above: an urgent query comes to Zendesk support. In this case, the 'urgent query' is an action and a trigger condition that activates the subsequent step - this ticket auto-assigns to the specific agent.
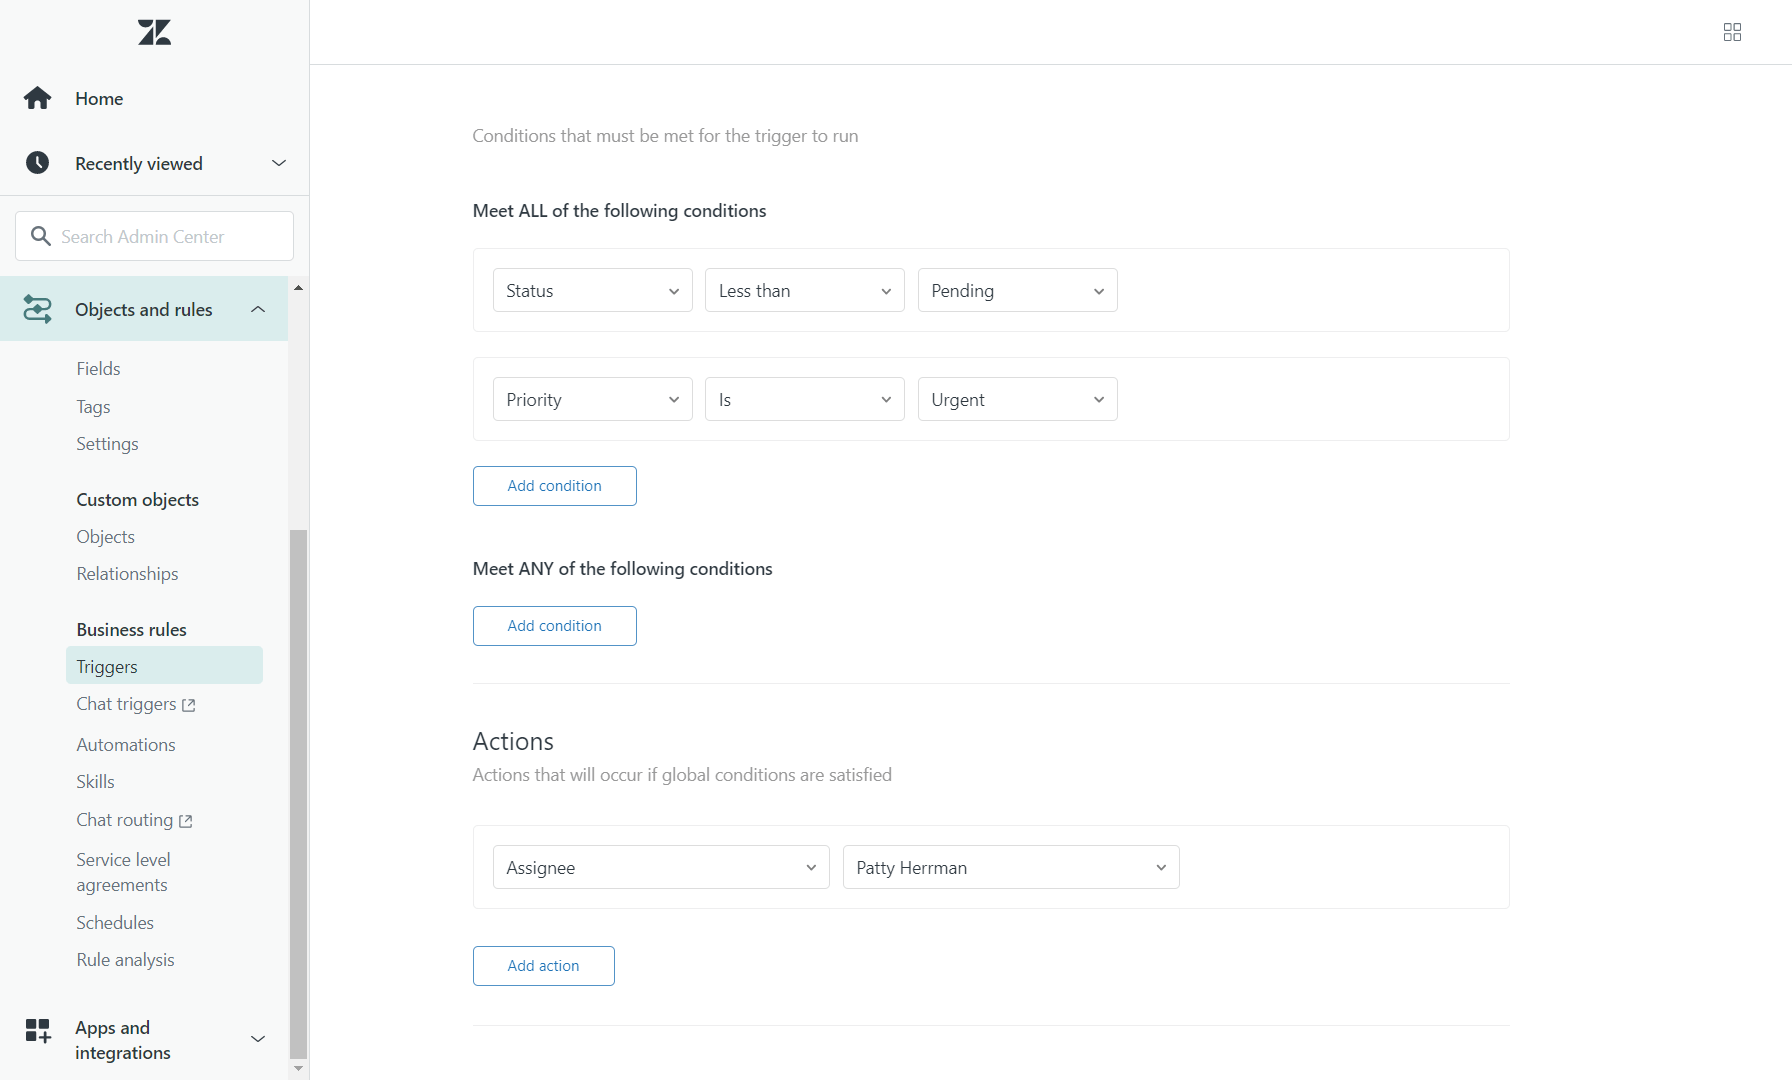
Next up, automations. In the automations background lyes the time. So it might be easier to comprehend their work. For example, you want your Solved tickets to turn into Closed status after four days of inactivity. Therefore, you put conditions: when the ticket status is Solved for more than 96 hours, it becomes Closed.
2. Use tags for quick browsing
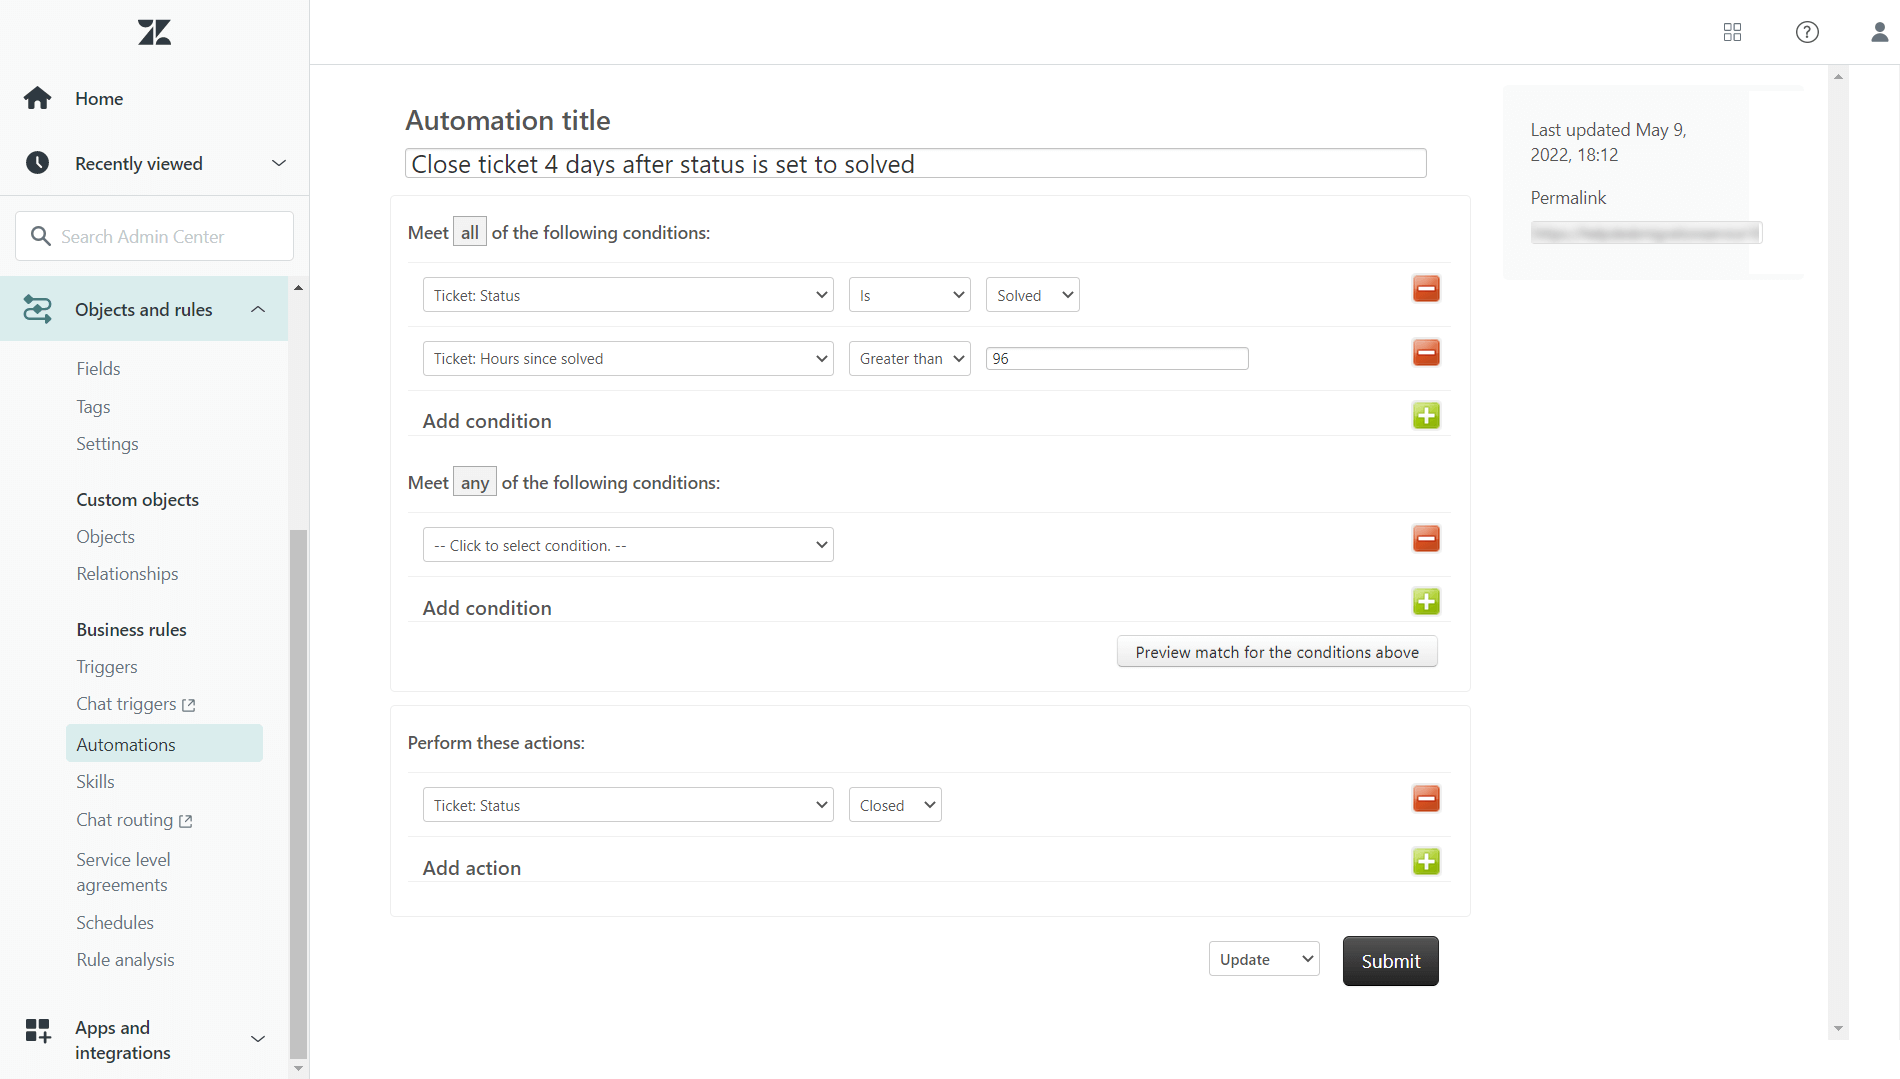
This tip is simple yet very helpful for an organized ticket assignment and storage. In Zendesk, it is possible to add words or combinations of words to create so-called Tags. Thus, you can automatically assign tickets to specific departments, for example. In addition, you can distinguish which type of services or products in your company cause the most issues.
Later, it will be convenient to search even occasional emails or messages according to the Tags connected to them, filter tickets, and have an additional source for reporting.
By the way, also write tags on the customer details tab so that they will be added to tickets requested by this customer.
You can even try to create chains of Tags so that you have unlimited flexibility for managing and customizing your customer support operations. Or, you can utilize Tags with external services to deal with customer requests in unusual Zendesk ways.
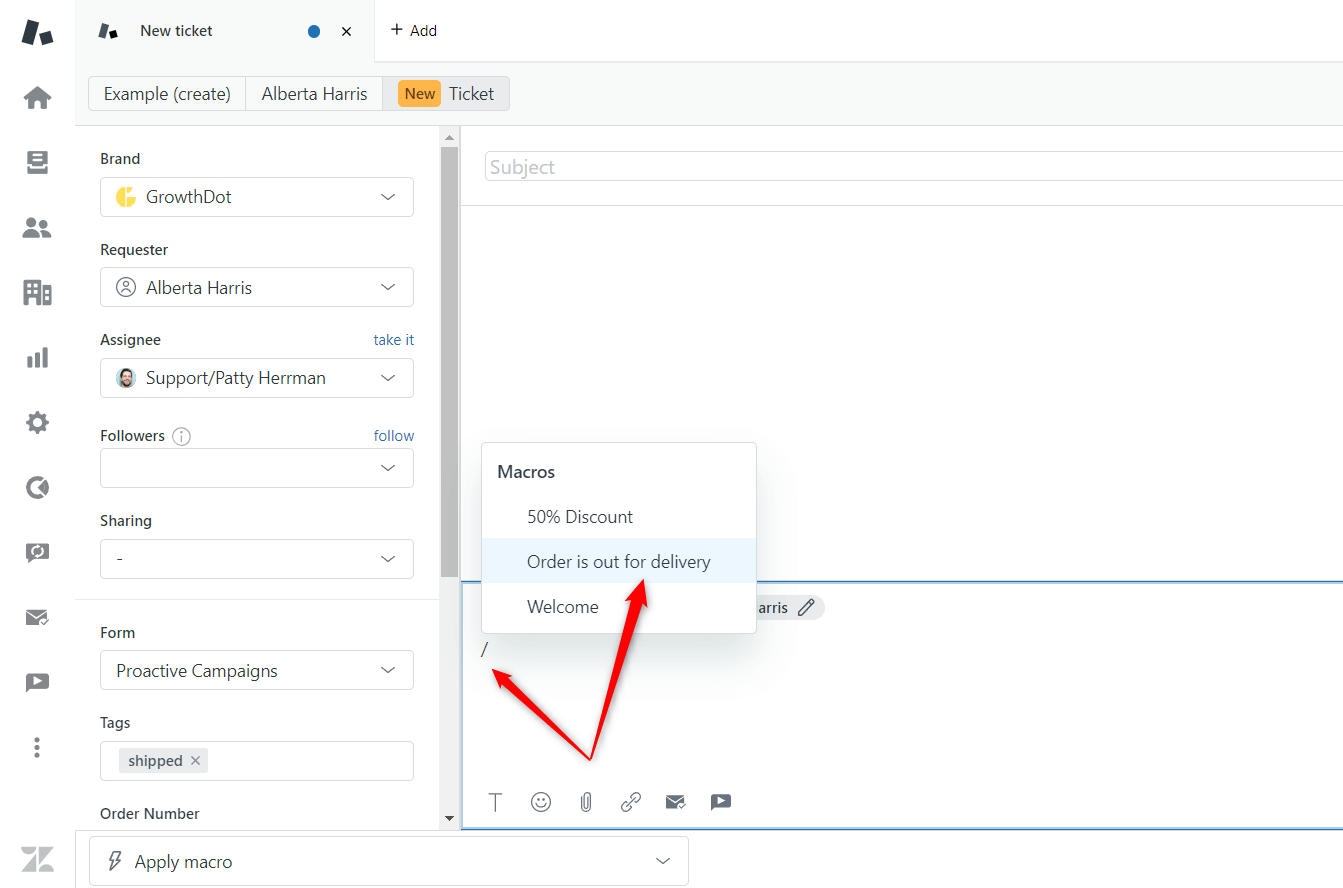
3. Create macros to save agents’ time
Usually, a company with a vast customer base can't prevent its agents from conducting repetitive actions. So, if you're tired of making repeated steps over and over, then Macros will become another life-saver for you. They also aim to make part of the workflow hands-off for advanced users. However, they are different from triggers and automation.
Their main principle is to conduct actions automatically, only without any conditions. It means that agents can set up specific actions (e.g., updating ticket properties, replying to tickets, sending canned responses, etc.). And then only activate them when needed manually. This way, they don't have to make a chain of actions every time.
With macros, you can also record tickets so that you don't need to fill in fields with the same information each time.
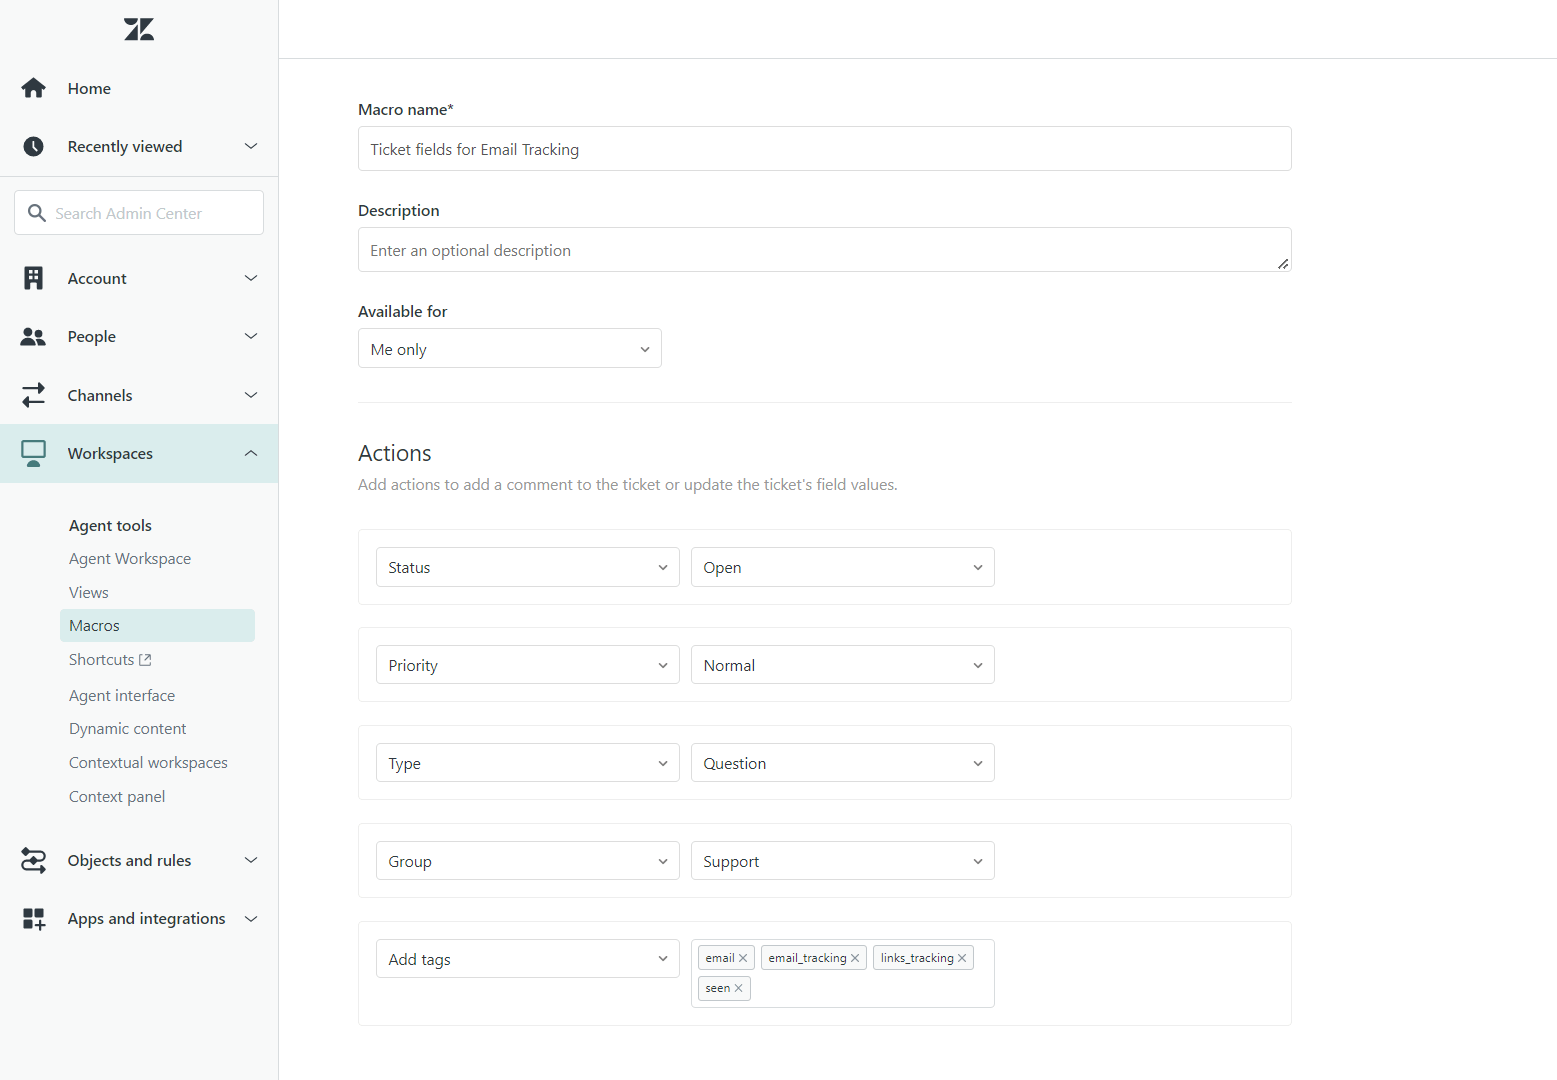
What about other great Macros possibilities? They include the ability to:
- Send customers answers with a template message instead of writing it from scratch every time;
- Automatically change ticket status, for example, to Resolved;
- Add or remove tags;
- Modify form values;
- Re-assign or escalate tickets;
- and many more!
Although, be sure to use the right amount of Macros in your workflow, scaling their usage and complexity as your customer experiences grow.
4. Use shortcuts in Zendesk
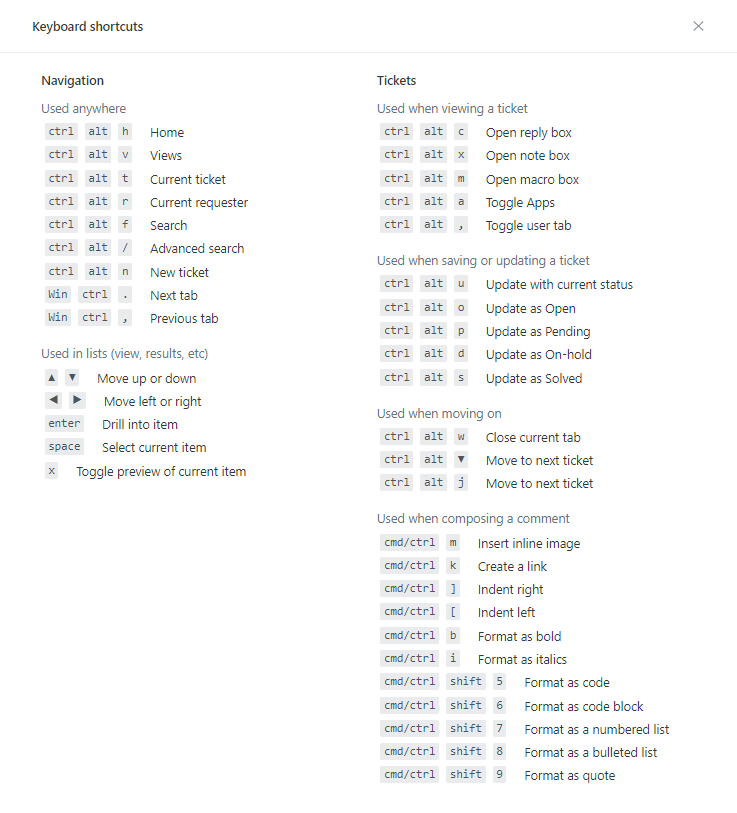
Consistent customer service takes a lot of time and human resources. However, shortcuts are handy for any customer service software and become time savers for agents. But, before enjoying all the benefits of hotkeys, you need to activate the option in profile settings. You can open the general view of all shortcuts by clicking the profile icon.
So, one of the most underestimated Zendesk tips can make your everyday workflow faster.
5. Connect ticket updating to Slack integration
Slack is one of those project management tools that is known by most businesses. So, how does Zendesk integrate with Slack? Is this even possible?
For sure, this is one of the easiest Zendesk setup tips. When Zendesk enables you to track, prioritize and solve customer requests, Slack streamlines workflows and provides effective communication across the team.
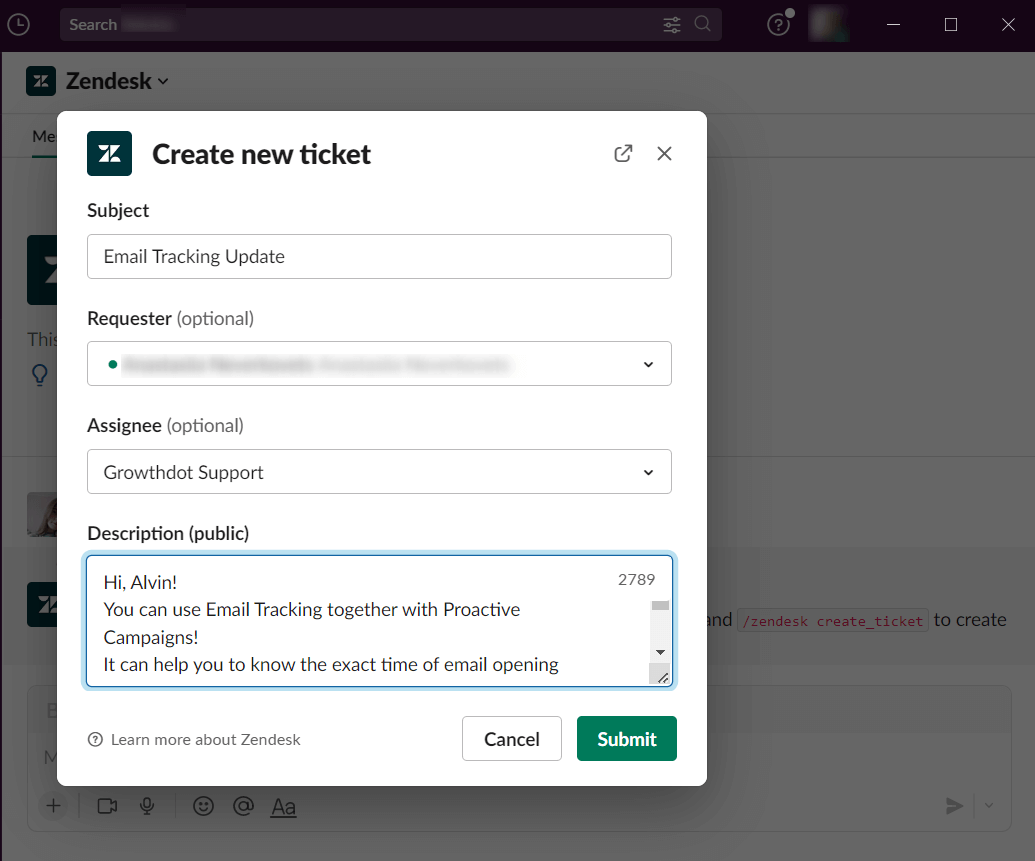
As soon as you connect your Zendesk account to your team’s Slack channels, your co-workers will no longer have to switch between applications constantly. So now, new ticket raises and updates will notify a required staff member directly from Slack.
Moreover, your support team will also be able to create tickets themselves and add internal notes within the Slack messaging system. Thus, you will always keep your support agents coordinated and focused on working faster!
6. Set automated reminders for customer issues
Another example of automations and one more of Zendesk hacks are reminders. There are a lot of situations when agents can forget to close some of the tickets. For instance, they wait for an update from a customer or another teammate before they can close the ticket. Then, to jog their memory, you can set up custom reminders that will fire after a certain number of days and enable the employees to remember the ticket is there.
Of course, you can additionally customize the required number of days that must pass before the reminder has to fire. However, the most important thing when using automated reminders you can make sure that not a single customer request slips away from your team. And this is a huge advantage.
7. Add internal notes for customer context
Zendesk internal notes is an extremely important feature for agents. However, not every Zendesk user takes advantage of them.
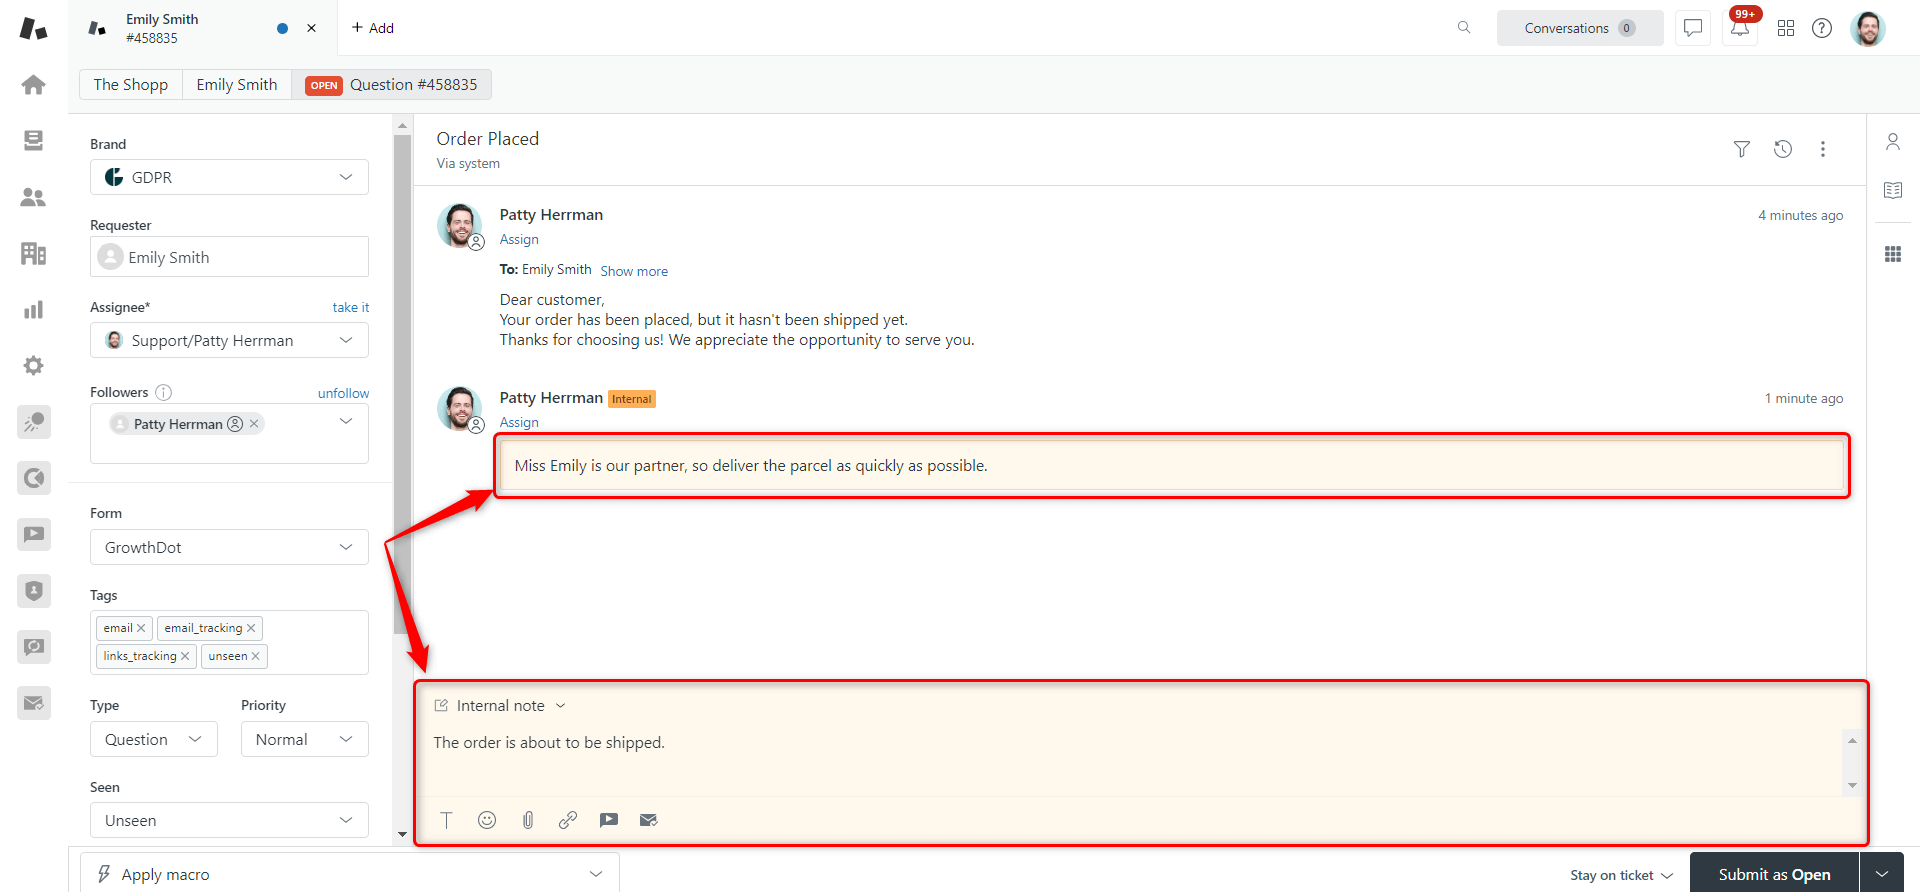
They enable managing customer requests effectively when you’re throwing them through many different support reps. When agents need to pass their tickets to another team member leaving Internal Notes can provide them with customer context or any other additional info about the case. This way, you will facilitate your information sharing.
An internal note will never be an unnecessary update as you will supply your teammates with helpful context on the case. In addition, you will communicate with them over the issue without making your customers read a cluttered conversation. So, it’s better to consider using this Zendesk feature if you still haven’t.
Send internal notes in bulk
Your support team has likely faced similar issues that were reported by multiple customers. They’ve also probably had to manually copy and paste the same information into private comments across numerous tickets or perform updates via the API. Since this process is time-consuming and increases the risk of errors, bulk internal notes are a game-changer.
This feature is especially beneficial when some common updates or announcements must be applied to many tickets simultaneously, such as service interruptions, policy changes, or routine status updates.
With the email automations in the Proactive Campaigns, you will be able to reduce the workload of the support agents, especially during high-volume periods, by automatically sending internal notes in bulk to improve team efficiency.
8. Link problems to incidents to streamline issues
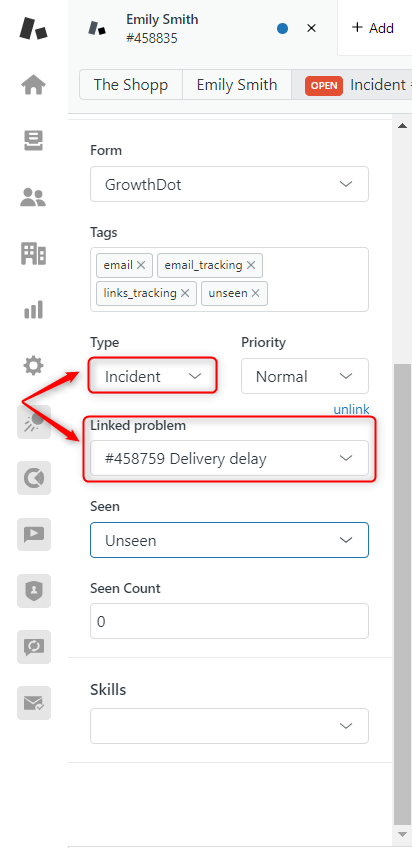
Sometimes, agents need to solve complex customer service issues. Therefore, there might be situations when one problem's appearance causes many incidents. Then, your support team will receive a constant flow of similar customer requests. You can link all these requests under one related problem ticket and simultaneously send updates about the resolution info. Also, you can simply close the tickets altogether when the issue is solved.
This option provides better customer access since you can find any customer through the linked problem. For example, when huge problems with your mobile app come up, many customers will raise tickets due to this topic. As soon as your agents can figure out the approximate resolution time, workarounds, and else, they will be able to send out messages even to thousands of customers at one time.
9. Use placeholders for dynamic info
More and more businesses tend to use automated messages, and placeholders become incredibly helpful in this case. So, how do placeholders work?
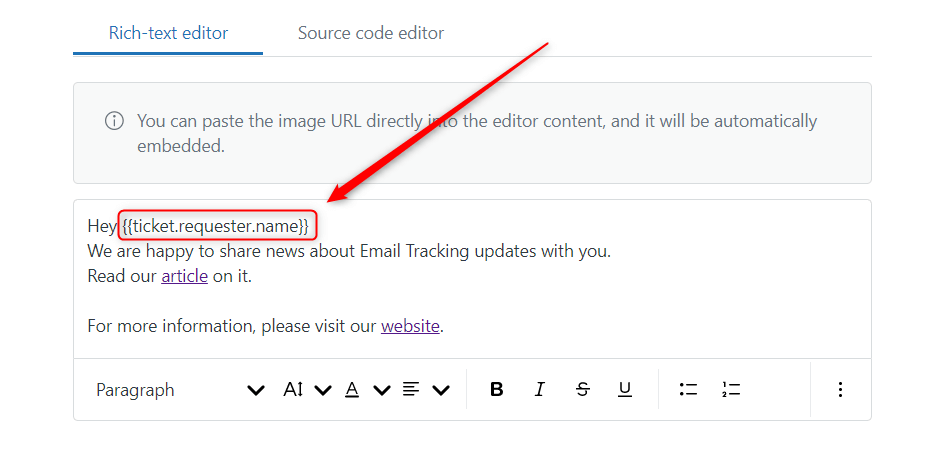
Placeholders (or Liquid markups) are shortcodes that are automatically substituted with required information depending on the customer's individual information. They are widely used in tickets, triggers, and macros to make them more personalized regarding customers.
For instance, you need to notify your customers of an upcoming event, server outages, or whatever else that demands sending mass emails. You also want a ticket requester to see their names instead of being addressed with starting phrases. So, the most helpful placeholder is {{ticket.requester.name}}. Every customer will see their full name in received messages if tickets contain this liquid markup.
As placeholders are vital when talking about message automations, we should tell you the way that allows sending mass emails from Zendesk Support. The Proactive Campaigns integration helps agents create and run email campaigns just in a few clicks. So, you can reach more than 500 customers simultaneously. Moreover, it supports placeholder inserting and allows you to create liquid markups using custom fields in Zendesk. You can watch the related video to find out how placeholders can be used in our app.
10. Organize tickets on the Views page by attributes
The easiest way to organize your tickets in Zendesk is by using Views. They operate different criteria to group tickets depending on your work style and preferences. For example, you can create a view for tickets that get Open status, or you may sort tickets by their Priority and add a view with only urgent tickets.
This way, views help decide what customers' queries need your attention, giving you quick access to them.
Besides, it's also convenient to utilize views if you need to restrict view access to some agents or groups. For instance, agents can create an 'Assigned to me' ticket view, and other agents won't be able to see it.
Another example of ticket organizing is gathering tickets from different channels. All you need to do is choose a criteria, 'Channel,' add the condition 'is,' and select from which channel the customer's requests will come to this view.
As a result, you will get a well-organized ticket queue that reflects your needs.
11. Analyze customer satisfaction metrics
Companies of any size try to find the best way to get more valuable information about their products and services. So, it becomes difficult to view the complete picture of your business without conducting Customer Satisfaction surveys.
Fortunately, Zendesk provides an excellent opportunity for its clients to have CSAT surveys. As a result, companies can know whether customers love their service, what needs improvement, and so on.
To get started with getting feedback in Zendesk, you need to turn on such an option. Besides, the platform offers an 'Ask a follow-up question after a bad rating' feature to be more precise about your agent's work. So, you can collect feedback and monitor your co-workers' performance regarding support quality. The only disadvantage you can face is that users who have a Professional plan or higher are available to use it.
If you're looking to expand your feedback collection even further, consider using the NPS and Survey app. This app is specifically designed to measure not just immediate customer satisfaction but also long-term loyalty through Net Promoter Score (NPS) surveys. With different survey types and automated triggers, you can send surveys at different stages of the customer journey. The app also provides detailed analytics and reports, giving you a comprehensive view of how your customers perceive your service over time.
12. Share ticket details with CCs, Followers, and @mentions
Another simple but essential Zendesk feature allows other agents to see your ticket workflow. It might be helpful when, for example, the issue you are working on requires the advice of another agent from a different department.
So there are three ways to add other agents that can follow your tickets.
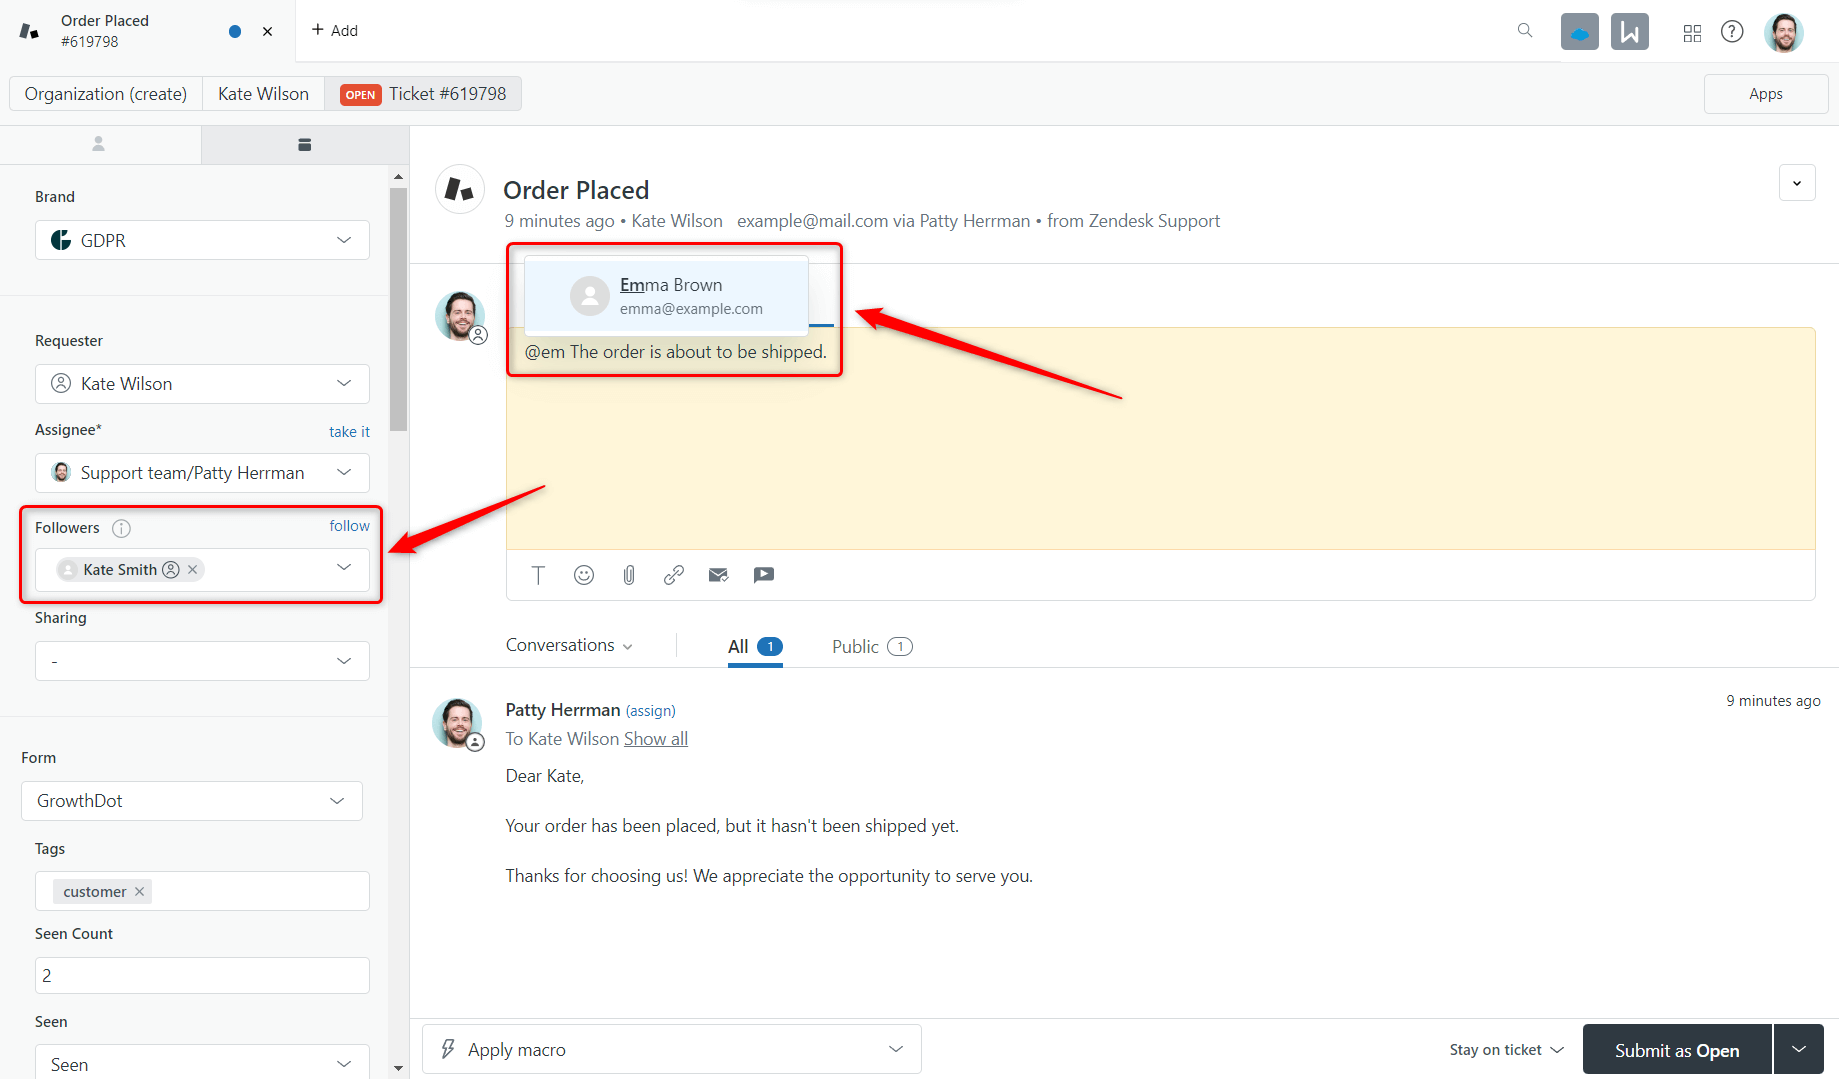
- CCs (Copied user). The unicity of CCs is that agents can add internal (agents, admins) and external users (customers) who will get ticket updates notifications.
- Followers. This feature enables agents with different access levels to interact with tickets they follow.
- @mentions. It is a notable feature that is widely used in social media channels. You can mention other agents in your tickets when sending internal notes.
13. Enhance your Zendesk with integrations
One more tip that will make your life easier is installing Zendesk integrations. Many modern tools (both free and paid) available on the Zendesk Marketplace can meet almost any of your requirements. These integrations allow your Zendesk instance to connect with other platforms like online shops, project management tools, delivery systems, and more, significantly expanding its functionality.
For example, if you need to handle sensitive customer data, the GDPR Compliance app is an excellent solution. This app lets you delete or anonymize customer data in bulk from Zendesk Support, ensuring that you stay compliant with privacy regulations while freeing up valuable storage. The app also provides features like bulk attachment redaction and ticket management, making it an essential tool for maintaining both data security and efficient workflows.
By the way, all our applications integrate with Zendesk, so you can find at least one that will extend the platform opportunity at reasonable costs.
So, don't miss the chance to level up your Zendesk and make the most of its usage.
14. Use skill-based ticket routing
Skill-based routing is a method for directing incoming customer requests to the most appropriate support agent or team. This means that tickets are assigned based on the specific skills required for handling each request, as well as the expertise or availability of the support representatives or groups during the routing process.
To set up skill-based routing, follow these steps:
- First, you determine the main criteria for assigning incoming tickets to your support team.
- Second, select ticket attributes that set them apart from each other.
- Third, combine these two factors and develop an SBR strategy for your company.
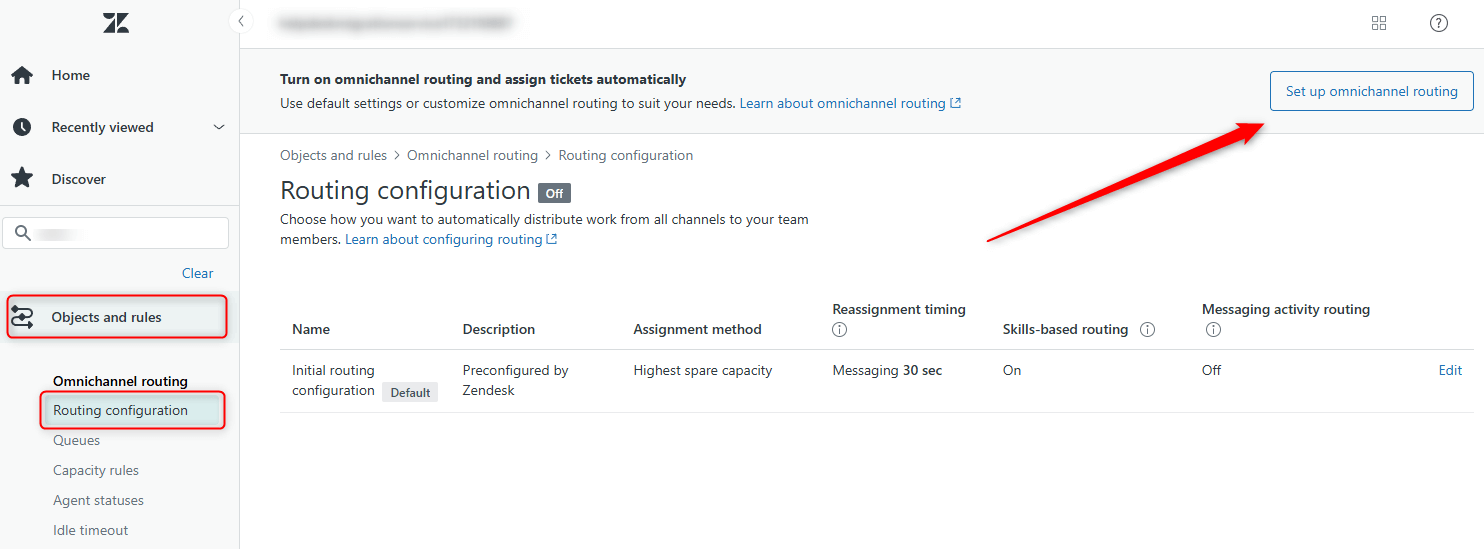
- Lastly, set up routing in Zendesk itself. Start with Objects and Rules - > Omnichannel routing -> Routing configuration -> click on Set up Omnichannel routing.
The bottom line
These were top tips on how to use Zendesk customer support software at the max level. The Zendesk tips list is much wider than it is, but if you feel that is not enough for you, we would be happy to teach you. Our Growthdot team is a certificated Zendesk partner that provides Zendesk Consulting and Training.
Don’t hesitate to try our Zendesk applications, as you will definitely feel the change in workflow effectiveness and customer satisfaction. And if you’re already using some of them, great of you! Maybe you could share more useful Zendesk tips and tricks with us!
