Timely and efficient customer service is one of the critical components of any successful business. We’re in an age where customer experience is just as necessary as the product you provide. So, staying on top of your communication game is a must. And to make your customer support service, there is a tool called Email Tracking for Zendesk.
Despite the popularity of social channels and live chat, email remains one of the most common ways of talking to a company. In this article, we’re going to cover ways Email Tracking can help you better communicate with your customers. Besides, we will tell you how to implement Email Tracking app if you’re using Zendesk.
Let’s get started!
What Is Email Tracking and How Does It Work?
Email tracking is a method for monitoring whether or not the intended recipient has opened your email. Indeed, it is not new. Sales and marketing teams have used it for ages to track, assess, and improve customer communication.
The way it works is that email tracking software inserts a unique, transparent image into every email you send. The image is usually a 1×1 pixel. It's invisible to the recipient and doesn't affect how an email looks. When the recipient opens your message, the pixel records the time and date the email has been opened and sends you a notification.
Why should customer support teams consider email tracking?
Reason 1: To save time.
Imagine you want to send follow-up campaigns to your leads and customers. But why waste the sales or support team's precious efforts if recipients haven't even opened the message? Having an email tracking app under your belt will save you a lot of time on unnecessary follow-ups.
Reason 2: To get more context.
Knowing which emails have higher open rates helps you understand what your customers are thinking. You can know exactly when a more appropriate time to send a follow-up email is, see what types of replies make people engage, what macros work better, and analyze individual and overall open rates. Afterward, this insight will help you increase your outreach and nurture your specific relationships, whether with leads, prospects, customers, or potential partners.
Reason 3: To get more insight.
You have much more information about the customer when using Zendesk (or other help desk software). It can include professional history, details about their company, their X feed, other social profiles, your email history, and any other information they share with you. Using an email tracking app to complement a help desk tool will significantly increase your chances of succeeding in email sales or marketing.
How to track emails if you’re using Zendesk
Unfortunately, with Zendesk Support, there are no options that allow tracking email opens out of the box. However, you can install an add-on, like our Email Tracking, to fill that gap.
Email Tracking provides:
- Valuable information about your contact’s engagement with your emails.
- Observe the stats and learn what works for certain clients and what doesn’t.
- See the difference between sent and opened emails.
- Check the average time it took to open after an agent sent a message.
- Get a complete picture of your email campaign result. Isn’t it great?
Besides, another feature that can attract your attention is Link Tracking. The option works similarly to email tracking, letting agents see which links they sent were clicked by recipients.
So, without further ado, let’s look closely at how you may use Email Tracking to stay on top of all customer conversations.
Tracking email openings
With Email Tracking, you can see the full history of email opens and follow how and when your customers opened the ticket. Moreover, analyze which reply triggered a customer to read emails.
How it works: the app creates an internal note with the exact time and date to confirm that the email has been successfully delivered to its destination. You get a notification for each email opening. These read receipts are possible to switch off on the app's settings. Just go to the Settings tab and toggle off the Enable PUSH Notifications to start or stop receiving alerts.

Plan activities
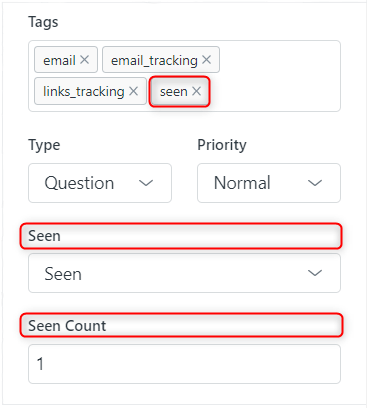
Email Tracking for Zendesk creates an internal custom field and automatically updates it when the client opens the emails. For example, depending on the ticket opening, the Seen field is filled with Seen and Unseen values. In addition, the Senn Count calculates and depicts the number of times a ticket requester has read the email.
However, the app also adds 'unseen' and 'seen' tags to tickets, allowing you to create ticket views and filter for problem tickets. It's a significant feature, as you will avoid missing emails from customers, ensure that every single email communication is addressed, and resolve every issue.
Track followed Links
Although Email Tracking users get the opportunity to see customers' interaction with Zendesk tickets, they still wonder about the links they send out. 'Were they followed or not?', 'Are customers interested in links we send them?' - agents widely ask such questions. So, Link Tracking helps get answers to them.
How it works: when an agent is preparing a ticket to send off and insert a URL, he must checkmark this link as required to be tracked. Then, after a customer reads this email and follows a link, the app sends the agent an internal note. As you see, the principal is the same as in the email tracking option. In addition, the read receipt contains information about the link's sending and opening time.
You also can disable these internal notifications from the Settings page.
![]()
Track openings accurately
The app seamlessly blacklists agents to prevent them from accidentally creating a read receipt. So you will know for a fact that email opens are tracked correctly. However, you still have the opportunity to manage (add and delete) IP addresses when working with agents at a client’s site.
Control who can use the add-on
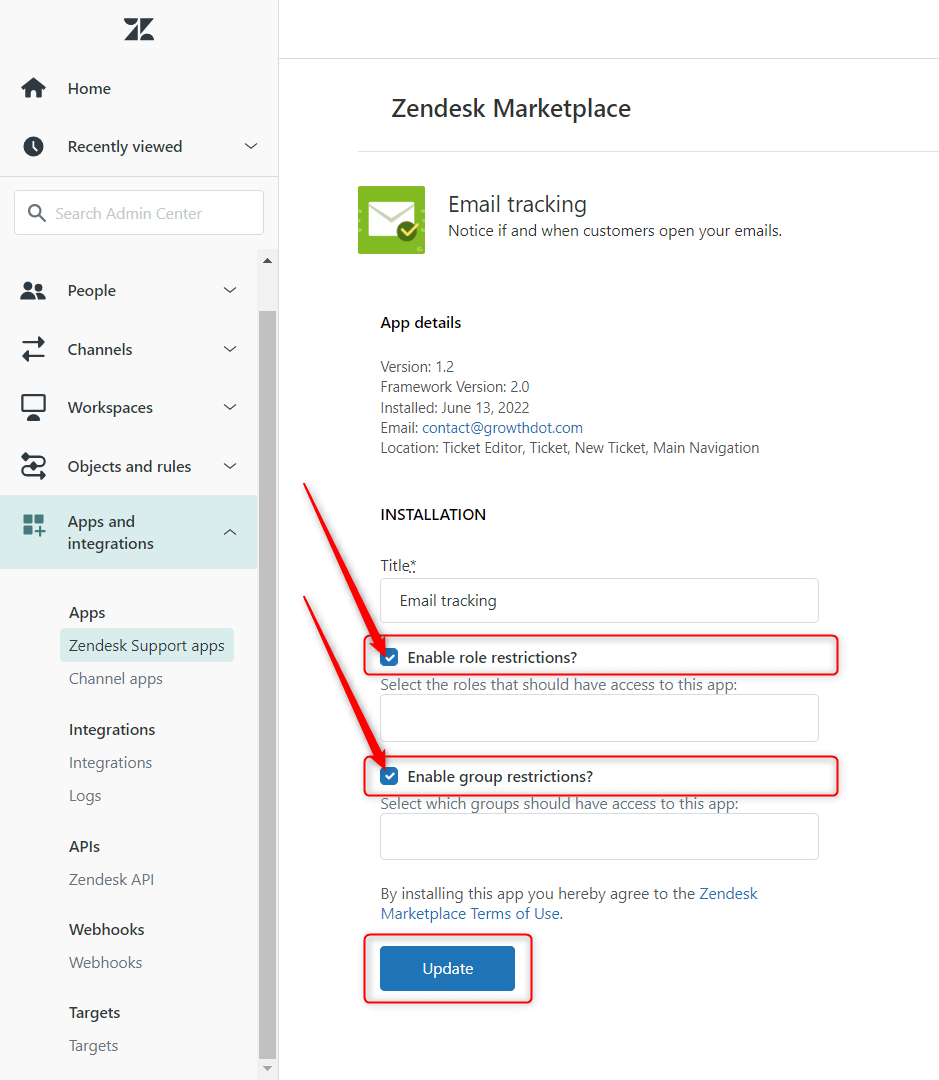
You can limit access to the Email Tracking app like you set default settings in Zendesk. For example, to restrict access for specific roles or define the groups who should have access to the Email Tracking app, go to the Admin Center -> Apps and integrations -> Zendesk Support apps. Then, hover over the cursor in the apps' icon, click on the arrow icon, and select Change settings from the dropdown menu.
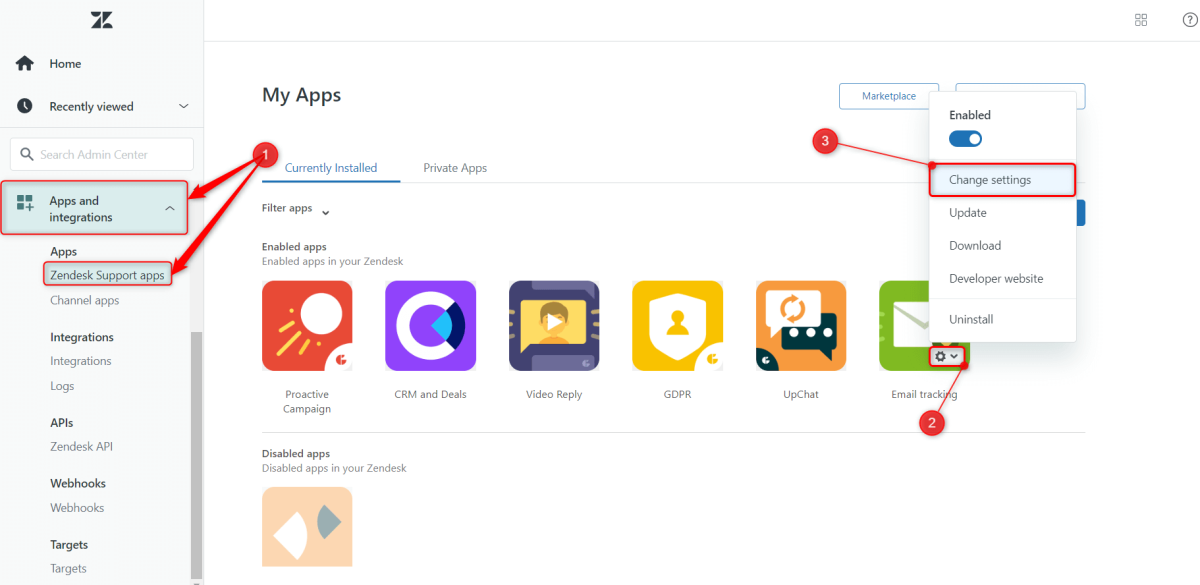
Next, check the Enable role restrictions and Enable group restrictions options.
Stay GDPR and CCPA compliant
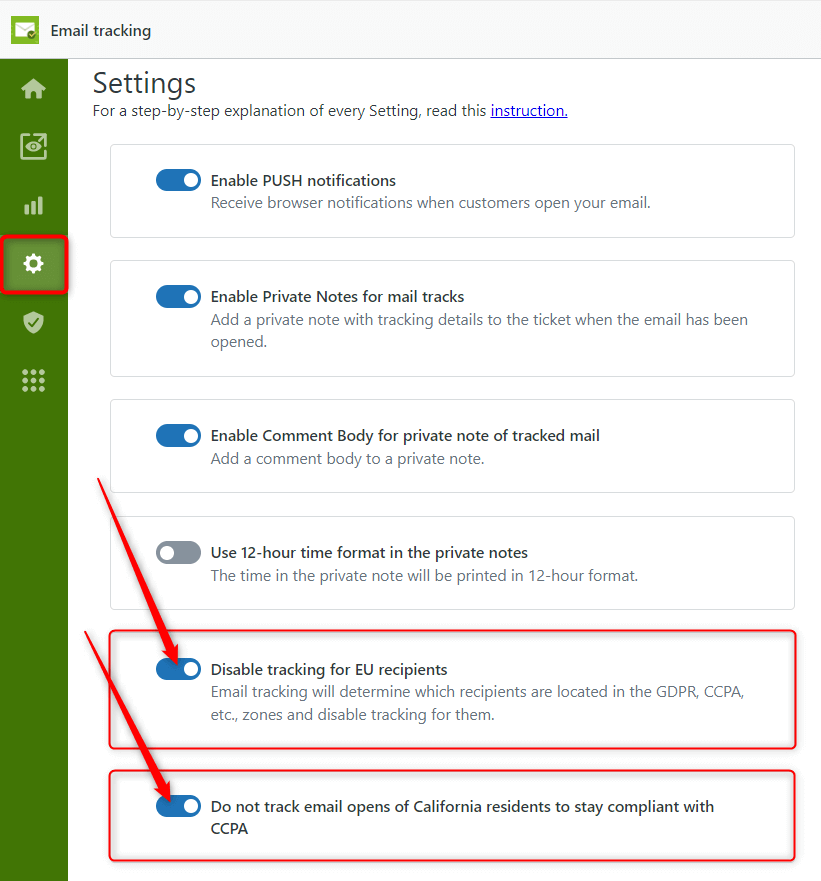
If you’re partially working with EU or Californian recipients, you still can use Email Tracking without violating the norms or GDPR and CCPA regulations. According to them, the users have the right to know what data is to be collected, can demand it deleted, and opt out of further data sales to third parties.
You also must have your users’ informed consent prior to the initial tracking, and this consent must be withdrawable.However, with Email Tracking, you can leave all these concerns behind. All you need to do is just click the corresponding toggles, and the app will stop tracking email opens for recipients under GDPR and CCPA regulations.
Analyze the performance
The Email Tracking app also offers transparent reporting options for emails and links. Here you can see how many emails and links were sent and opened. Then, there is the average time from Send to Open status and the average bounce rate percentage. Bounce rates measure the percentage of how often your emails/links get “bounced” back to you. In other words, the email/link cannot reach the intended recipient and gets bounced status.
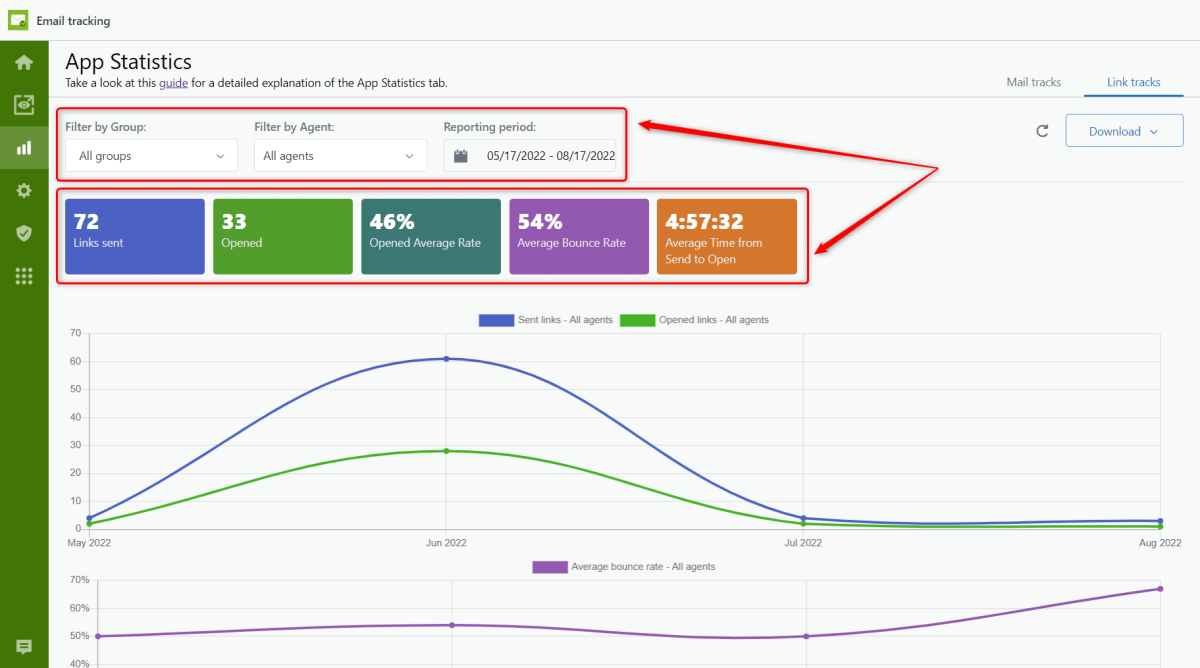
You can view the reporting data for particular agents and time periods. In addition, the charts contain a graphic representation of the insights from the email campaigns we mentioned above for your better understanding.
How much does Email Tracking cost?
The app costs only $2 per agent per month for the LITE Plan and $3 for Pro Plan. However, if you decide to pay yearly, you will get a 20% discount. So, start now and get a free 7-day trial. There are no additional payments or long-term agreements. Subscribe and cancel anytime.
How to install Email Tracking on your Zendesk
You can start tracking your emails in a few simple steps:
- Go to Zendesk Marketplace.
- Click the Install button to place Email Tracking on your Zendesk Support account.
- Select the Zendesk instance to install Email Tracking. Then, sign in and provide access to your account.
- Refresh your tab where Zendesk is opened.
- Go to the app menu, enable/disable the necessary settings, and start seamlessly tracking your email openings.
And just like that, you are ready to start out with the best email tracker for Zendesk Support.
Wrap Up
With the Email tracking app, learn how well your campaigns perform and why at any time. Consequently, you can immediately change your strategy or improve your tactics for better results. The advantages of email tracking are vital if you want to outrun your competitors.
Marketing, sales, and customer support teams can also address customer needs better and build meaningful business relationships in the long run.
Email Tracking does the entire job for you! So what's left for you is to observe and enjoy it!
Frequently Asked Questions (FAQ)
Is Email Tracking for Zendesk built into Zendesk Support?
No. Zendesk Support does not offer native email open tracking. Install a third-party add-on such as Email Tracking for Zendesk from the Zendesk Marketplace to track email opens and link clicks.
Can customers see that their emails are being tracked?
No. The tracking pixel is tiny (1×1 pixel) and invisible, and it does not change the appearance or content of the email. Customers will not see any visual indication that tracking is enabled.
Does Email Tracking notify agents when an email is opened?
Yes. When a customer opens an email, the app creates an internal note in the Zendesk ticket with the exact date and time. Agents can also enable or disable push notifications from the app settings.
Can I track how many times an email was opened?
Yes. Email Tracking for Zendesk records how many times an email was opened and stores this information in custom fields and ticket tags, such as Seen, Unseen, and Seen Count.
Does the app support link tracking?
Yes. The app allows agents to track link clicks. When a tracked link is clicked, an internal note is added to the ticket showing when the link was opened.
Will agents accidentally trigger tracking themselves?
No. The app automatically blacklists agent IP addresses to prevent internal opens from being counted. Admins can also add IP addresses manually if needed.
Can I restrict who can use Email Tracking in Zendesk?
Yes. Admins can limit access by role or group using Zendesk app settings. So, only specific teams or agents can use Email Tracking.
Is Email Tracking for Zendesk GDPR and CCPA compliant?
Yes. The app includes built-in controls that let you disable tracking for recipients protected by GDPR or CCPA regulations. Tracking can be turned off with a toggle, helping you stay compliant with data privacy laws.
Can customers opt out of email tracking?
Yes. Since tracking can be disabled per regulation or policy, you can respect customer opt-out requests and informed consent requirements.
Does Email Tracking affect email deliverability?
No. The tracking pixel is lightweight and does not negatively impact email deliverability or email content formatting.
Can I analyze email performance across agents or time periods?
Yes. The app provides reporting and analytics, including:
-
Sent vs. opened emails
-
Average time from send to open
-
Link click statistics
-
Bounce rate percentages
-
Filters by agent and date range
How much does Email Tracking for Zendesk cost?
Email Tracking starts at $2 per agent/month for the Lite plan and $3 per agent/month for the Pro plan. A 7-day free trial is available, and annual billing includes a 20% discount.
How long does it take to install Email Tracking?
Installation takes just a few minutes. After installing from the Zendesk Marketplace and enabling settings, you can start tracking email opens immediately.


