Automatization in Zendesk is essential if you need to save time for agents to perform higher-priority tasks and create a seamless ticket flow without any delays. Growthdot apps can help you with it. Besides, we release new options in the GDPR Compliance for Zendesk from time to time to power up your customer support and unload your employees.
This time, we made the following changes in the GDPR Compliance app, so let’s look at them.
Bulk Retrieval for Zendesk Data
Managing individual data subject requests is already easy with the GDPR Compliance app. But what about when you need to handle dozens at once, or export entire ticket histories for audits or account offboarding?
We’ve launched Bulk Retrieval, a powerful new add-on that allows you to export large volumes of data from Zendesk in just a few clicks.
How does it work?
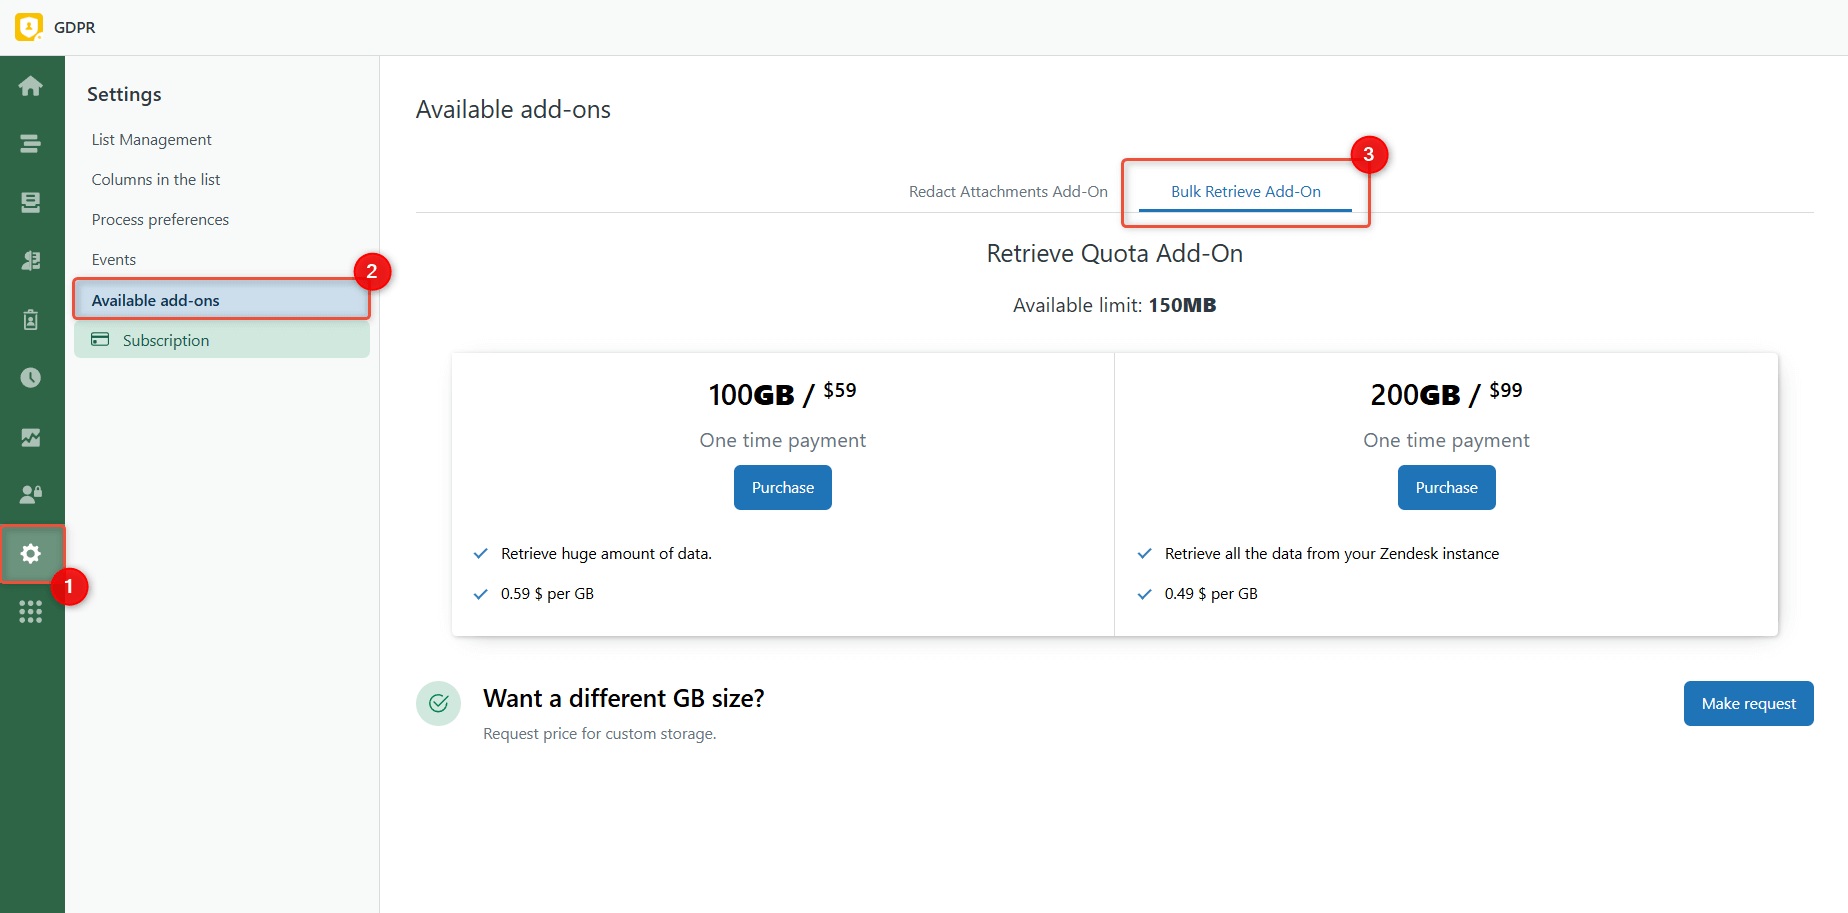
1. Open the app and navigate to Settings > Available add-ons. Select the Bulk Retrieve Add-On to view your available export storage or purchase more if needed.
2. Choose an existing list of users, tickets, or organizations, or create a new one based on your export needs. Launch a new process and select Retrieve Data as the process type.
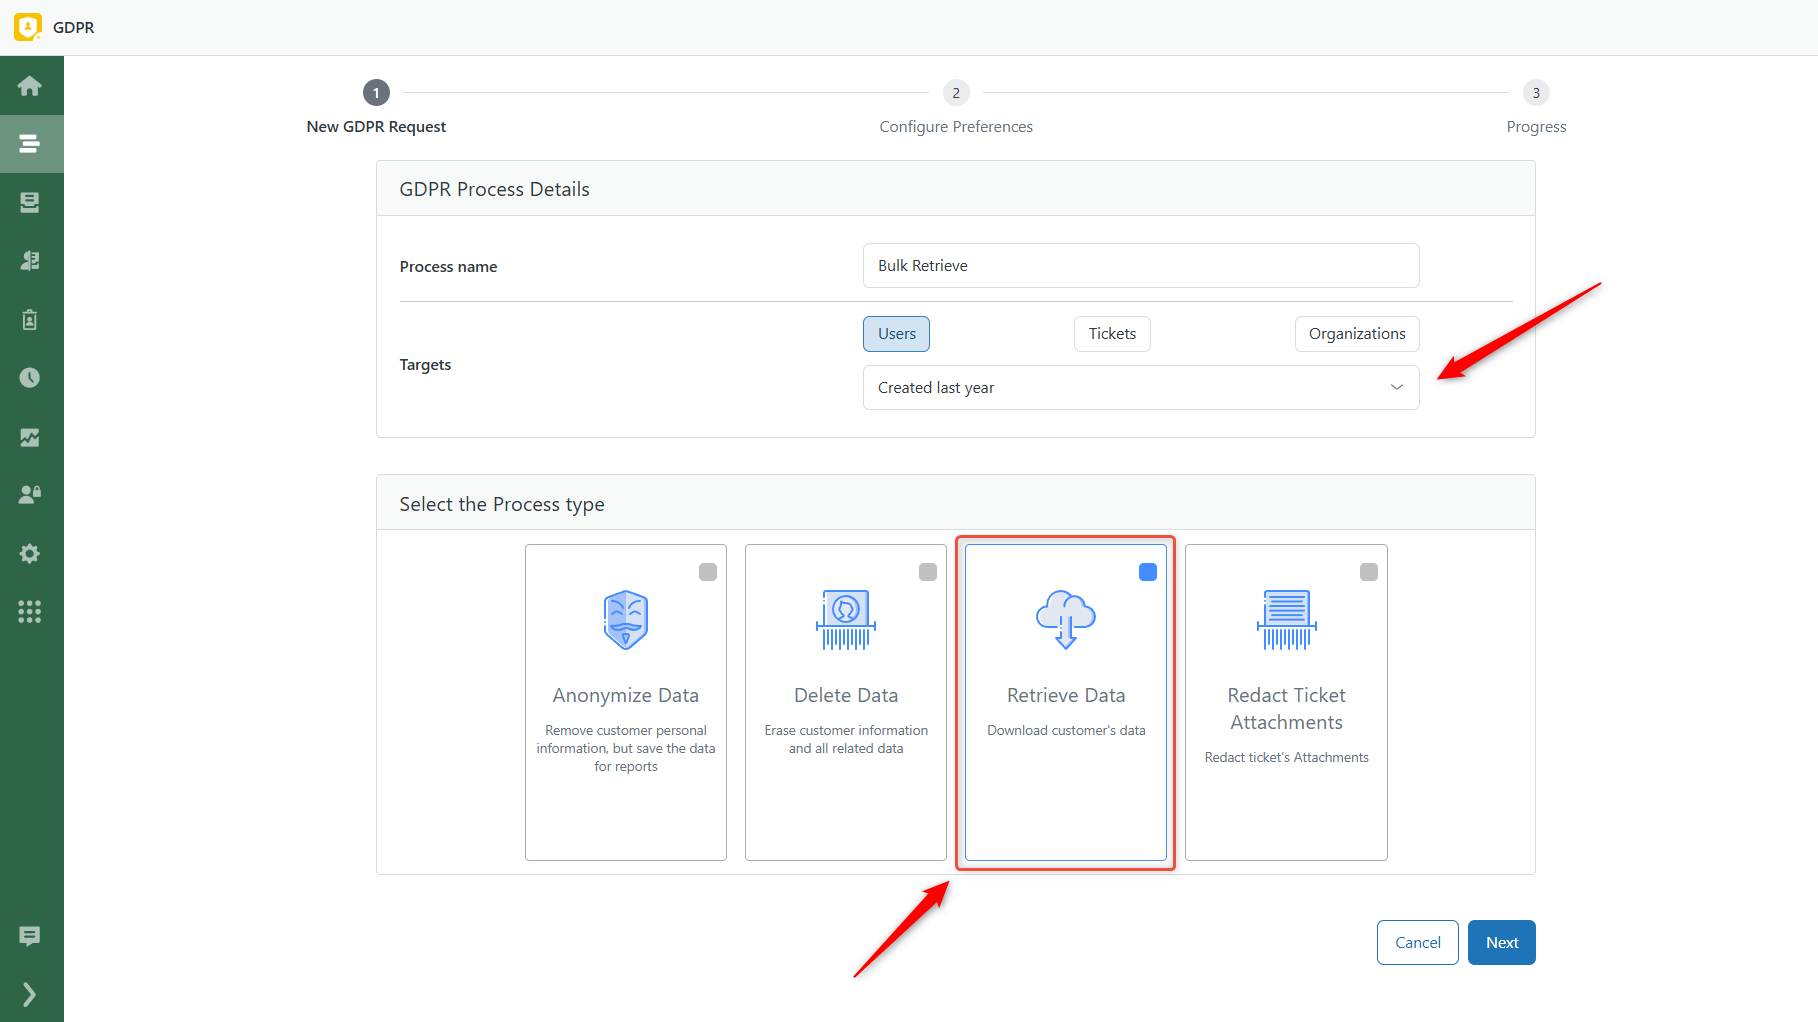
3. Set your process preferences and choose your preferred export format: CSV or HTML.
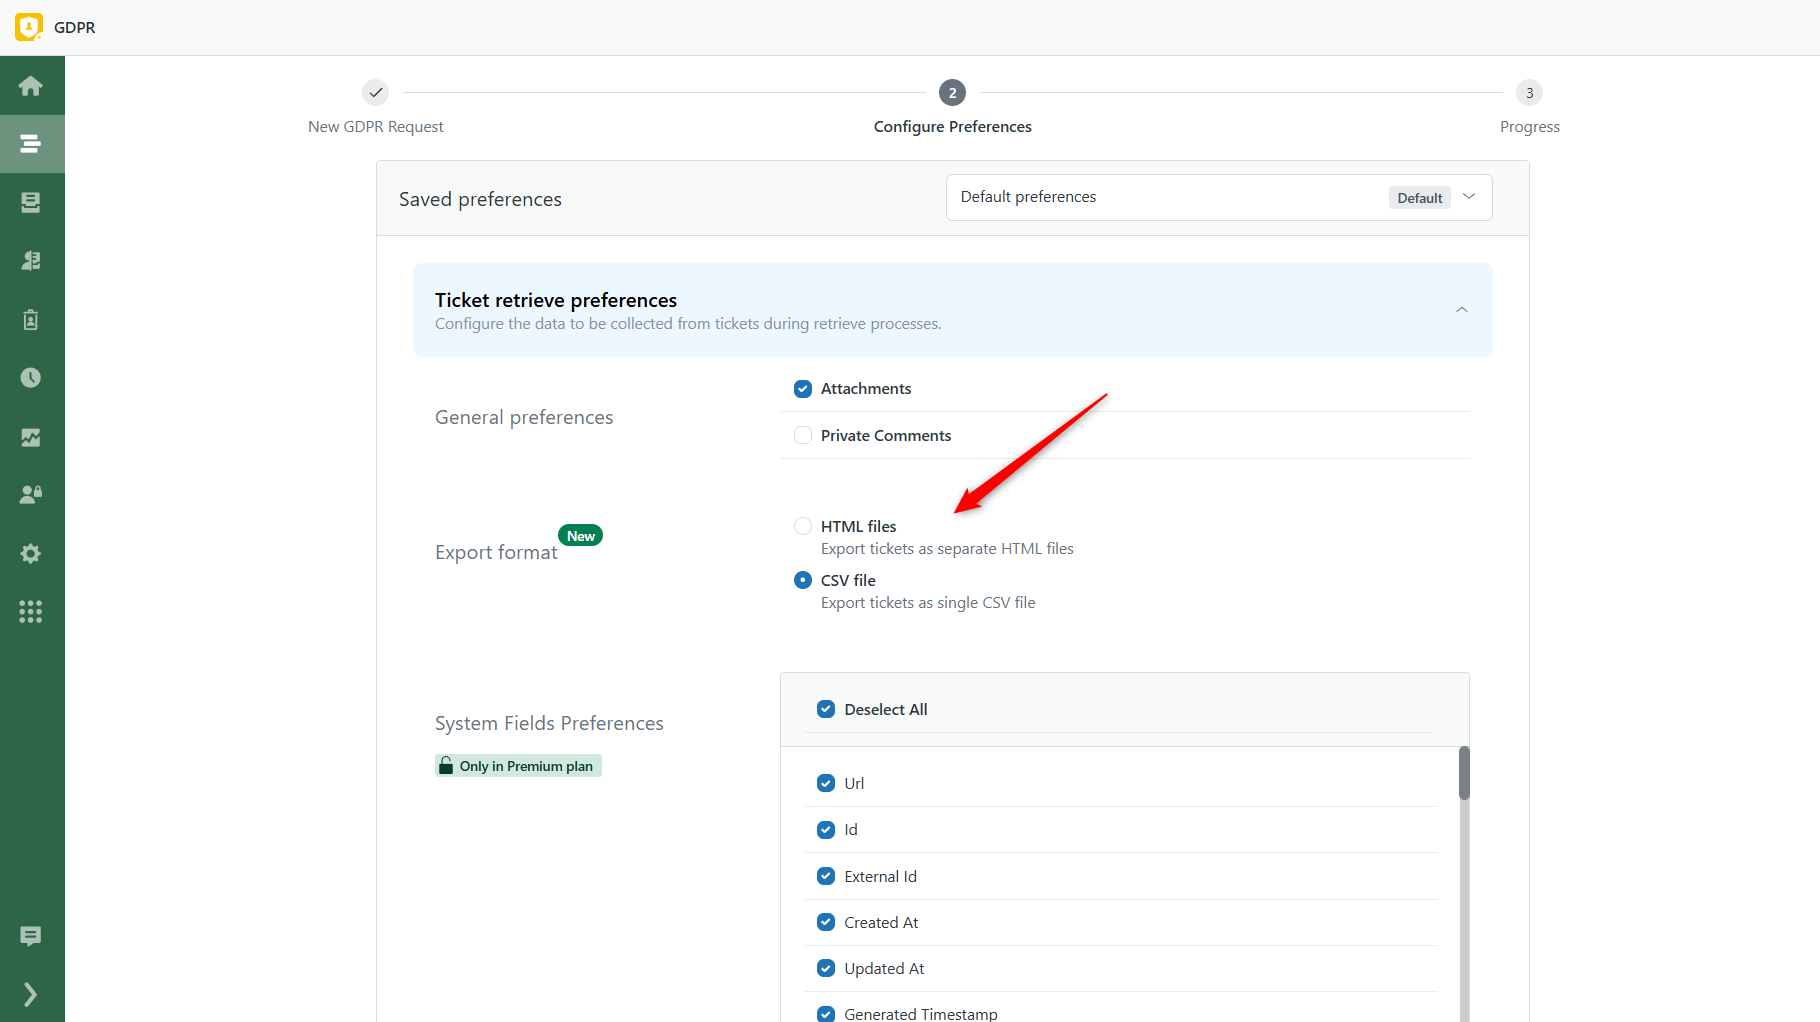
4. Start the process and get all your collected data into a single file.
Reinvented Combined Lists - Automatic and Advanced Creation
If you are an active GDPR user, you have likely heard of or tried our powerful feature for combining lists. But we’ll admit it—until recently, creating these lists wasn’t always the most intuitive experience.
That’s why we completely reworked the flow and introduced a much more streamlined approach. Now, you can create Combined Lists using two improved methods, depending on how simple or specific your needs are:
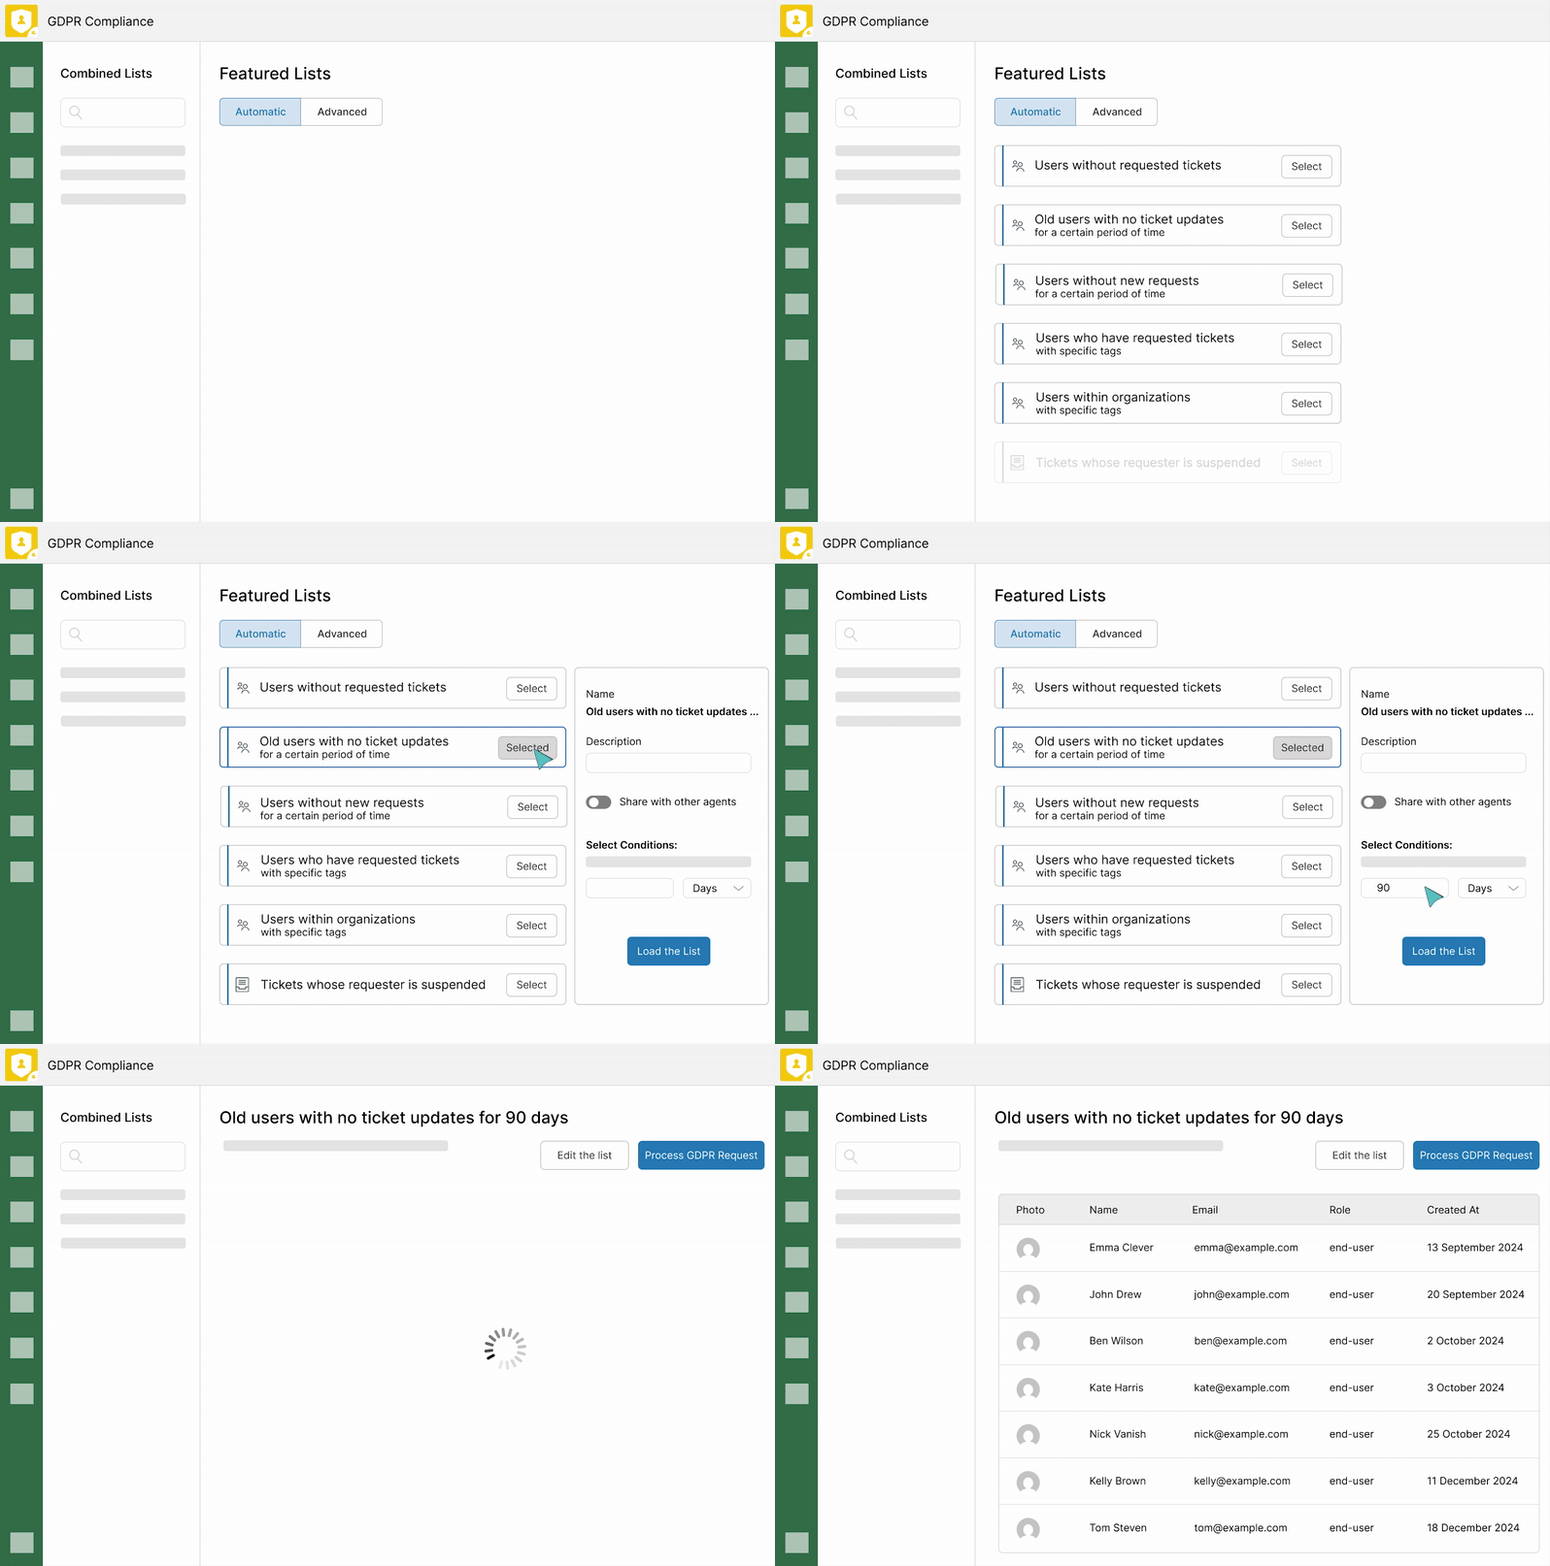
Automatic Method
The easiest way to get started. With pre-made combinations for common scenarios like 'Users without requested tickets' or 'Tickets of suspended users,' you can build your list in seconds—no complex setup required.
Simply select a template, adjust any minor details, such as the time period or tags, if necessary, and then load the list. It’s fast, flexible, and efficient.
Advanced Method
The Advanced method gives you full control to mix and match users, tickets, and organizations based on any criteria, such as dates, tags, custom fields, and more.
Use the 'Include' or 'Exclude' logic to define how different data types should interact. For example, you can easily filter organizations that don’t contain any active users or users who have tickets with specific field values.
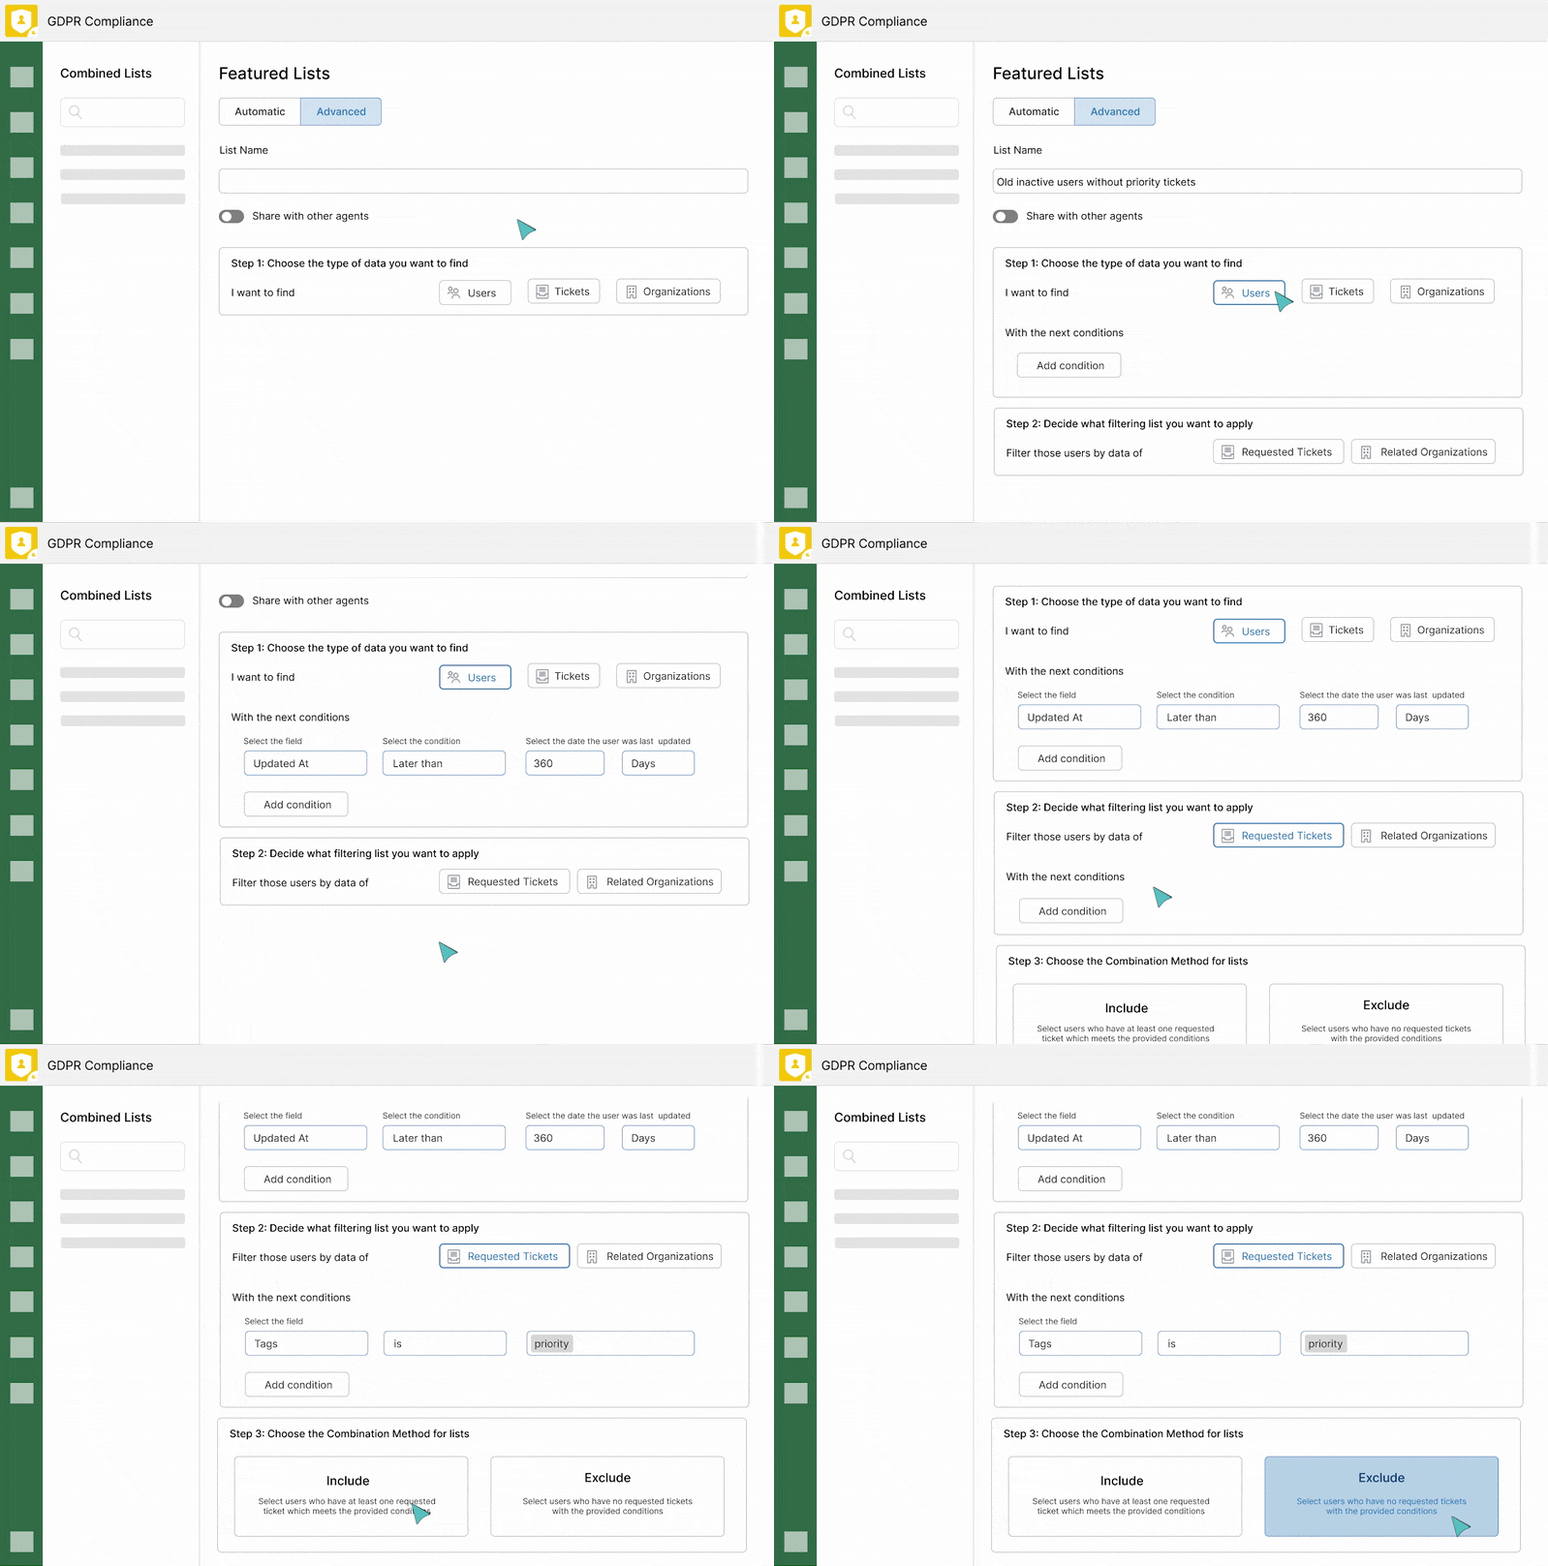
Check out the Combined Lists tab in the GDPR Compliance app to start building your custom lists with the Automatic (available only with the Premium plan) and Advanced methods.
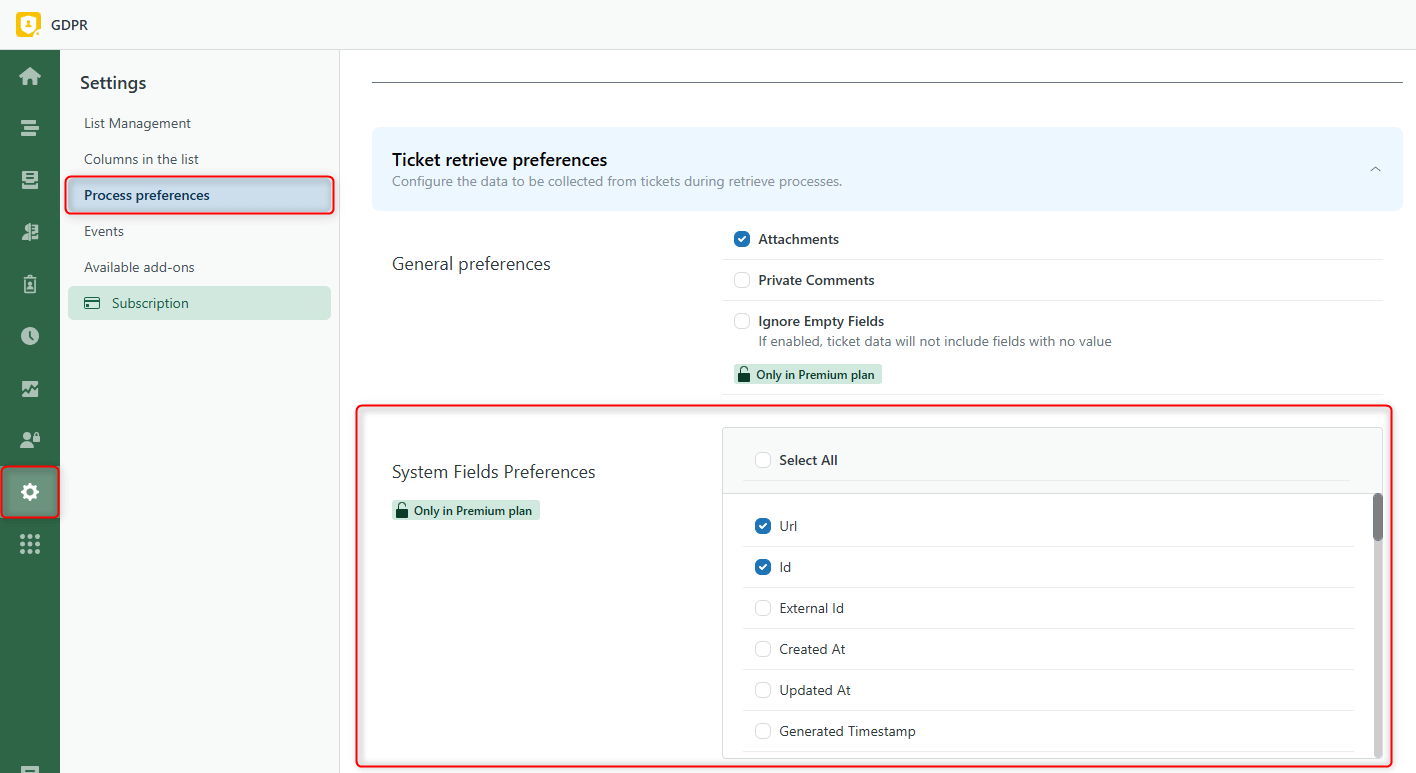
System-generated fields can be removed from the export
When exporting data using the GDPR Compliance app, you may need to skip some system-generated data that couldn't be removed by default previously. We made some changes, so now, you have an option to remove unnecessary system fields from CSV retrieval and checkmark only the needed ones. This update makes your data retrieval process more accurate, allowing you to share only relevant information with your customers.
To adjust the retrieval, go to Settings -> Process preferences -> Retrieve tab -> Create new preset or edit the existing one. Then select the fields you want to be retrieved. The feature is available for Premium plan users.
Flexible Anonymization for User Identities
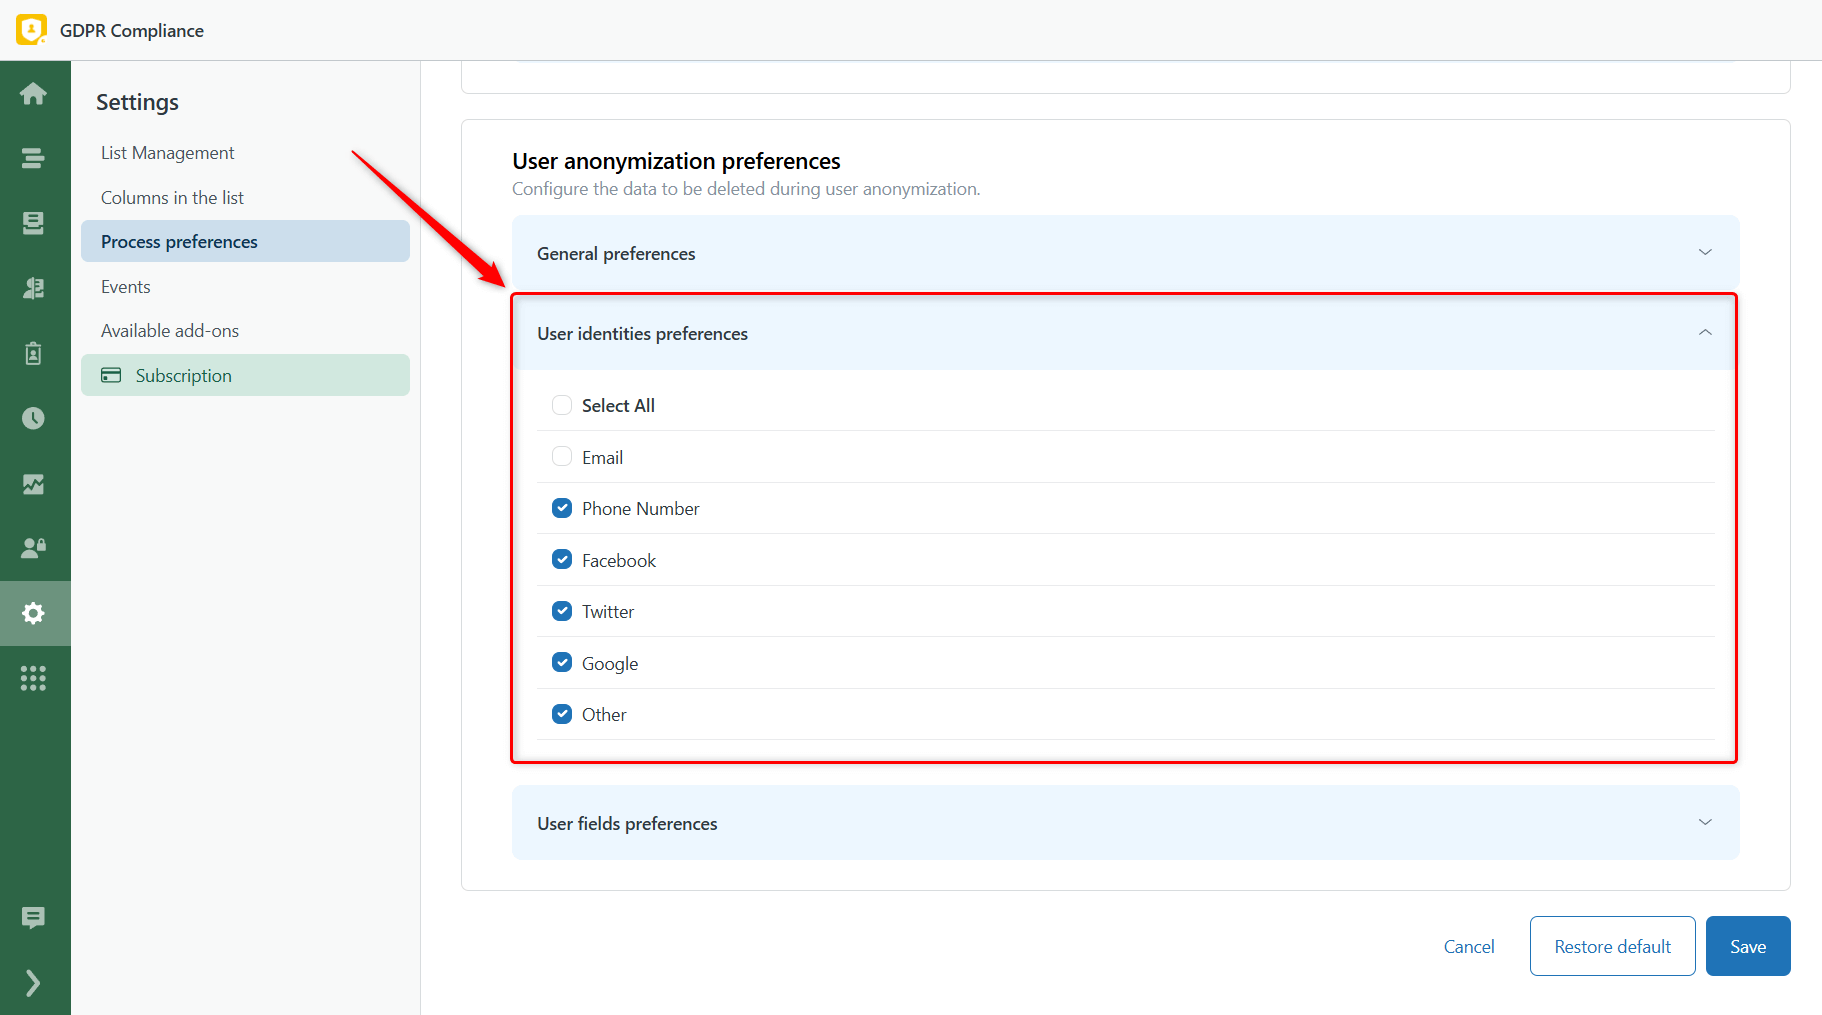
To improve the anonymization process, we've added a new User identities preferences section to the User anonymization preferences. This allows you to choose which identity types, such as email, phone numbers, Facebook, Twitter, Google, and more, to anonymize in user profiles.
For example, if you want to remove all identities except the email, just deselect the email option and keep all other identities selected.
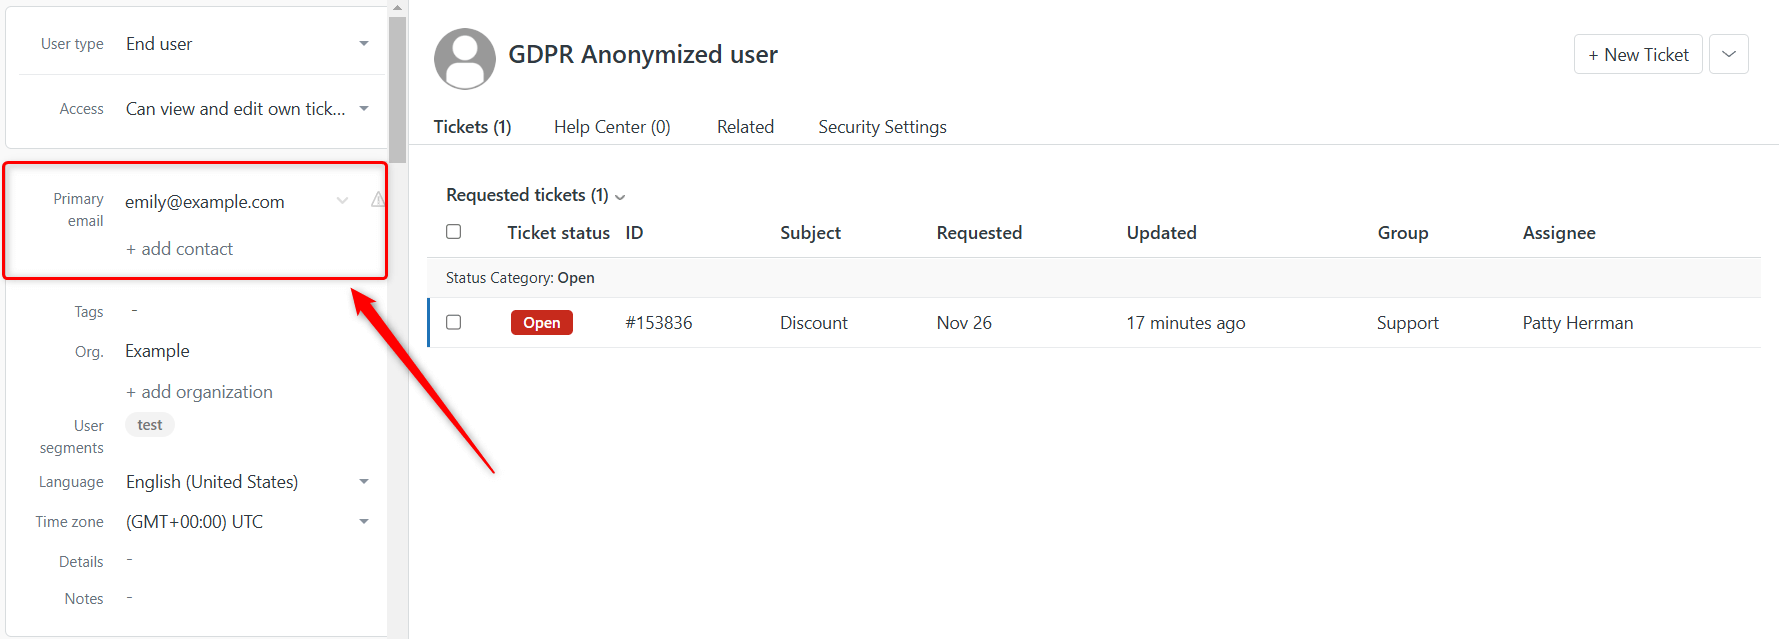
Below is an example of how the result will look once the preferences are configured. As you can see, only the email remains visible, while all other identities have been anonymized for improved data control.
Edit Preference Presets from the Modal
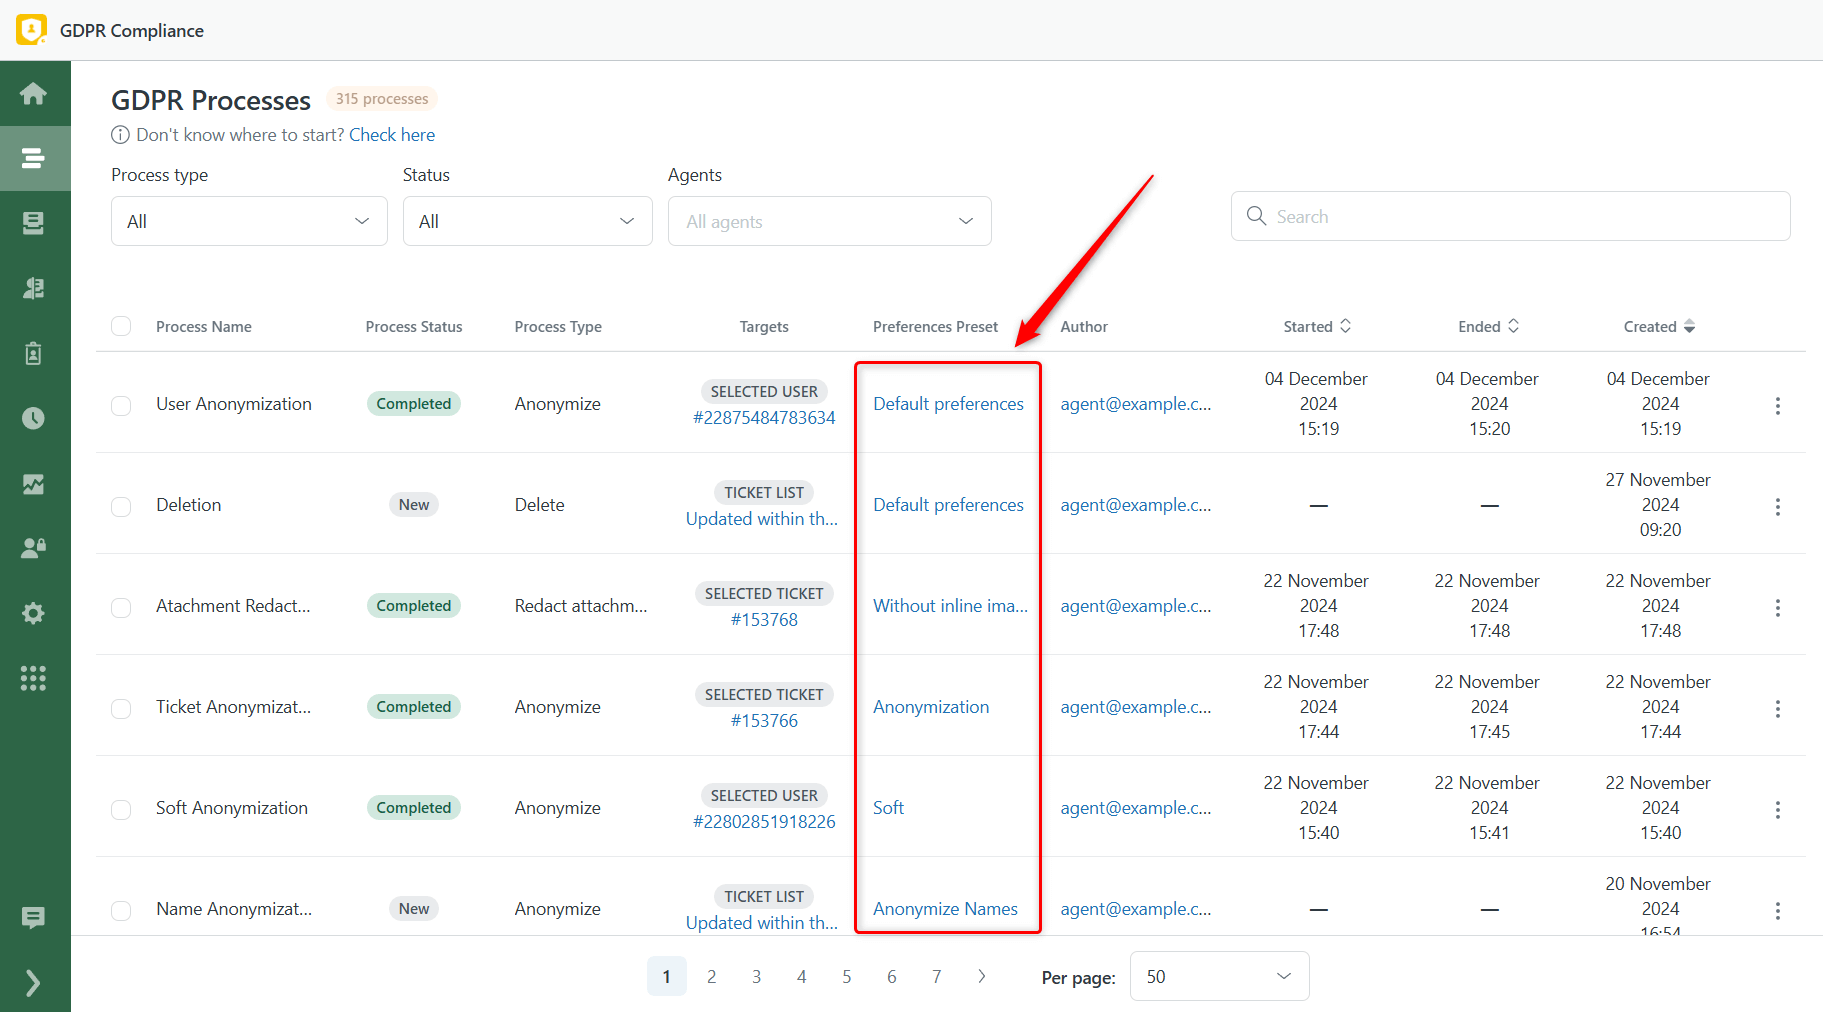
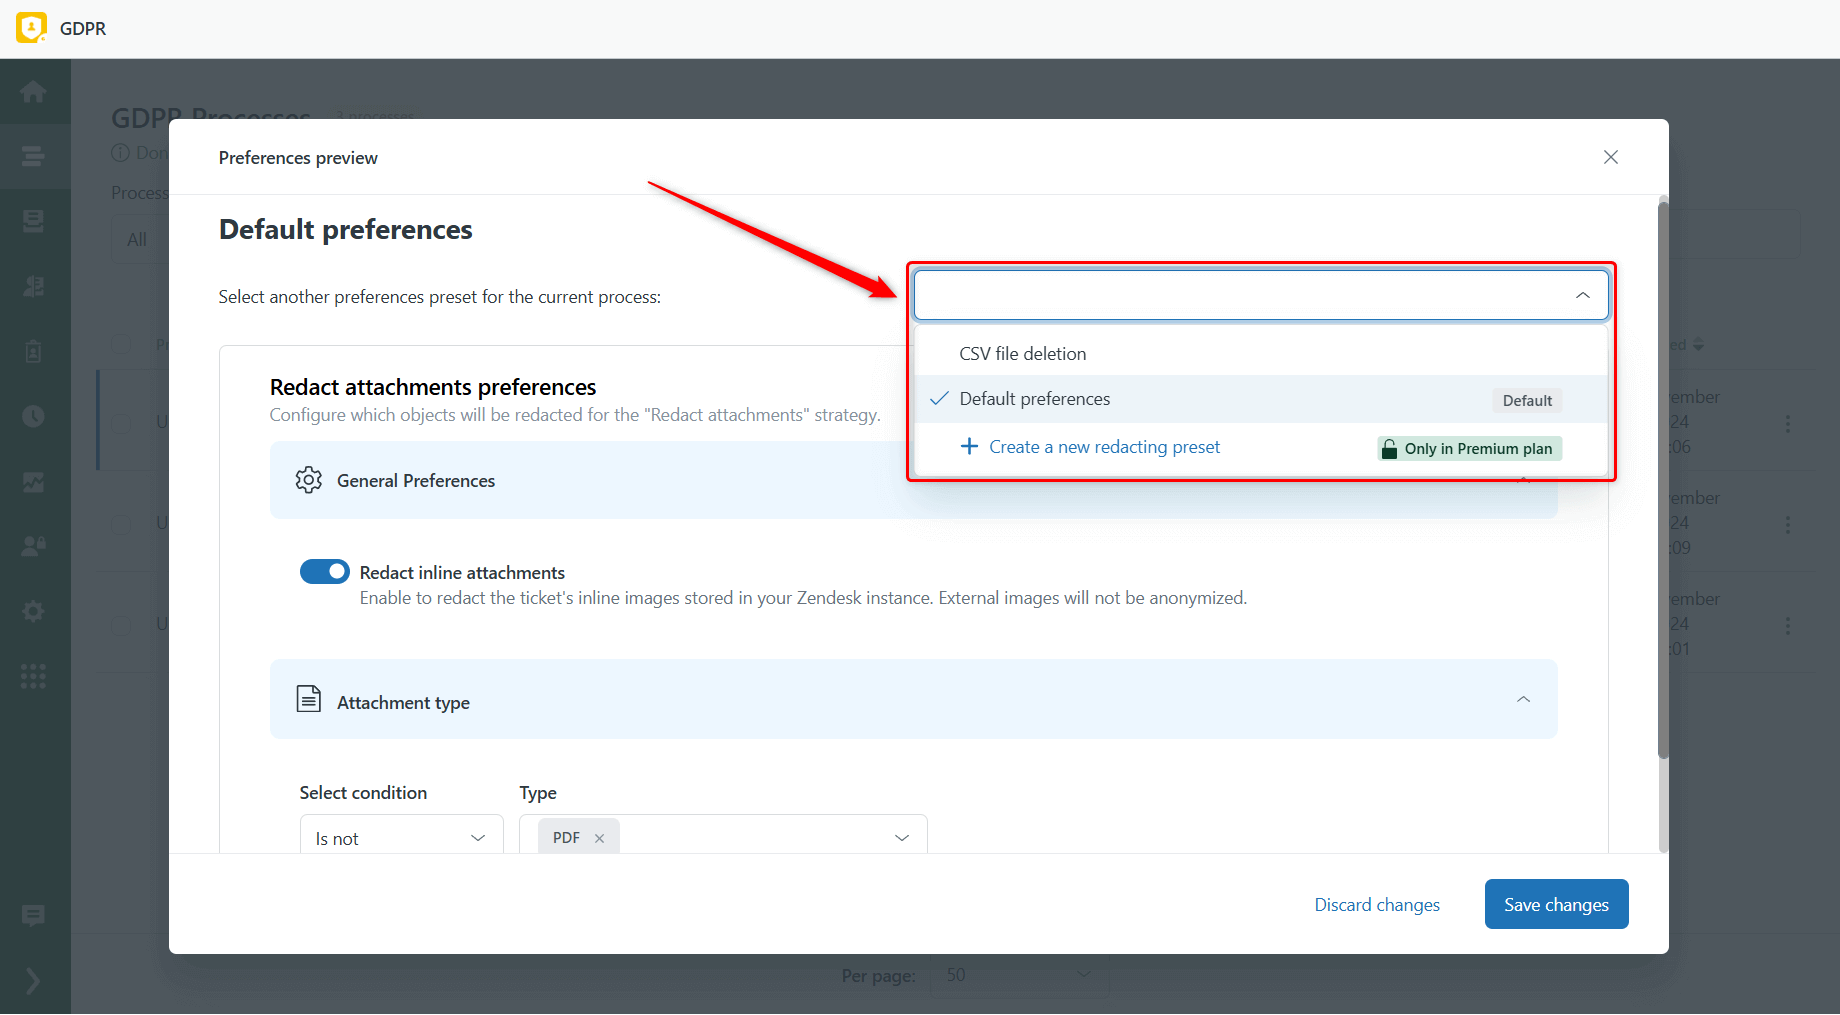
We've made it easier to configure your process preferences by adding the ability to edit presets directly from the modal window. To open this modal, just click on the preset name from the Processes page, either next to each process or within the process details.
In this modal, you can adjust specific preferences for the preset and save changes for future use.
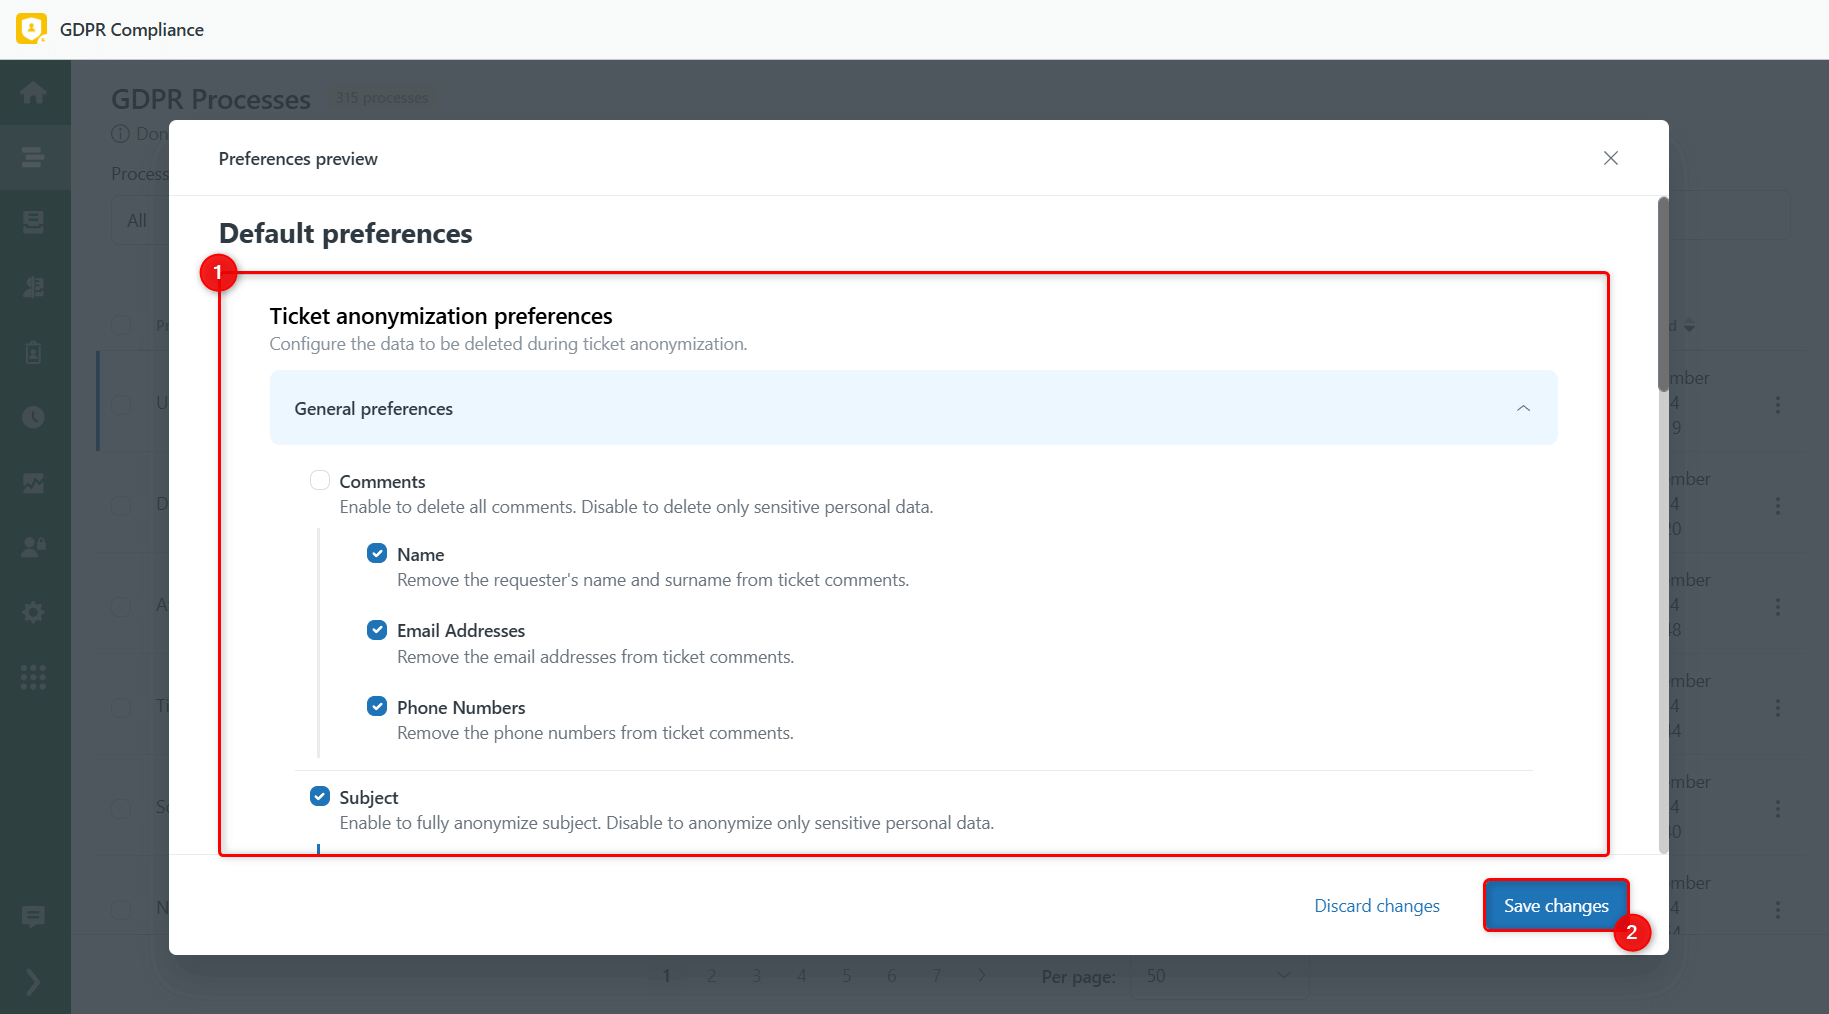
If the GDPR process's status is New, you can also switch between different presets and configure preferences on the go to launch the process with the needed settings.
Anonymization of External ID
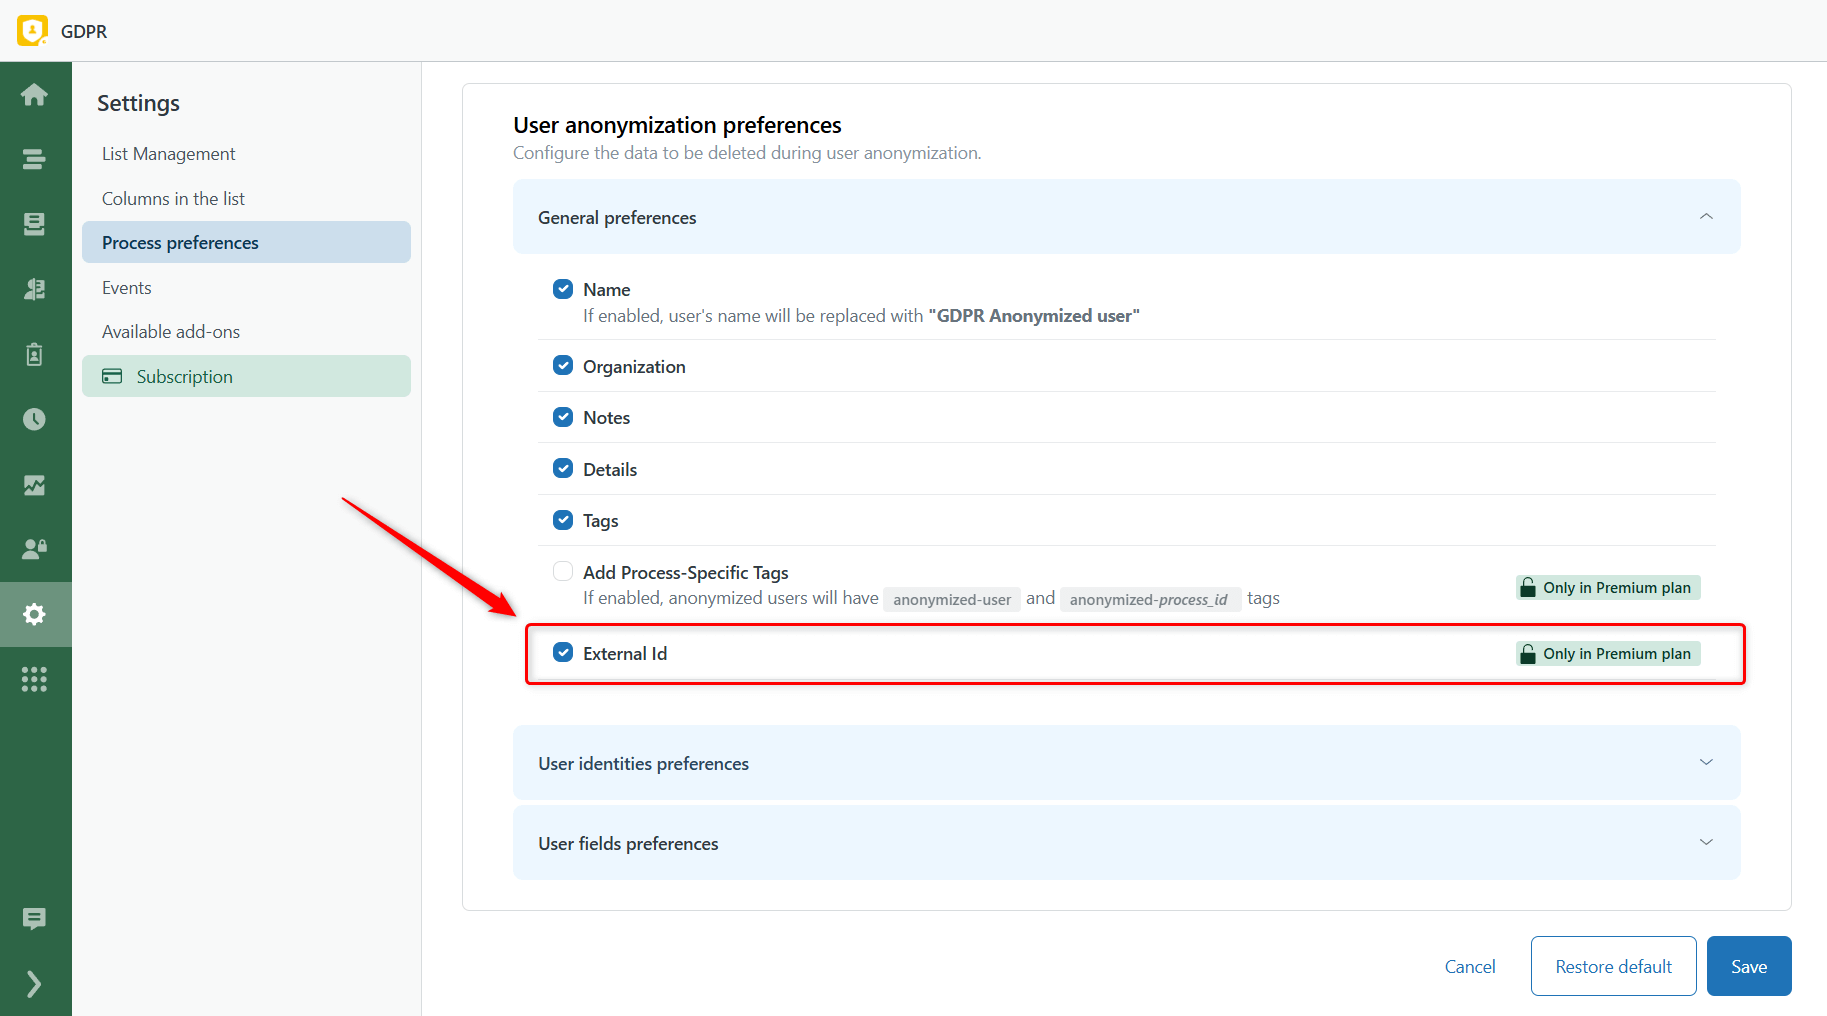
Many companies use External IDs to link users to their internal systems or third-party platforms. That's why, in the GDPR Compliance app, you can now decide whether to keep or remove the user's External ID during the anonymization process.
This option is available in Settings > Process preferences > Anonymization under User anonymization preferences > General Preferences. Simply check the box to remove the External ID or uncheck it to retain it for your business needs.
Simplified Date Conditions for the Lists
You may have noticed changes in the text for date-related conditions when creating or editing a User/Ticket/Organization list. We've simplified these conditions to make them clearer and more intuitive.
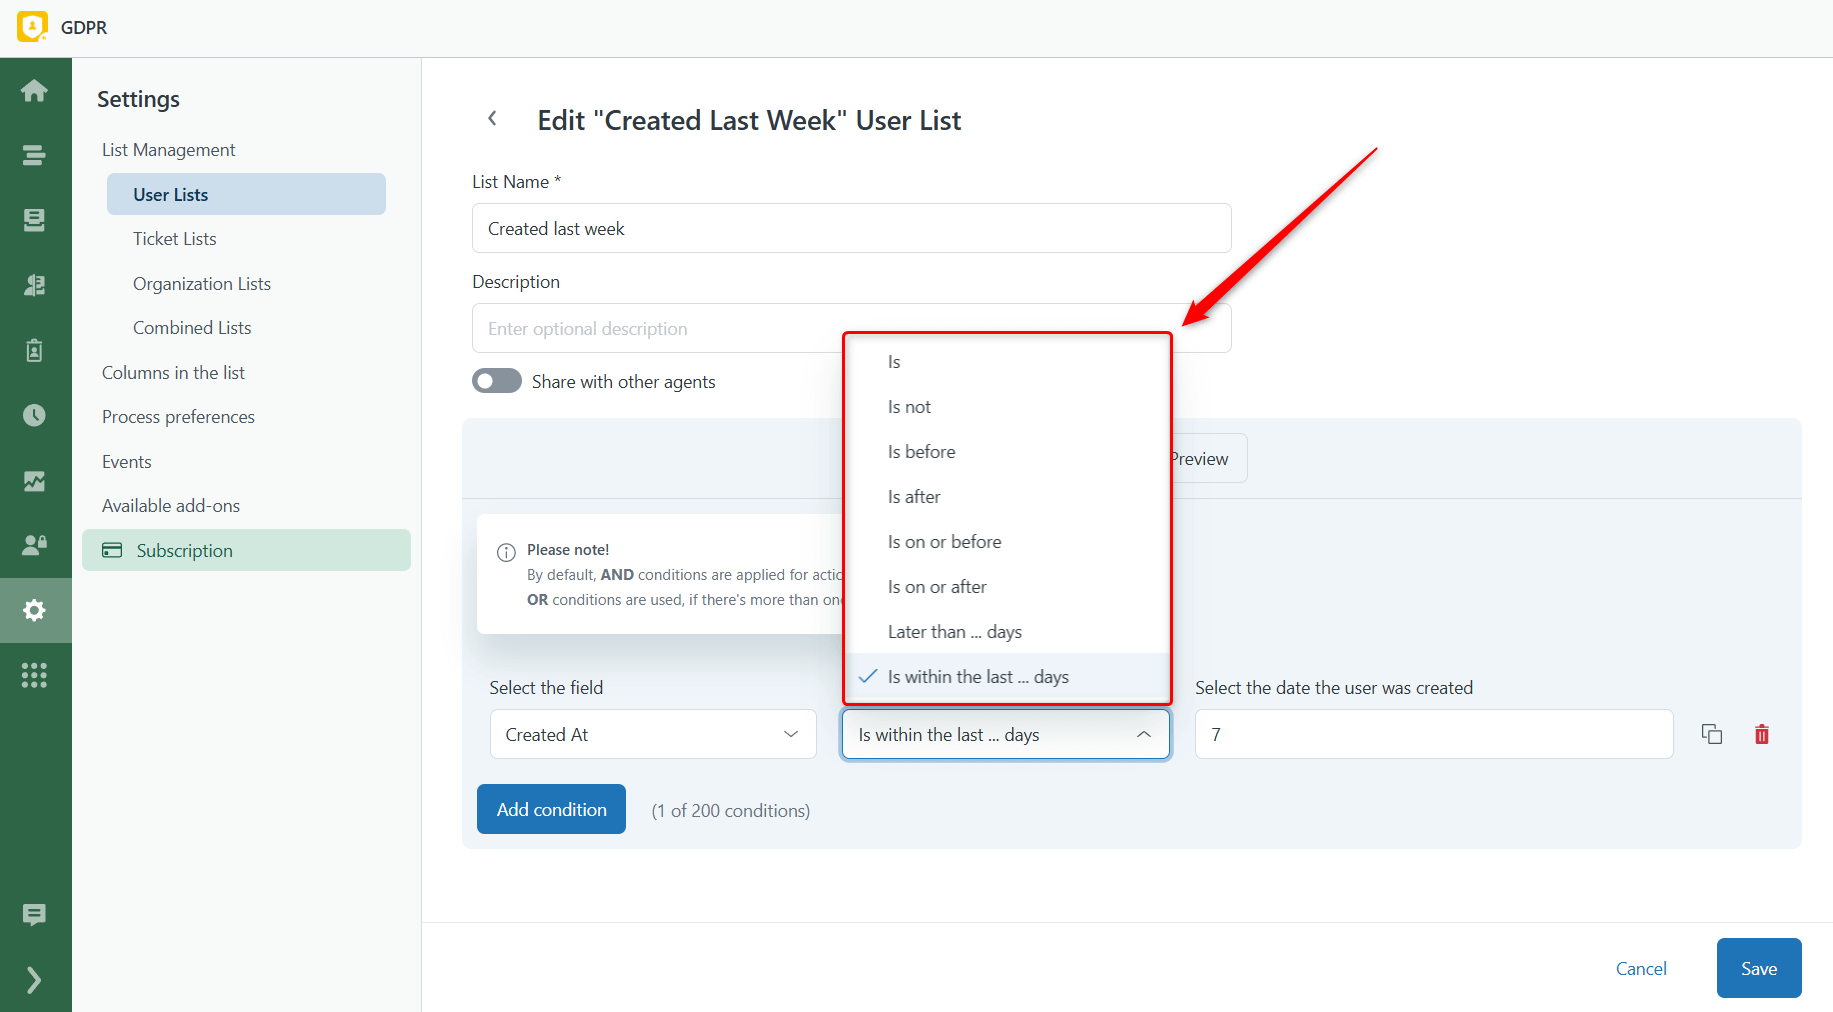
Hope it helps you set up your filters more easily and saves you time while managing your lists!
New Design & Usability Enhancements
We're excited to introduce new design updates for the GDPR Compliance app. These changes not only give the app a modern and clean look but also improve usability, making it easier for you to navigate and complete data protection tasks.
Redesigned Process Page
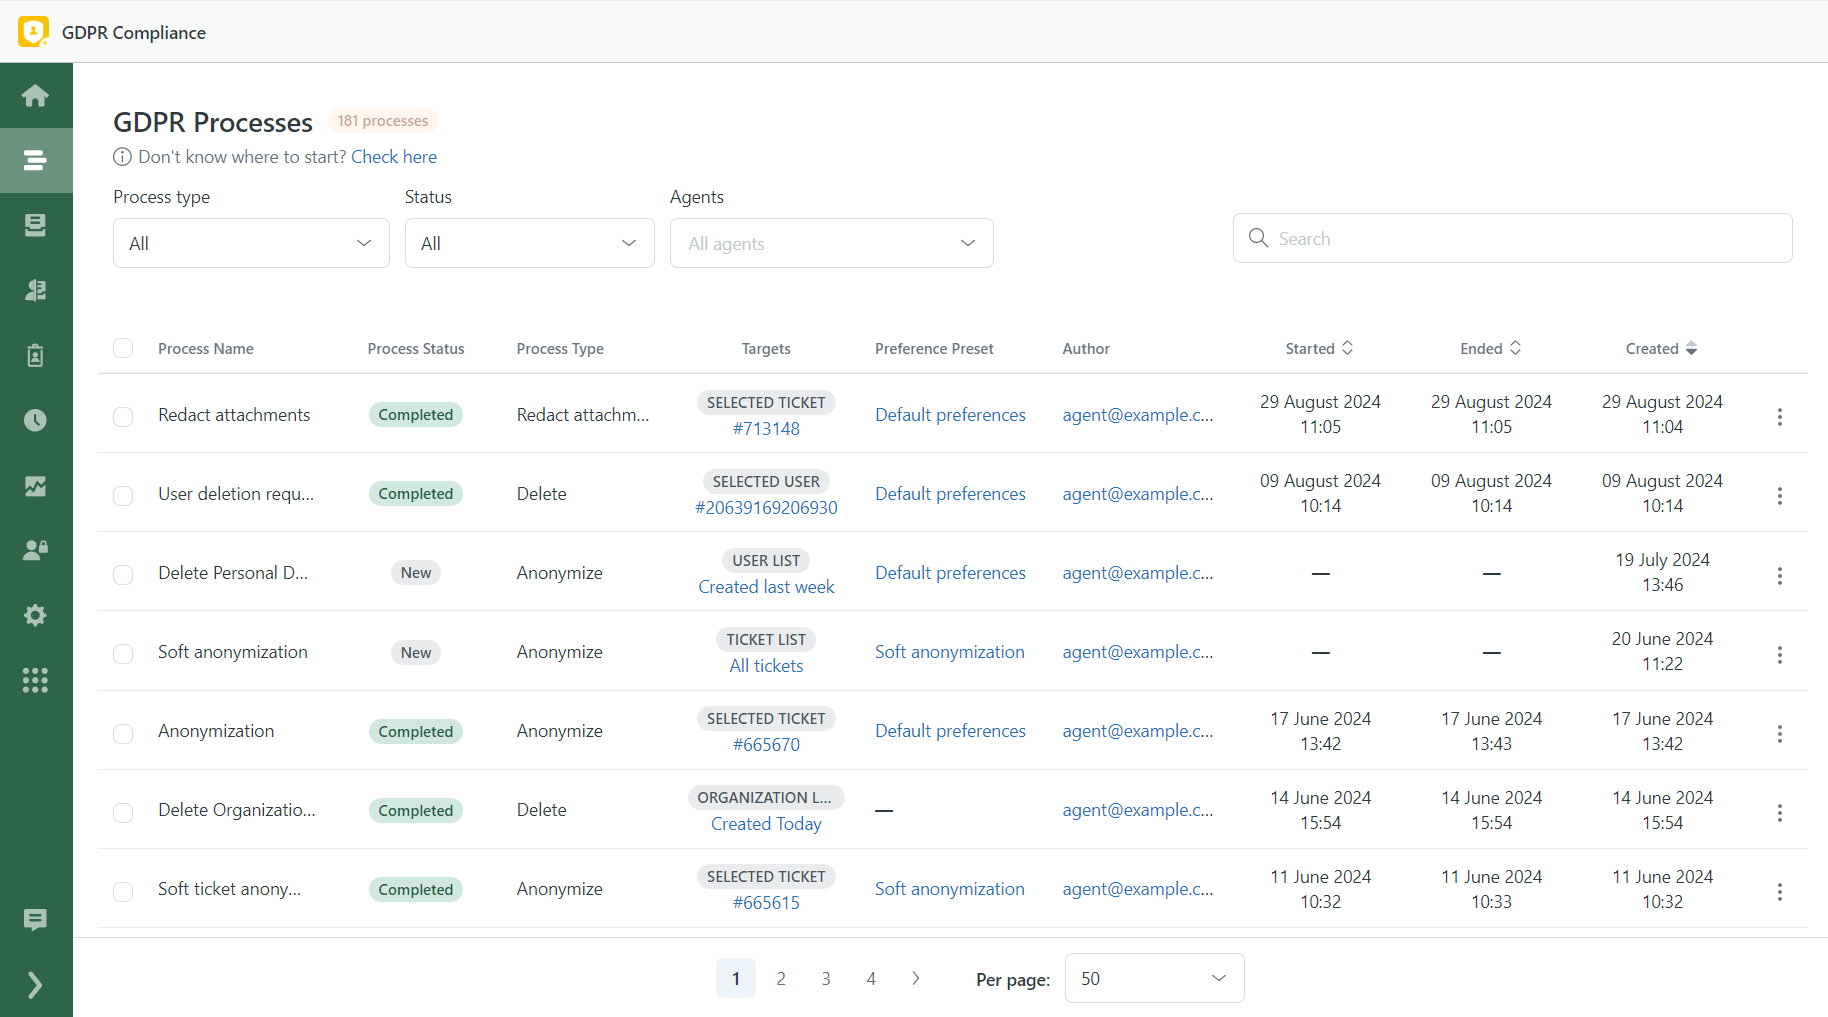
One of the biggest changes we've made is to the Process Page, giving it a fresh and streamlined layout. The new design allows you to view and manage your GDPR processes with greater clarity and efficiency.
Unified List Tab
In addition to the design overhaul, we've also simplified how you manage different lists. The Ticket, User, and Organization lists are now grouped in one tab — List Views. So, everything you need is in one place.
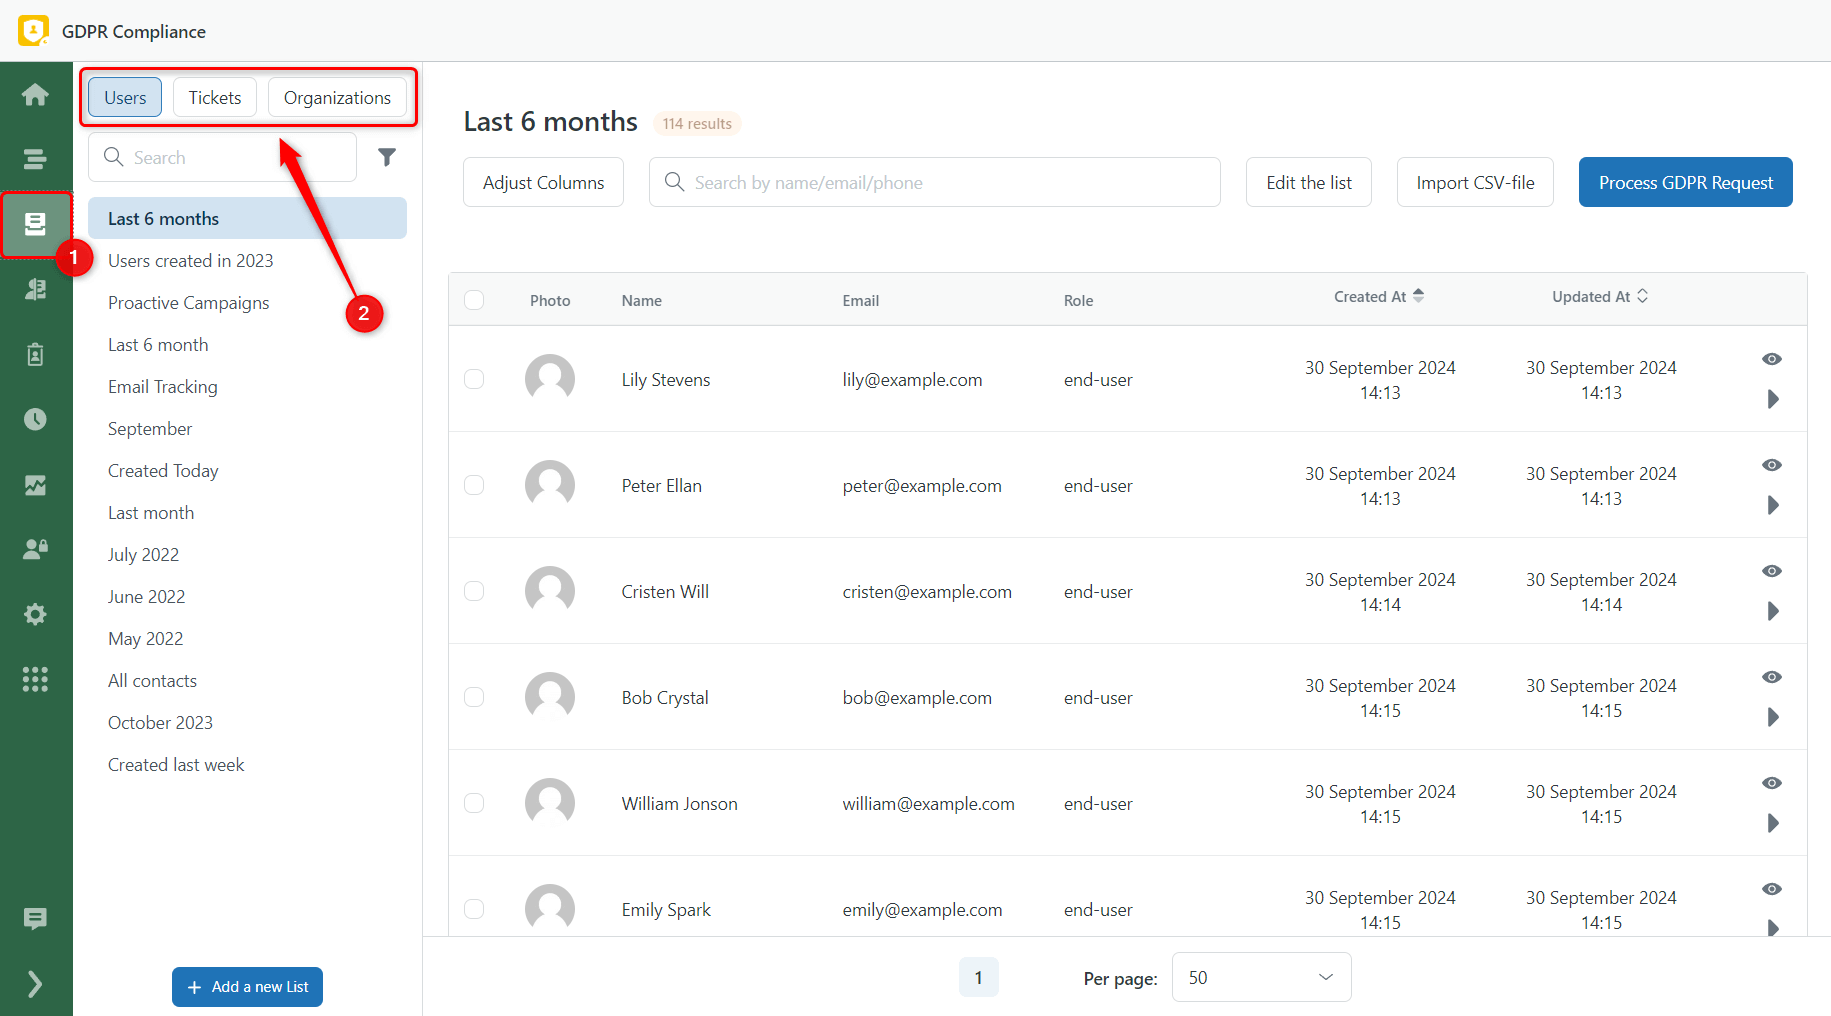
To make it even better, we've added an Adjust Columns button directly on the list page.
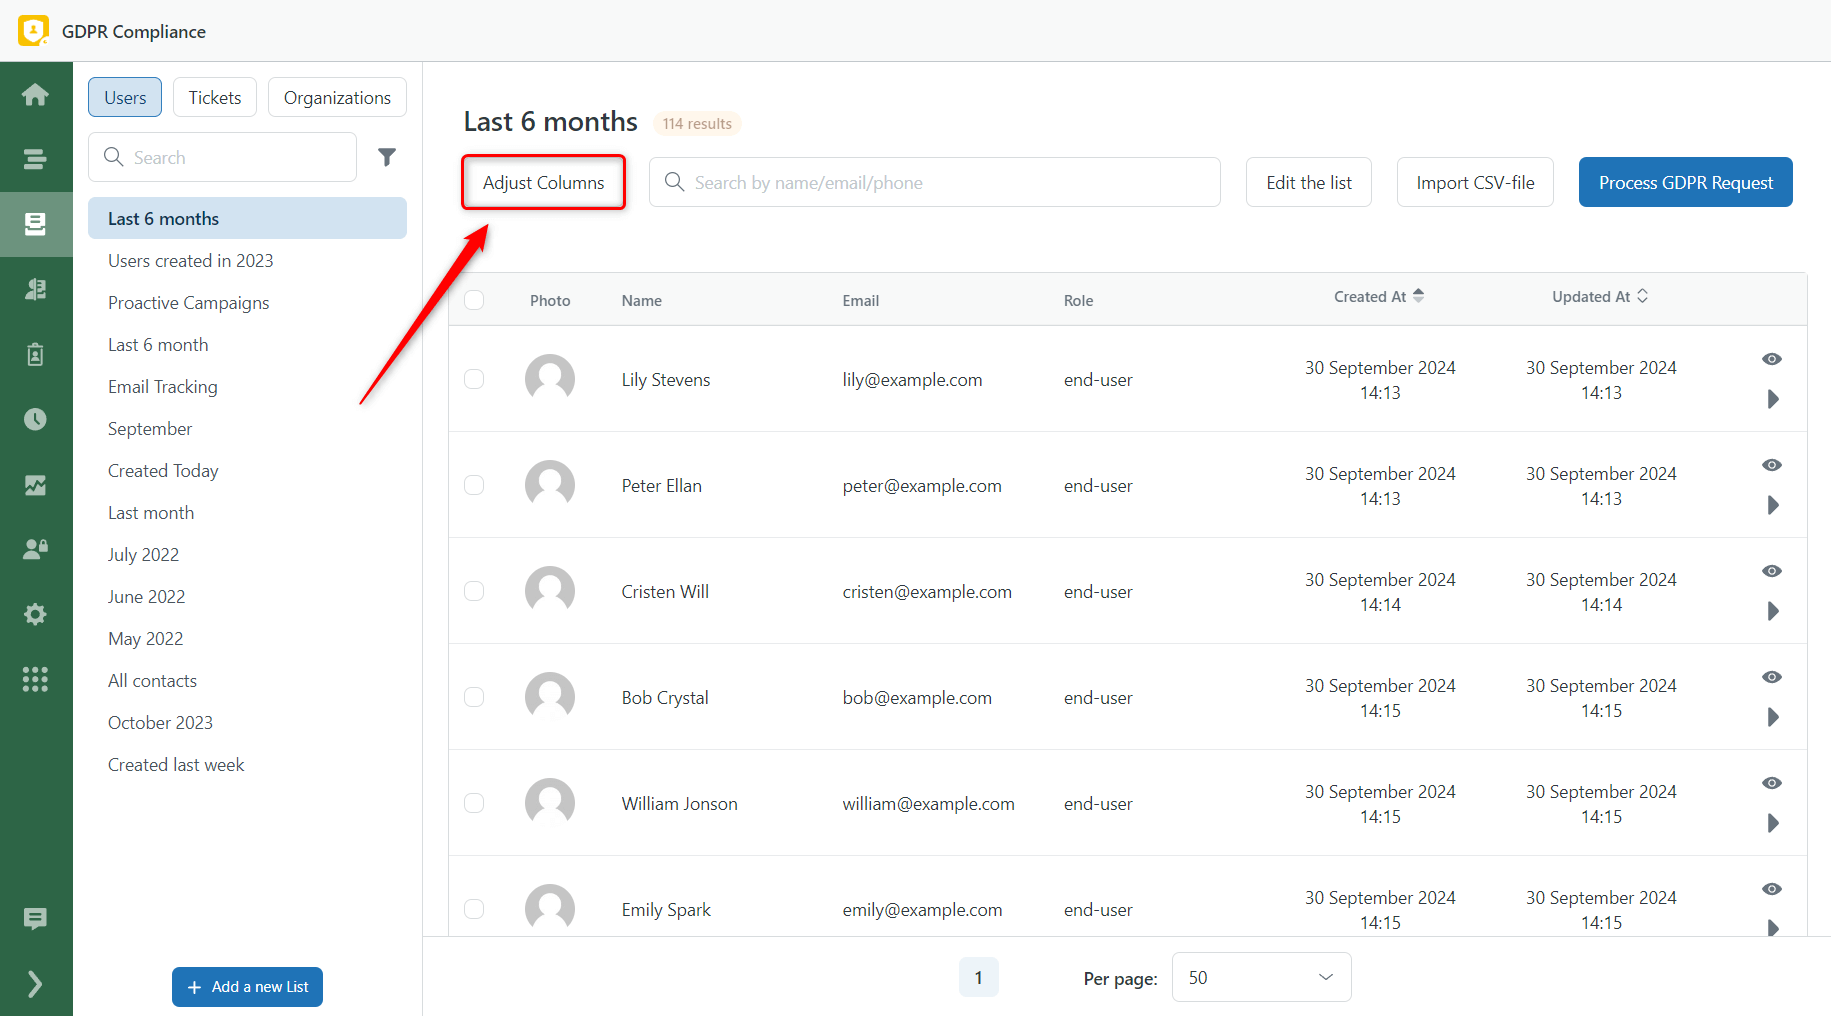
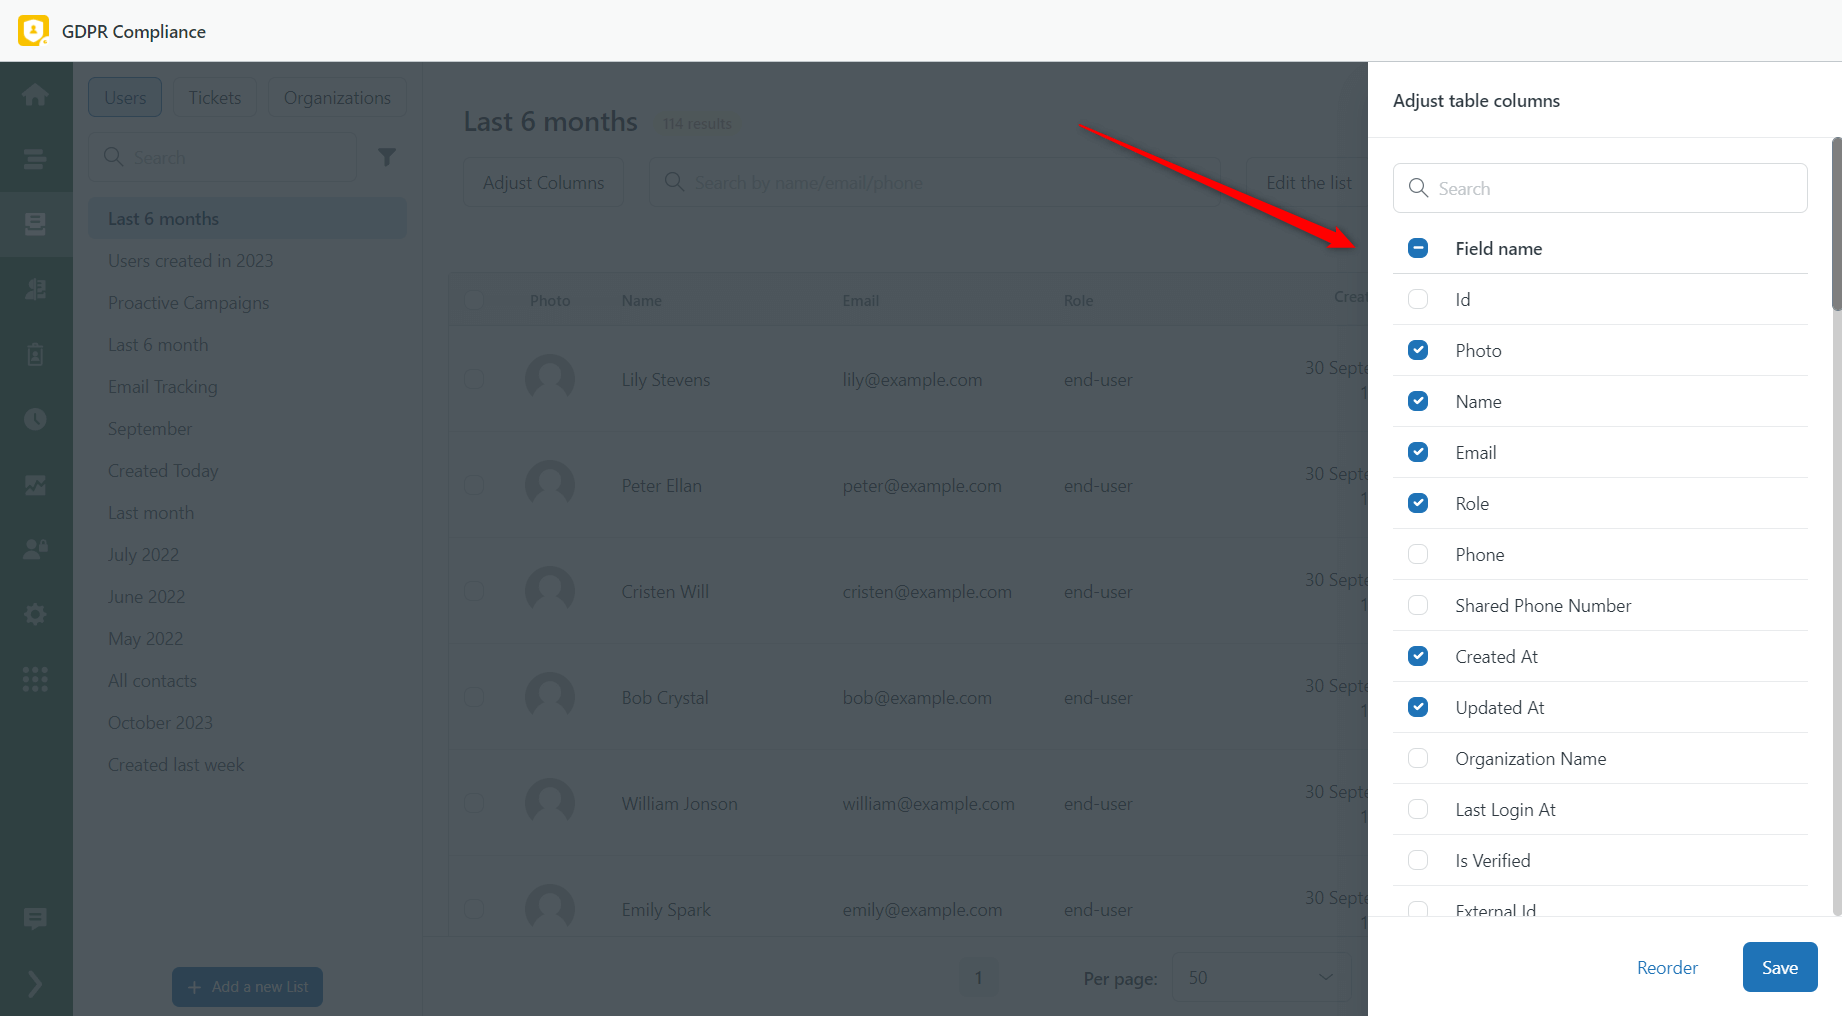
This new feature gives you complete control over your lists' display. You can quickly customize and reorder the columns from the sidebar without leaving the page.
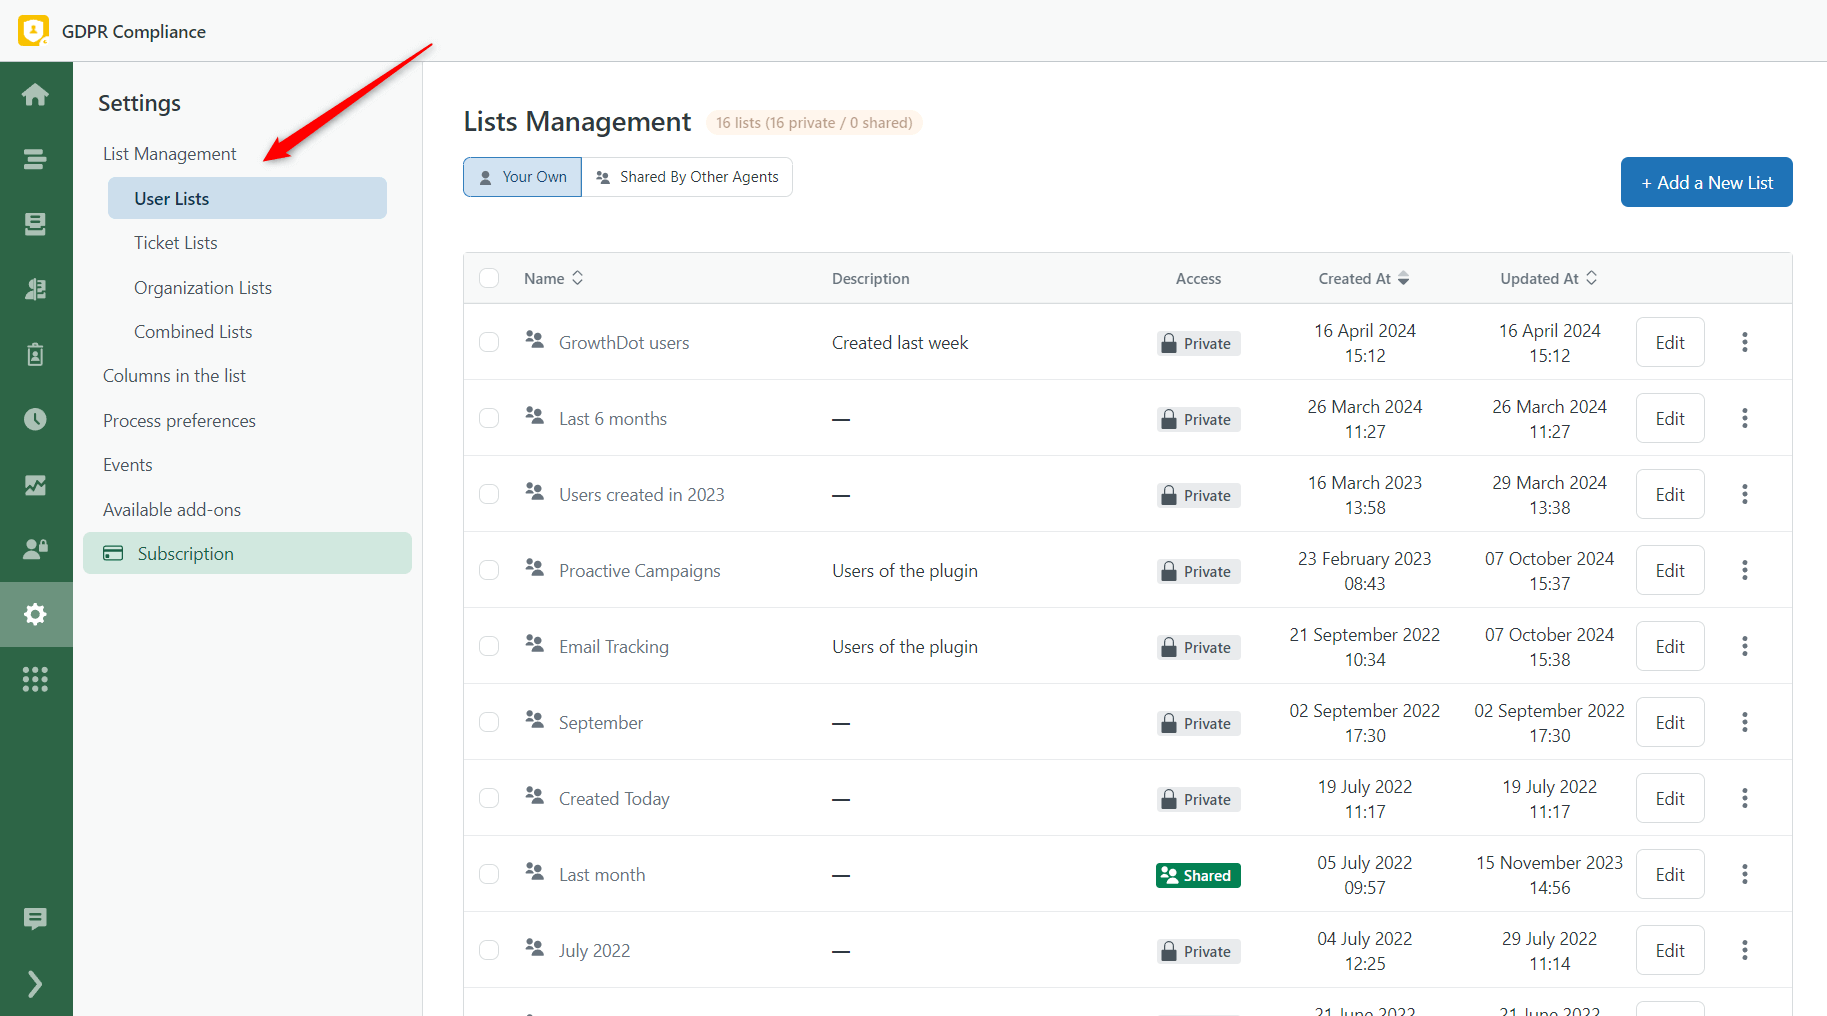
Streamlined Navigation in Settings
Also, when you open the Settings page, you'll notice a refreshed sidebar layout. The key update is in the List Management area, where you can now conveniently choose the list type you want to modify straight from the sidebar, making list management smoother.
Remove Ticket Attachments and Manage Zendesk Storage
The long-awaited feature is finally here! We’re excited to introduce a new process in the GDPR Compliance app: Redacting Attachments.
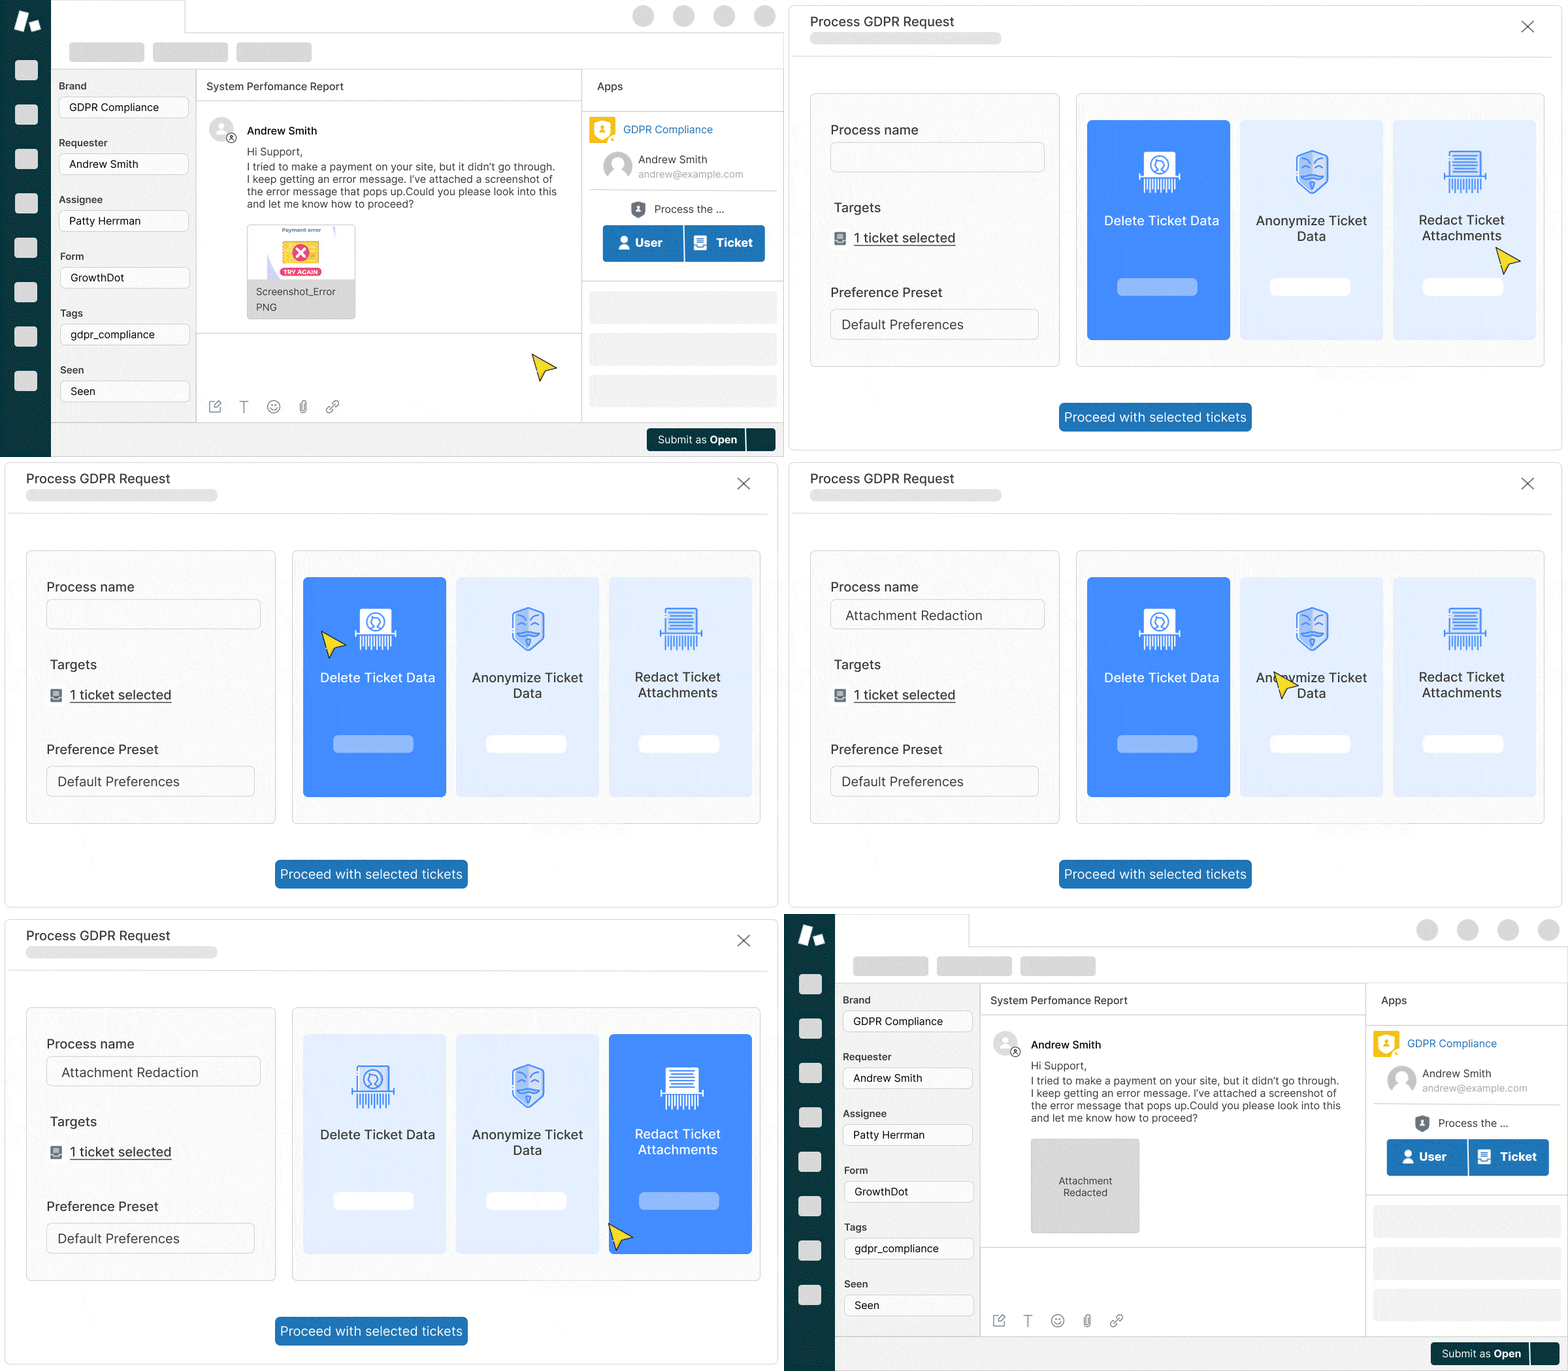
Now, you can fully control your Zendesk storage usage and easily delete attachments from tickets while keeping all the rest of the data untouched. We developed this process to help you:
- Free up Zendesk storage and remove no longer-needed attachments;
- Preserve all essential ticket information;
- Simplify compliance and reduce manual effort for your support team.
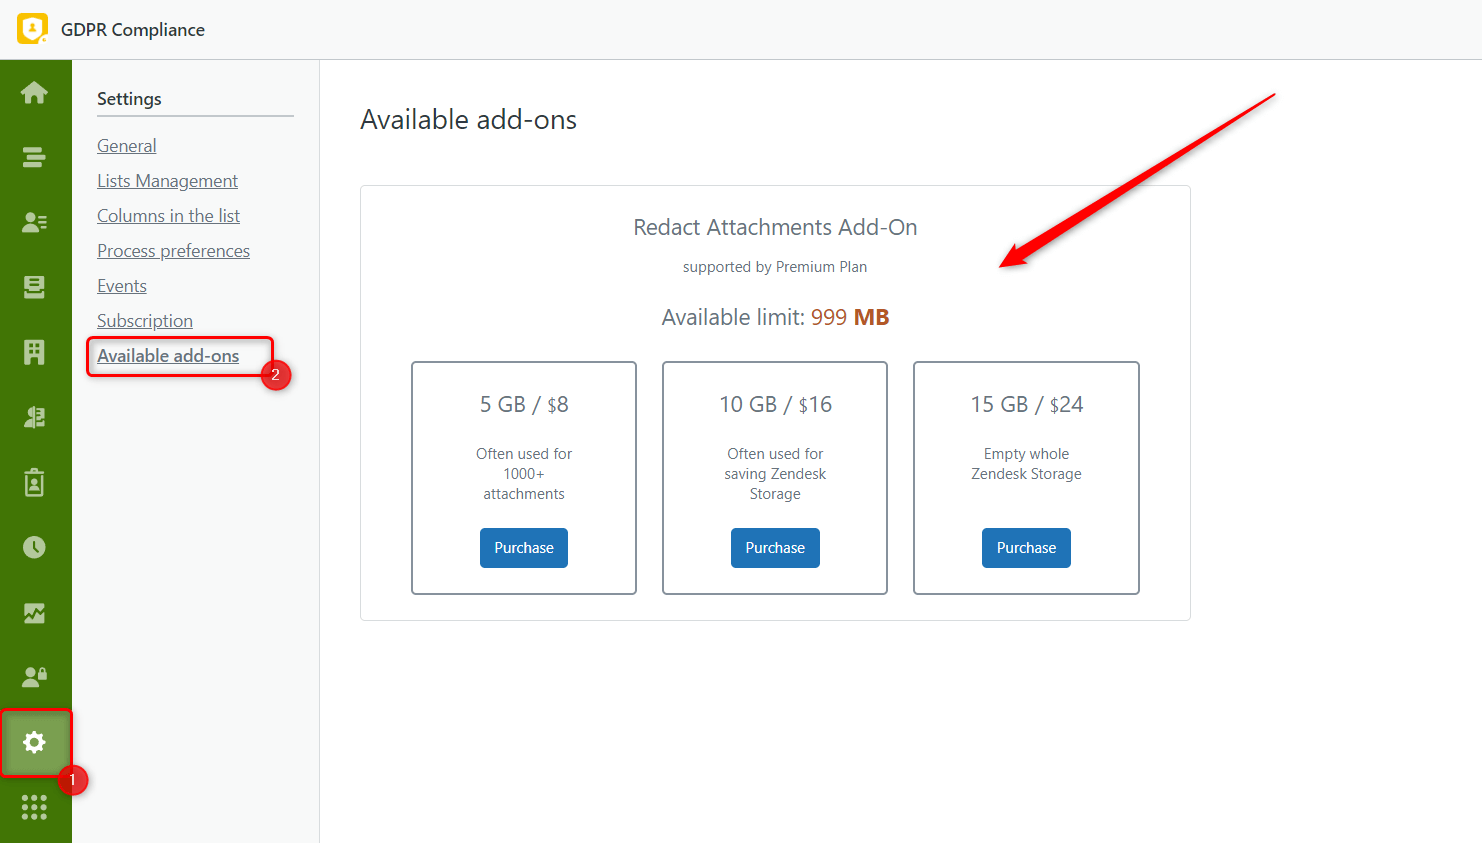
The Attachment Redactions is available as an add-on in our app. To find it, open the GDPR Compliance plugin and go to Settings > Available add-ons.
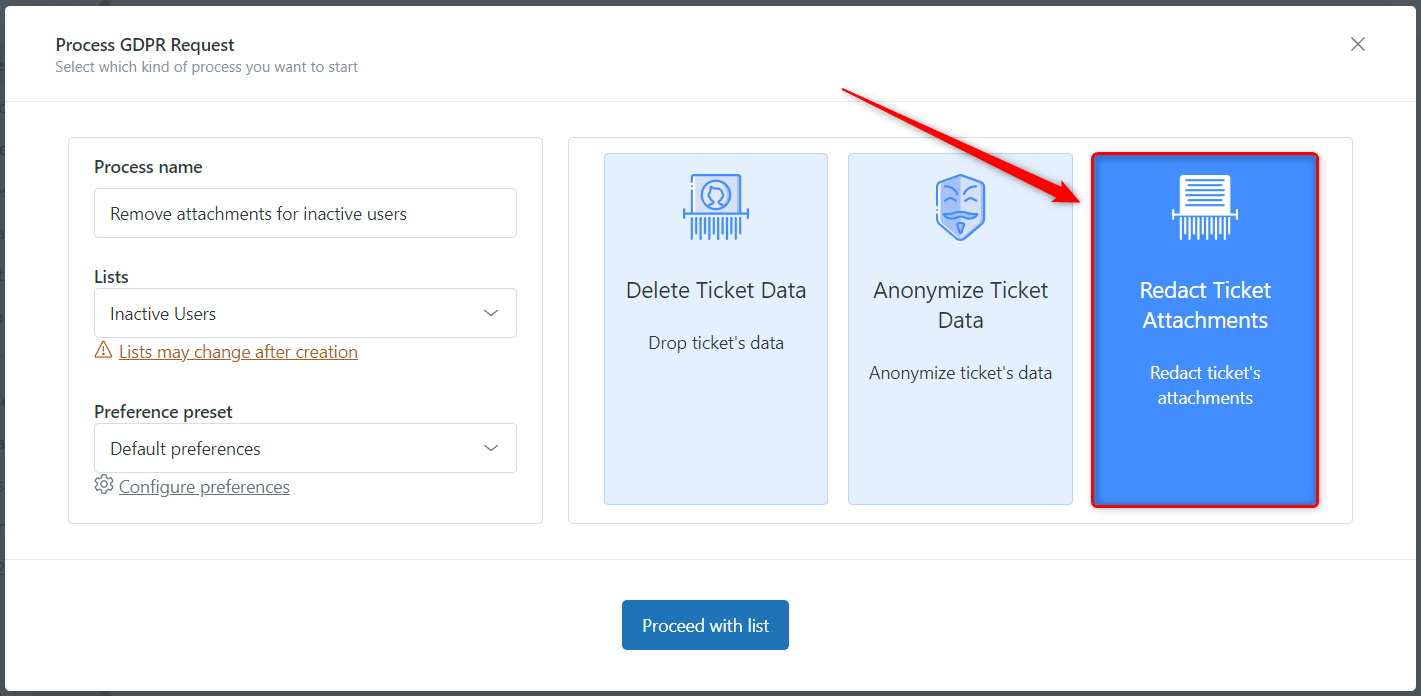
To start cleaning up attachments, open a specific ticket/user or ticket/user list and launch a GDPR request. In a modal window, select process Redact Ticket Attachments and run it.
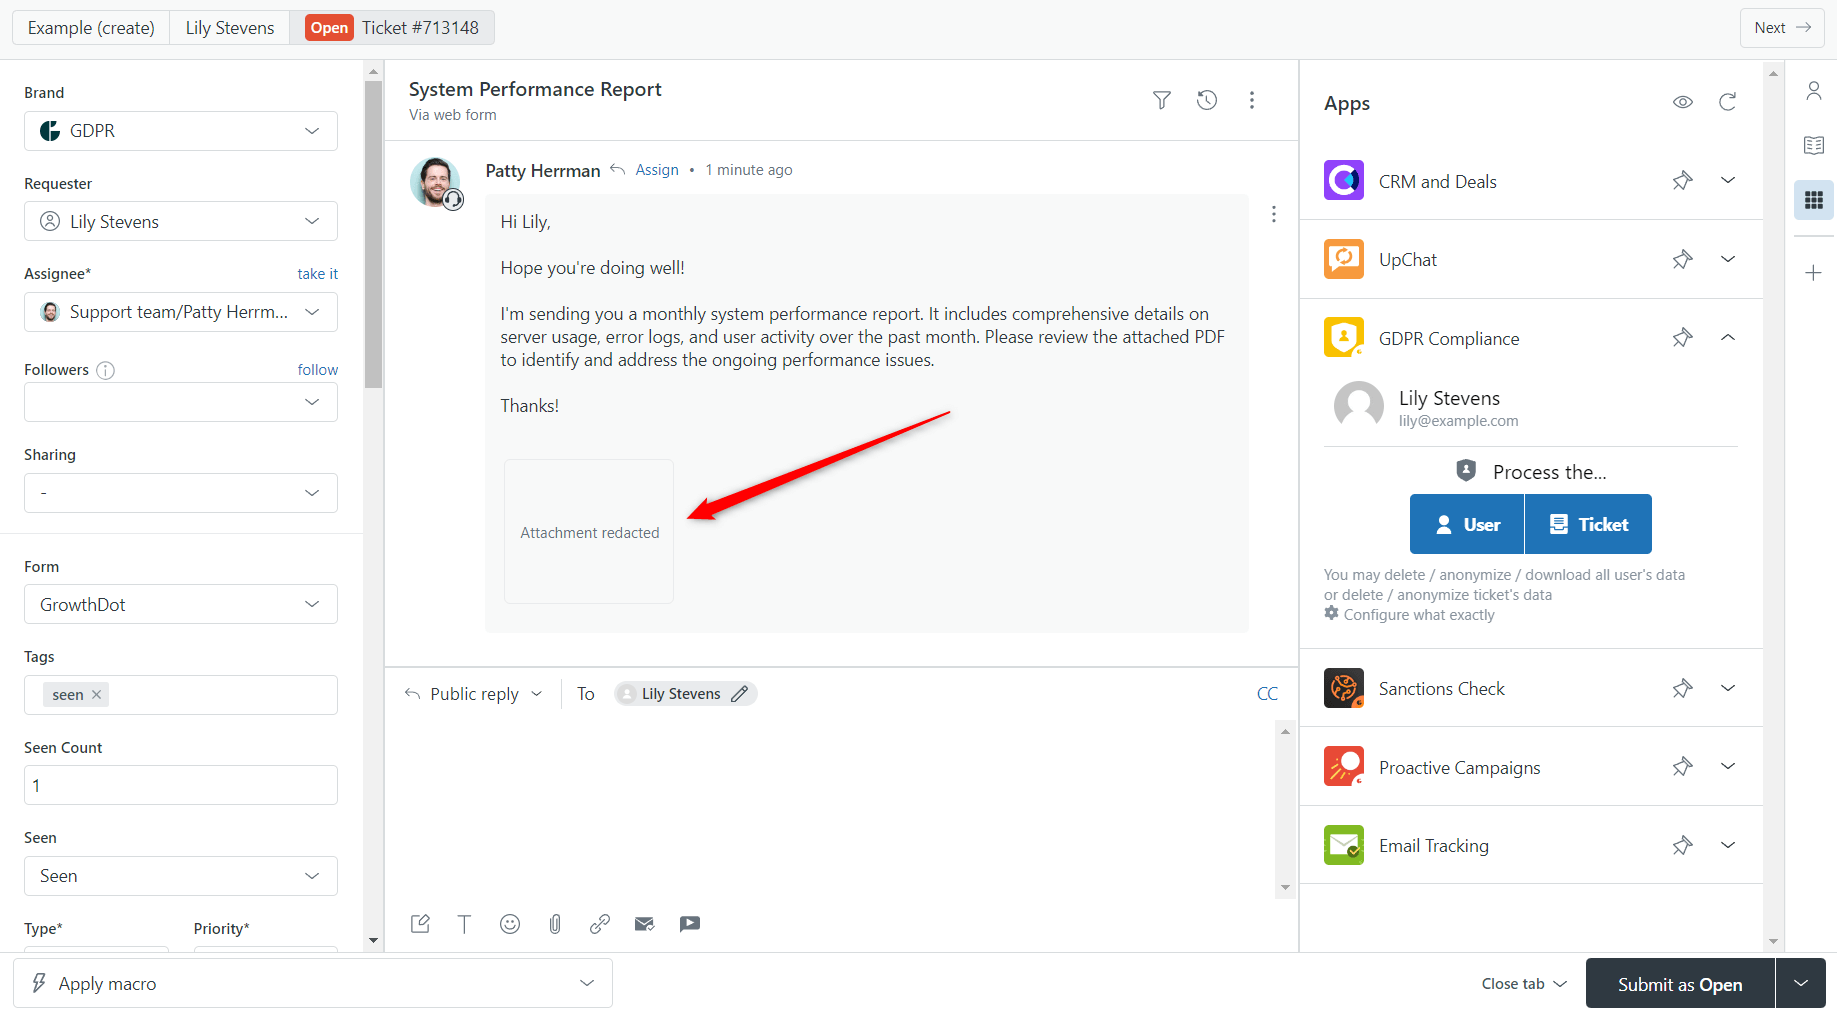
Afterward, you’ll see that processed tickets no longer contain attached files, but other ticket details remain the same.
Retrieving Comments from Chats
In response to user feedback and evolving data privacy regulations, we've enhanced the app's capabilities to ensure even greater compliance and data protection. This time, our team has improved the retrieval process to include comments from tickets along with messages from chats.
By incorporating chat messages into the data retrieval process, businesses can now maintain GDPR compliance without overlooking crucial interactions.
So, the next time you retrieve customer data containing tickets with chat conversations, they will all, including attachments, seamlessly integrate into the extracted file.
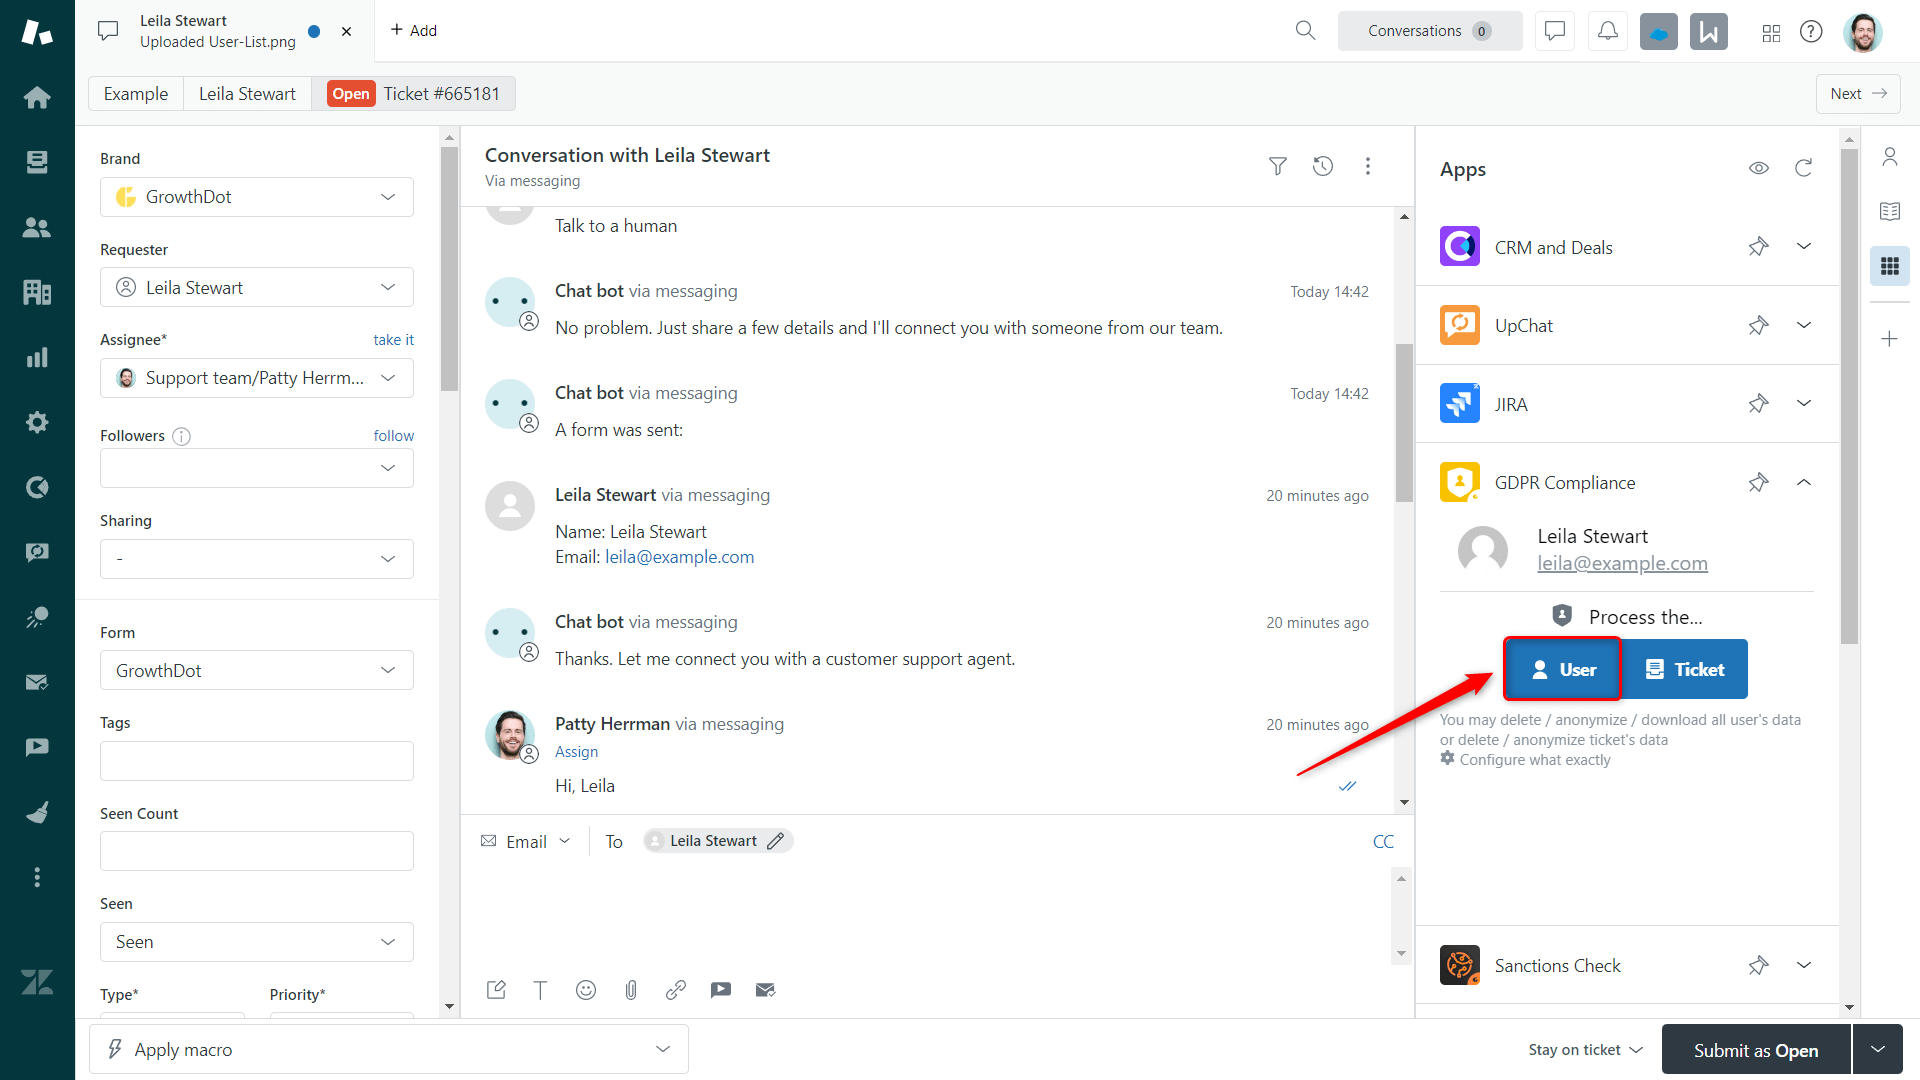
After downloading the archive, find the necessary ticket folder and open the comments.csv file. There, you'll see a detailed record of all comments from tickets as well as messages from chats. Automatic responses from the chat are identified by [System] in the Author ID column.
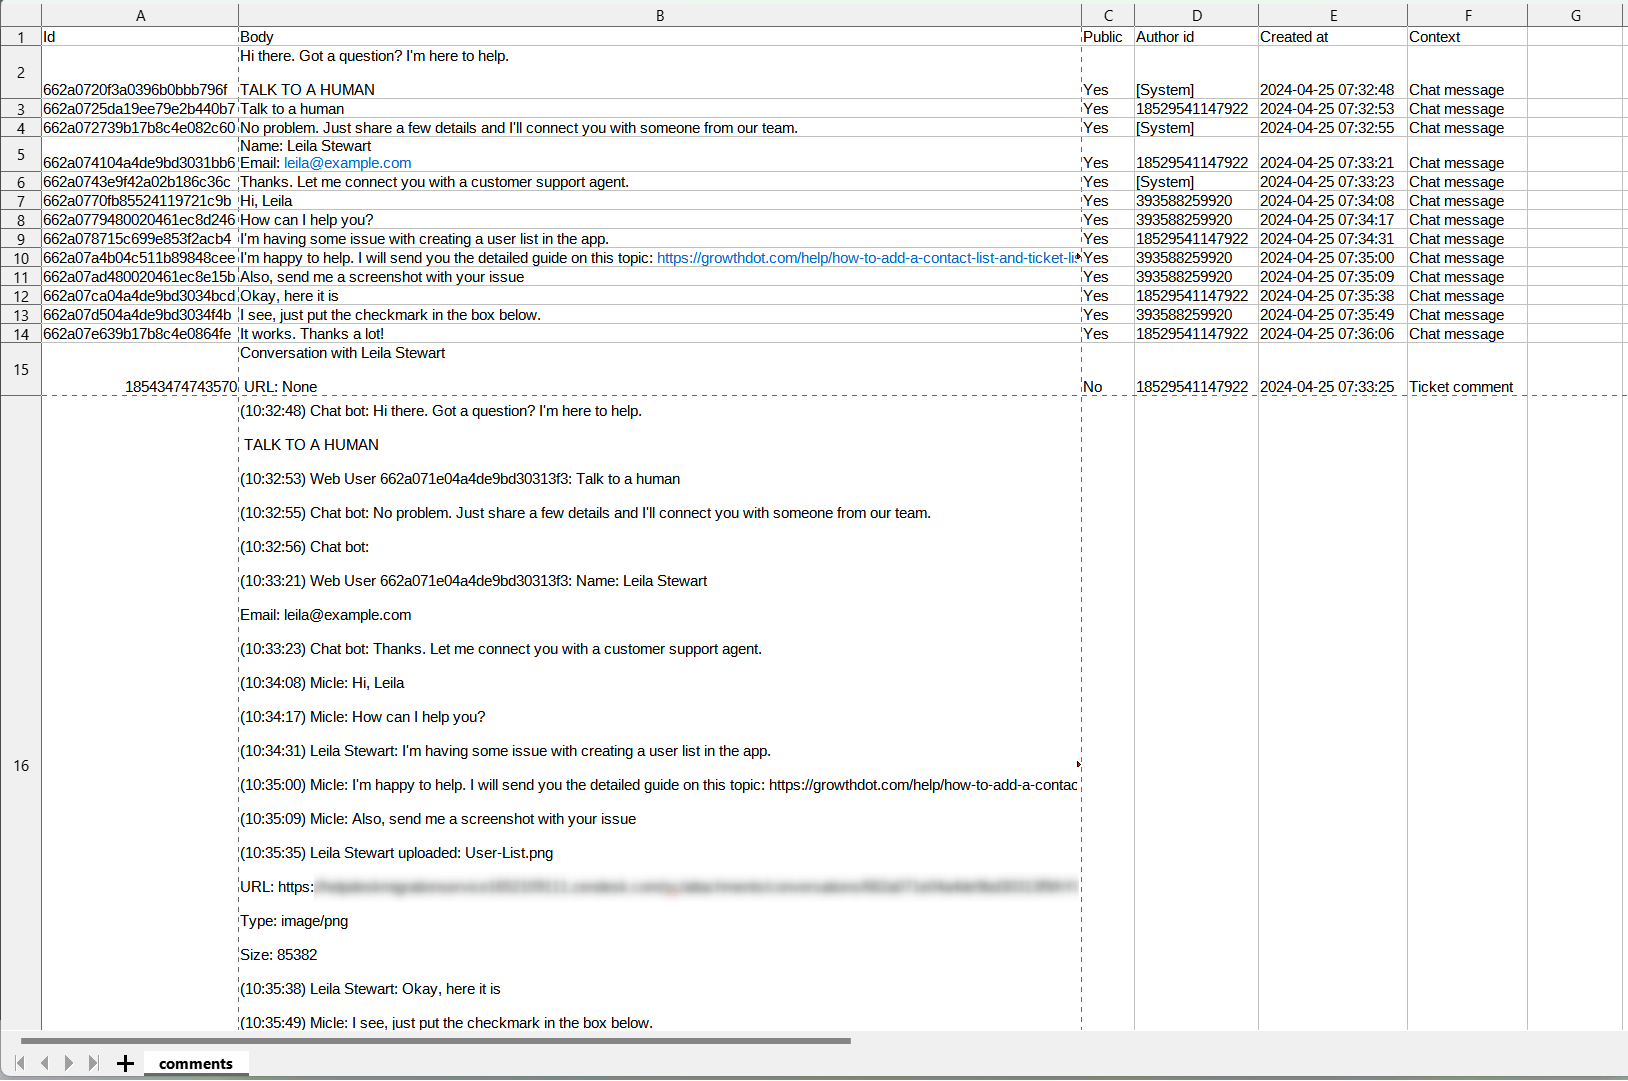
There may also be a private comment, 'Conversation with…' and a transcription of the chat if it is enabled in the Admin Center > Objects and Rules > Tickets > Settings > Transcript visibility.
Faster Data Processing
With the GDPR Compliance app, you can already efficiently handle bulk data. But what if we told you it could be even faster?
Thanks to the latest improvements, processing user and ticket data now takes less time. It means quicker responses to data requests, smoother compliance workflows, and more time for other critical tasks.
No configurations are required. Just ensure you have the Premium subscription to our app and the Enterprise or Enterprise Plus account in Zendesk (with the necessary limit of 2500 API requests).
Try it today to effortlessly delete or anonymize large volumes of data and maintain GDPR compliance without sacrificing speed.
Events Feature
To keep track of agents' actions and changes in the GDPR Compliance app, we've added a new Events page in Settings.
The list shows the Event Object, such as process, list, preferences, and settings. Then, it indicates the Action Type, the Actor (the agent who did this action), the exact Date of the event, and the Actions.
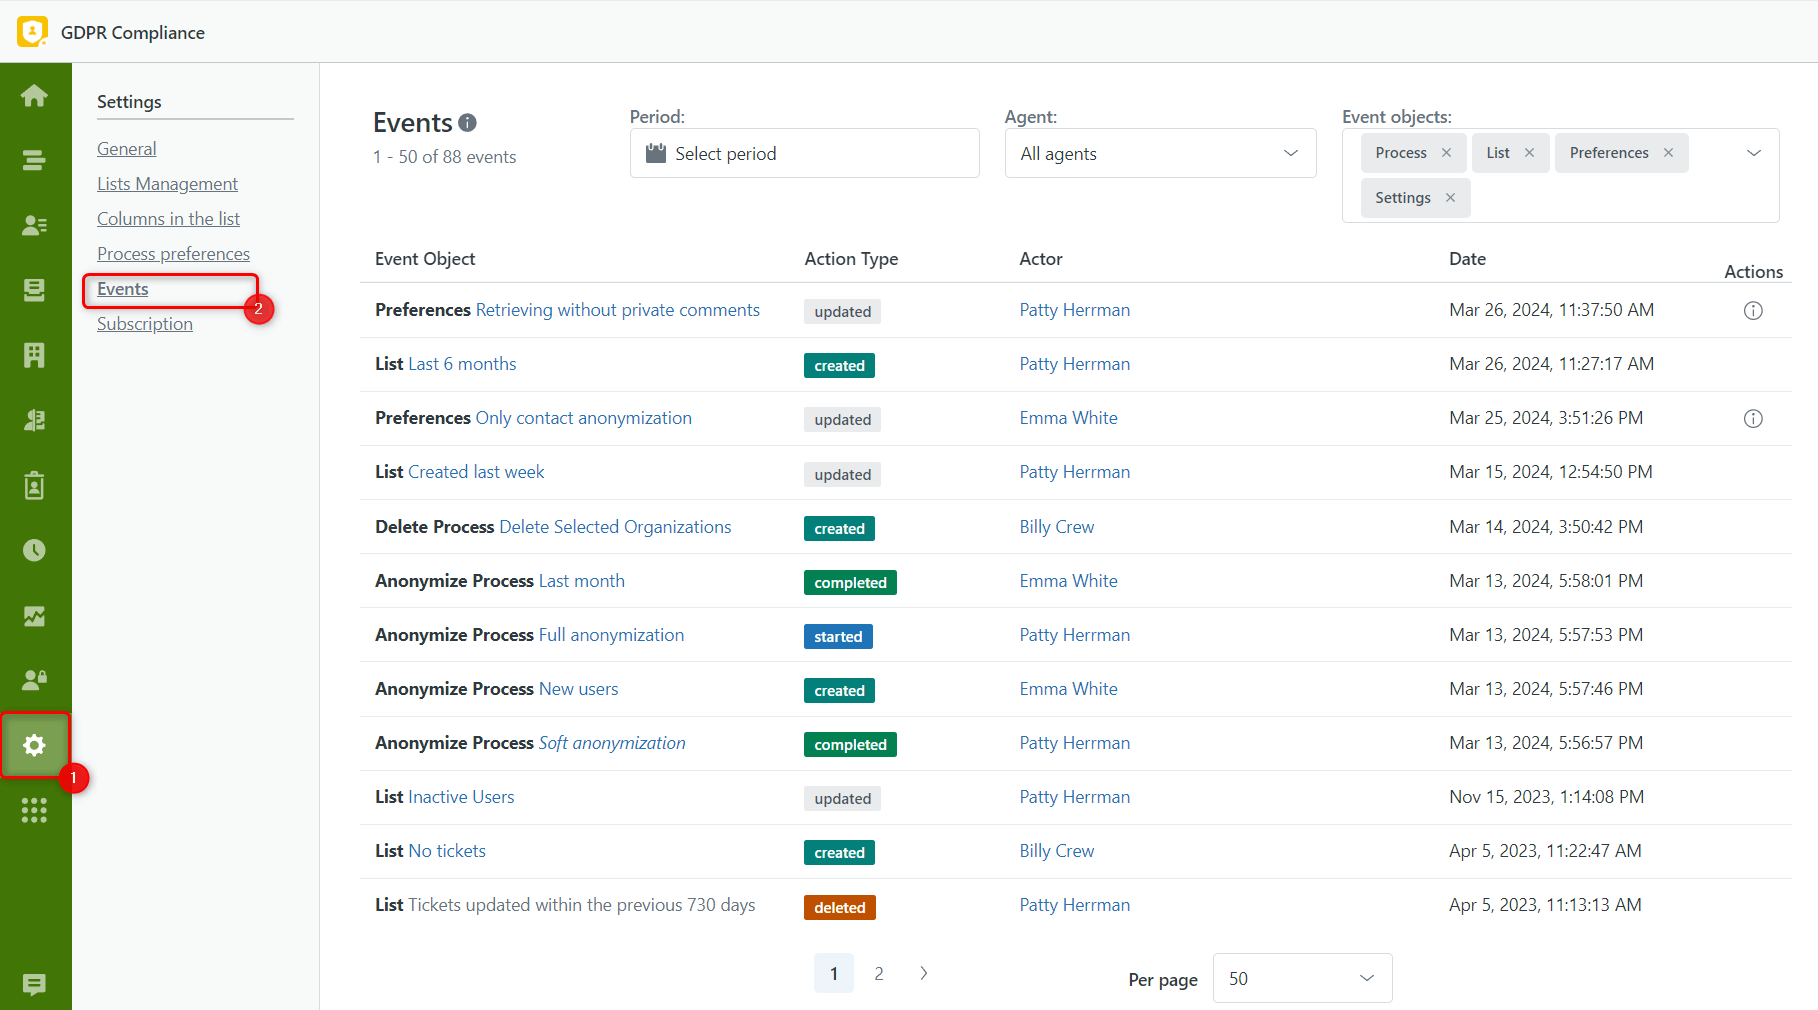
The last column is helpful for monitoring modifications in the process preferences presets. By clicking on the information symbol, you can compare the configurations right after the changes and the current ones side-by-side.
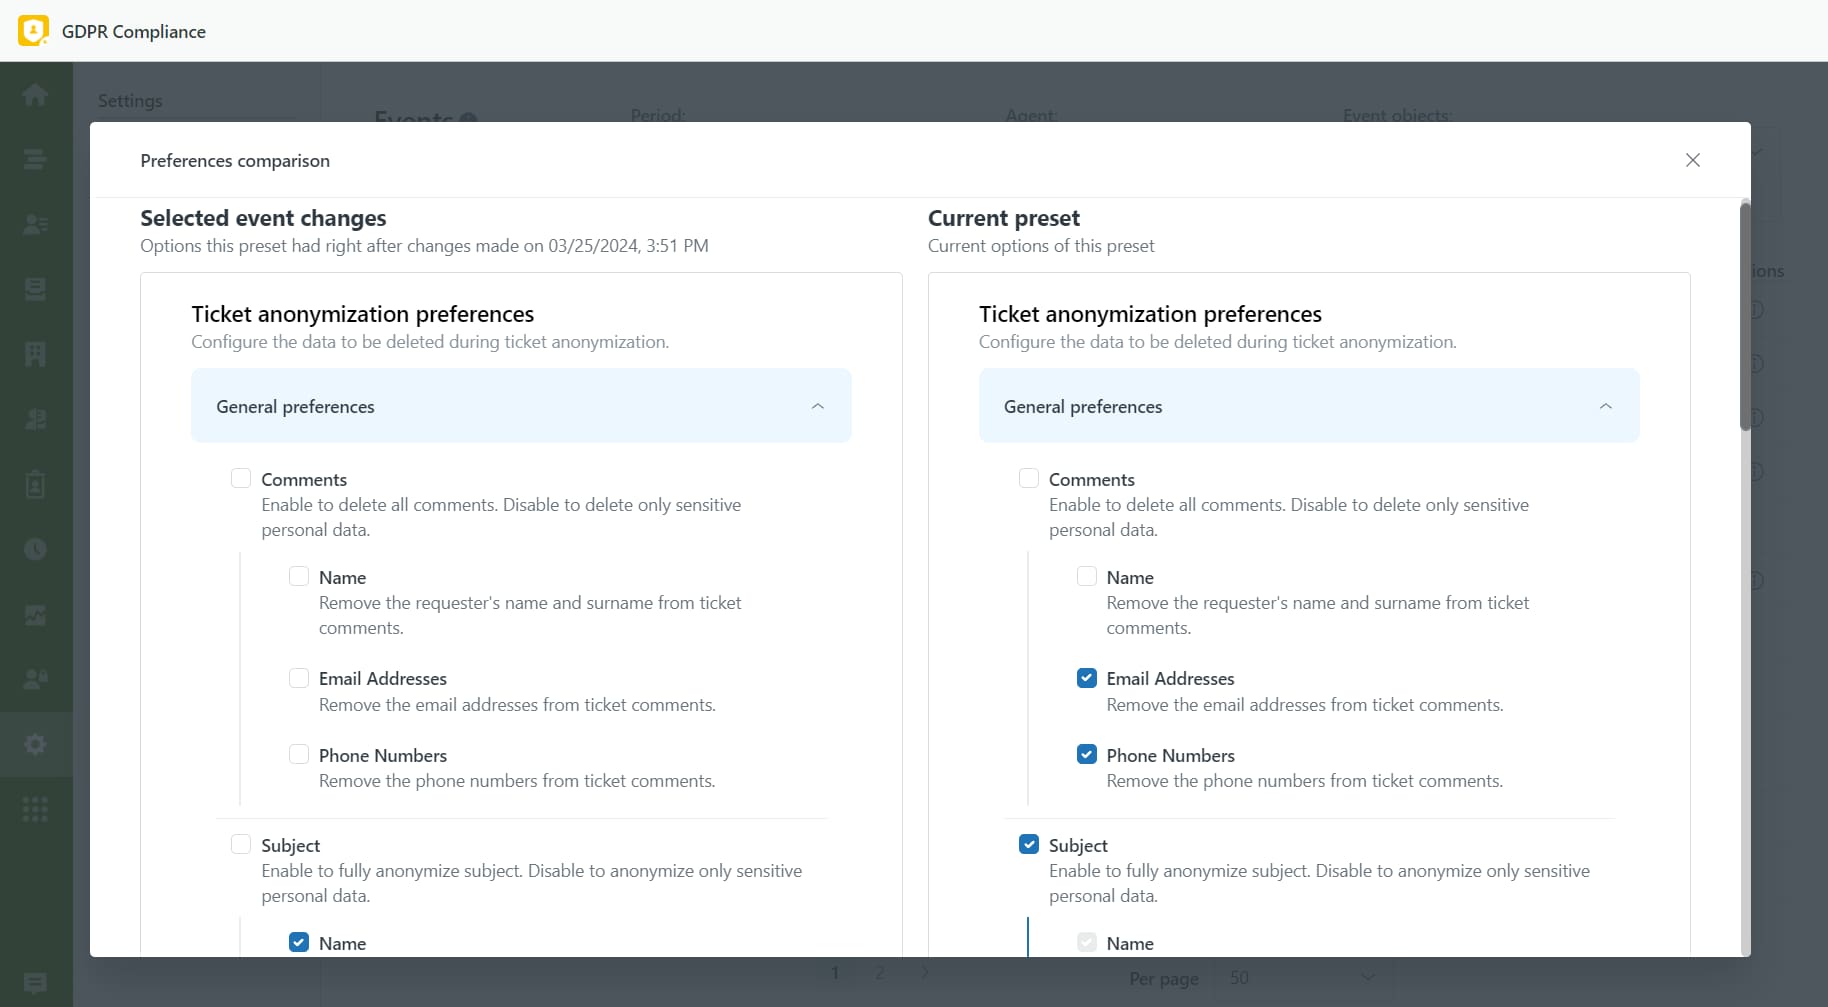
Be aware that only agents with full access can see other agents' events.
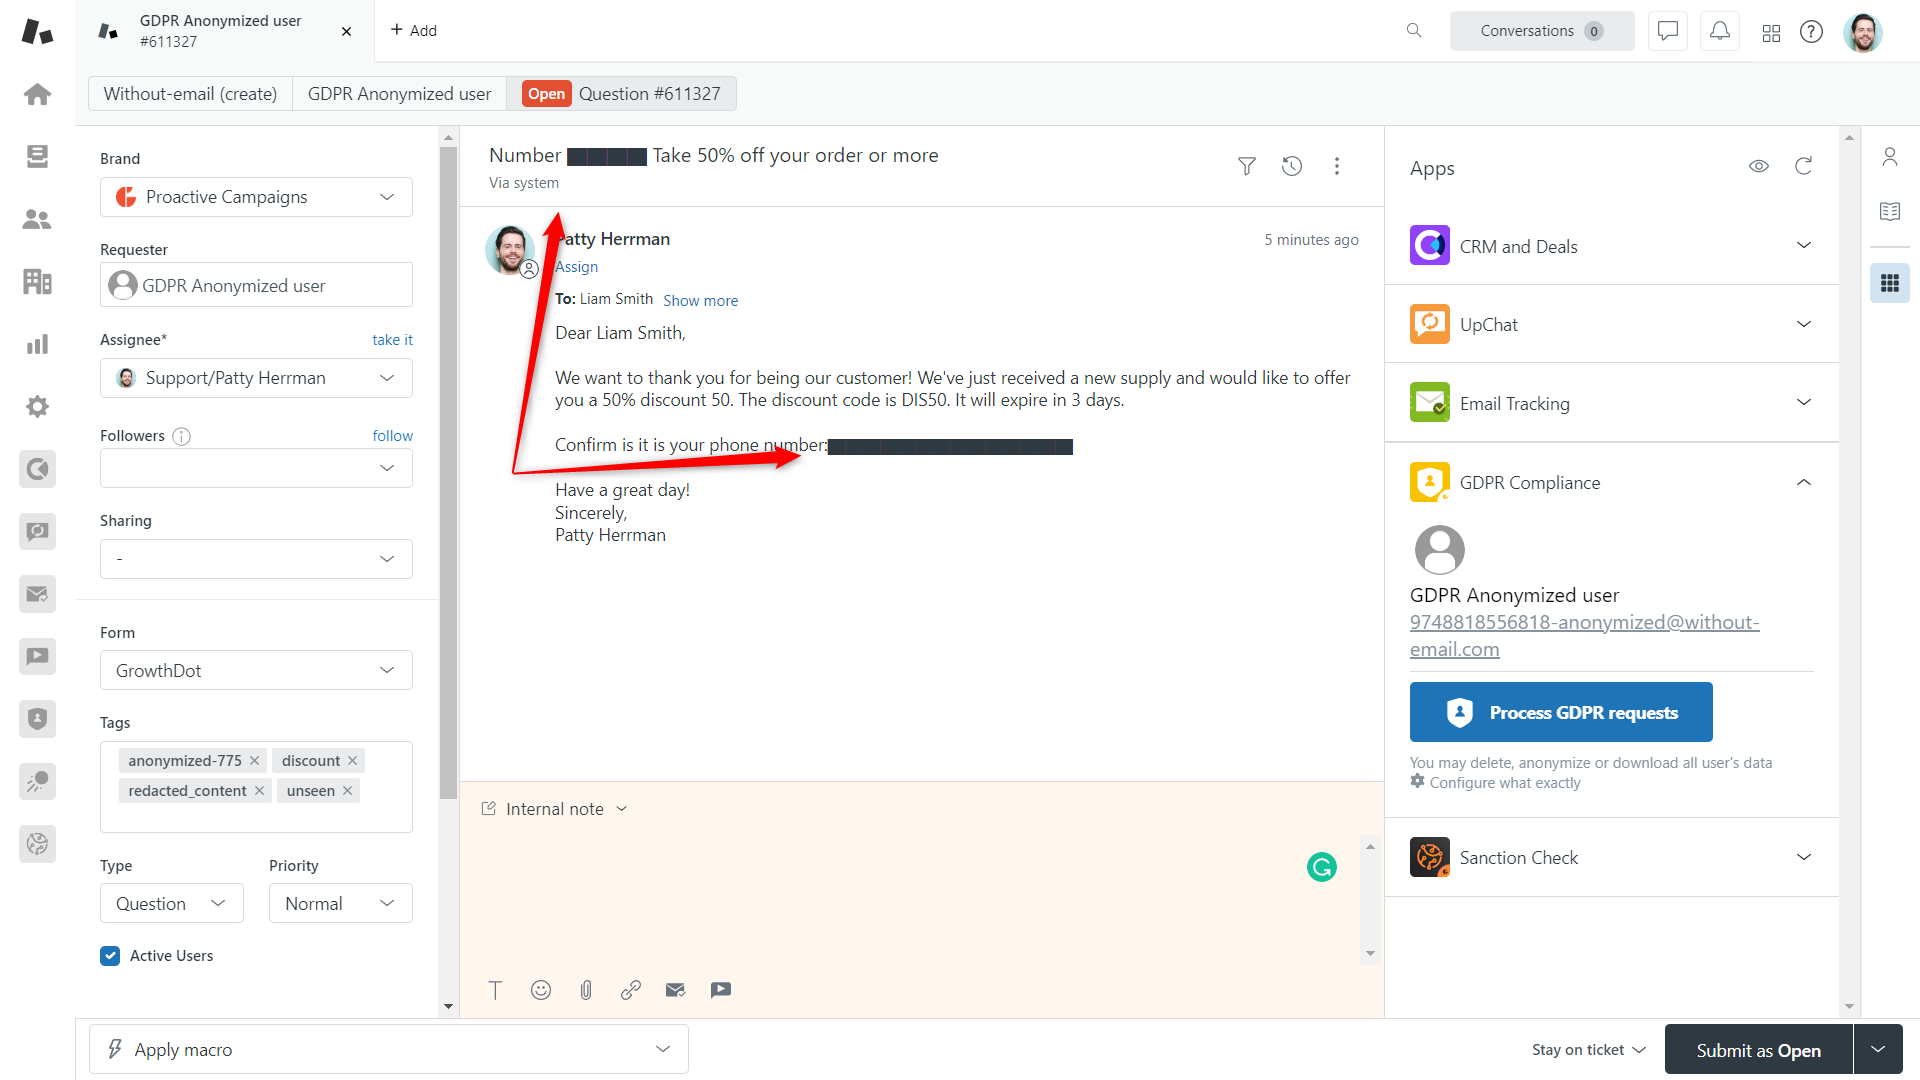
Process the Ticket Right From the Sidebar
Previously, you could initiate a GDPR request only for a user profile within the ticket. Now, it becomes possible to process both the user and the ticket data directly from the sidebar.
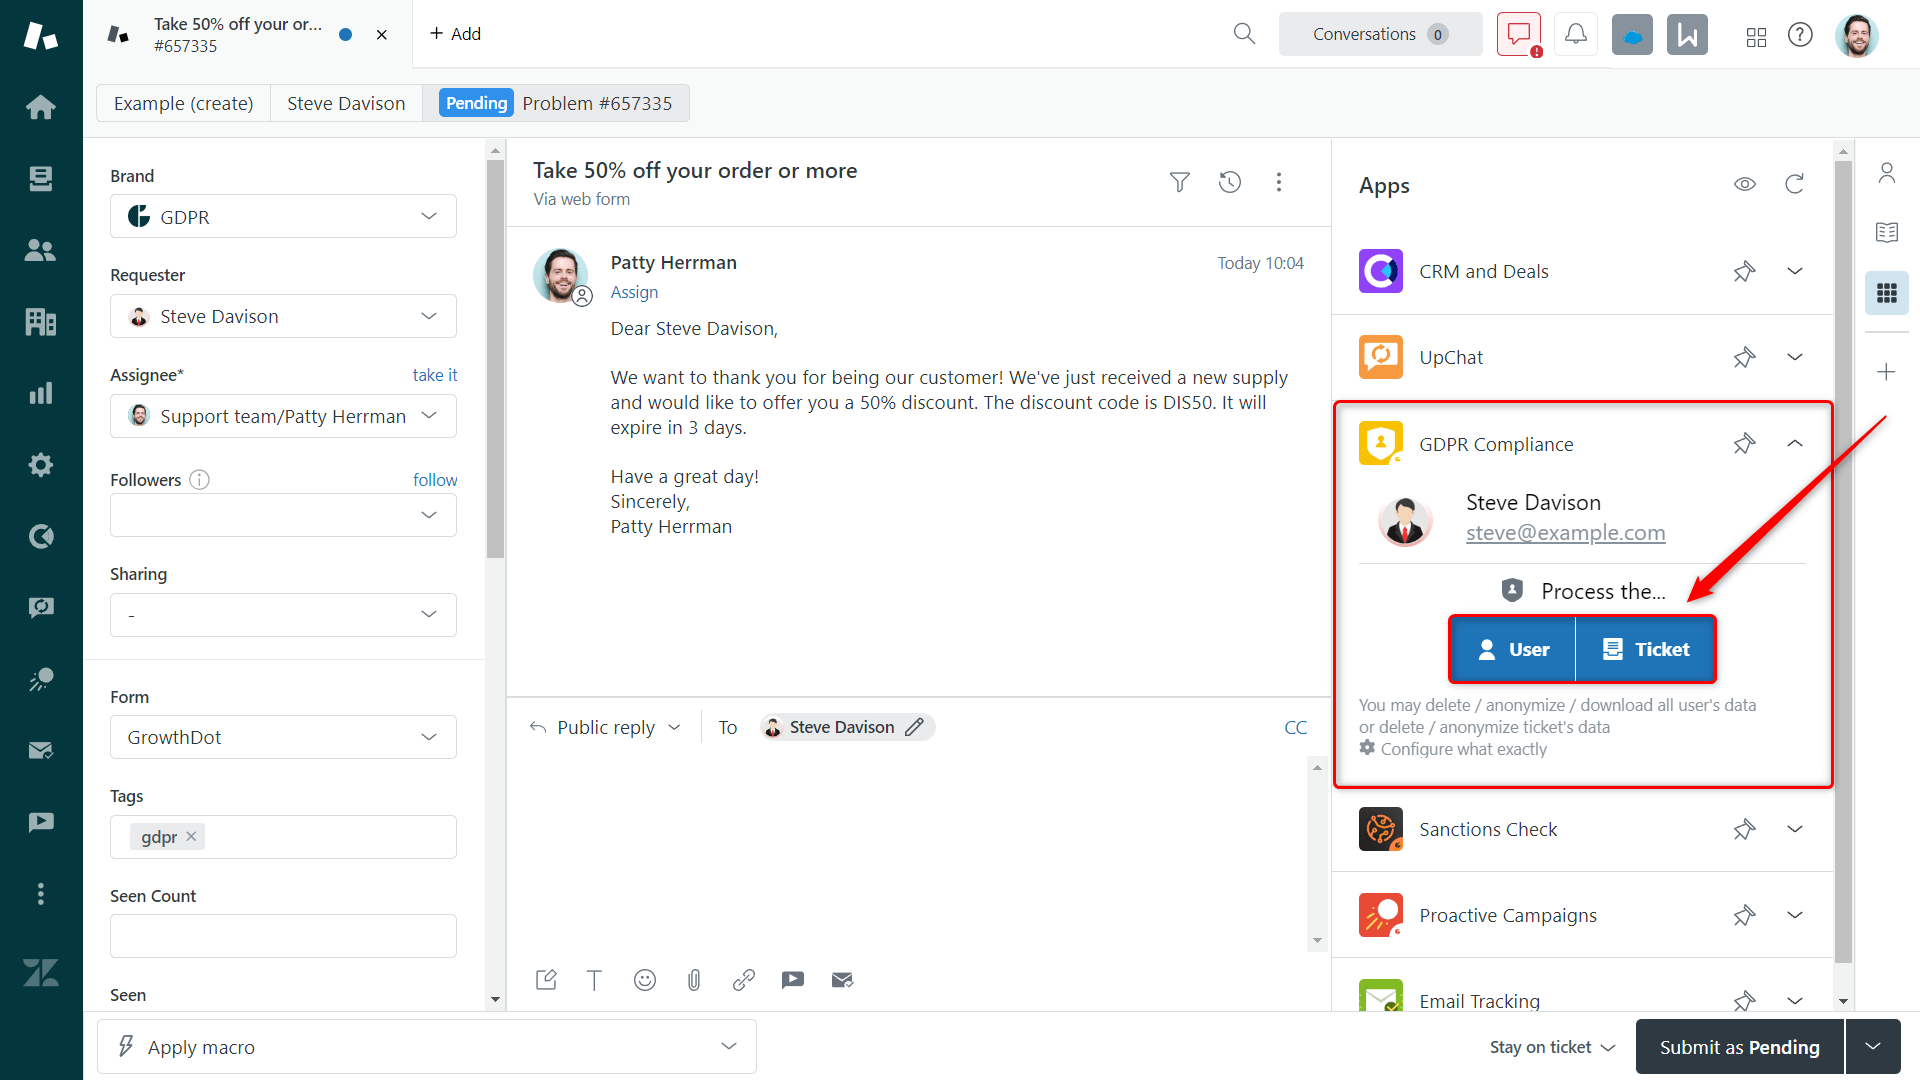
It is very convenient if you want to anonymize or delete only one particular ticket. Just choose the type of GDPR process, give it a name, select the preference preset, and proceed with the chosen ticket.
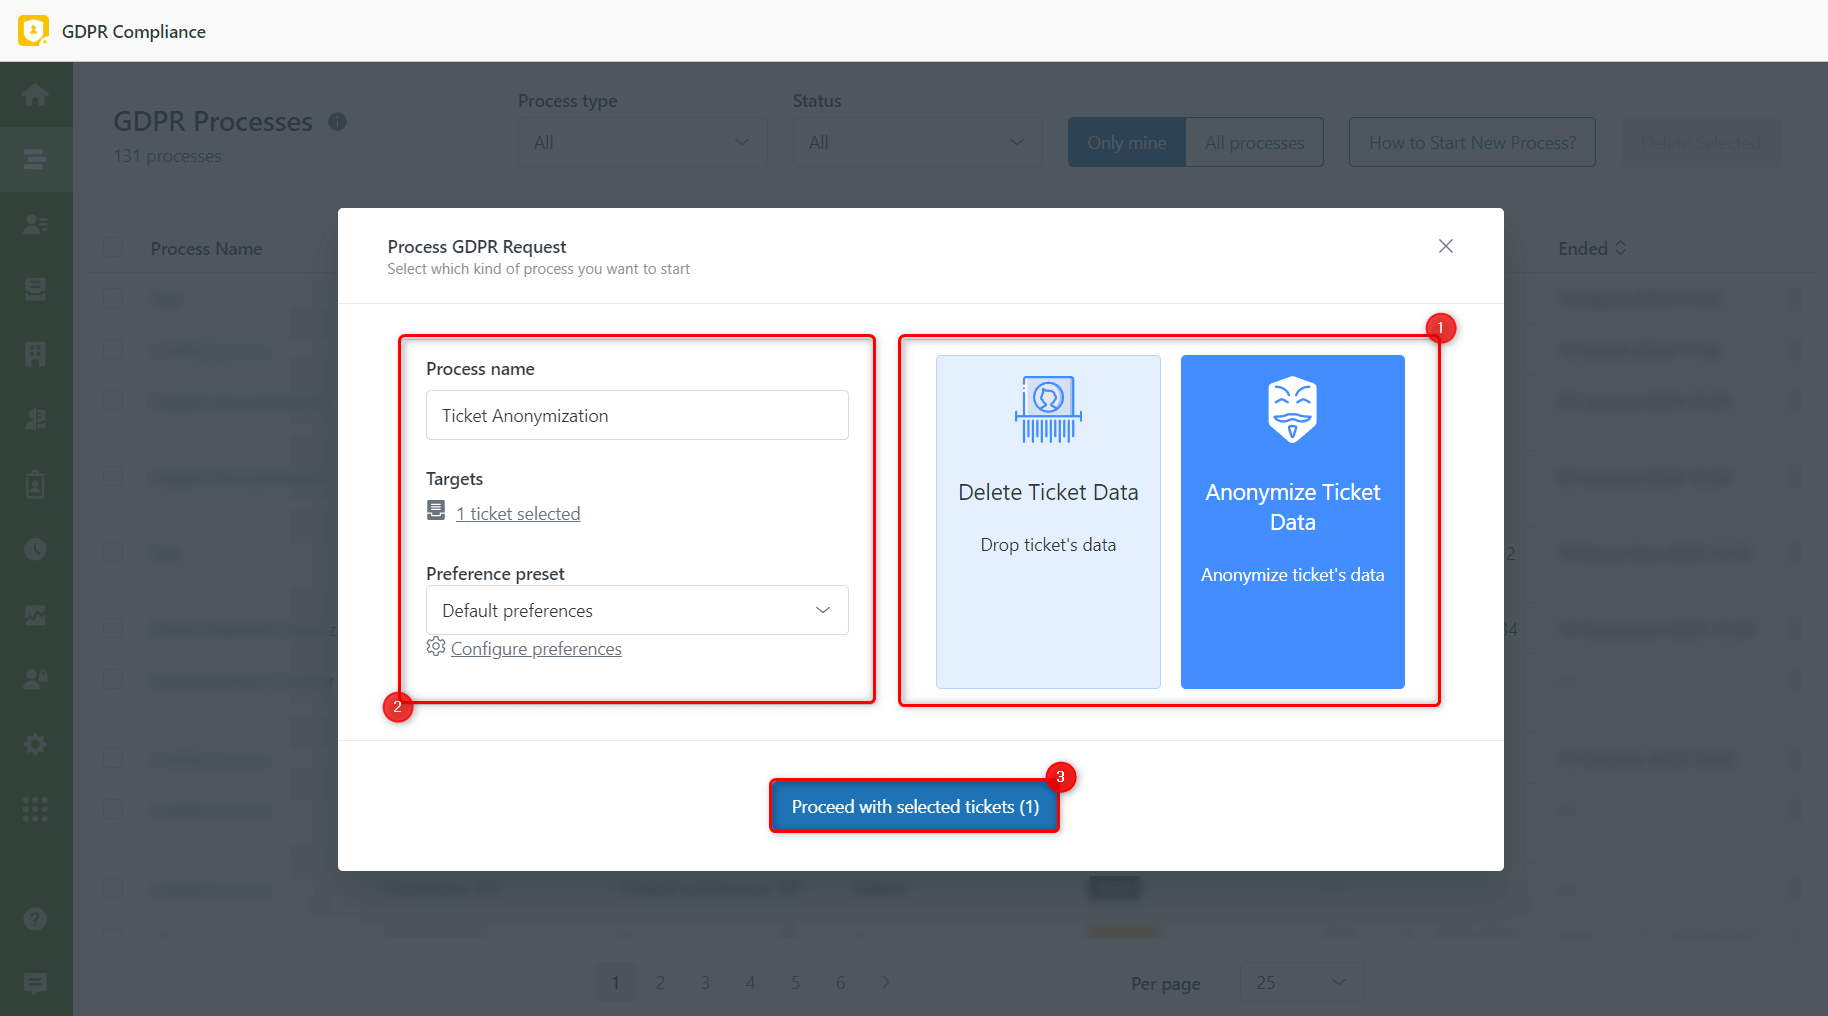
As you can see, we redesigned this Process GDPR Request modal window, but the functionality remains the same.
Email Addresses Anonymization - Updated
Data privacy is a top priority and the main goal of the GDPR Compliance app for Zendesk. With the latest update, you can be sure that all personal information is entirely secure.
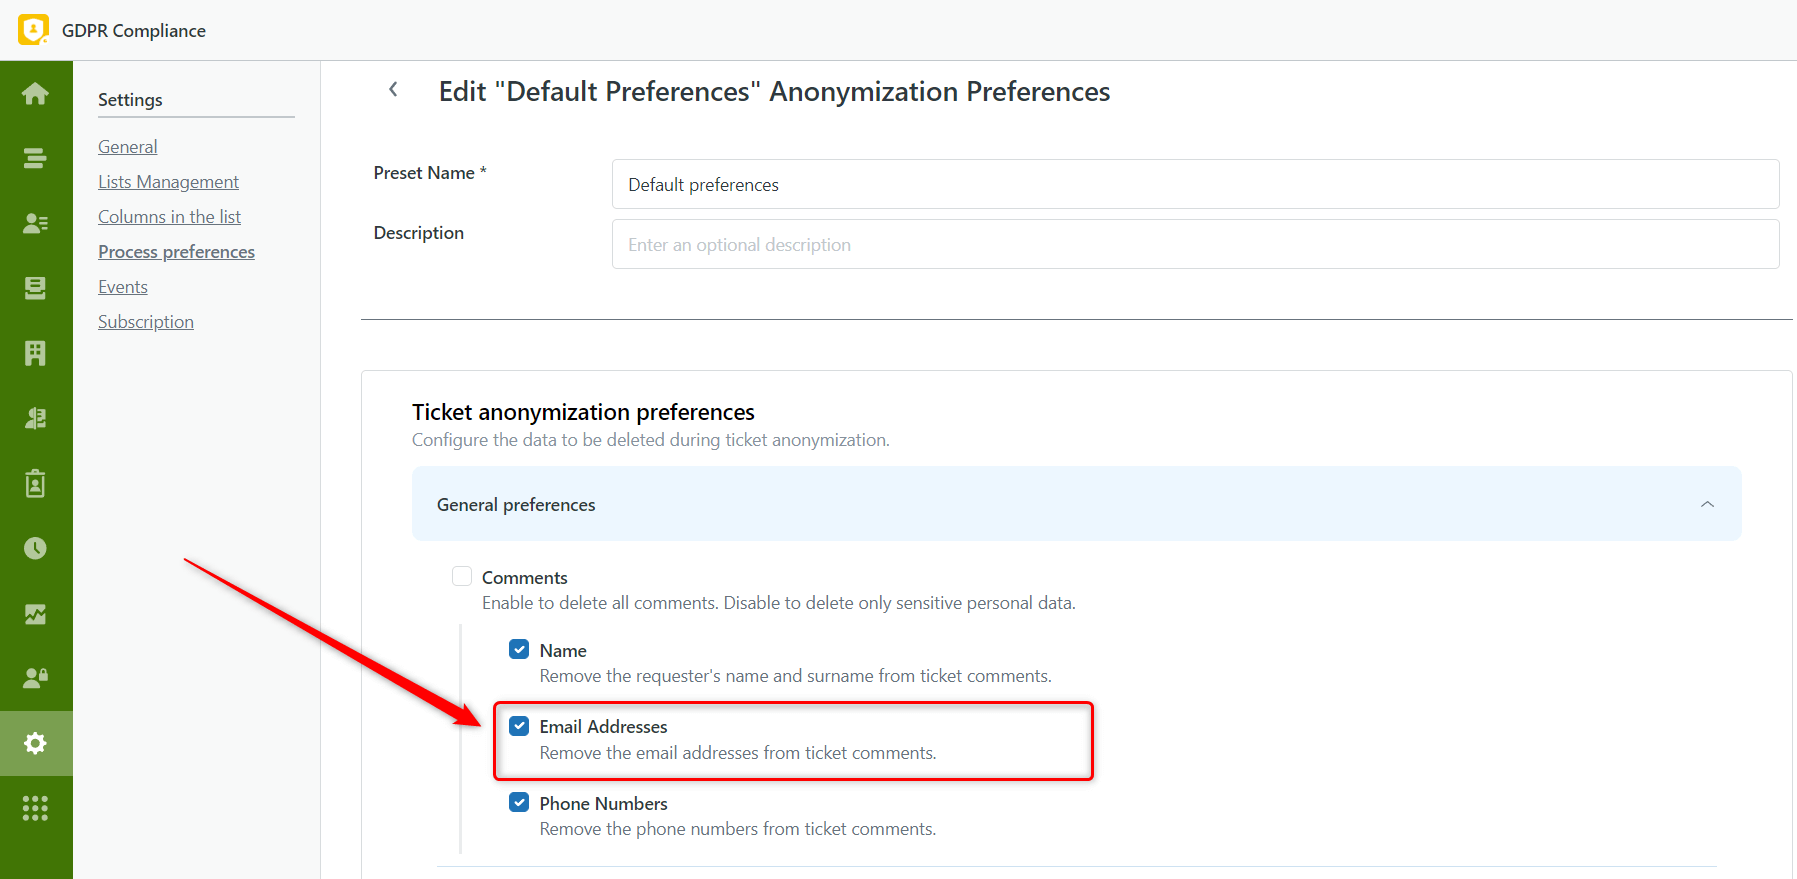
We've improved the anonymization process to anonymize not only the requester's email address but also all email addresses included in the comments. We understand that email is a type of data that must be kept confidential, whether it belongs to the requester or not.
Check your Ticket anonymization preferences on the Settings page > Process Preferences > Anonymization Presets Management to see if there is a tick next to the Email Addresses.
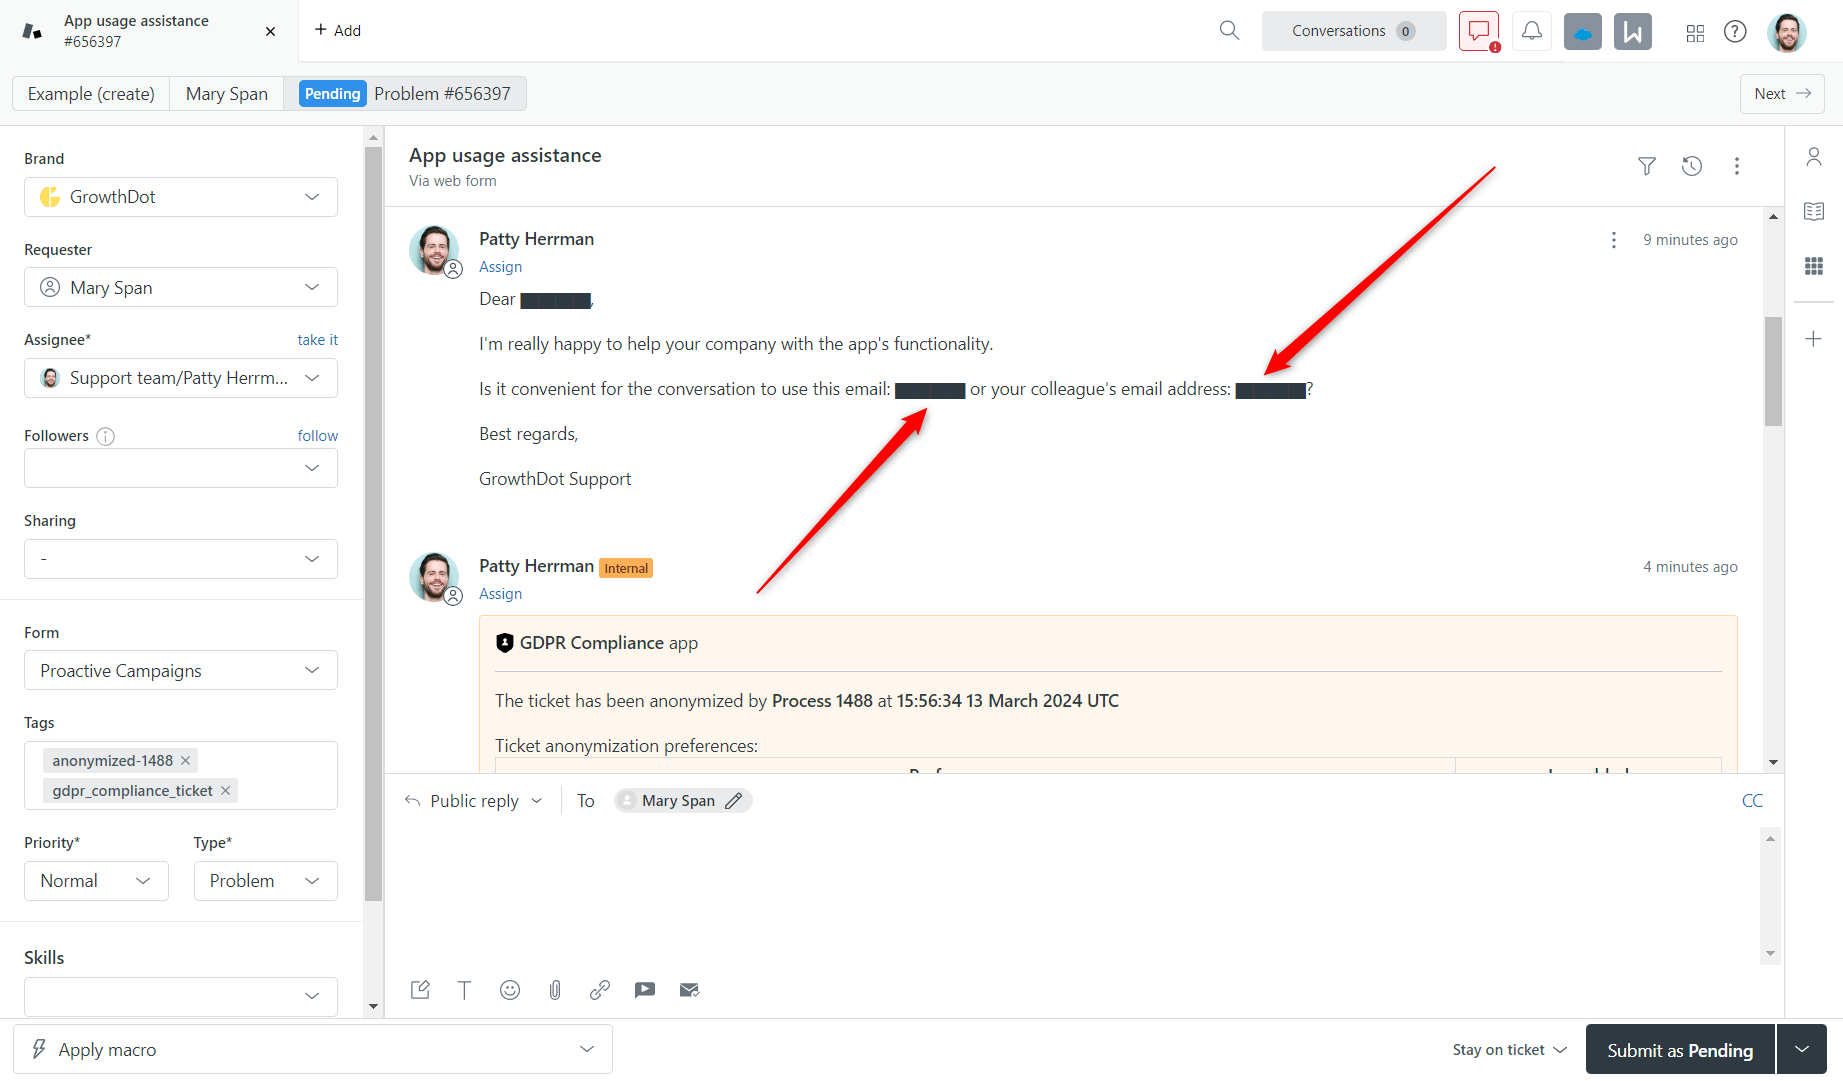
So, once you initiate the anonymization process, all email addresses in the comments will be hidden.
Custom Fields Preferences for Retrieval
If your company requires precise control over data exports, we're thrilled to introduce a new feature in the GDPR Compliance app. We understand that not all users' and tickets' data is meant for external eyes. With this in mind, our latest update empowers you to specify which custom fields to include during retrieval, ensuring that only the necessary data is exported.
To do so, go to Settings > Process Preferences > Retrieving Presets Management and select the preset you need to configure. In the Ticket and User retrieve preferences, you will find Custom fields preferences where you can choose necessary fields.
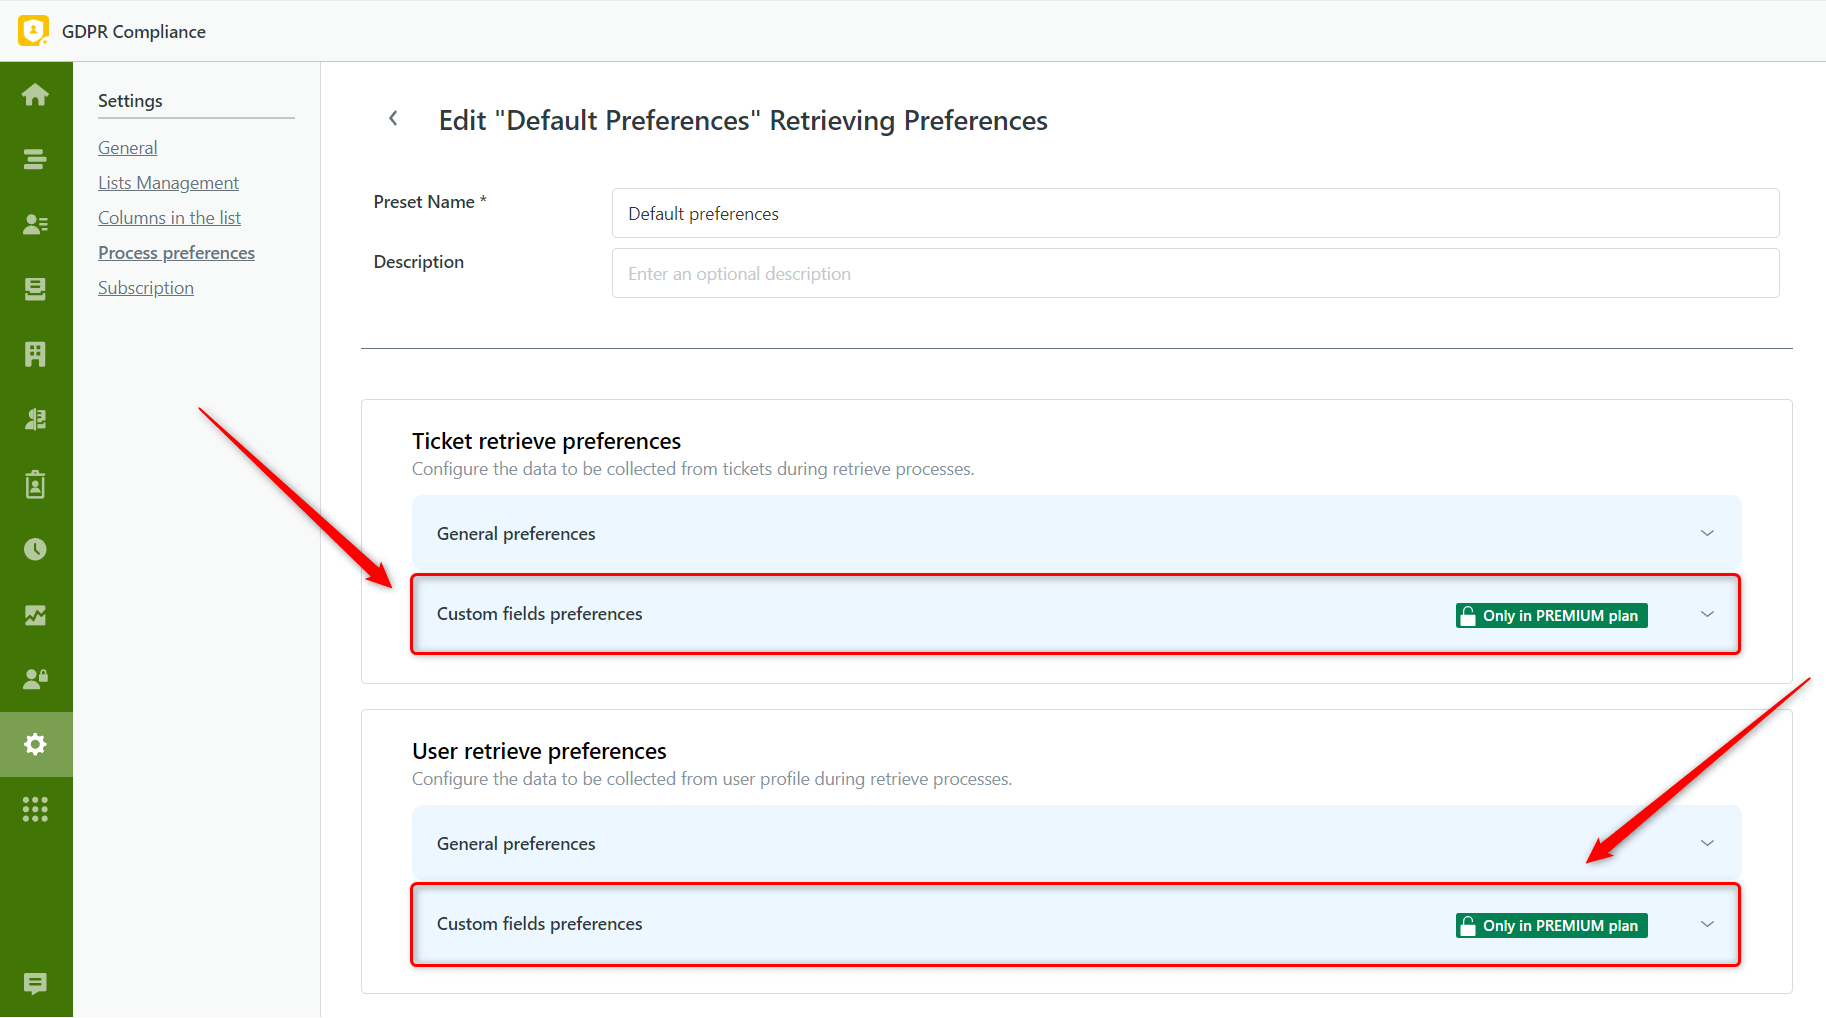
Plus, in General Preferences, we've added a new option to Ignore Empty Fields that will exclude any fields that contain no information, keeping your retrieving data clean and concise.
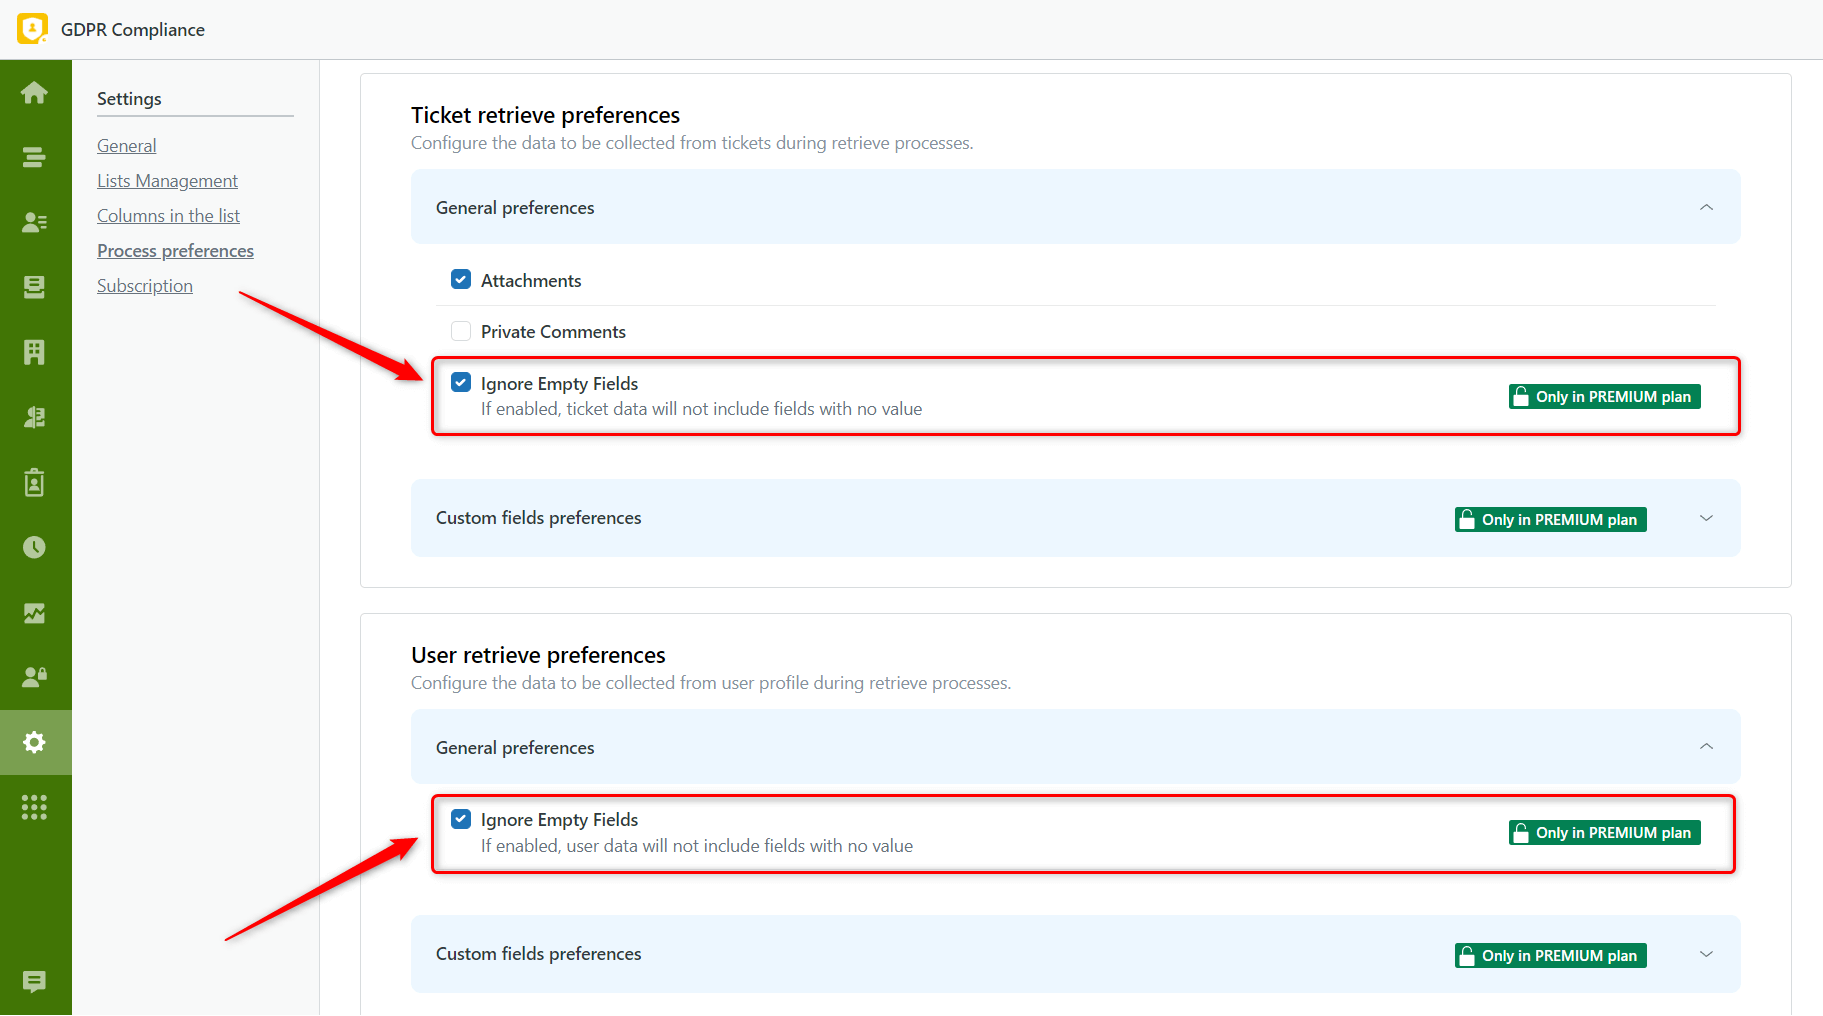
Try new features now with the Premium Plan to take full control of your data retrieval process.
Attachments Condition for Ticket Lists
Due to our clients' requests, we've added a new type of criteria for filtering tickets. So, next time you create a ticket list, add a new condition based on attachments. It will include only tickets that have attached files or only those that do not have them.
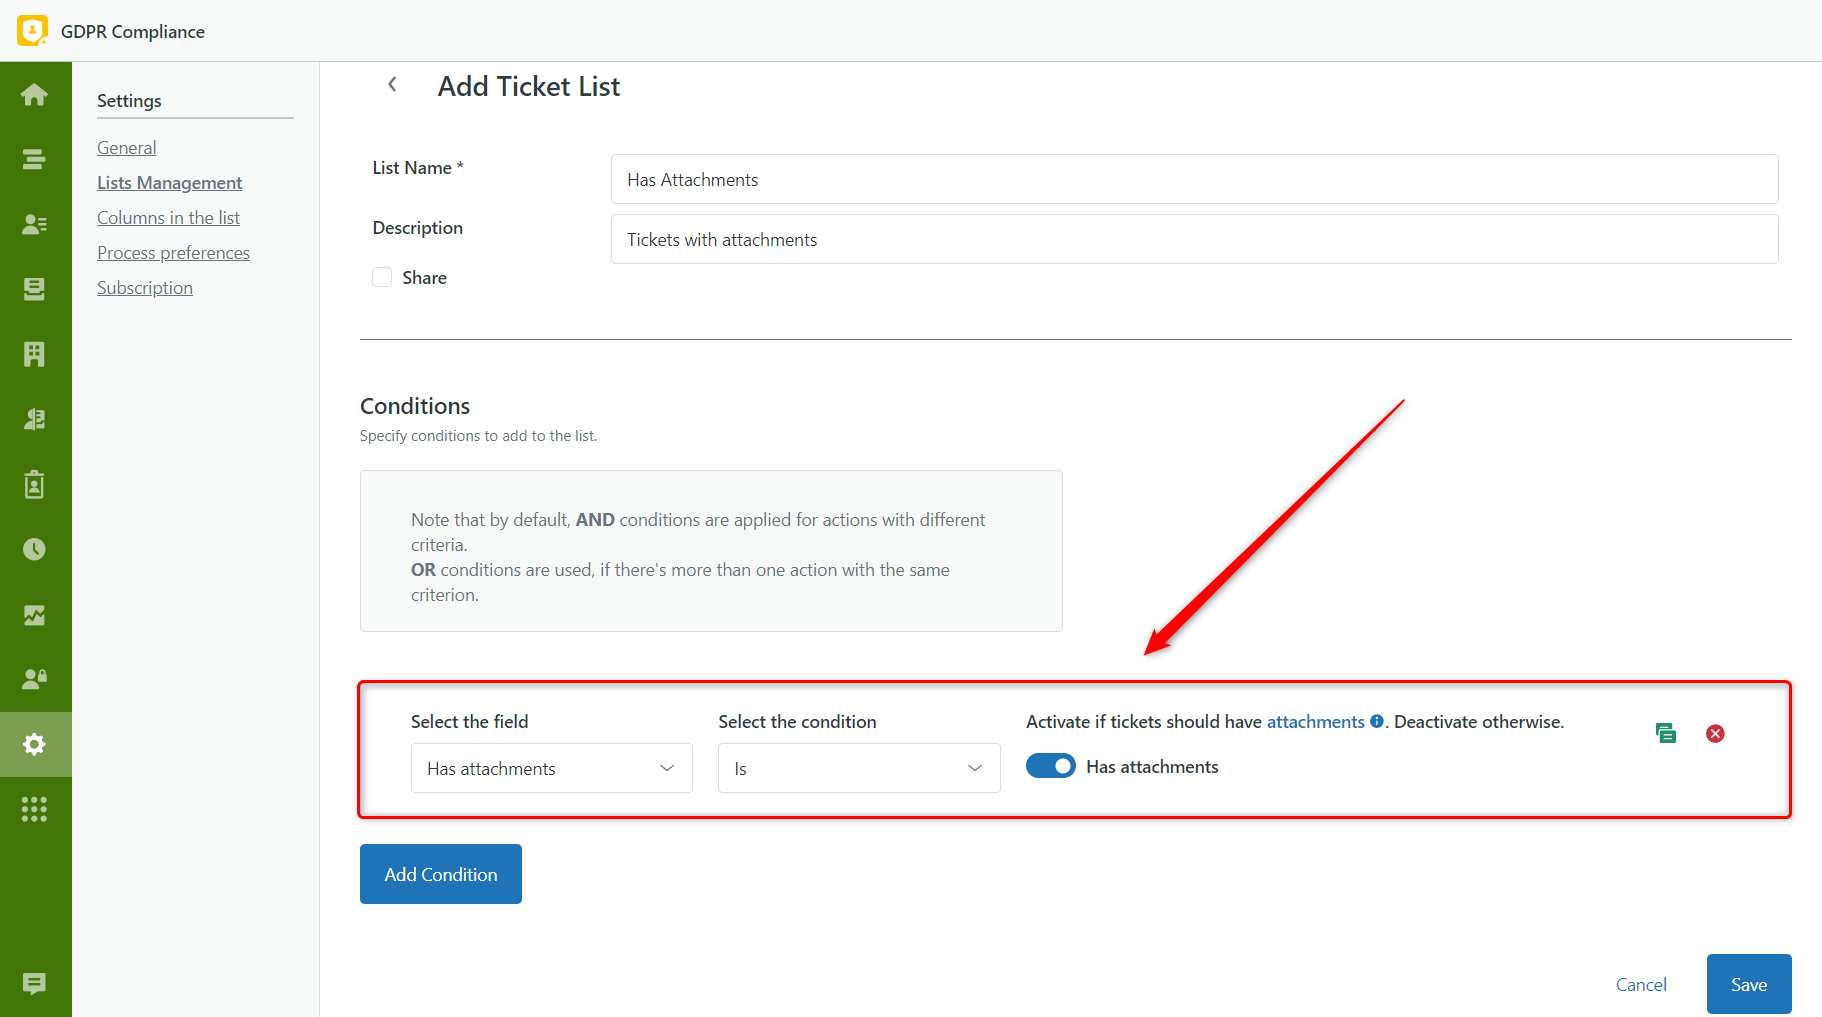
Whether you need to prioritize or skip tickets with attachments for deleting and anonymizing processes, the GDPR Compliance app now provides the flexibility you need to manage Zendesk tickets more effectively.
Subject Anonymization
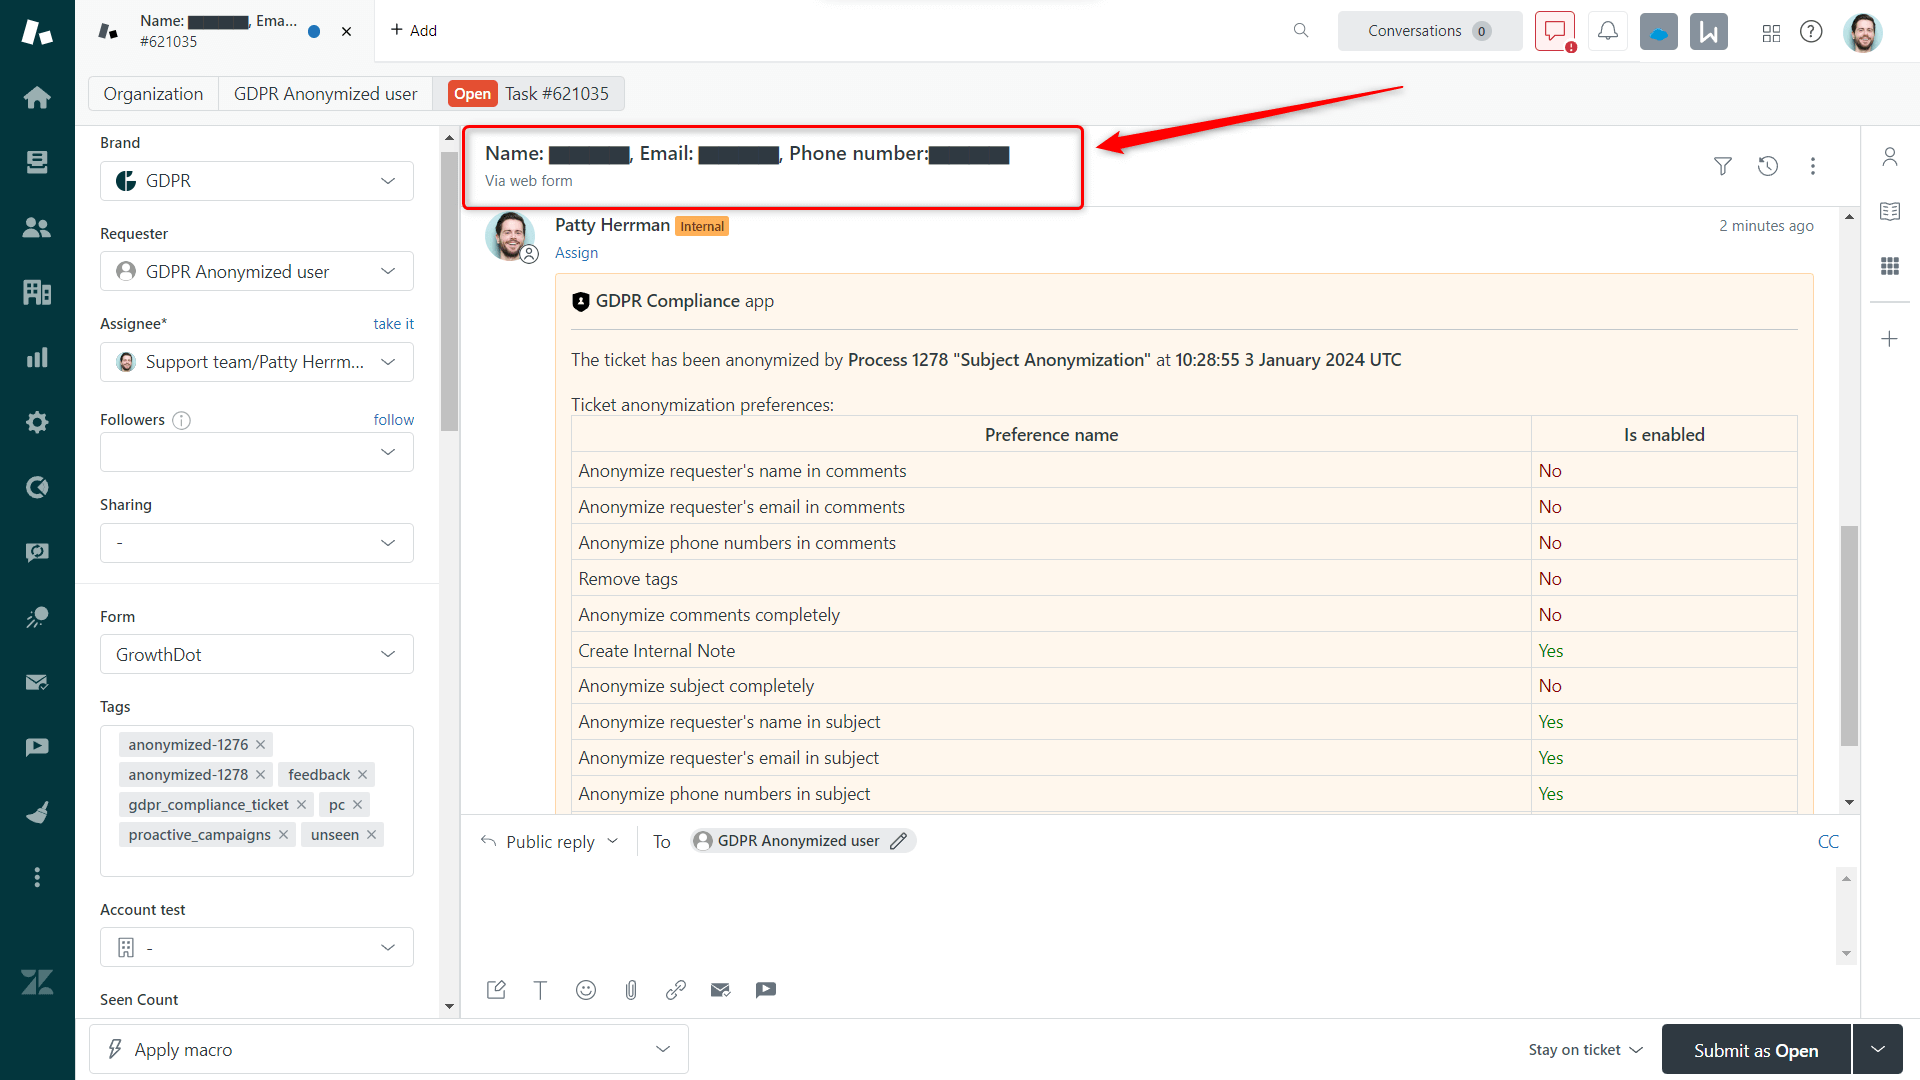
Our team works hard to make the anonymization process even more accurate. That's why we've updated the ticket anonymization preferences by adding subject preferences.
Now, you can fully anonymize the ticket's subject or specify what sensitive data you want to anonymize in the subject:
- Name: removes the requester's name and surname;
- Email: removes the requester's email address;
- Phone Numbers: remove the phone numbers.
To do so, go to the Setting page > Process Preferences > Anonymization Presets Management and edit the preset you need.
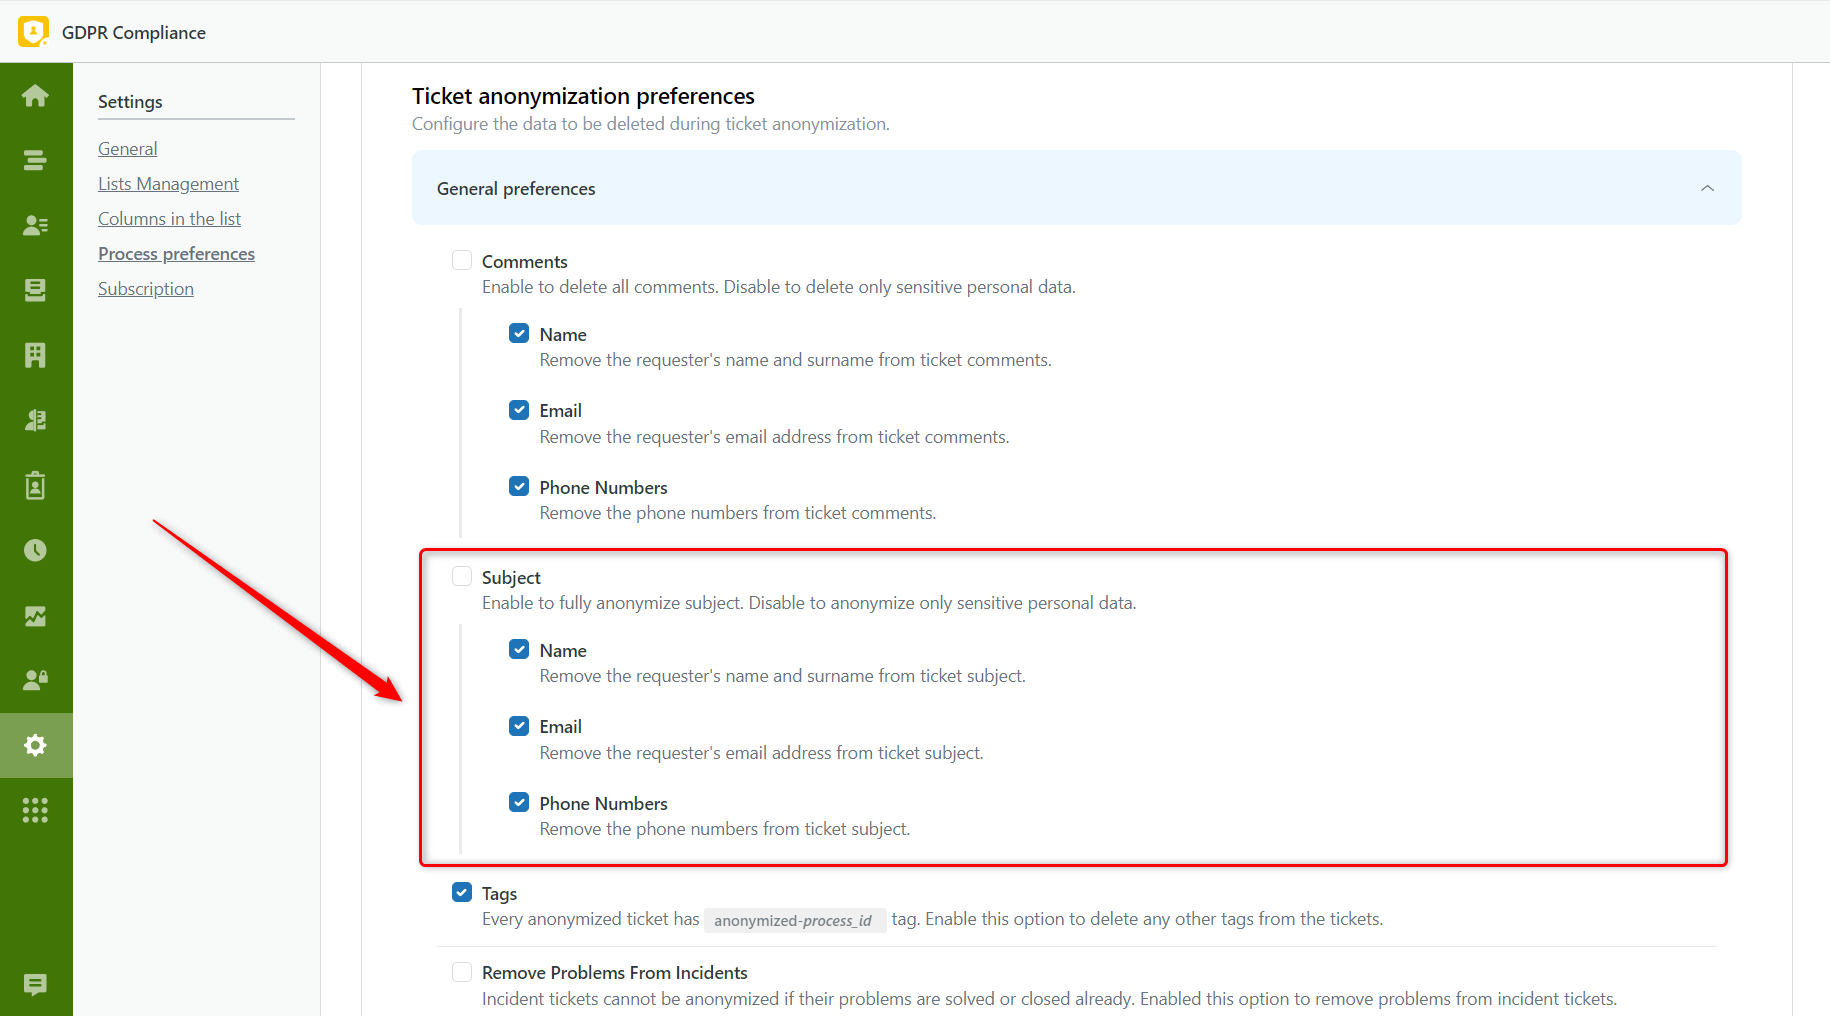
After running the anonymization process with the subject's anonymization settings configured, all selected sensitive information will be hidden in the subject.
Create Shared Lists
To ensure seamless collaboration between your team members, we've added an option to share the lists with other agents to comply with GDPR standards across the Zendesk ecosystem. By implementing shared lists, you can significantly improve your support team's efficiency, consistency, and flexibility.
This feature is available for all types of lists:
- Contact lists
- Ticket lists
- Organization lists
- Combined lists
Enable it by marking the checkbox Share when creating a list.
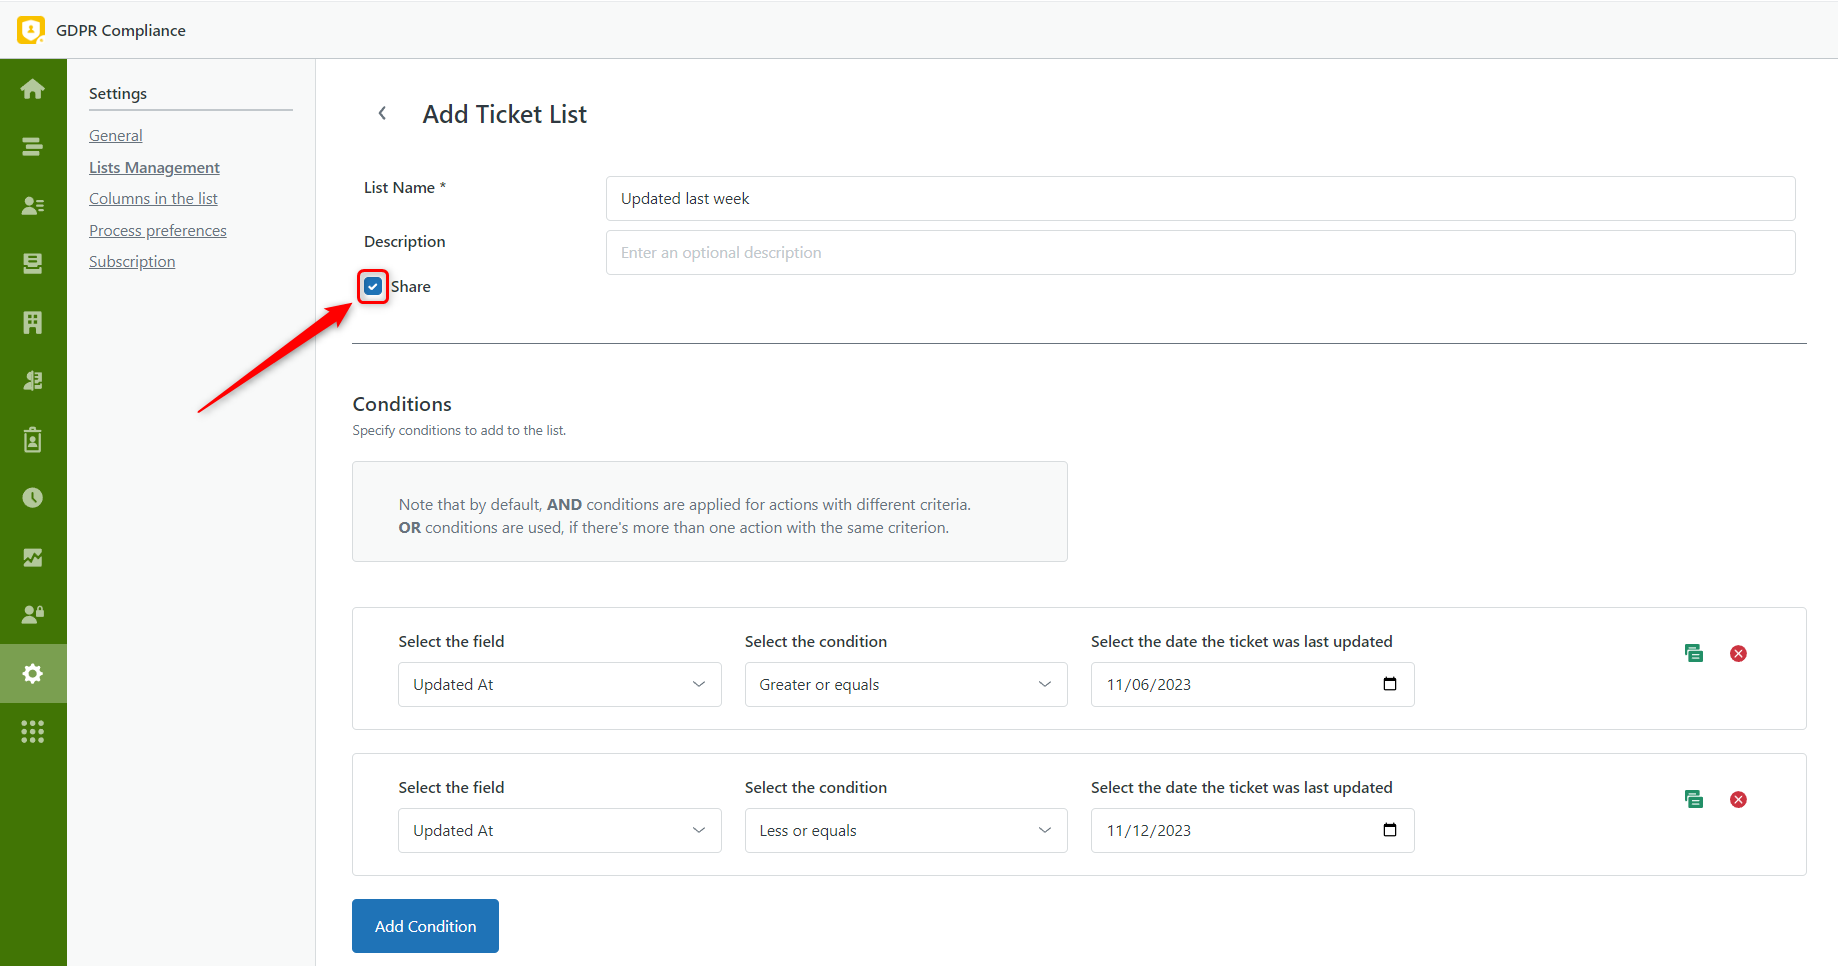
This way, your colleagues can use and process, for example, the same set of tickets, and agents with full access can also edit and contribute to this list.
Also, we've made it easy to navigate through lists with Sort and Filter options. You can now find the exact list you need in a few clicks.
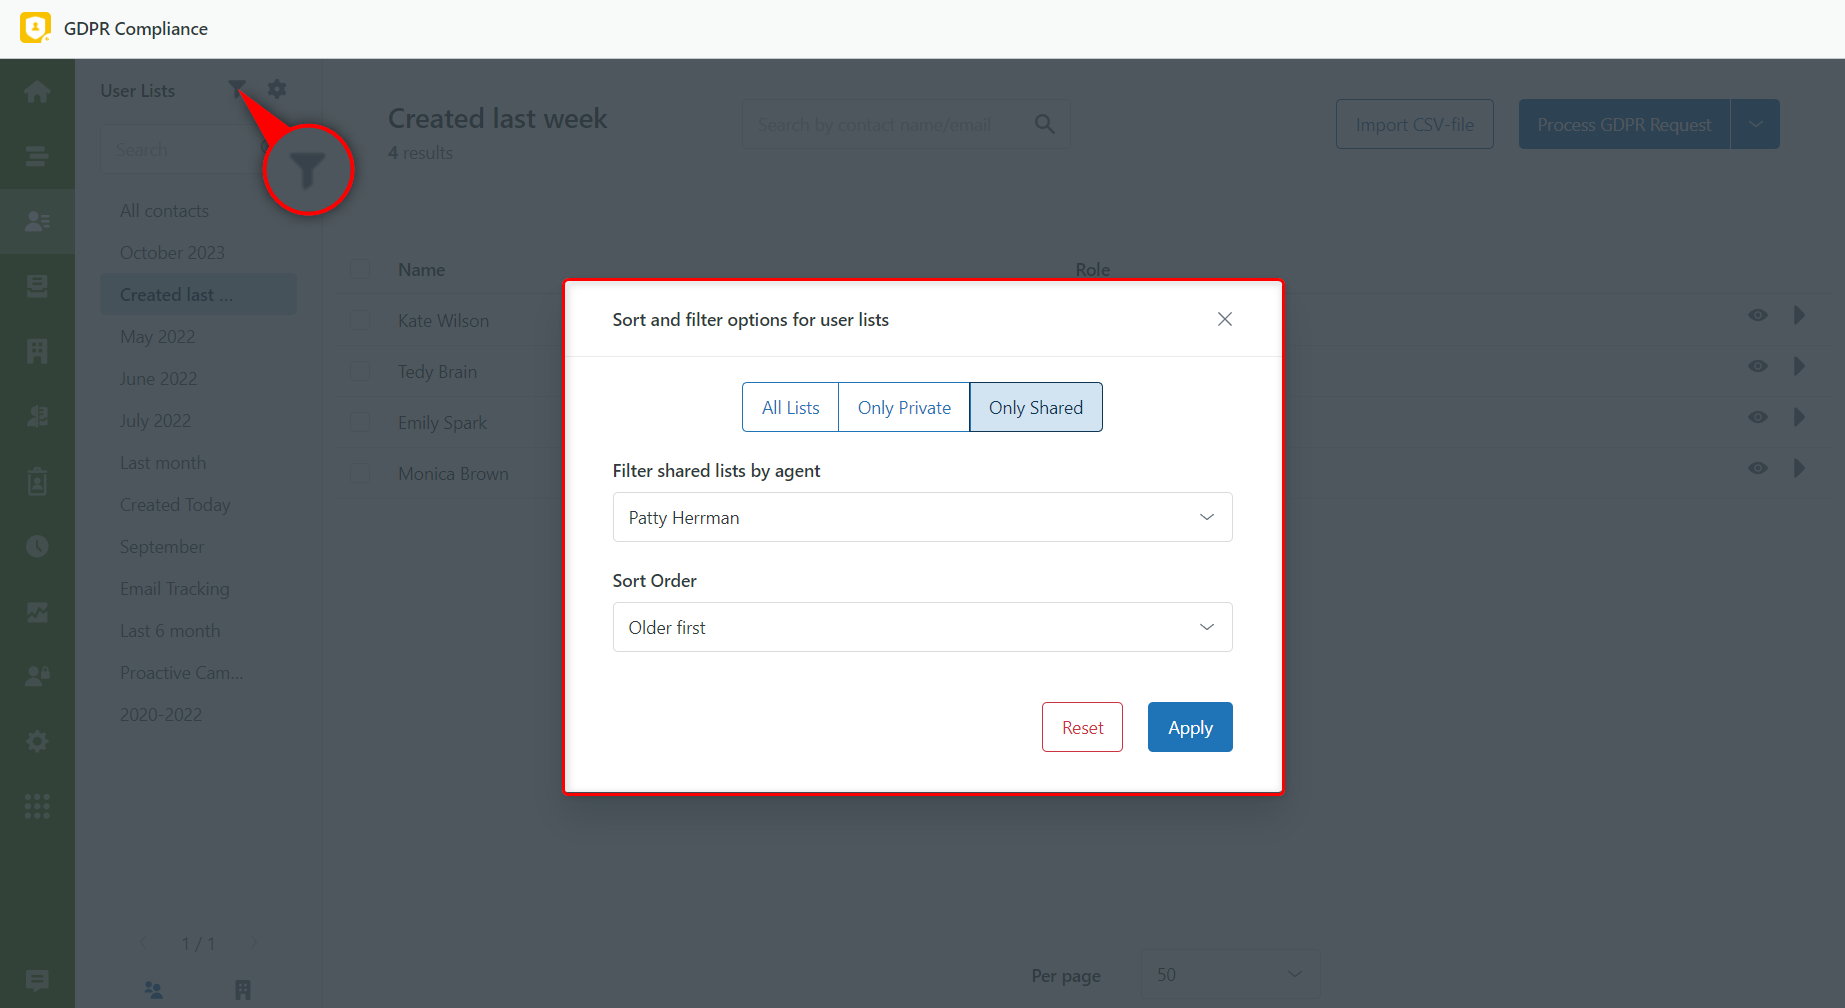
So, try shared lists right now with the Premium plan in the GDPR Compliance app to streamline workflows and enhance communication in your team.
Presets for Process Preferences
Some companies need to provide different types of anonymizing, deletion or retrieving depending on departments and their goals. Some of them need only ticket anonymization, the other one need to forget users but not to affect tickets. So shifting settings from time to time can take a lot of time and cause a mess in ticket processing. However, we found a workaround! Process preference presets can solve the problem.
The flow is super easy:
1. Create a new preset in the Process Preference tab as shown on the screenshot below.
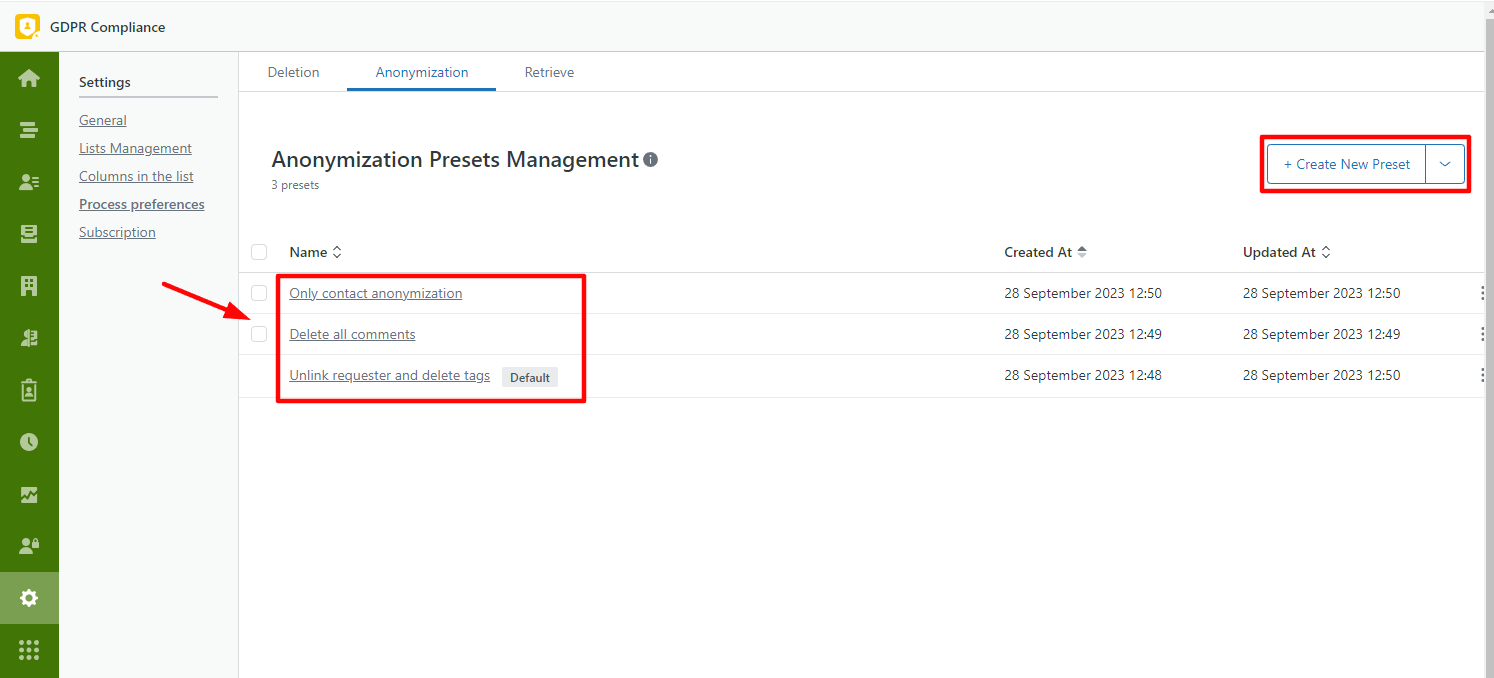
2. Select the preference preset from the dropdown menu during any process launch or automation creation so that different processes can be started at the same time.
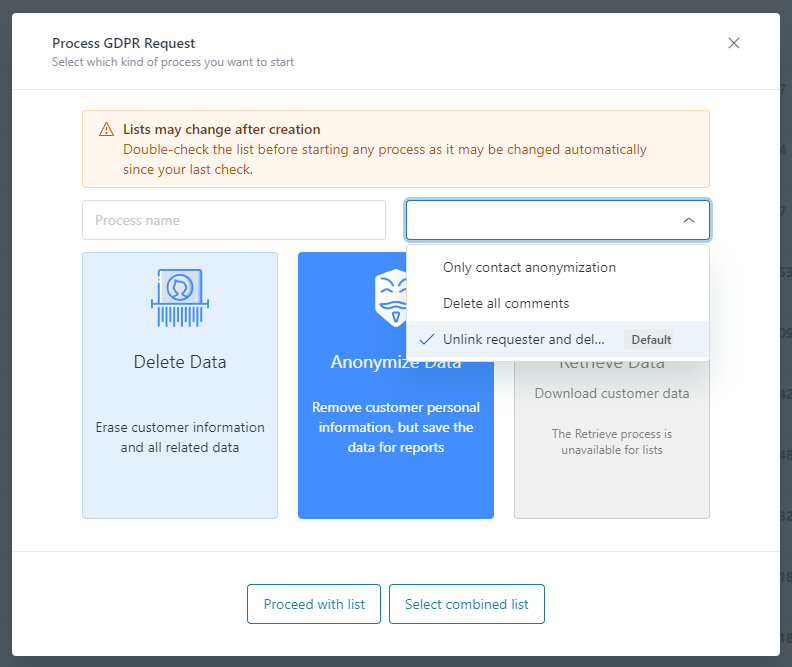
Note: You can create 20 presets per process for Premium plan and 1 preset per each process for Standard plan.
Identify GDPR Compliance’s tickets easily
If you consider how to check the number of anonymized tickets, we explain the easiest way! With a recent update, all anonymized tickets will get the gdpr_compliance_ticket tag.
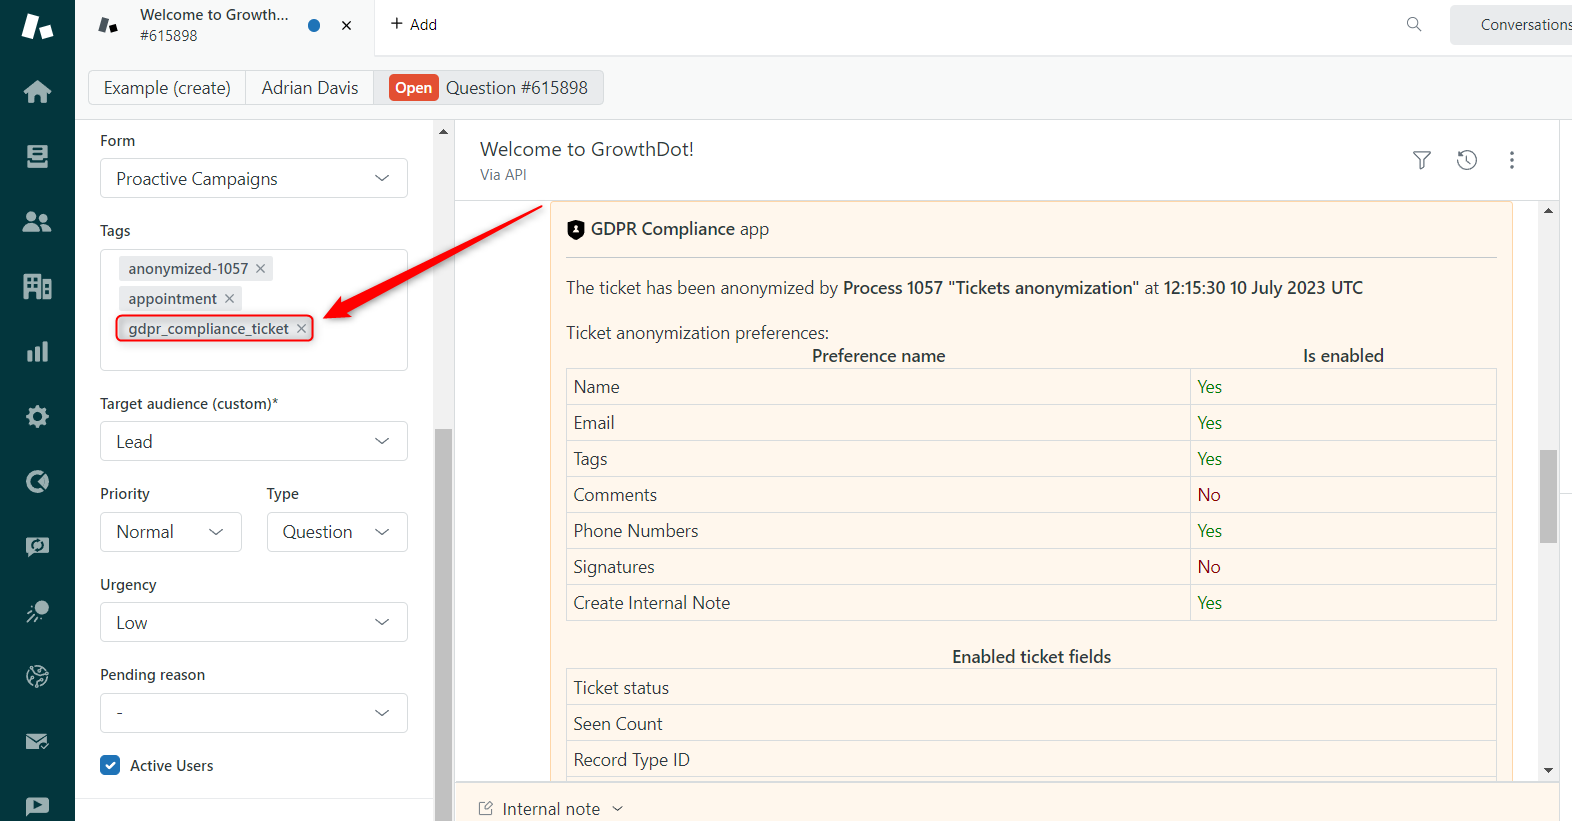
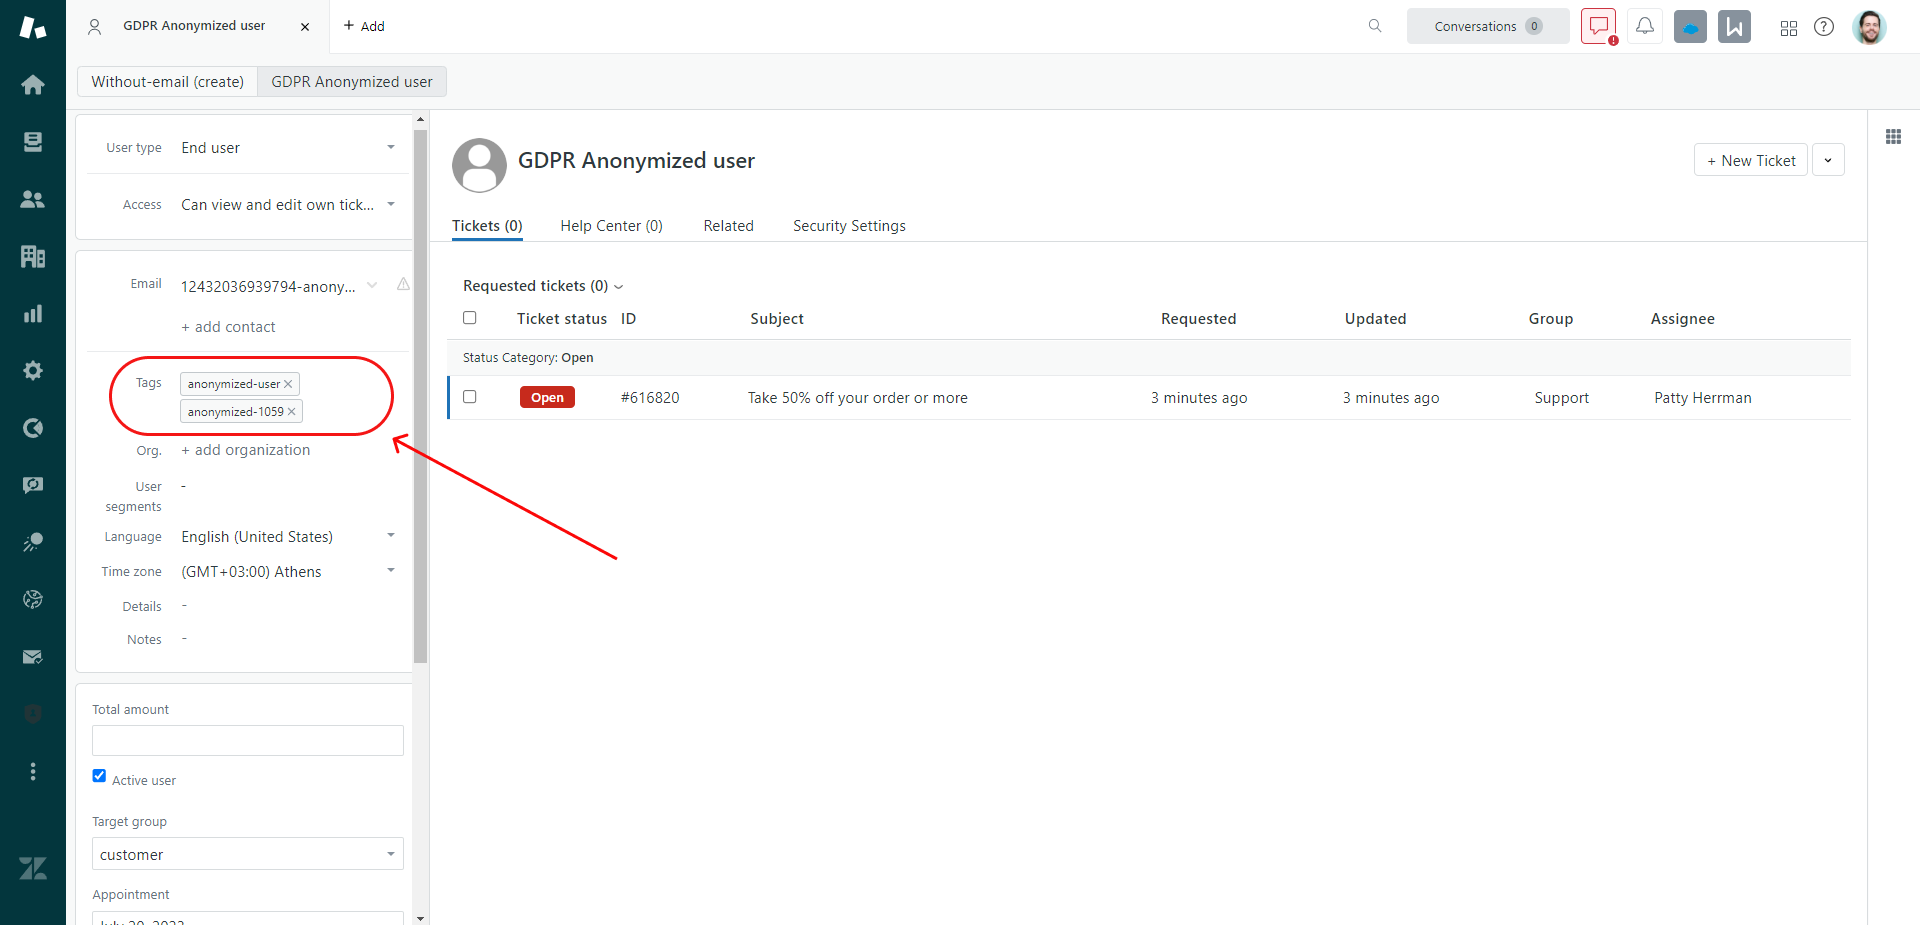
Besides, with the Pro Plan, there is one more tagging option - Add Process-Specific Tags. When the setting is enabled, after users anonymization, the app will add two tags:
- A general tag
- A specific tag related to the process that anonymized a user.
As a hint, you can use tag filtering in Zendesk Support on the Views tab or create reports in Zendesk Explore to analyze the number of anonymized tickets.
Free application on Sandbox
We now offer a free version of GDPR Compliance for Zendesk! This service is for you if you have a test Zendesk platform. This integration can be tested on a Sandbox account so that you can see how it works and make test anonymization and deletion. If you would like to try this out, please contact our support team.
Updated Homepage Interface
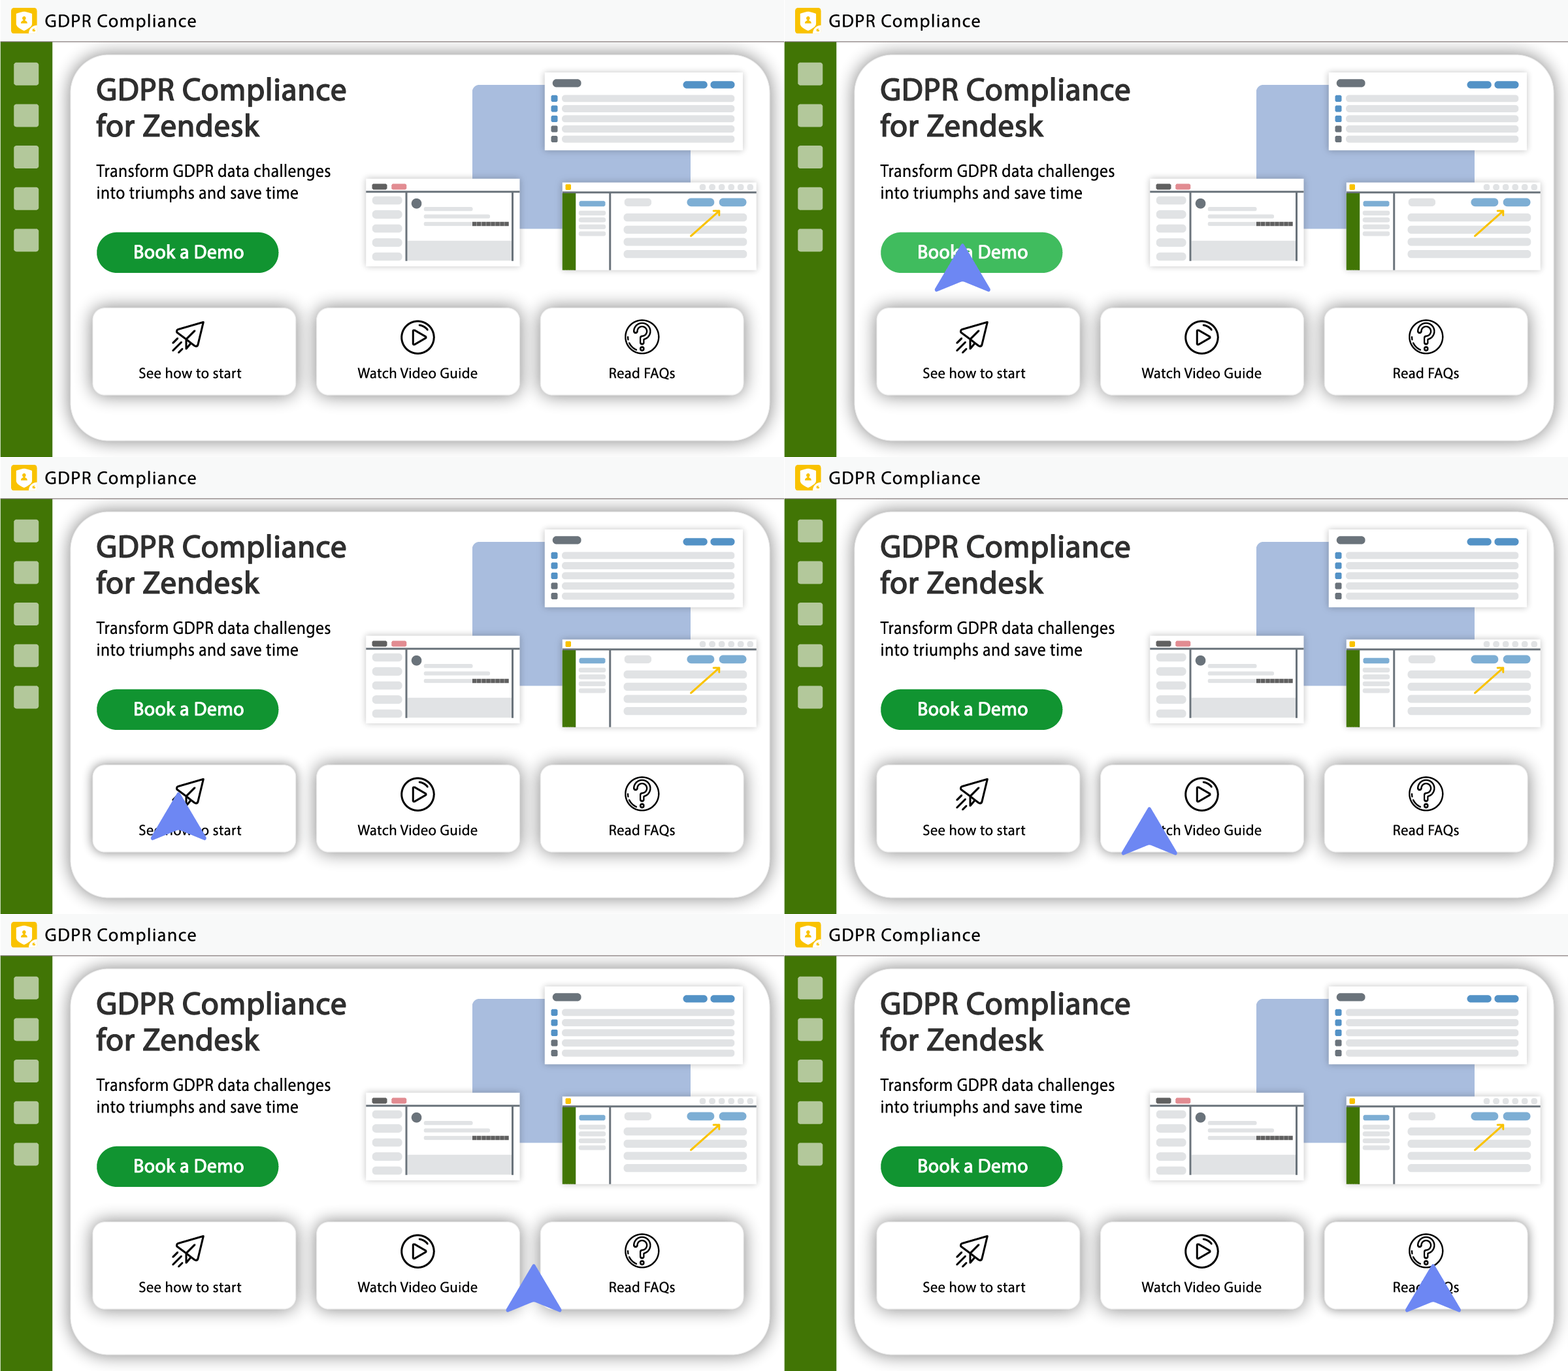
Meet a new look of our app's start page! You can schedule a demo with our support team, overview the guide on how to start using the application, view video tutorials, and read articles in Knowledge Base. So, click on a thematic box to access the desired topic.
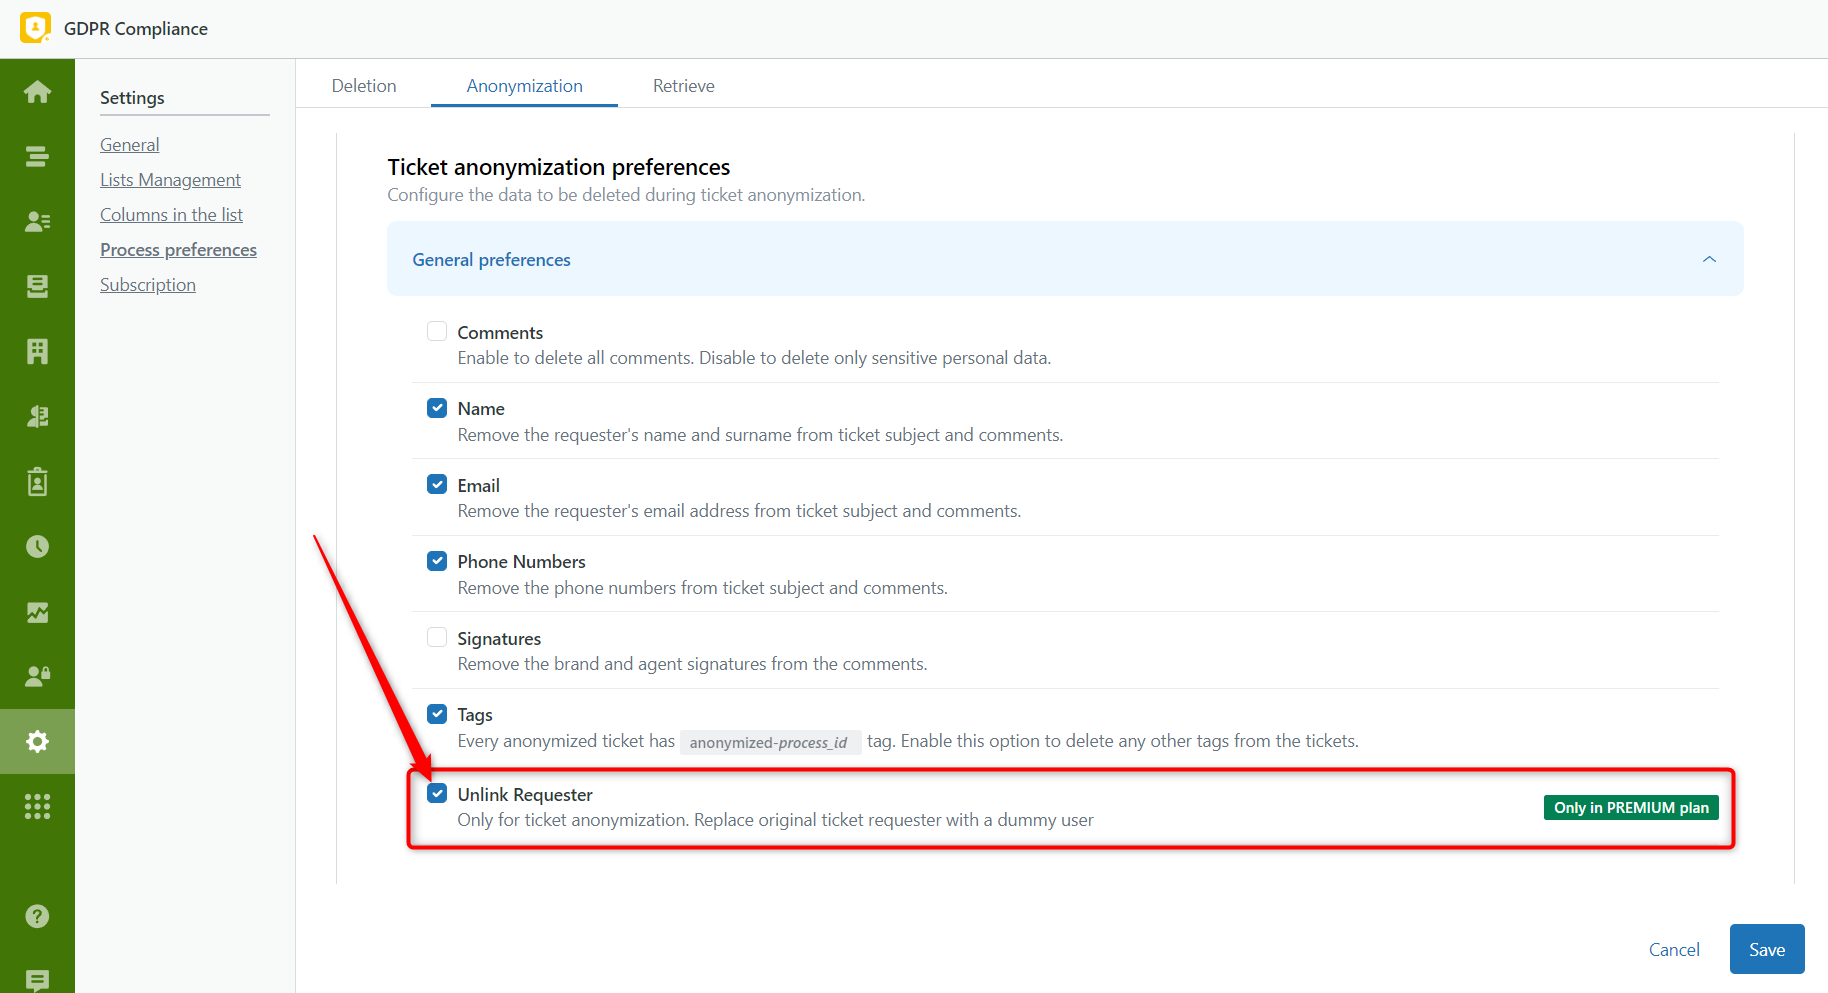
Replace the original ticket requester with a dummy user for ticket anonymization
We are actively working on our application to make it more agile for you. Therefore, meet our recent update regarding anonymization. After launching the ticket anonymization, you might notice that its requester still be visible. So, if you have, for example, old tickets that contain data of an active requester, but you should remove it according to GDPR, there is a new feature developed to handle it.
The new 'Unlink Requester' setting replaces the ticket requester with a new contact named 'GDPR Anonymized User (process_ID).' Therefore, this allows for keeping the contacts hidden after ticket anonymization. To enable this option, go to the Setting page > Process Preferences > Anonymization. Then, activate the Unlink Requester feature in the Ticket anonymization preferences > General preferences.
Anonymization Improvements
To work smoothly, our application constantly is under the improvement process. So, we would like to share what options were updated this time. The first one is about ticket forms. When you launch the anonymization, the pointed ticket form remains in the ticket. However, such a ticket form should be valid; otherwise, it will be replaced with a default form.
The second improvement regards the ticket channel. Previously, all channels were replaced with the web channel after the anonymization. However, now the original channel doesn’t change, which is good for statistics.
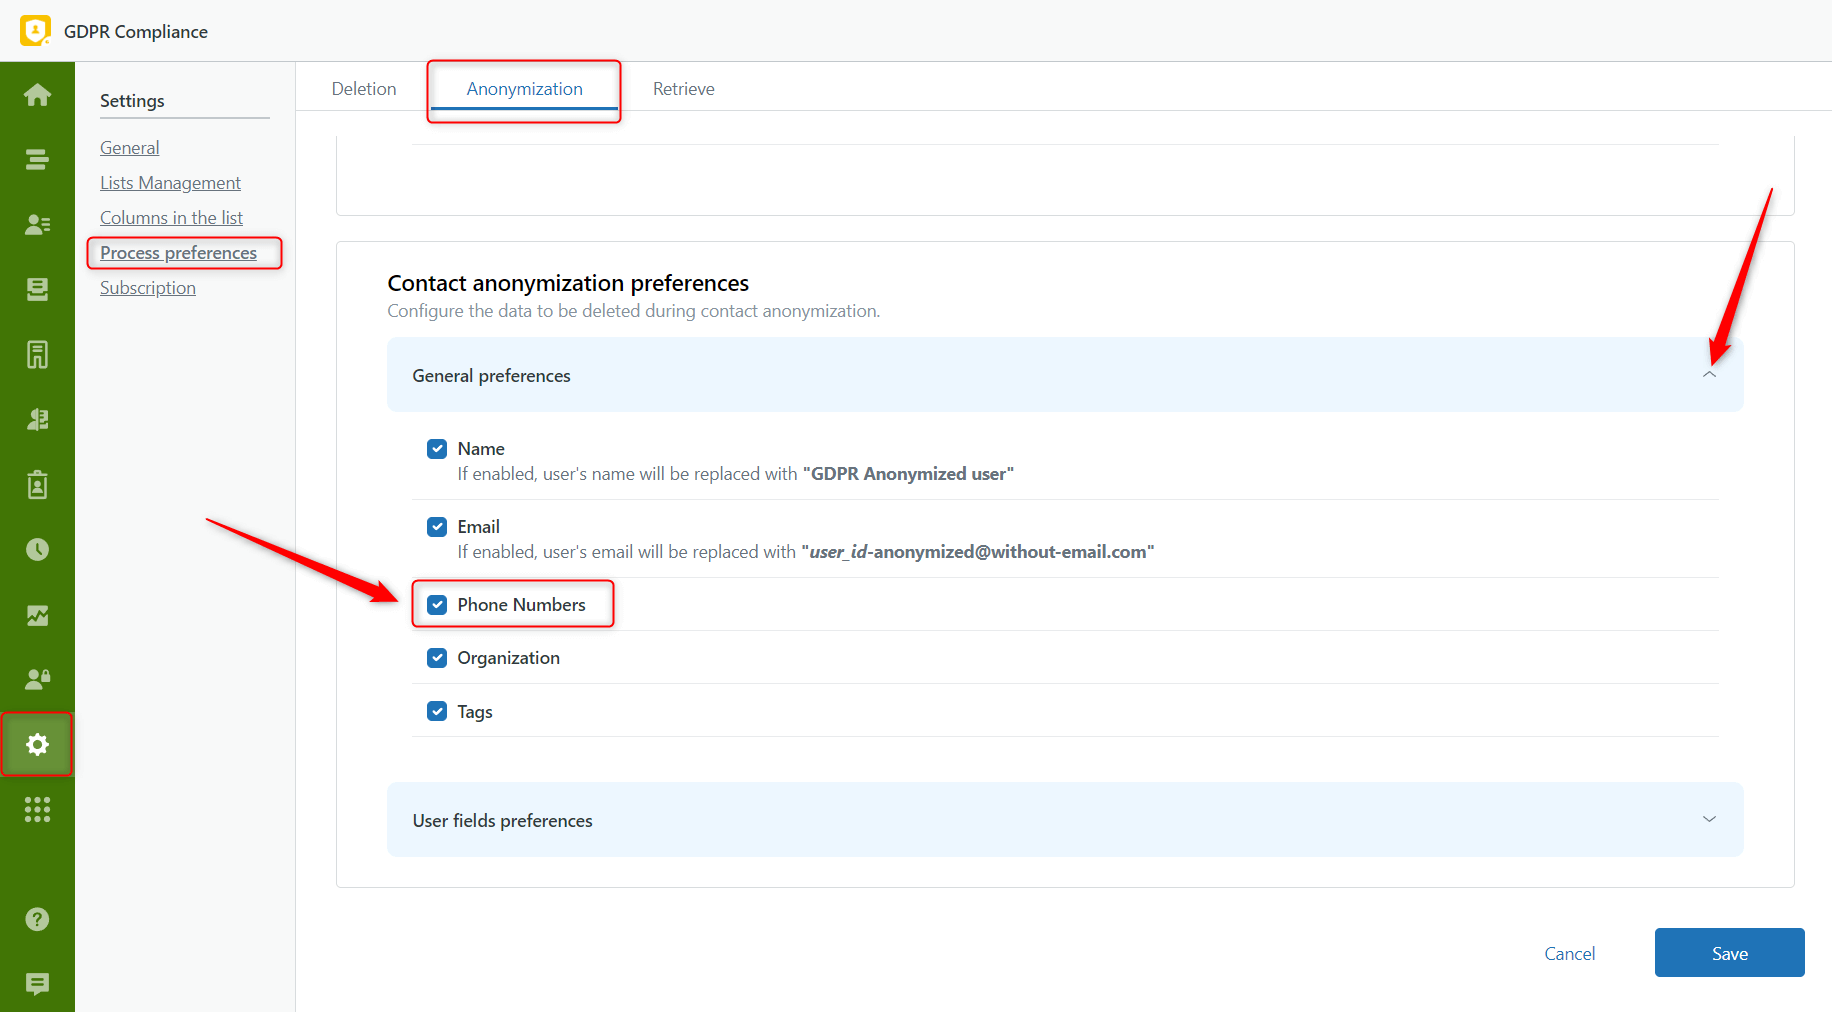
Contact Phone Number - Anonymization
Along with the phone numbers anonymization in tickets, we adjusted the same option for contacts. So, to hide the phone number from a user's profile, go to Settings > Process Preferences > Anonymization > Contacts anonymization preferences > General preferences. Next, enable the Phone Number.
Internal Note for Anonymization
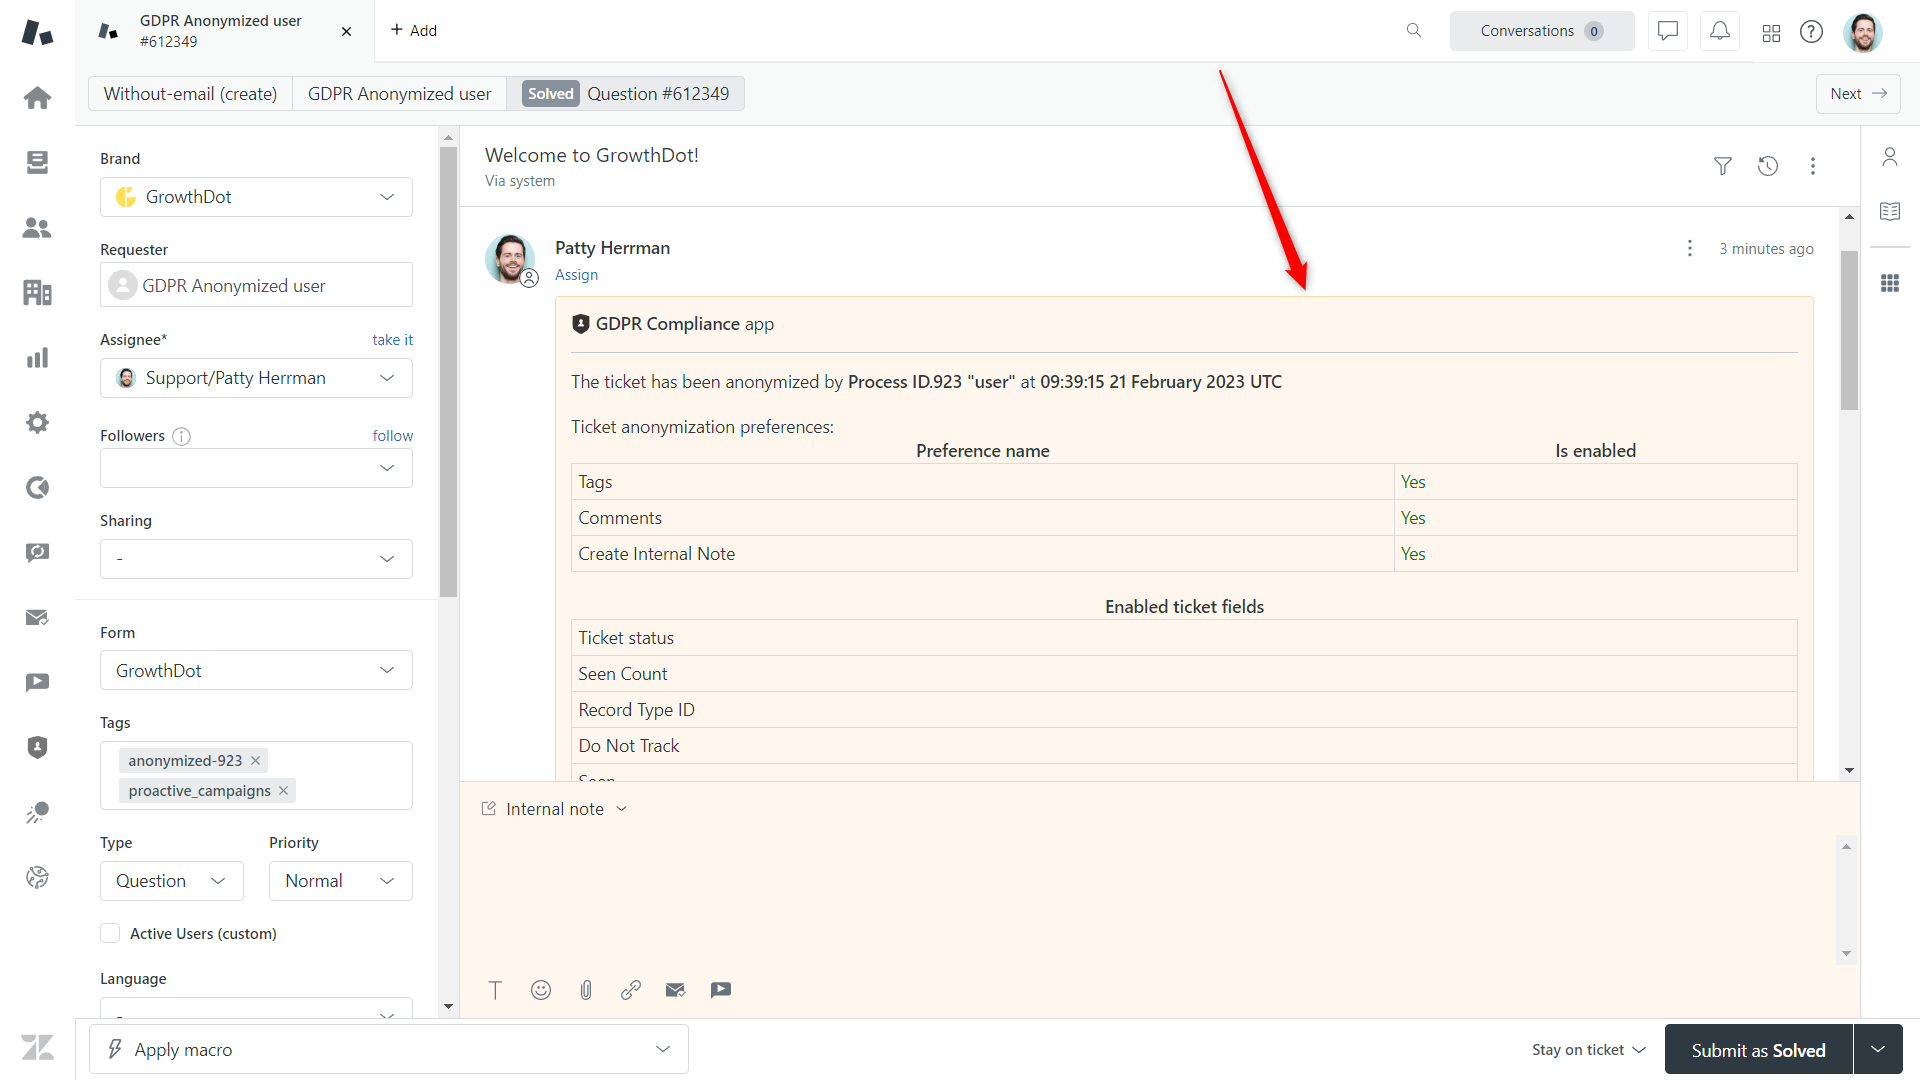
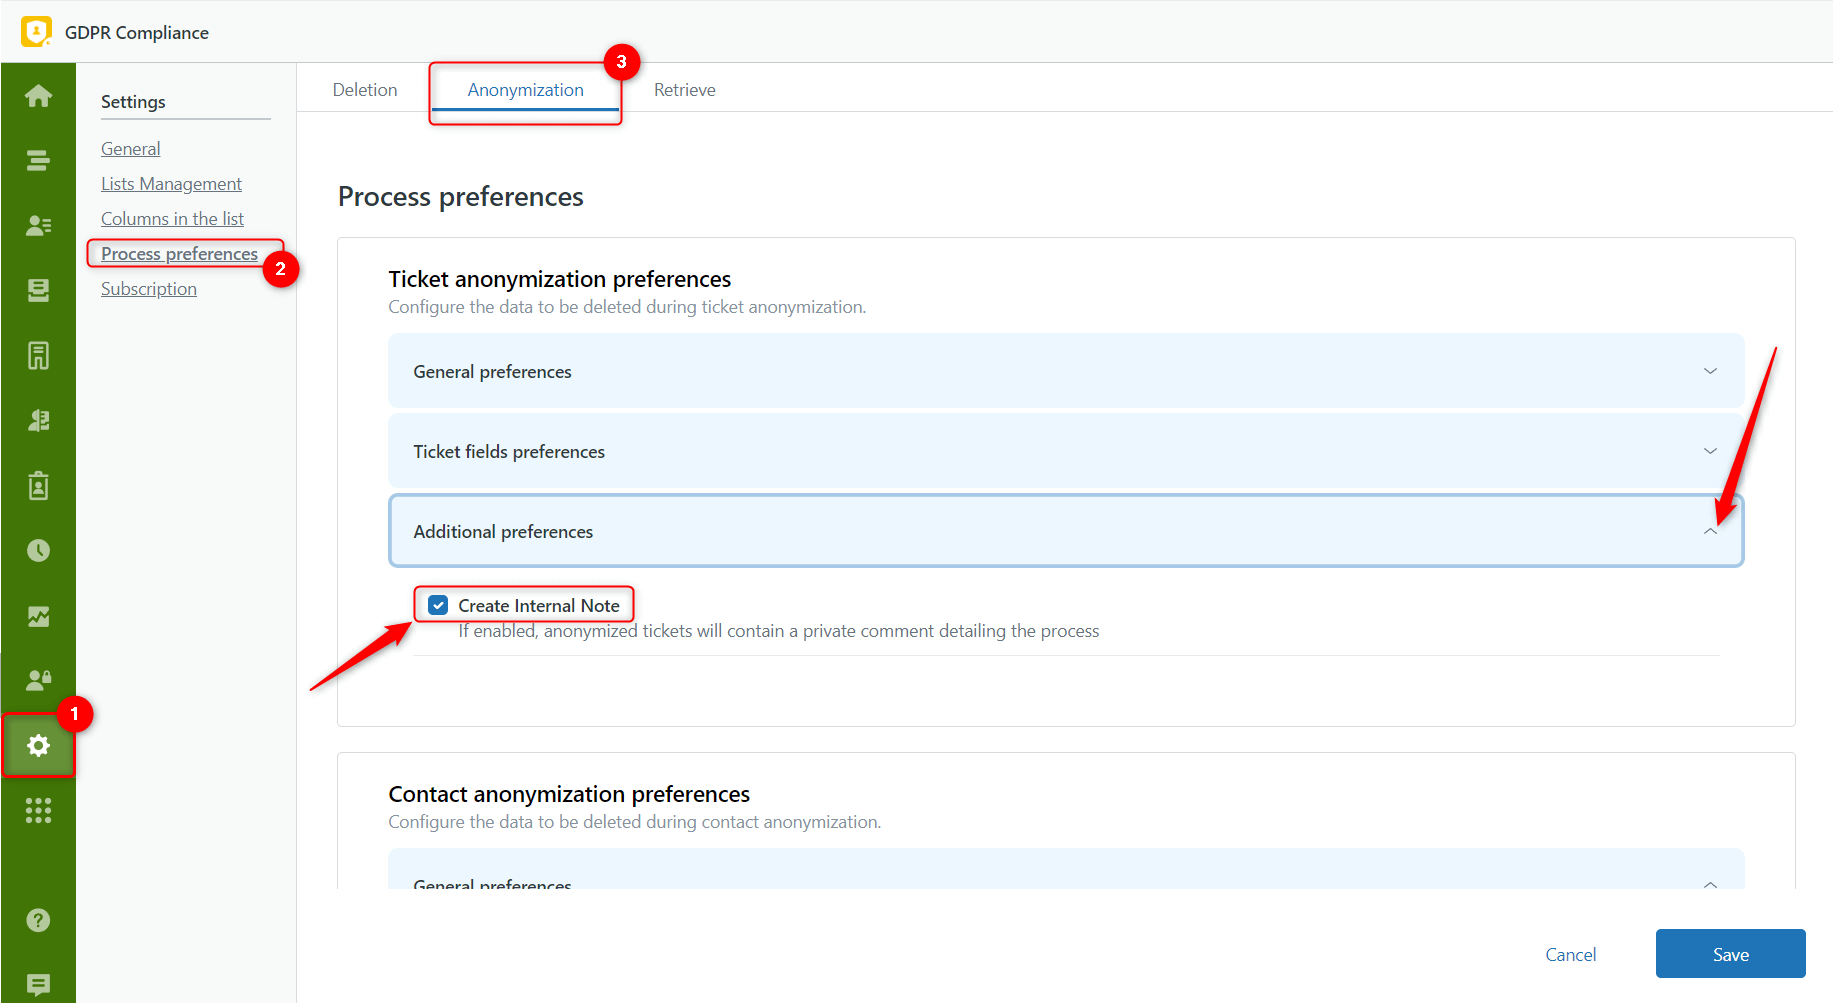
If you regularly anonymize users' data and change process preferences, it may be challenging to define the hidden information. Therefore, we added a new option - Create Internal Note. After the anonymization process is completed, the application generates an internal notification in a ticket. Here you can find a description of the preferences used to anonymize the ticket, the ID and the name of the process (if there is any), and the date.
To enable such an option, go to Settings > Process Preferences > Anonymization > Ticket anonymization preferences >Additional preferences. Then, put the checkmark next to the Create Internal Note.
Custom Fields for Ticket Lists
There is a new feature available that enables you to filter ticket lists more effectively. To create ticket lists, the application previously used only system fields. Now, however, you can also use custom fields to create unique lists and segment tickets.
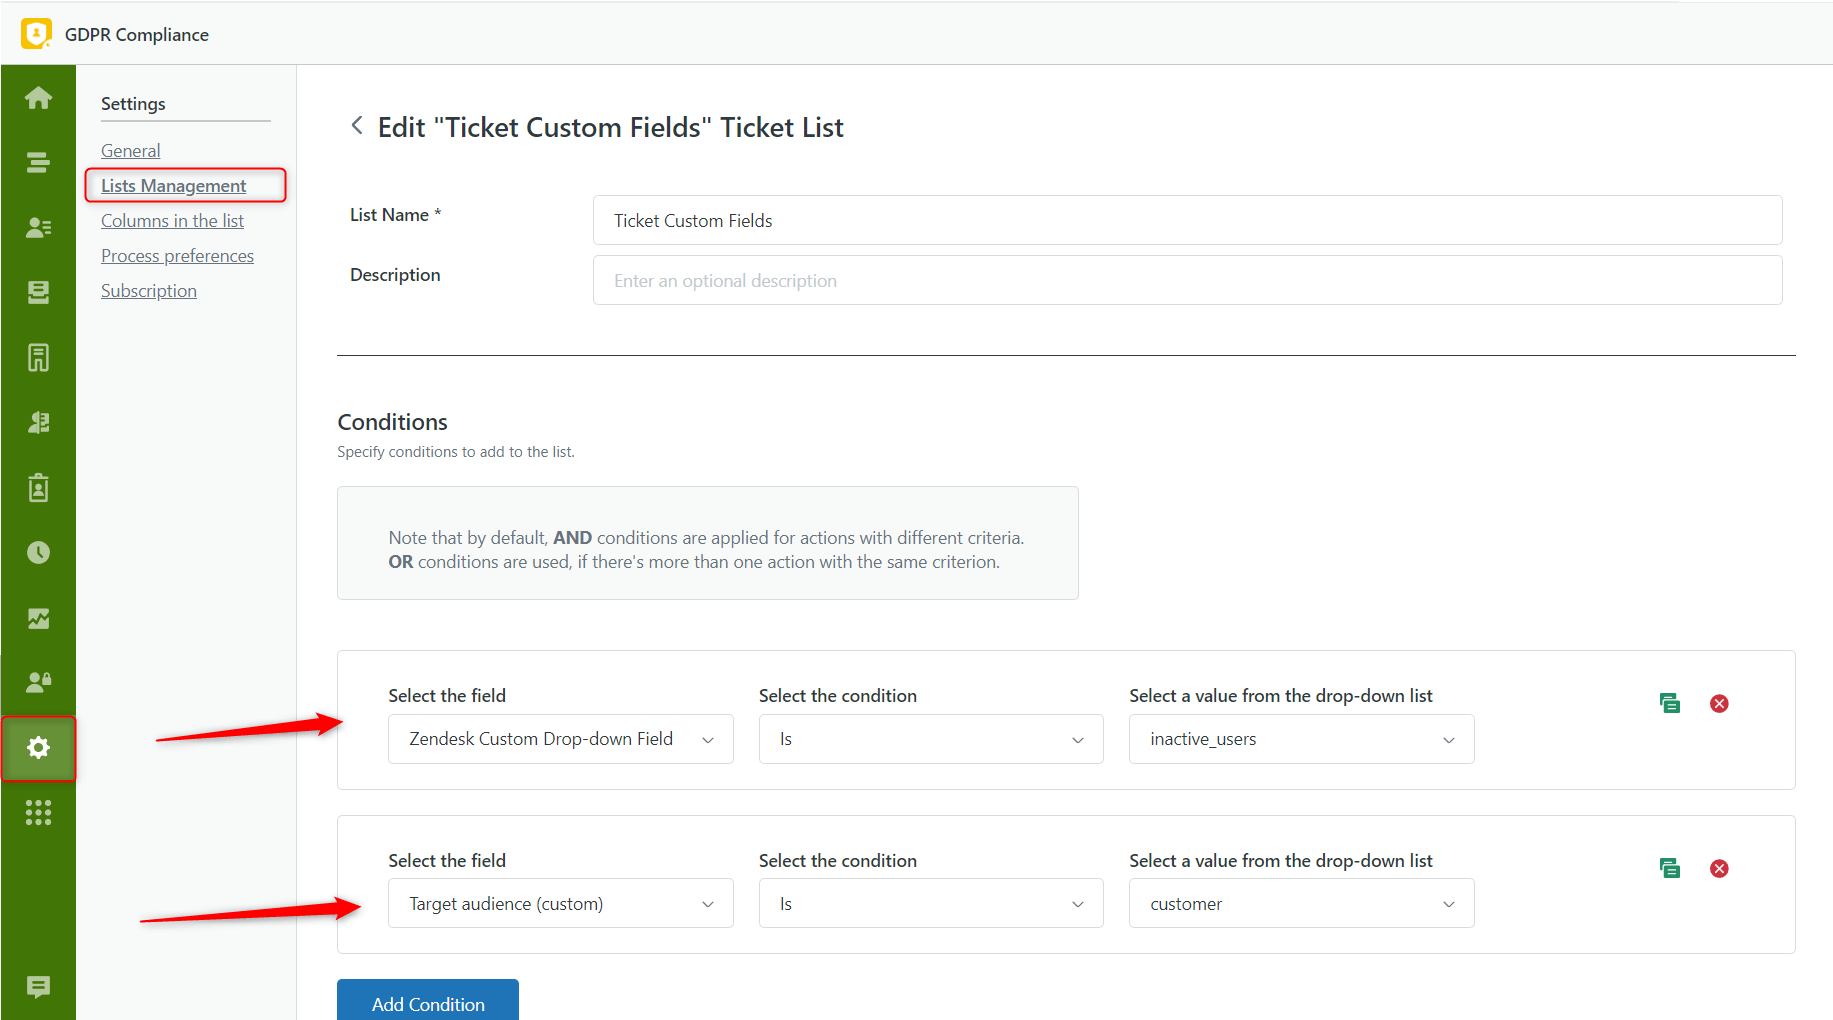
Fields Improvement
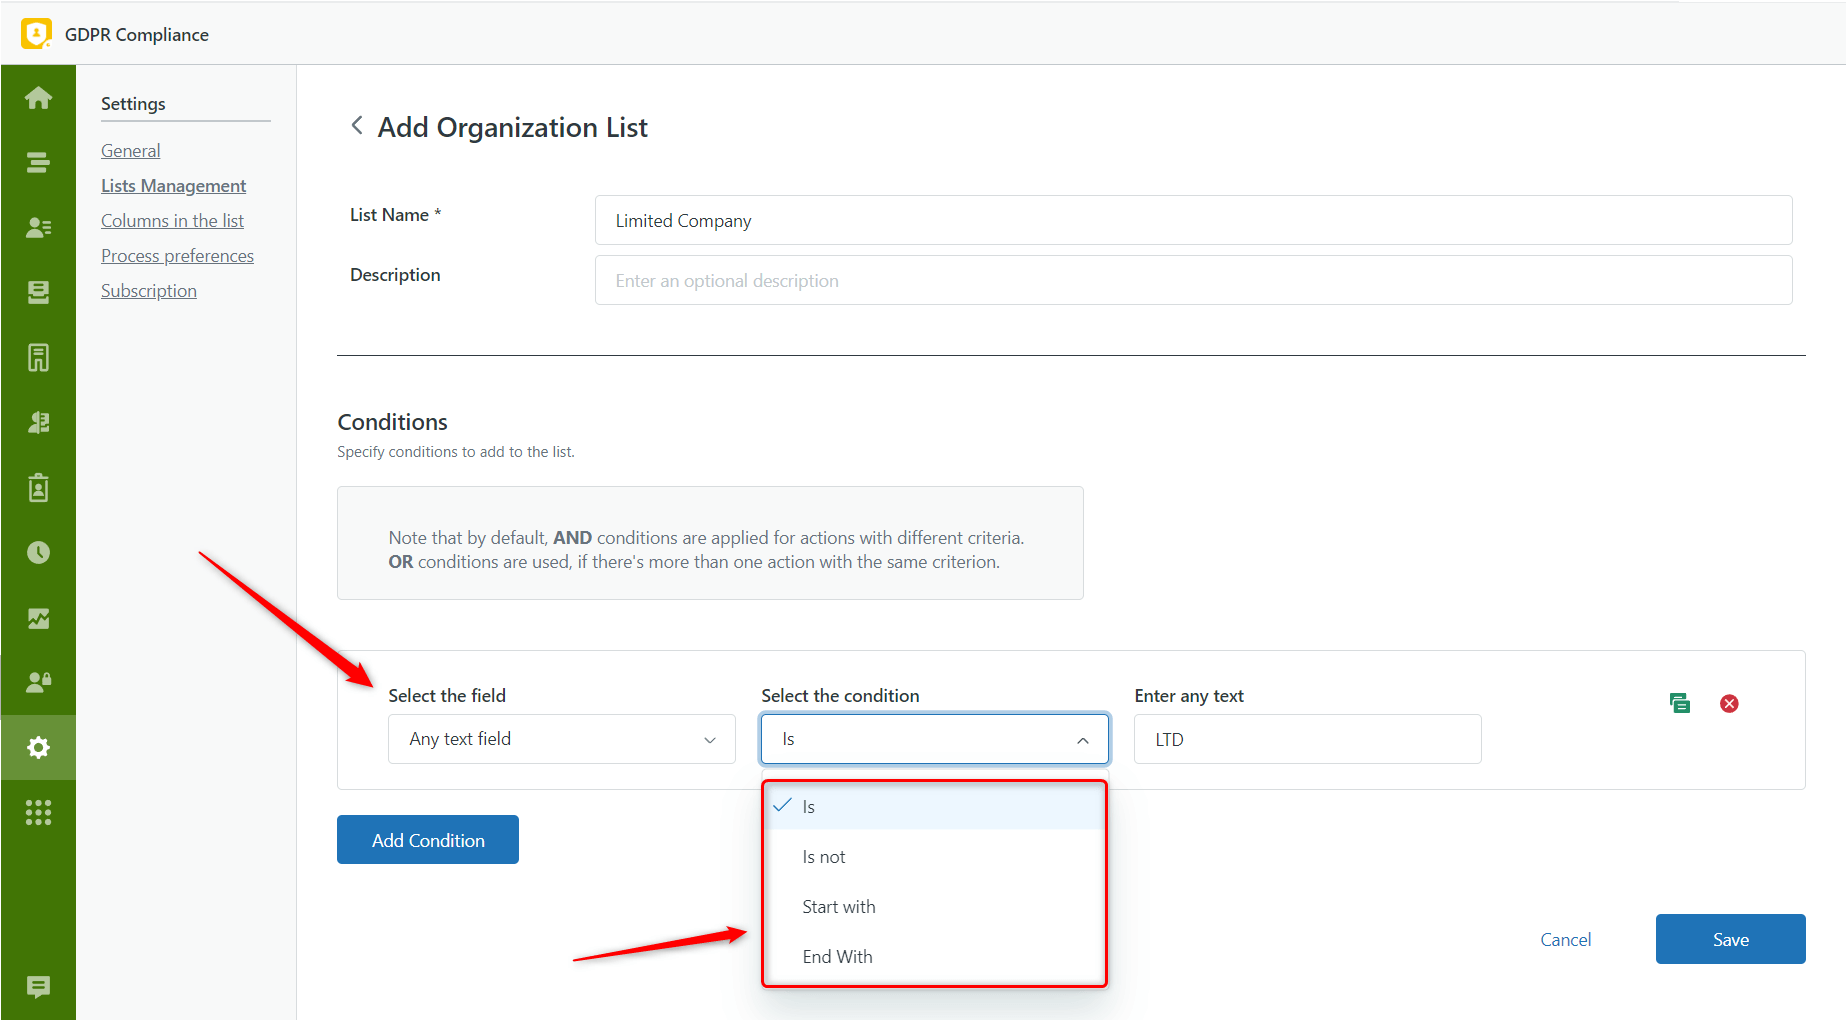
In Ticket and Organization lists, you can now use the new Any text field. This condition allows you to search for necessary items by keywords. Using 'Any text field' - 'is' - 'LTD,' you can search for organizations with limited corporate structures. However, only companies with names having the 'LTD' word will be selected by the app.
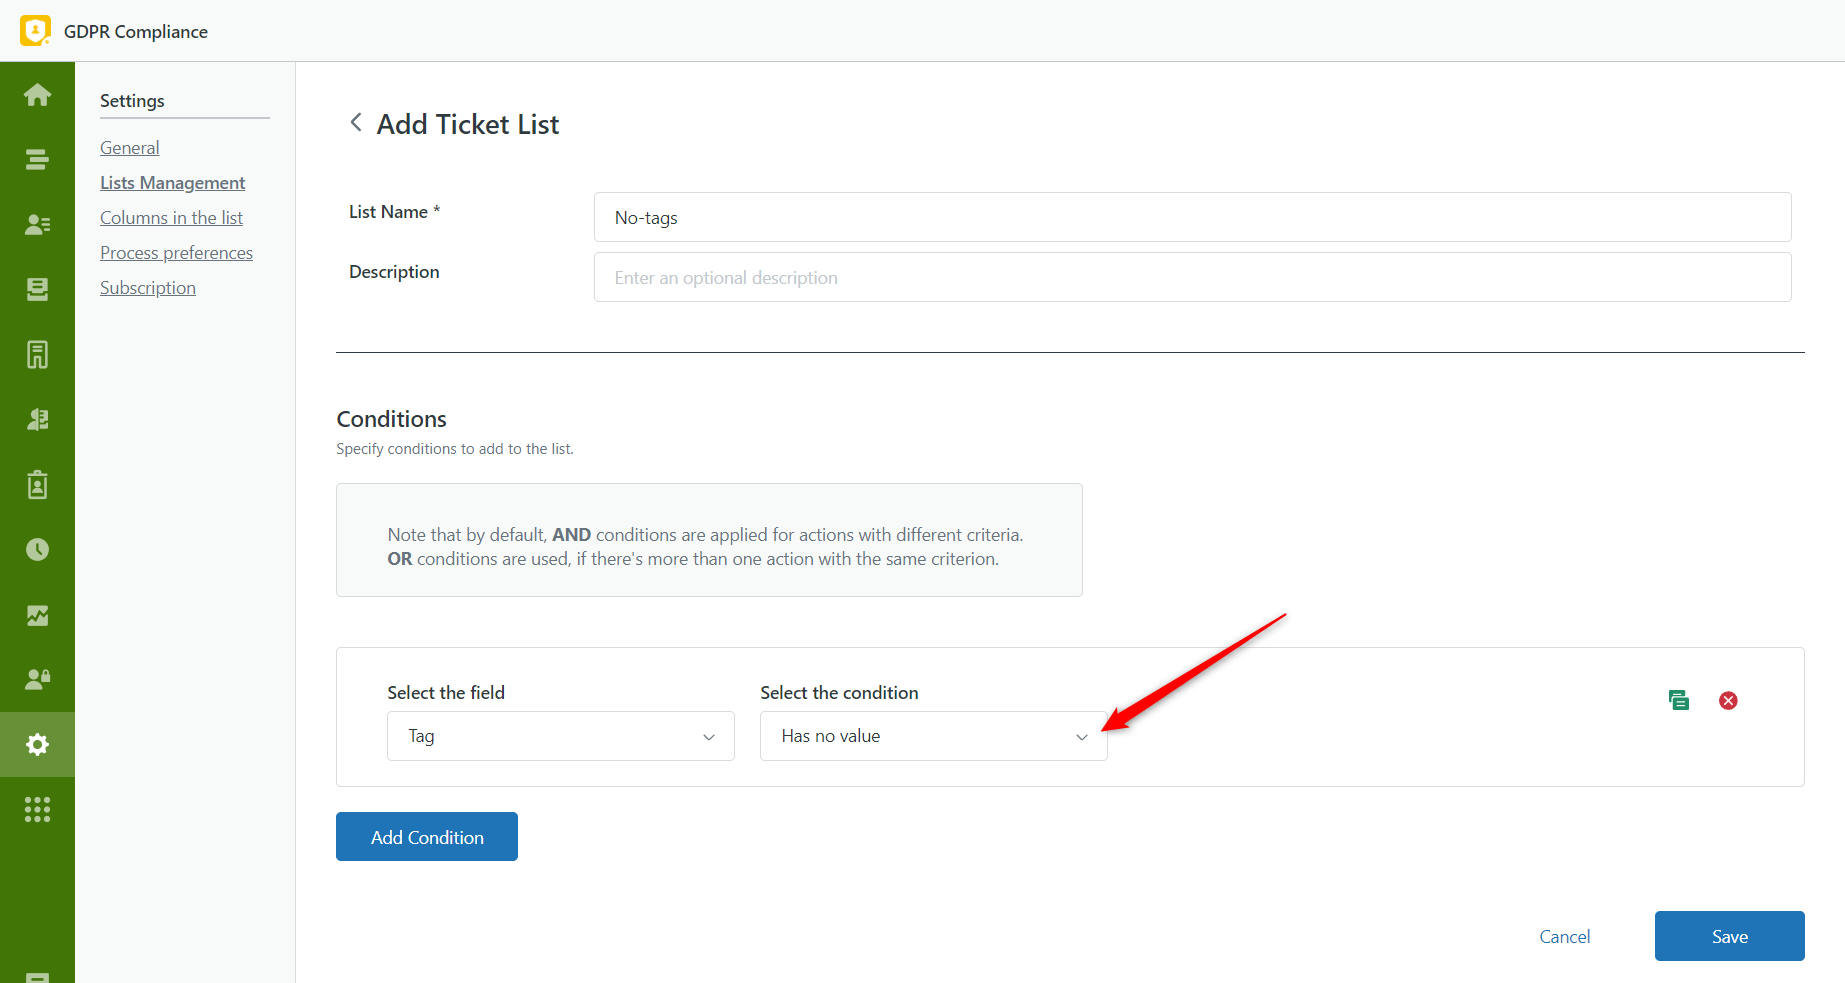
An additional improvement is the ability to create lists that contain no-value fields. Previously, we had an update with empty fields, so this option has been improved. If you need to use an empty value, select a necessary field from the dropdown list that supports such an option. Then, set a condition ‘Has no value’ or ‘Has any value,’ depending on your purpose.
The Phone Number Anonymization - Updated
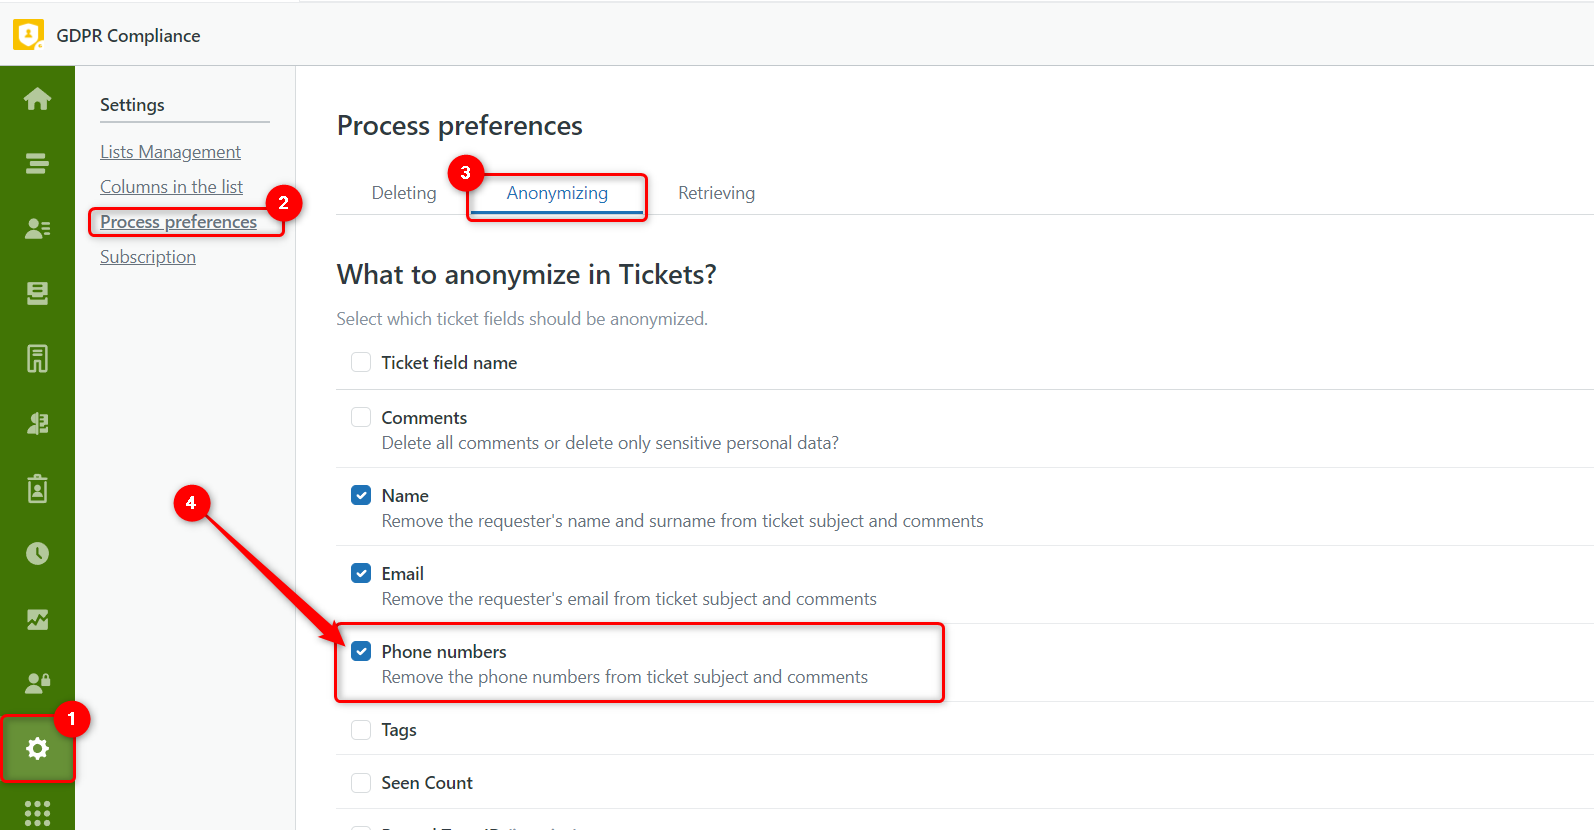
Good news! Our dev team improved the anonymization function of the app. If you want all phone numbers to be anonymized, ensure this preference is enabled. For this, go to Settings > Process Preferences > Anonymizing > put the checkmark near the Phone numbers. After you launch the anonymization process, all existing phone numbers mentioned in tickets' subjects and comments will be hidden.
'Combine the two lists' feature – updated
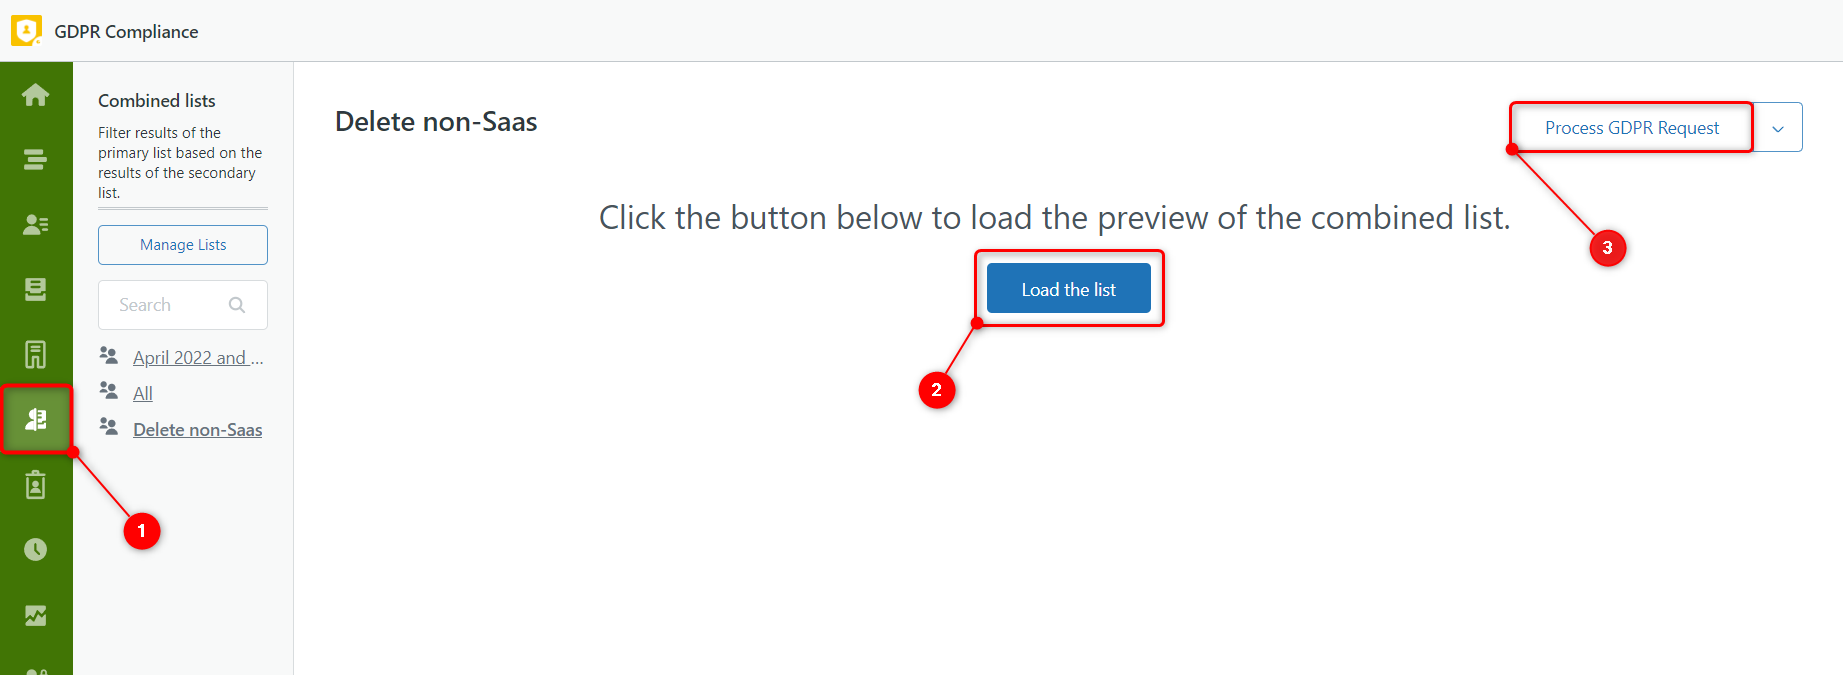
You might already know about the combined lists option in the app. Our developer team improved the combined lists; now, it has a separate tab, which is more convenient. All you need is to create a multi-list on the Settings page > List Management > Combined Lists > + Add New List > select Primary and Secondary lists and define the Combination method. Then, go to the Combined lists page and click Load the list. After the preview of a combined list is ready, click Process GDPR Request to start the deletion or anonymization process as usual.
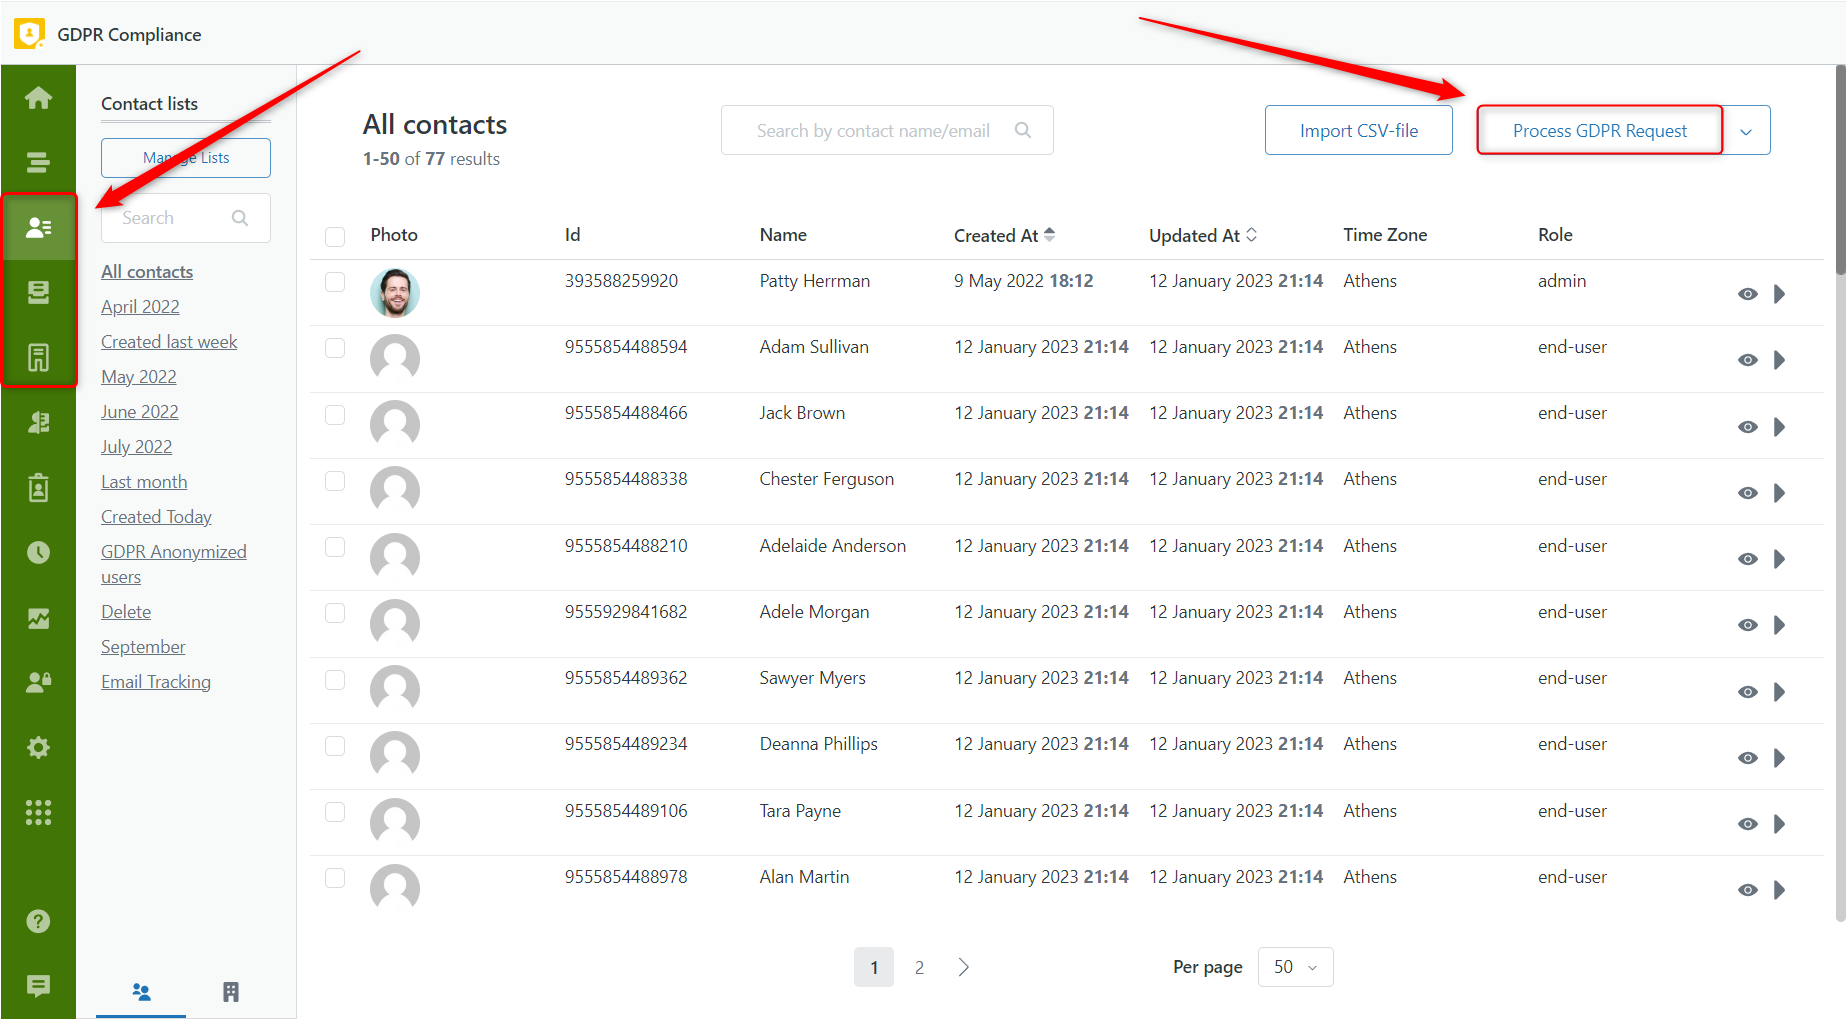
By the way, you also can select a combined list to process from Contacts, Tickets, or Organization lists pages. To do so, open the necessary Views tab and hit the Process GDPR Request button.
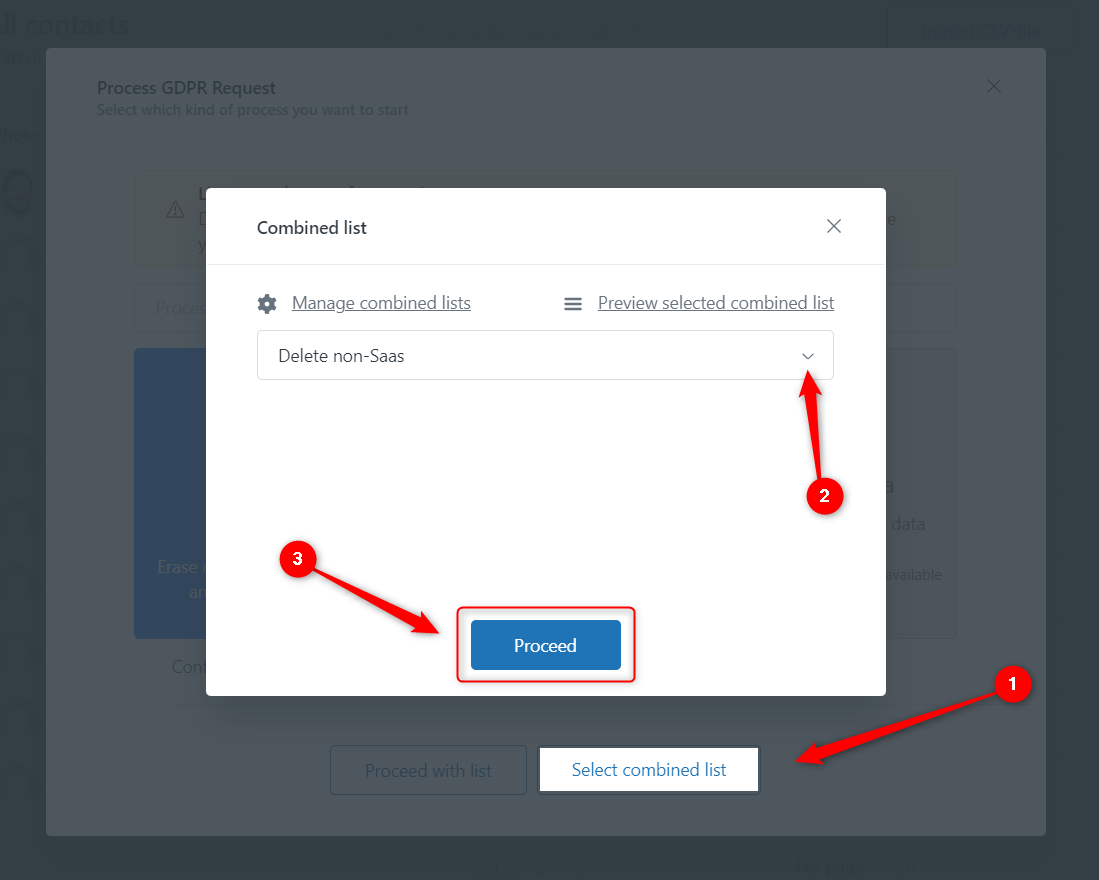
Next, name the process and set its type – deletion or anonymization, and click Select combined list. After you see the extra modal window, you should select a combined list from a drop-down menu. To continue, click Proceed.
Configure different access levels for agents
Now you can easily segment the access for your agents in the app. Our new feature allows agents to manage the app entirely or partially; some can even be assigned as inaccessible. To configure app restrictions, open the Access Control Management modal window from the Proactive Campaigns sidebar and set the necessary values. In addition, this feature allows defining what type of access new agents will get and changing the current restriction levels of each individual.
![]()
Automation configurations updated
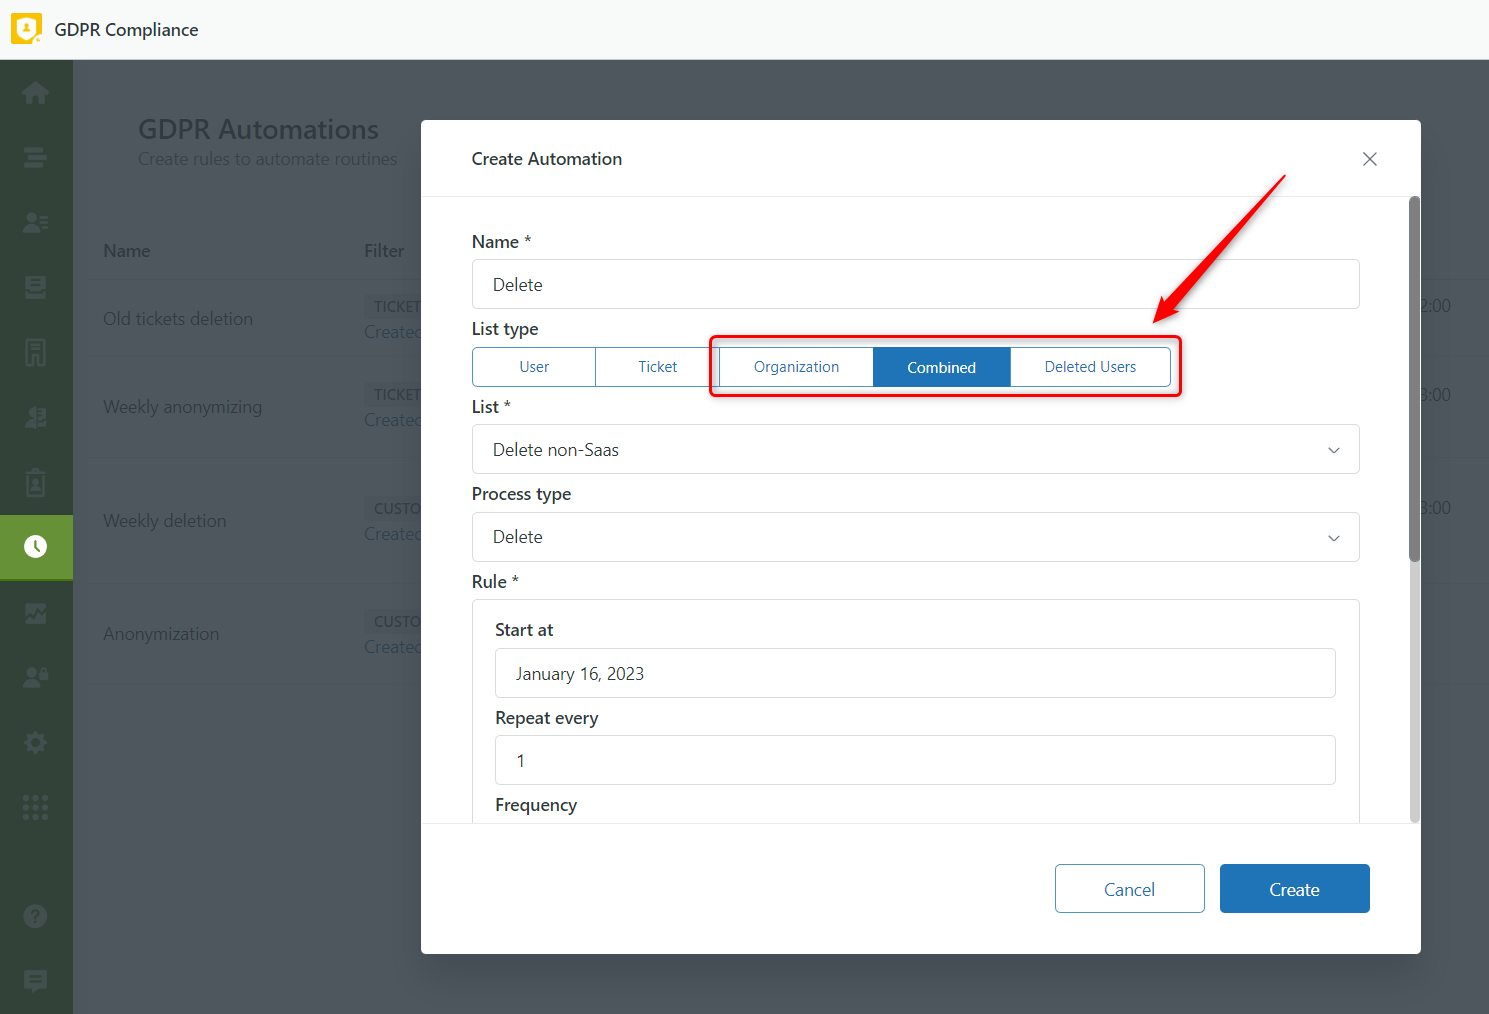
Previously, we proposed only several list types to schedule, but now we expanded this option with Combined, Organization, and Deleted Users lists. Therefore, you can automate such lists for deletion and anonymization. The Deleted Users list contains all soft-deleted contacts you removed within the Zendesk Support instance.
Permanently Remove Soft-deleted Contacts from Zendesk
Do you know that deleting the contacts option from the Customers tab in Zendesk Support doesn’t entirely remove the data? Indeed, you can find all deleted contacts in the Admin Center > People > Deleted users > Deleted users.
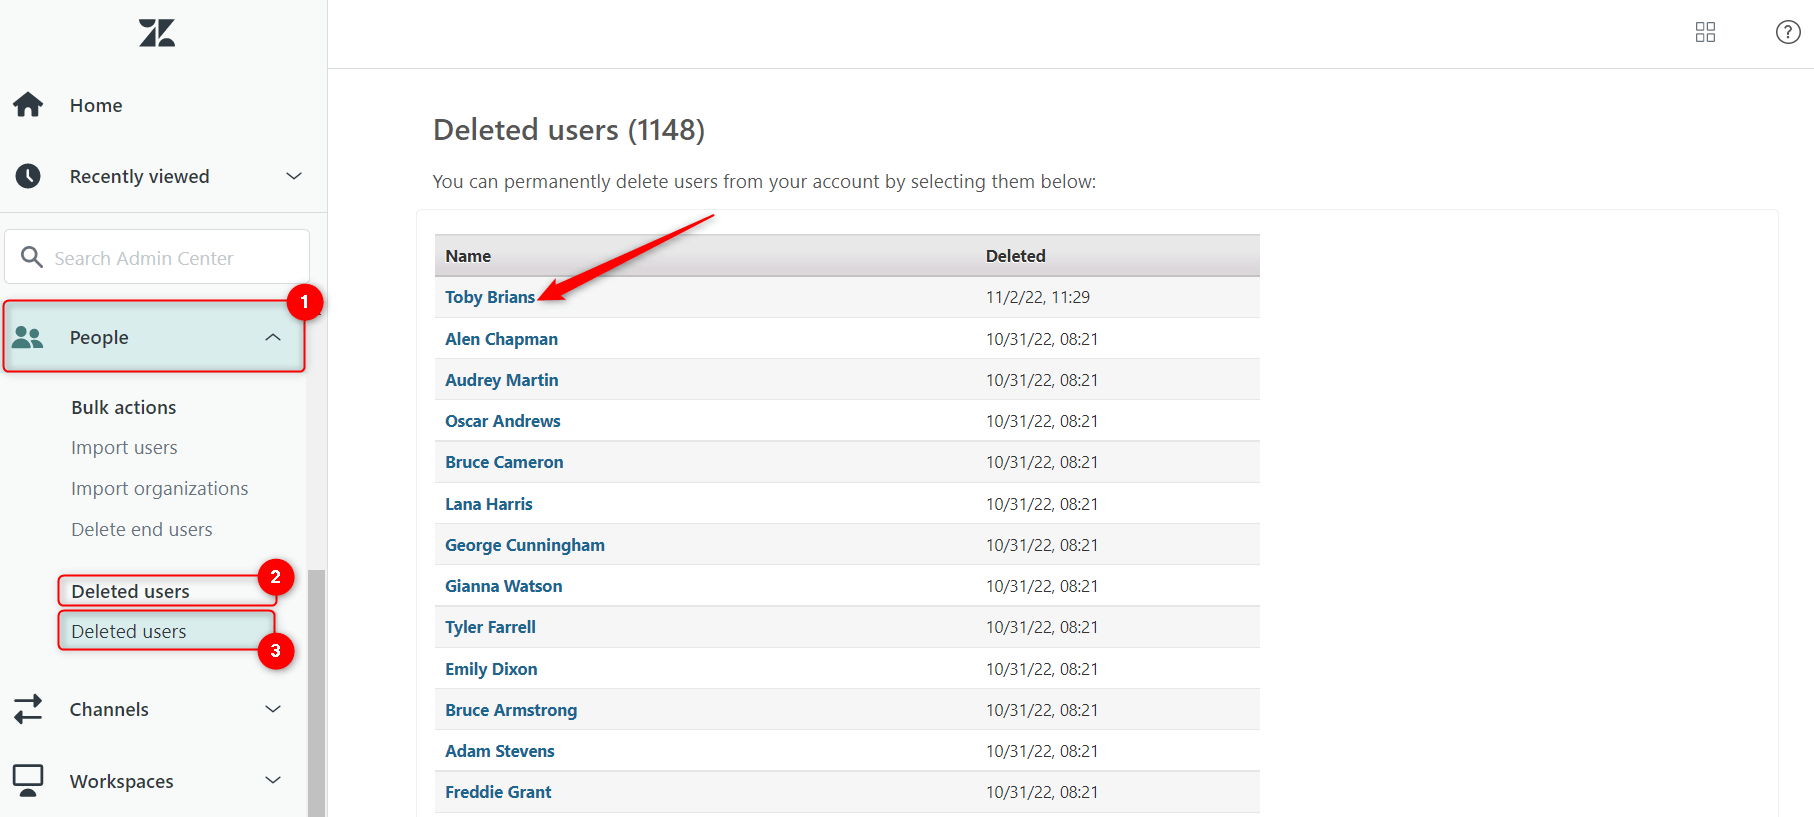
Therefore, they are still in your Zendesk instance. Of course, it is possible to get rid of such data by clicking on each contact’s name and then the Delete user button, but what if you also have more than 1000 items as we have? Well, our new feature was made precisely for this. So first, find and click the Deleted Contacts Views icon on the left-hand sidebar. Then, hit Permanently delete all soft deleted contacts, name the process in the modal window opened and click the Proceed button. After, you need to launch the deletion by clicking Start Process > Confirm.
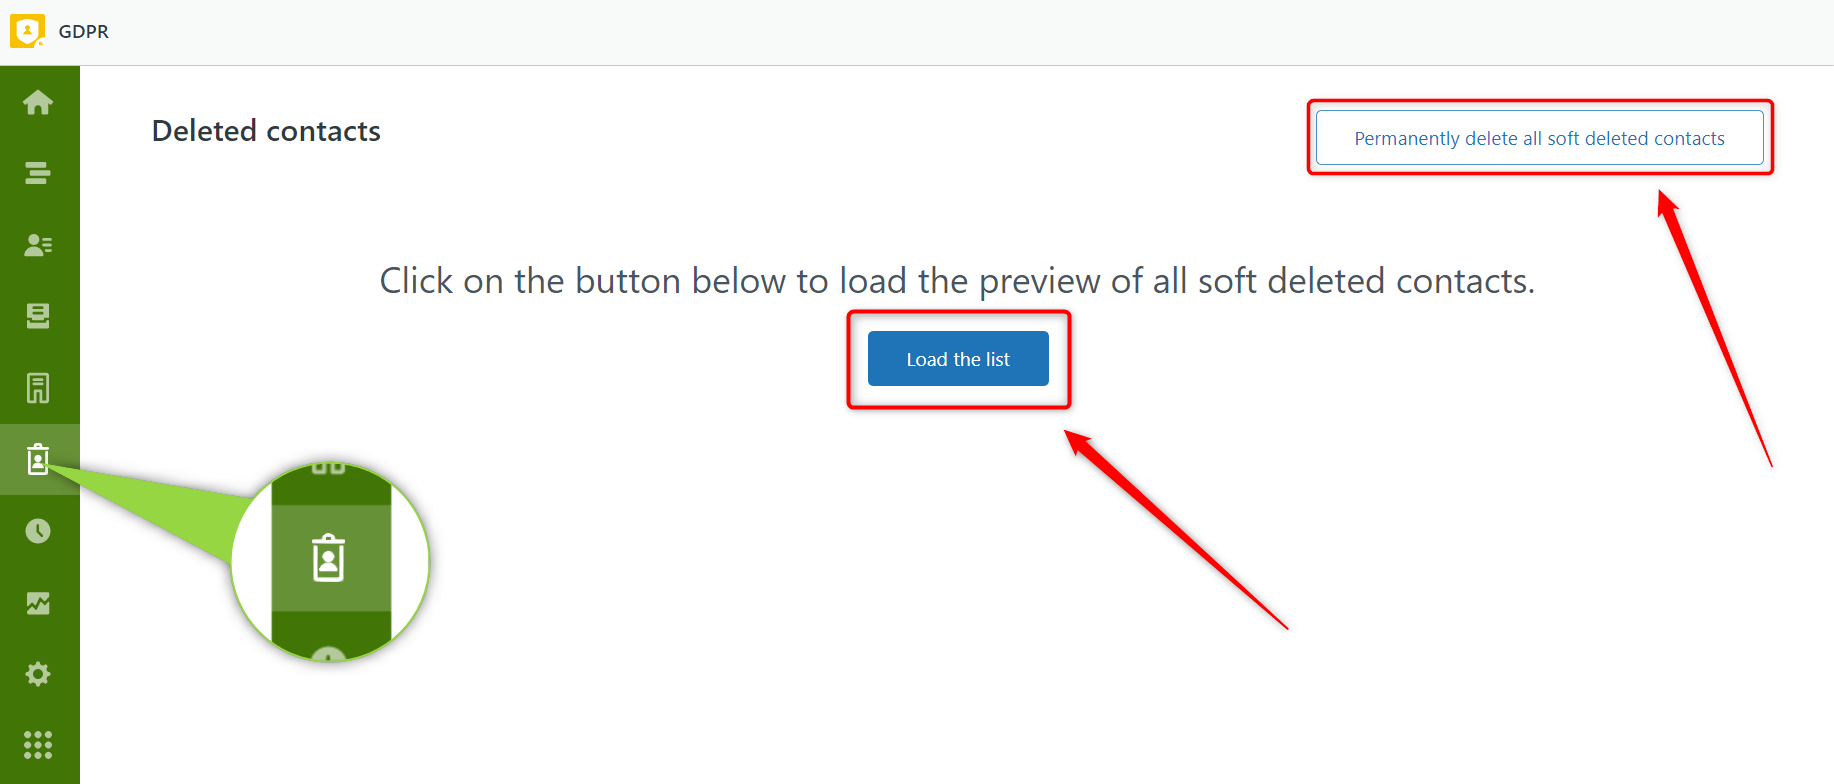
Moreover, if you need to preview the complete list of such users, hit Load the list button. However, the loading process can take some time, but do not close the page until it’s done.
Filter Tickets by Ticket Forms
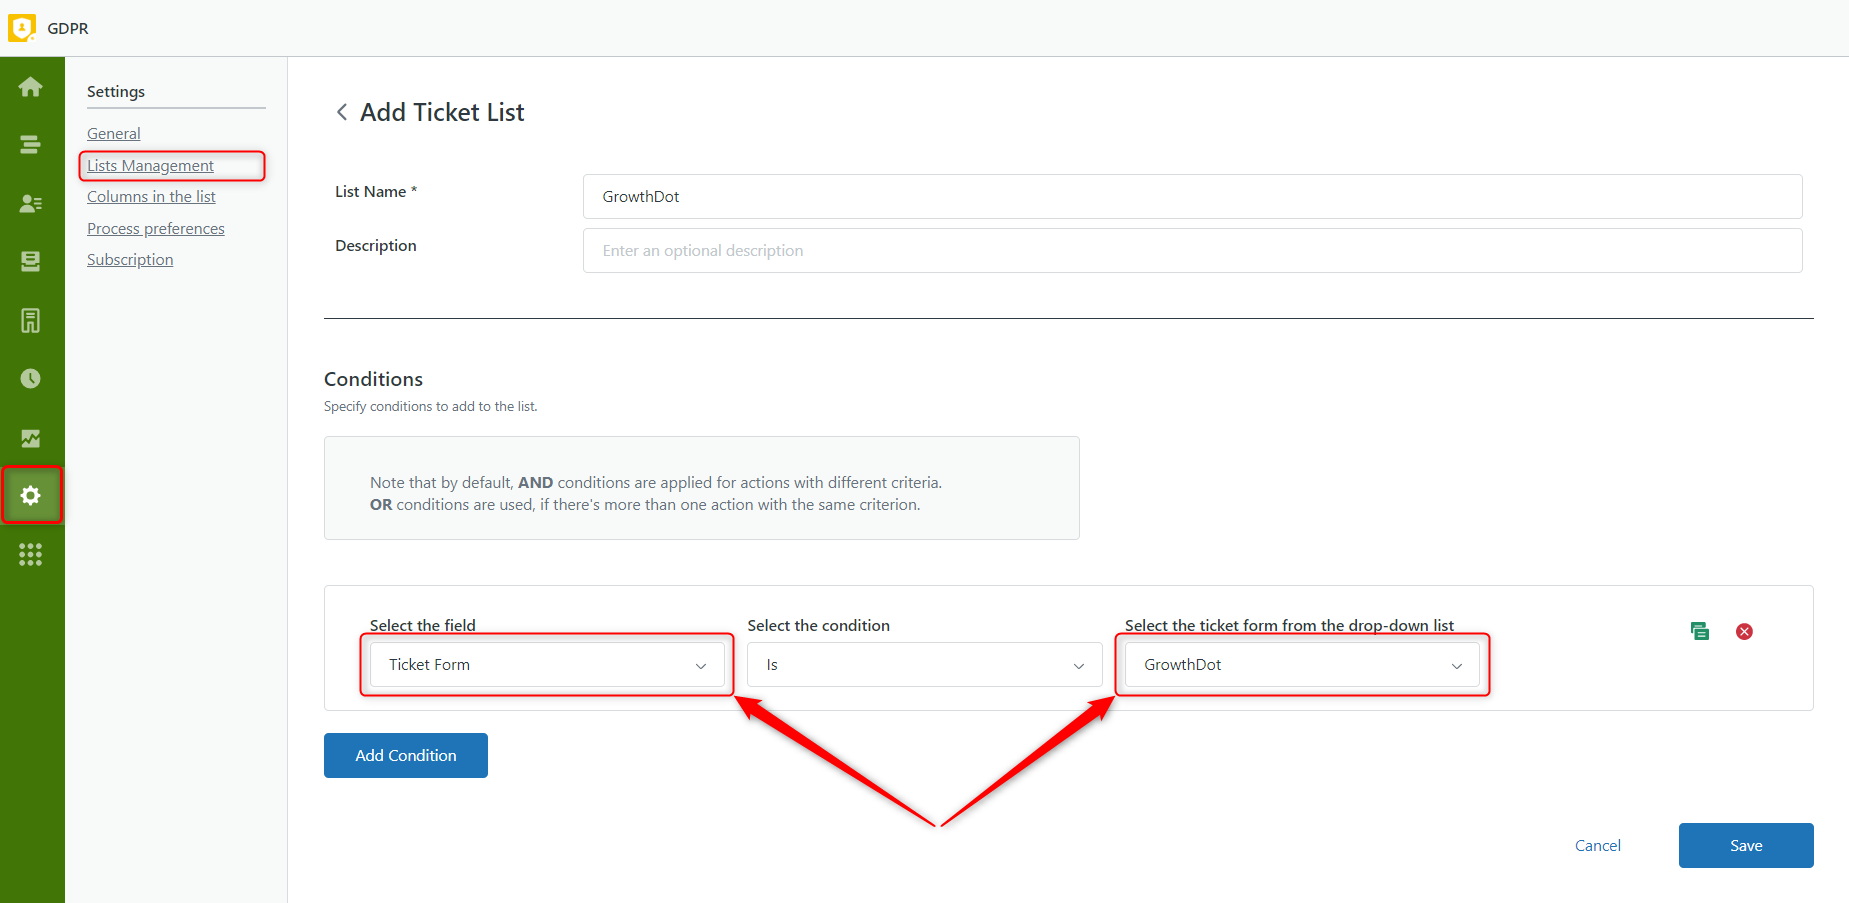
You probably have a lot of tickets you need to work with daily. Usually, companies create different types of ticket forms to be more precise about their organizing. Therefore, we developed the opportunity to create lists using Ticket Forms as a filter when setting conditions.
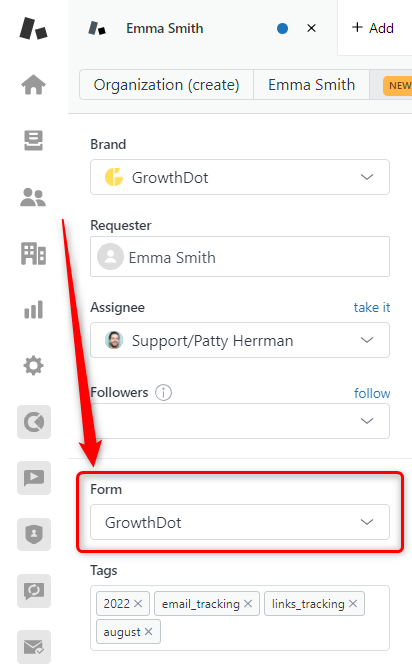
So, go to the Settings page -> List Management -> Ticket lists -> Add Ticket List. Then, in the Conditions block, select the field named Ticket Forms, set a condition (Is/Is not), and choose a necessary ticket form from the drop-down menu. Save changes.
Create a List with Empty Fields
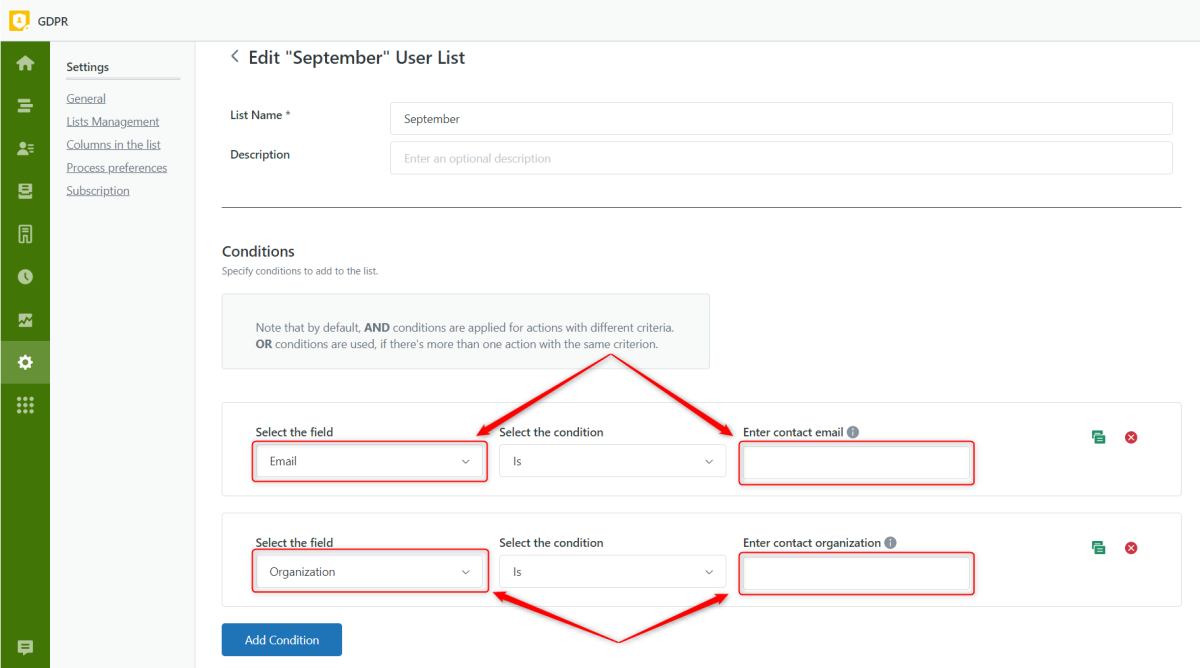
Some contacts in Zendesk Support might not belong to organizations, or they don’t have an email address, and so on. From now, you can easily create lists leaving the field empty for both conditions (Is/ Is not). For example, make a list with users that have no organizations assigned. So, go to the Settings page -> List Management -> Contact lists -> Add Contact List. Then, name the list and set a condition: Organization - Is - empty field. Save changes. If you want a list with only users with organizations involved, a condition will be: Organization - Is not - empty field.
Combined Lists - the Exclude Option
The Combined lists feature is a simple way to make data selection more precise while deleting or anonymizing. Previously, you could only select mutual data from Primary and Secondary lists. Now, there is an opportunity to process results from the Primary list that are not involved in the Secondary list. To get started, go to the Contact, Ticket, or Organization Views page and select a list you want to delete or anonymize.
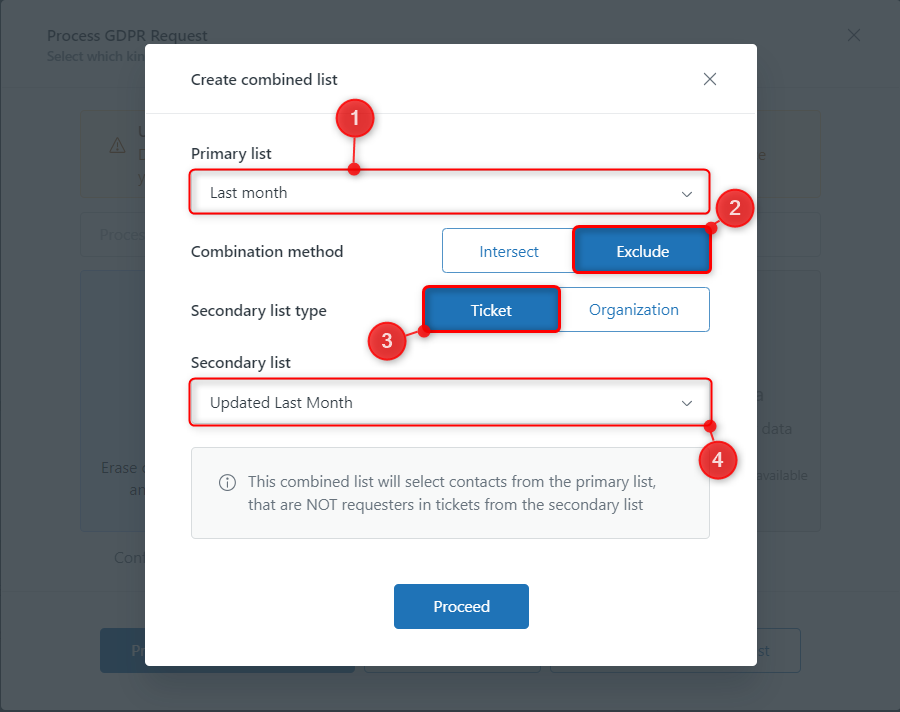
For example, you need to delete contacts (the Primary list) who are not requesters of tickets (the Secondary list). Then, chose a requirable list from the Contact Views page and it will be set as the primary object. Then, click Process GDPR Requests -> Deleting -> Proceed with combined list.
Next, set the Combination method as Exclude and the Secondary list type as Ticket. Then, select the Secondary list from a dropdown menu. To launch deleting, click Proceed -> Start process -> Confirm.
Improved Reports
Our Growthdot team works on our apps, improving them daily. Therefore, we have got an updated Reports page view to make your app interaction more convenient and effective.
On the Reports page, you can:
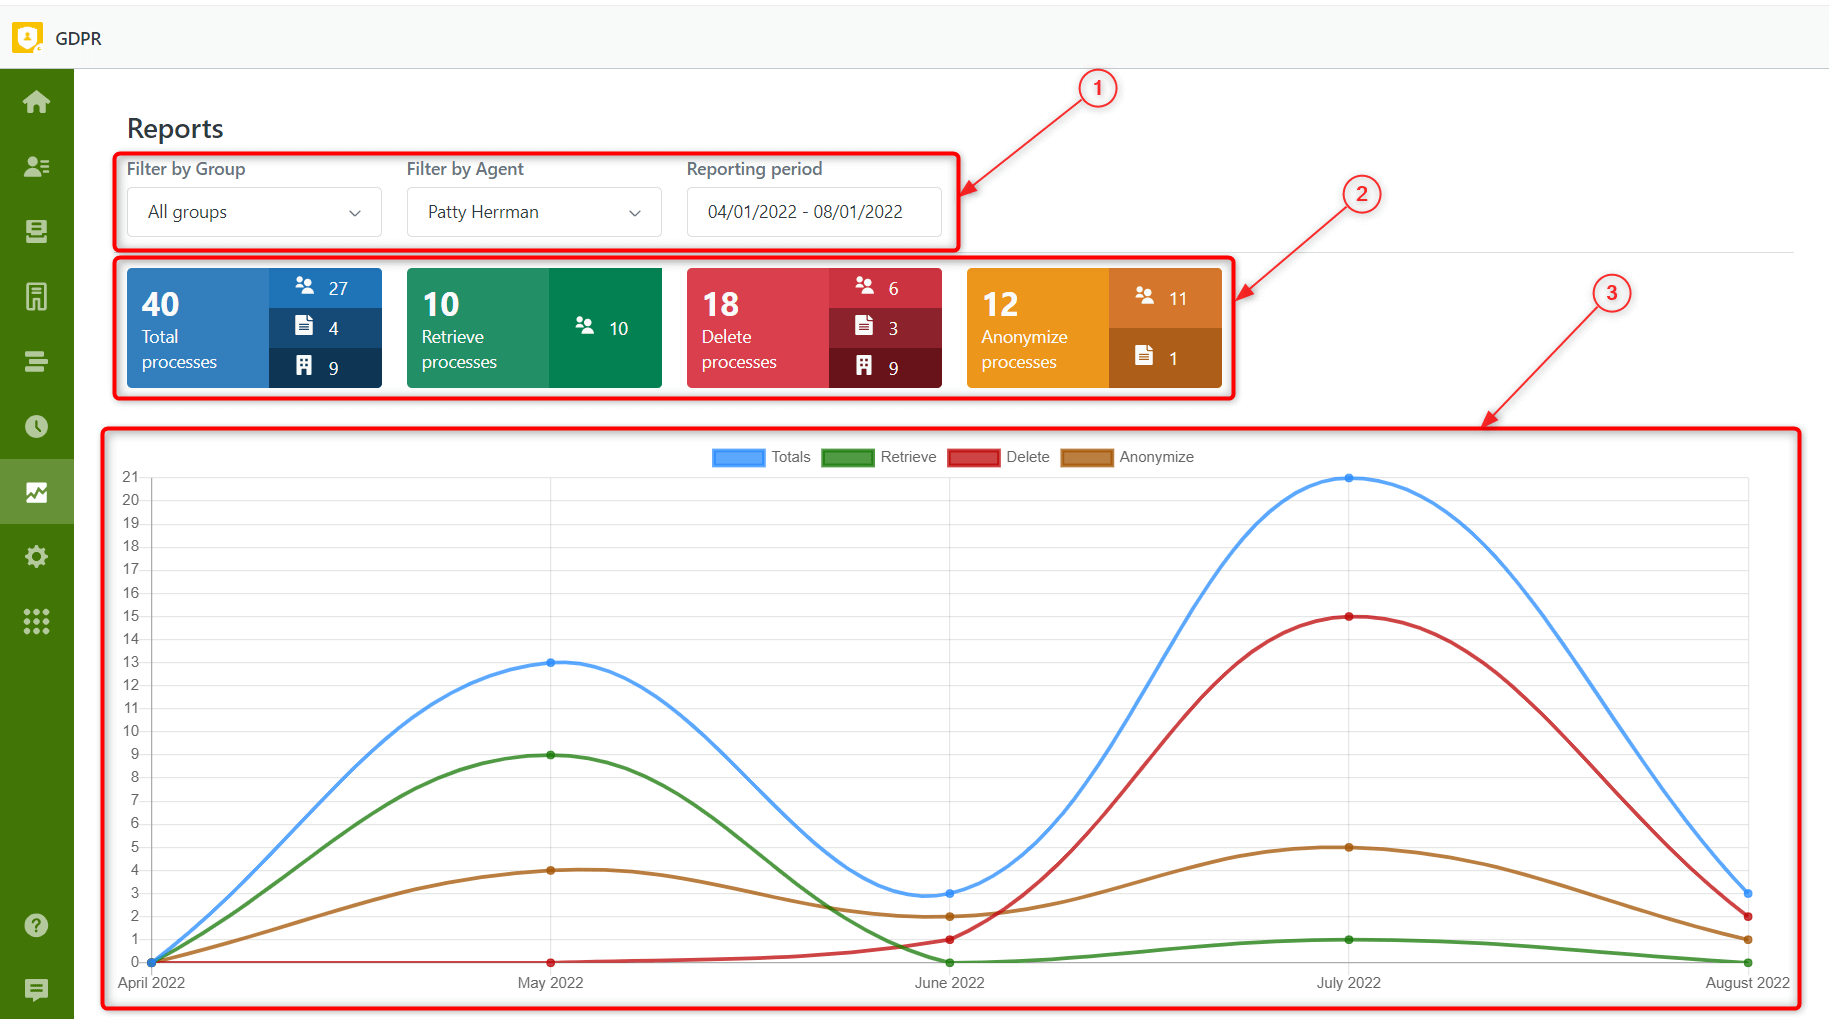
- Filter the statistics by groups, agents, and reporting period.
- Analyze the total amount of completed processes as well as each of them separately: Retrieving, Deleting, and Anonymizing. Besides, you can hover over a cursor on a particular icon in the block to know what it indicates: Contact processes, Ticket processes, or Organization processes. Thus, from the screenshot, we can conclude that the total number of processes is 40, which includes 27 points completed for contacts, 4 for tickets, and 9 for organizations.
- View the Line Graph to estimate the frequency and quantity of made data treatments.
Talking about peculiarities, the app allows each agent to see their statistics. If you want some of them to view all statistics, then go to the General Settings tab and assign related rights.
Process data with the Combined list
Do you want to delete or anonymize tickets that belong to particular requesters? Or maybe you have already thought about how to remove users' data from certain organizations. Then, the combined list can make your GDPR interaction in Zendesk more convenient. Just open the Contact Views or Ticket Views tab on the left sidebar and click Process GDPR Request. Afterward, select how your data will be processed - anonymized or removed. And click on the Proceed with the combined list. Finally, select the Primary and Secondary lists and launch the process.
For example, the Primary list could be a Ticket list you want to process, and the Secondary list could be an Organization list that plays a role as a filter.
You can delete or anonymize tickets that are included in specific organizations by choosing one of the ticket lists as the Primary list. Similarly, when your Primary list is selected as a user list, then contacts belonging to particular organizations will be either anonymized or deleted.
Analogically, you can set a User list as a Primary list, a Ticket as a Secondary, and vice versa, depending on your purpose.
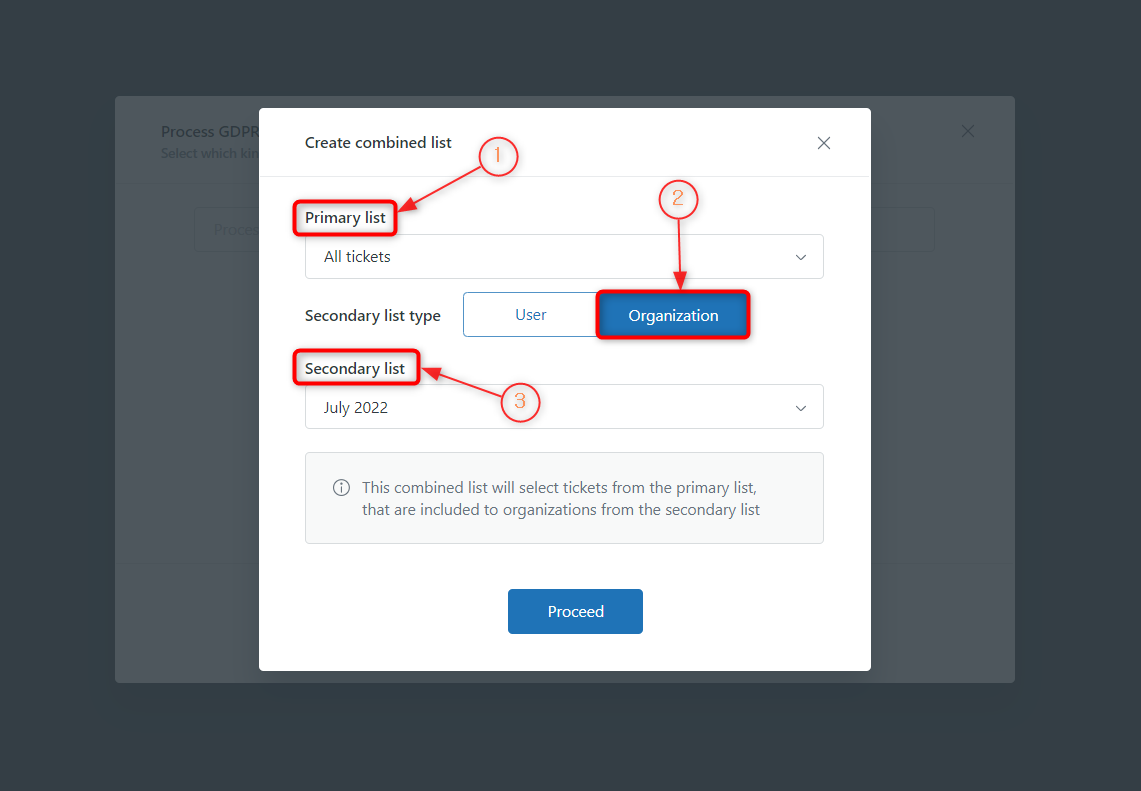
If you haven't tried this option yet, it's an excellent opportunity to test it now.
Delete or Anonymize Data Using Organizations Lists
Imagine a situation where you want to delete/anonymize tickets or users related to particular organizations. Intriguing, right? Now, you can easily do this in Zendesk using GDPR Compliance. If you need to process users from organizations, then go to the Contact Views page. Next, select a necessary organization list from the Contact lists sidebar. You also can create a new organization list on the Settings tab. Then, launch the anonymization or deletion process as usual via clicking the Process GDPR Request button on the right corner above.
Do the same actions on the Ticket Views page if you want to perform GDPR processes with tickets from organization lists.
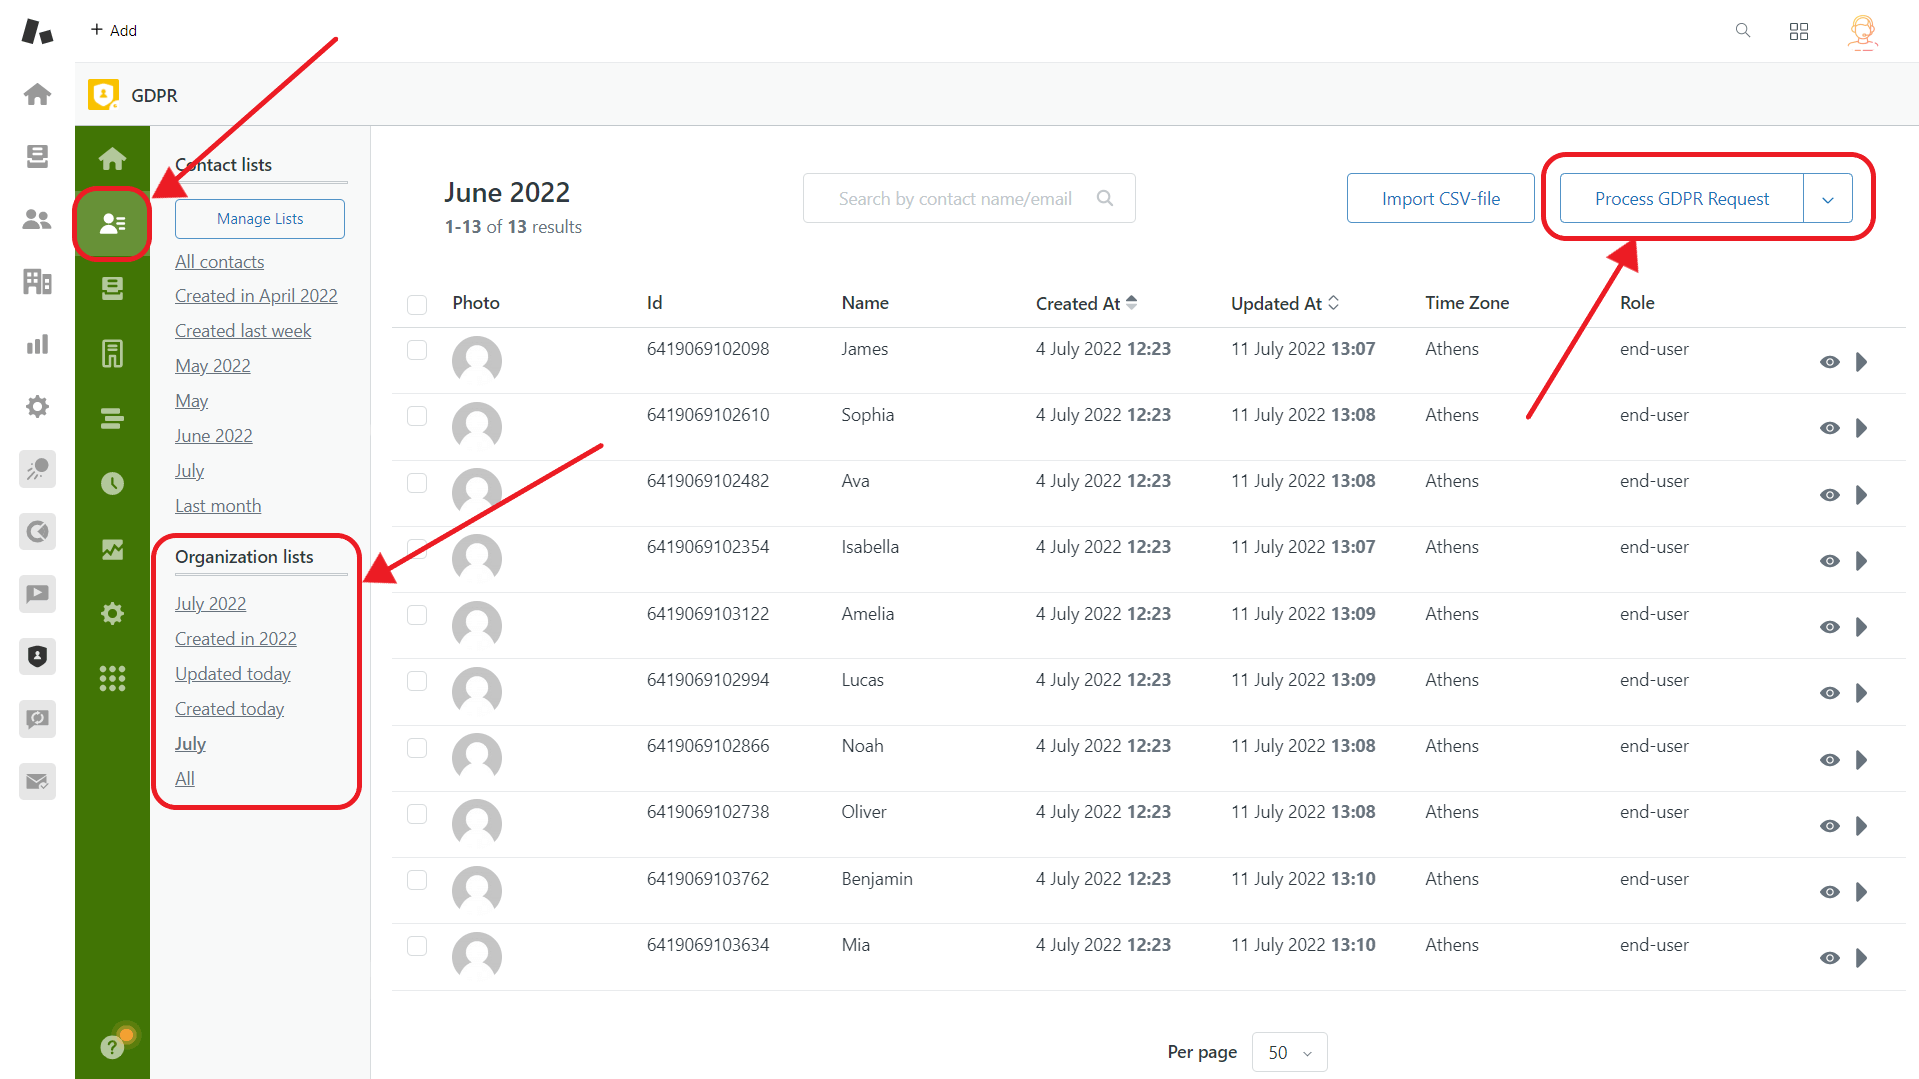
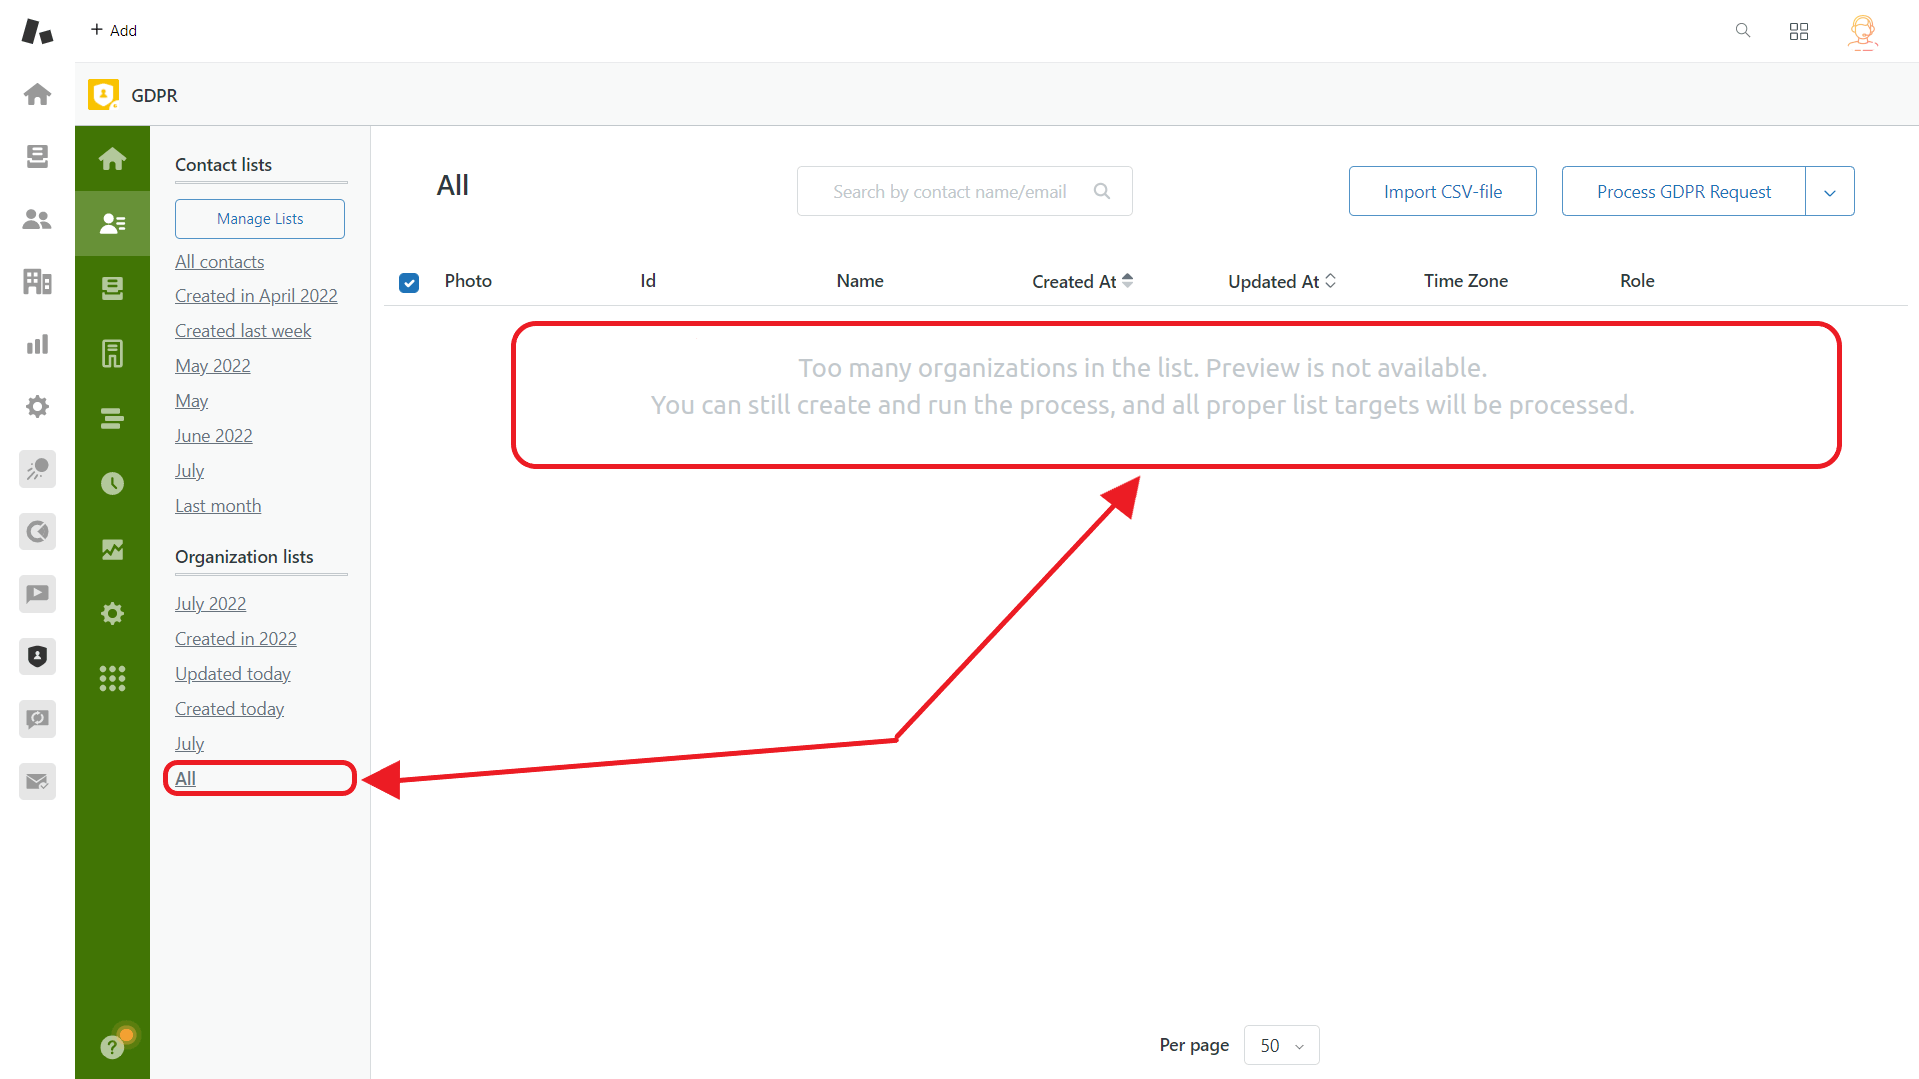
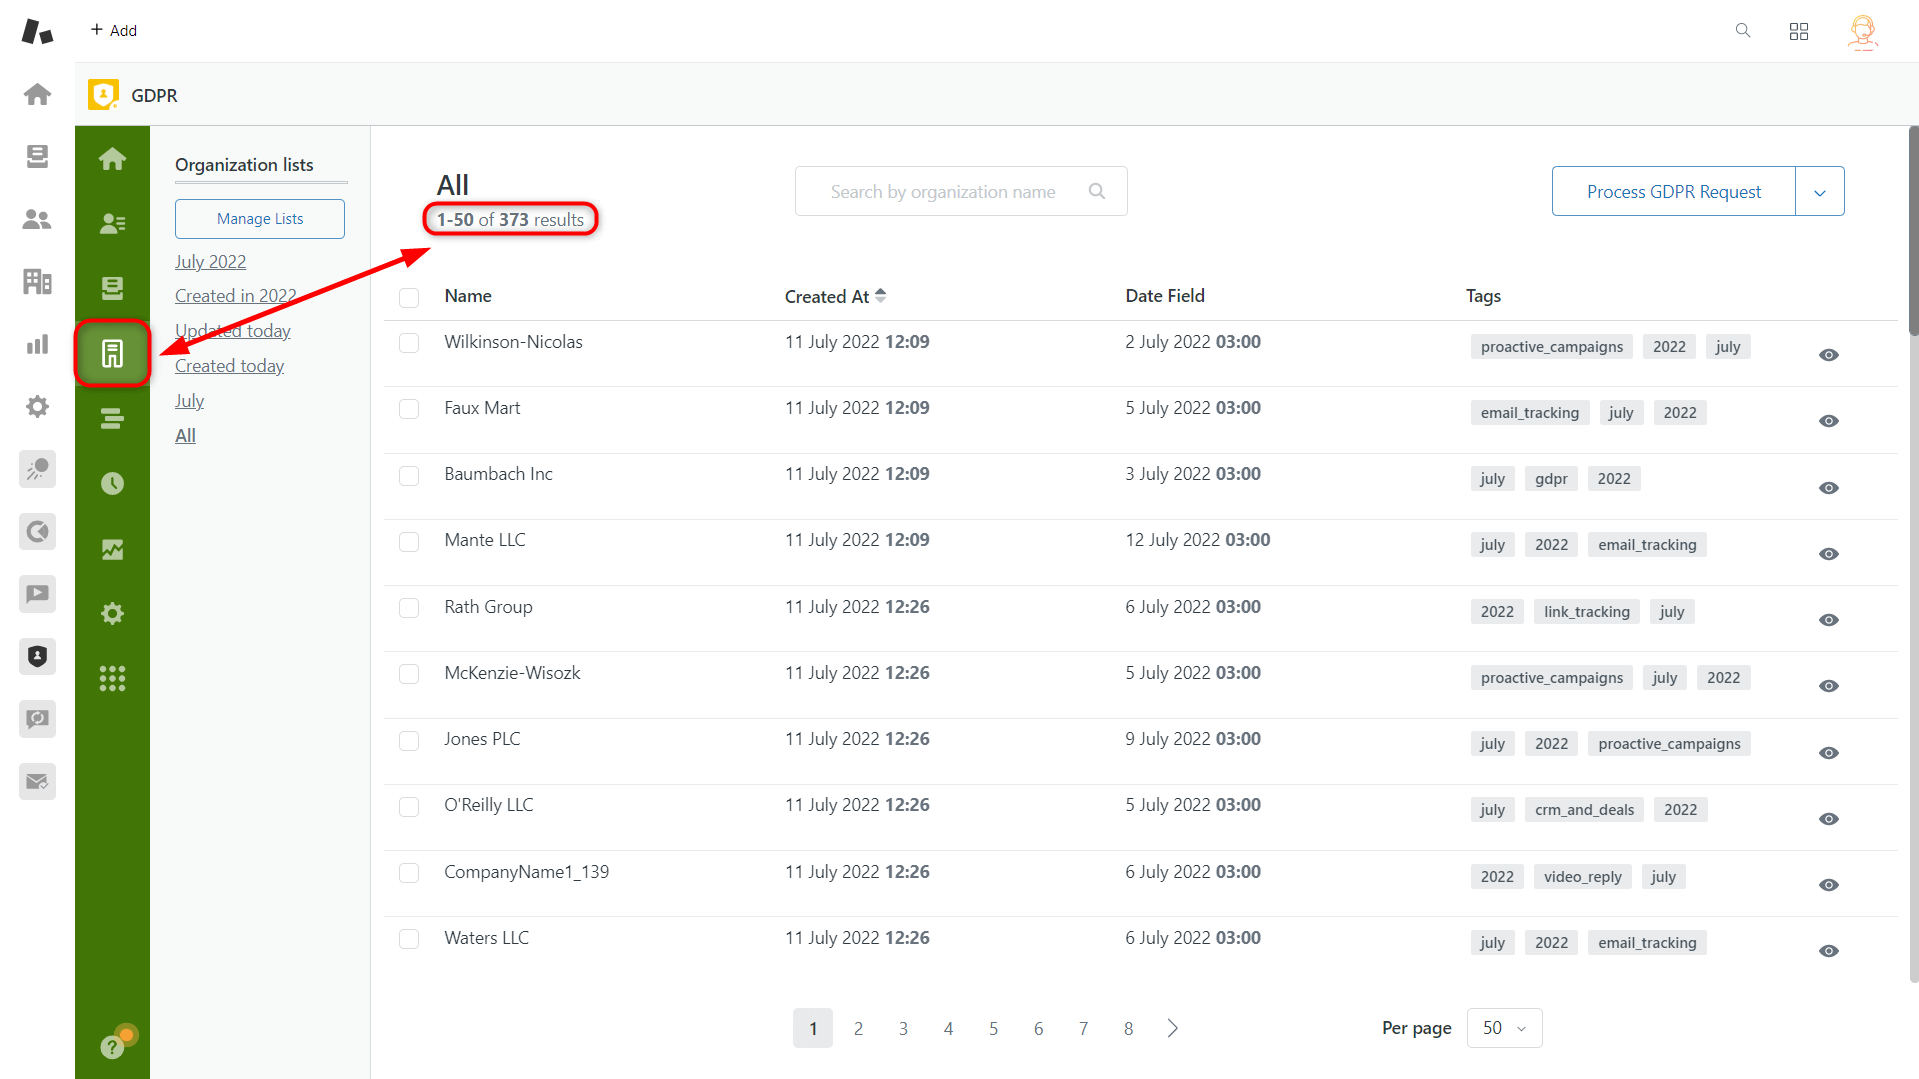
So, go to the app and test deleting users or tickets filtered by organizations on your own.
Retrieving private comments from Zendesk
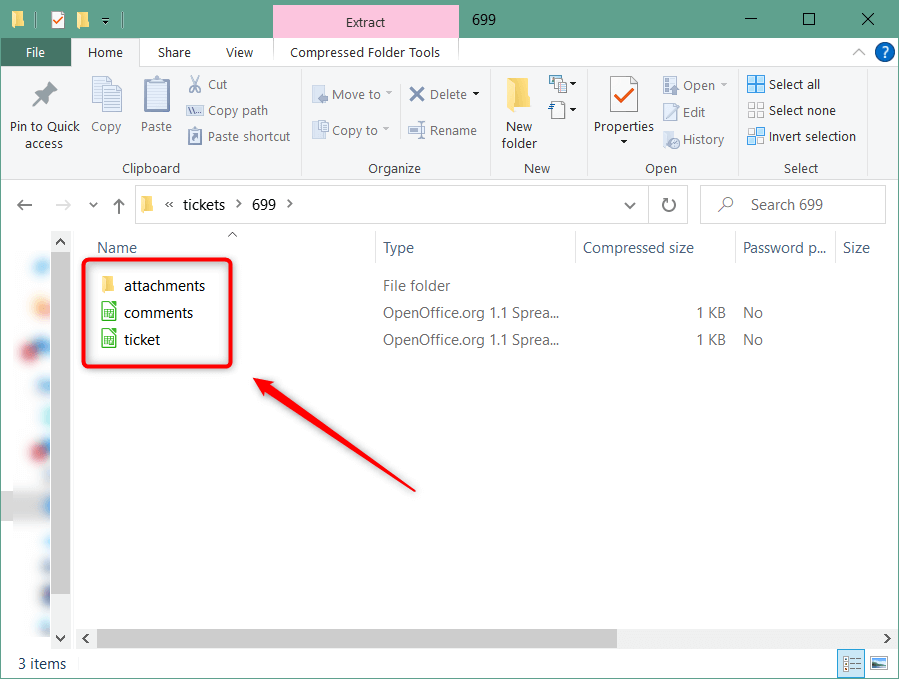
At our customer's request, the GrowthDot team has launched a new setting for GDPR Compliance. Previously, you could retrieve customer and ticket data that also contained public comments. However, we have added a new feature - the ability to download private comments in the CSV file. Besides, we improved the data appearance, so information is sorted in a more convenient way. So now, you can find each ticket stored in a separate folder.
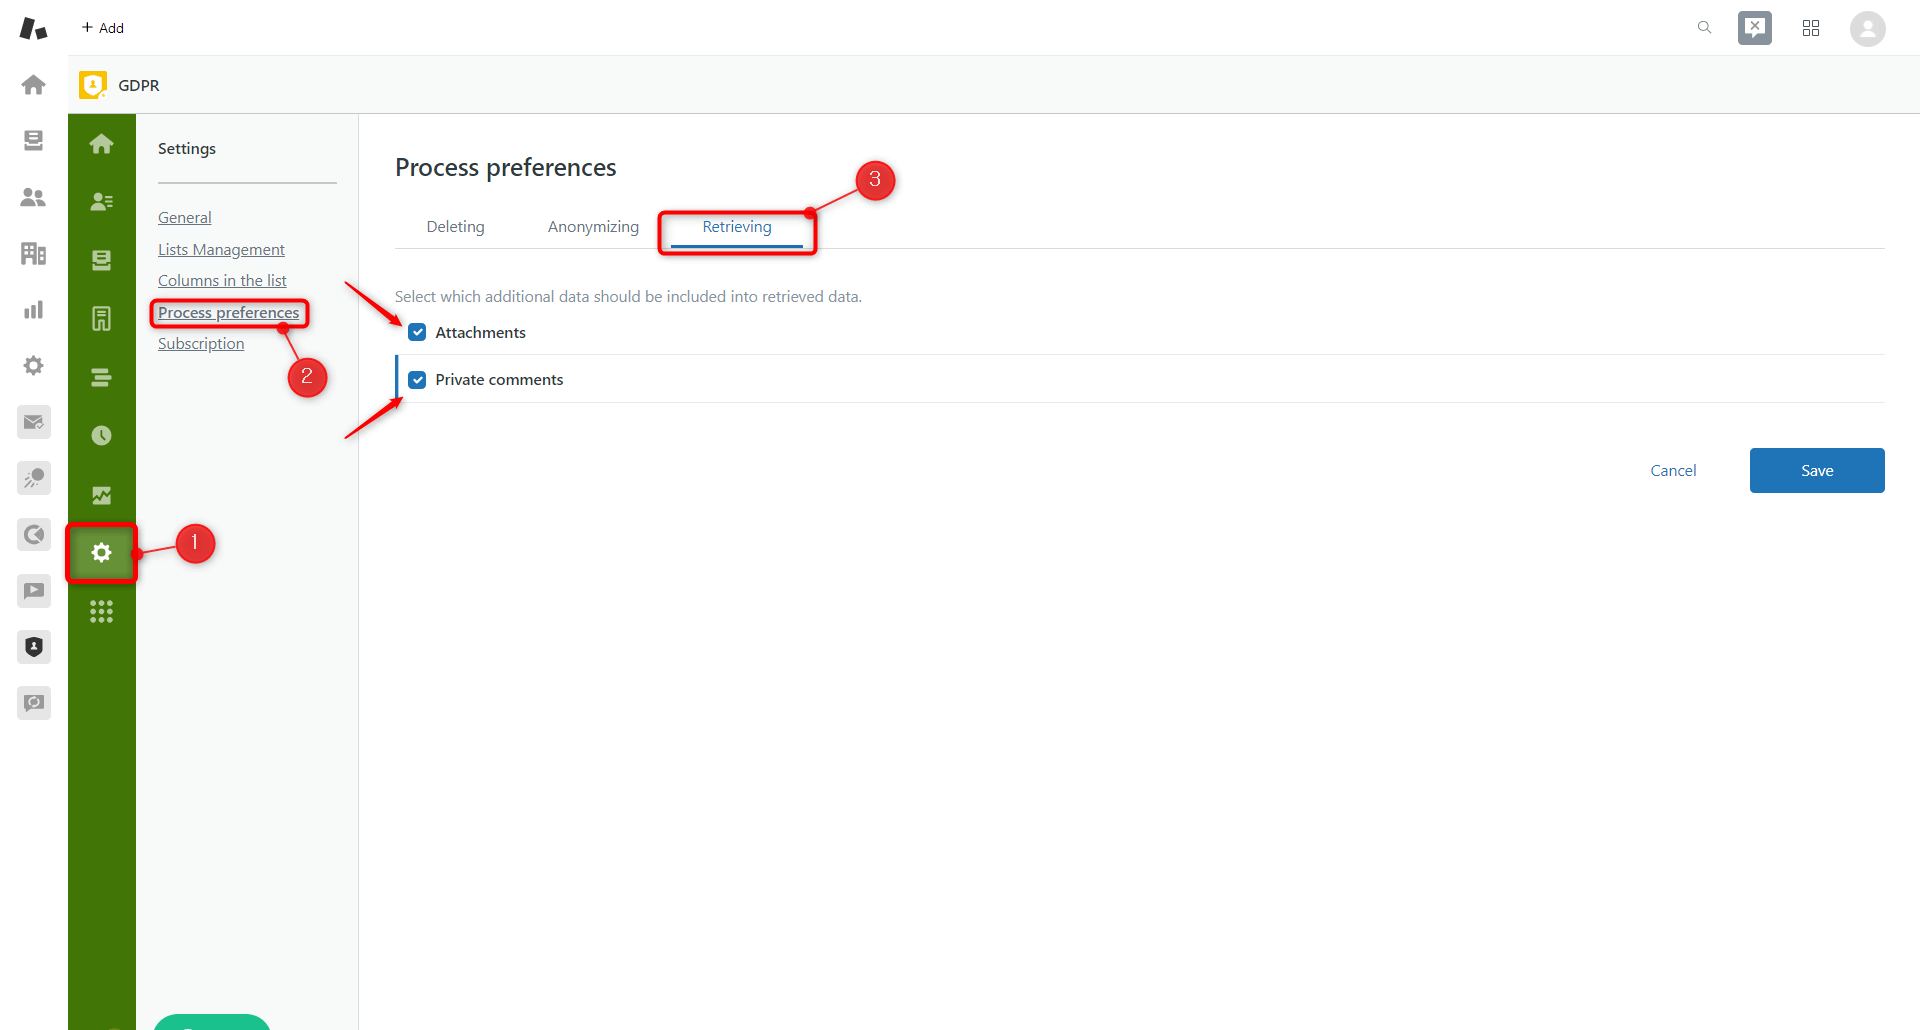
If you want to download private comments along with public ones, you should enable a related option in GDPR settings. First, go to the Settings page -> Process preferences -> Retrieving tab. Second, put the checkmark to include Private comments.
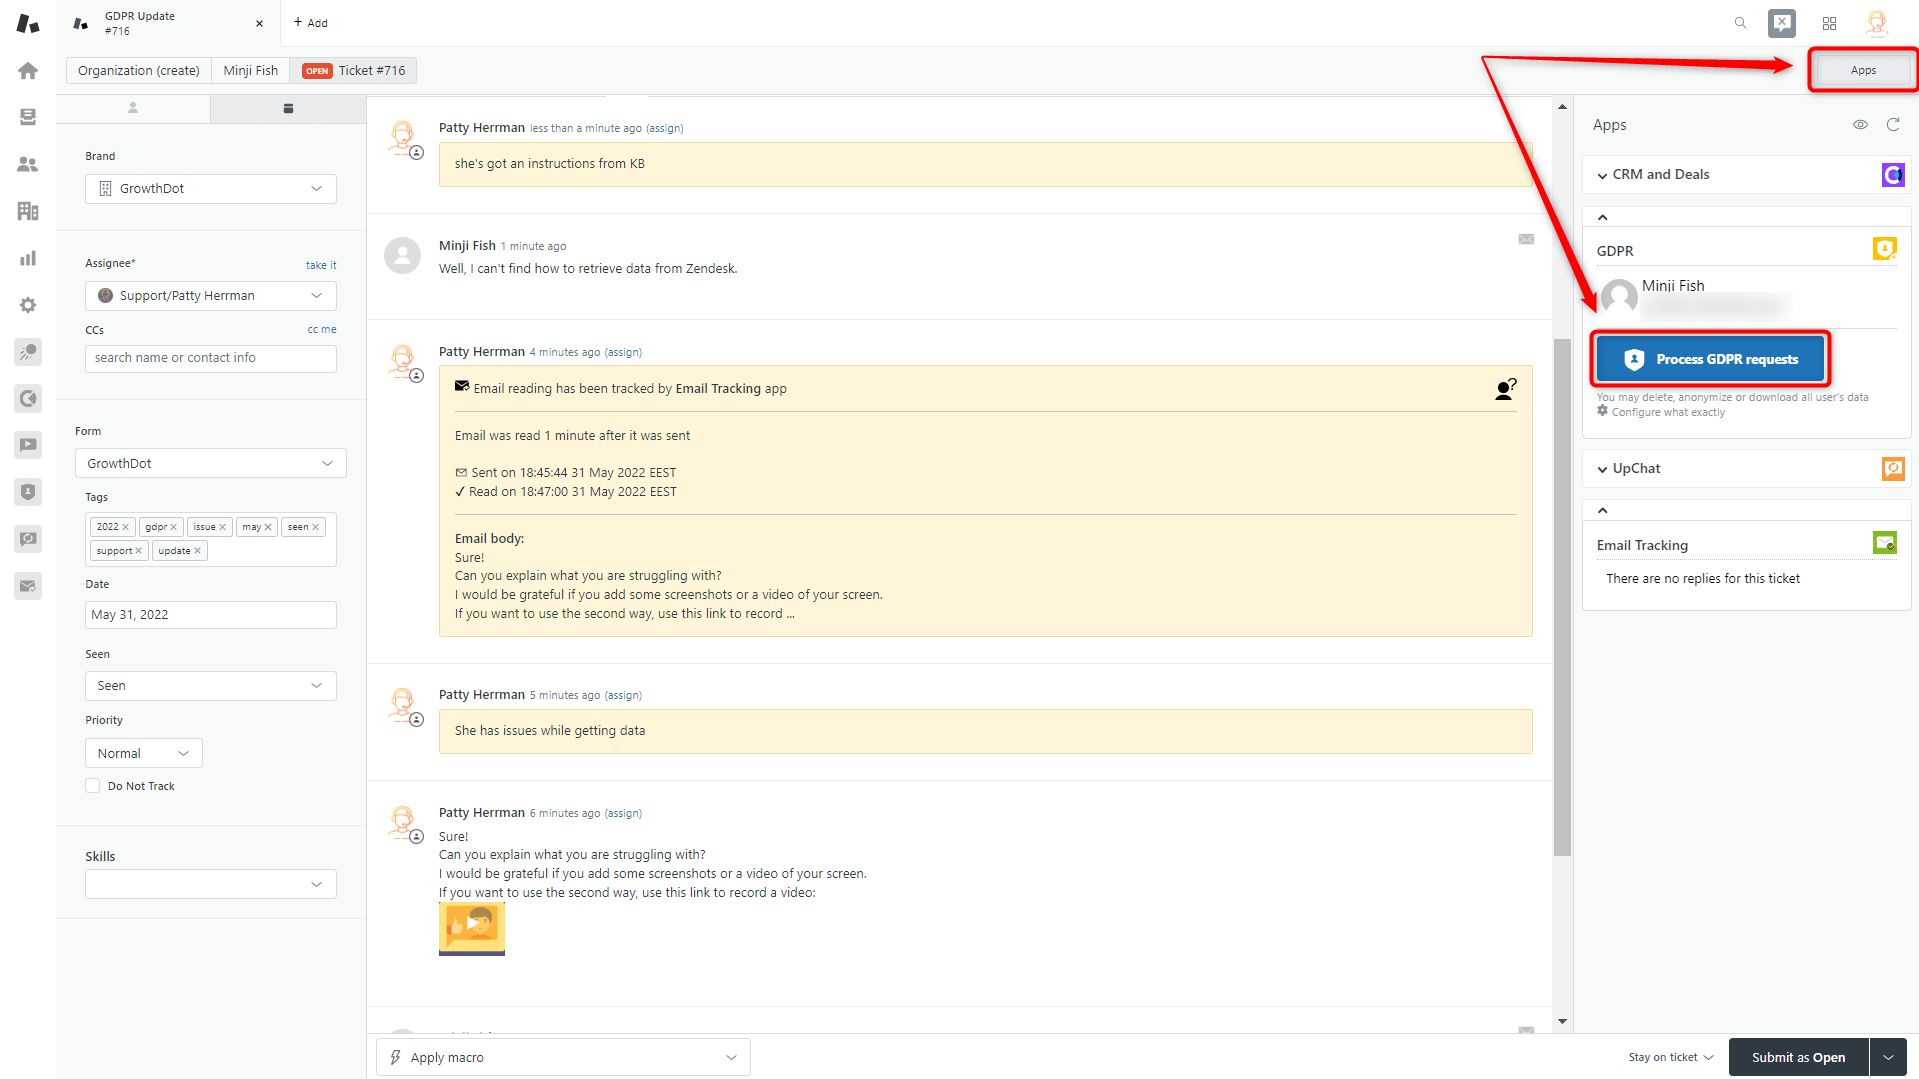
To retrieve data from a specific ticket, go to the Views tab in Zendesk and choose a ticket you want to process. Then, open the sidebar by clicking the Apps icon and click on the Process GDPR Requests. After, press Retrieve data -> Proceed -> Confirm and Download the archive.
You will gain sorted tickets by folders and the users.csv file as outputs. Public and private comments are in a comments.csv file you can find inside a ticket folder.
Deleting organization
We heard many times about the request to delete organizations from Zendesk. As a result, here is a new option available from now, just go to the Organization Views tab to start. Next, click on Delete selected organizations or Delete All Organizations. It is the same button, however, the name can be variable depending on what actions you need to perform. If you mark several organizations the button will be named as Delete selected organizations like on the screenshot below. If you need to process all items, leave empty checkboxes and press on the Delete All Organizations.
Then, fill in the only field in the modal window and hit the Create process.
Finally, click on the Start Process and wait till the ending.

New condition in creating ticket lists
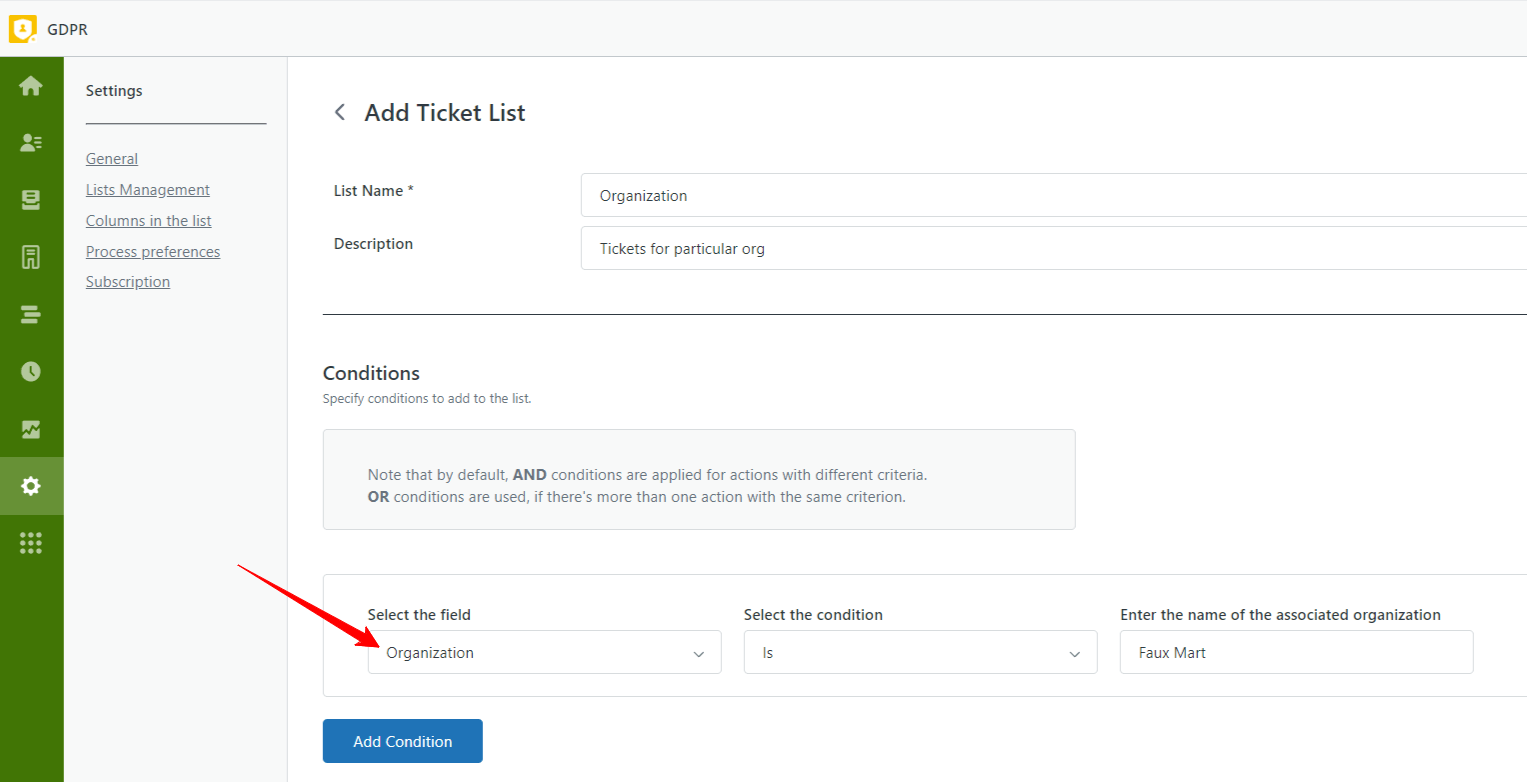
The more conditions you can add, the more accurate list you can create before starting any process in GDPR Compliance. That is the reason why we’ve added one more condition Organization Is (Is not) to GDPR Compliance for Zendesk. Consequently, you can significantly reduce the time spent on data treatment.
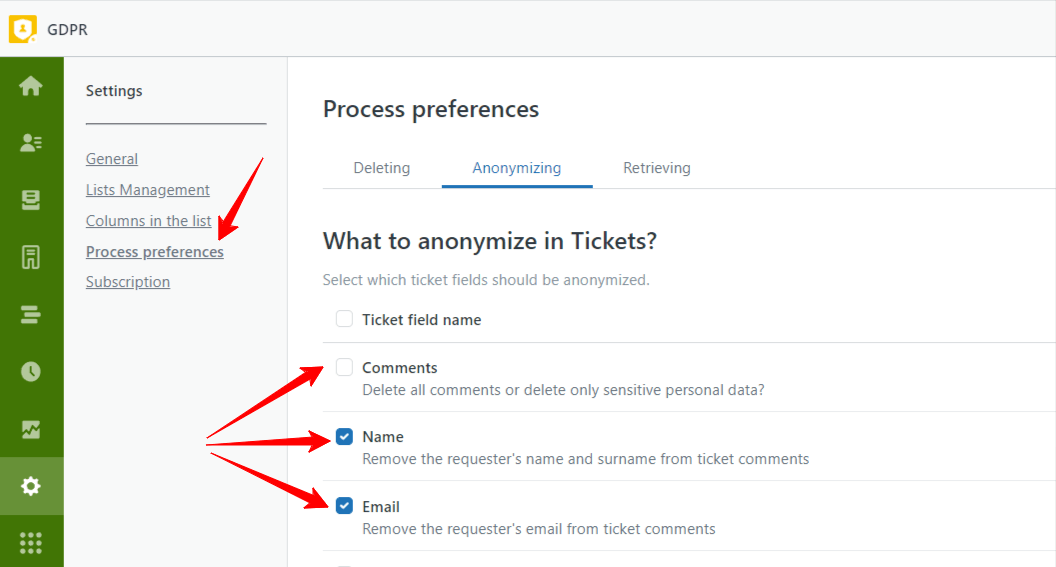
Ability to anonymize only sensitive info in the comment
Our new update is helpful if you need to leave a comment but anonymize sensitive information (e.g., user name).
 Just perform the following actions to switch on the feature and treat personal data. First, go to Settings -> Process Preferences -> Anonymizing. Then, put the checkmarks in the Name and Email boxes and leave the Comments box unchecked.
Deleting and anonymizing from CSV file
If you've got an imported list with your contacts from Zendesk, you can quickly start the process in the GDPR Compliance app from the CSV file. Here are some steps to follow before starting the process.
At first, go Contact Views page and click on Import CSV-file, and you will be taken to the New process from CSV- file.

Here you can drag and drop the file or click to select the needed one. Next, select the column which contains users' emails, select the data treatment type and click on Create the process to start the deletion or anonymizing.
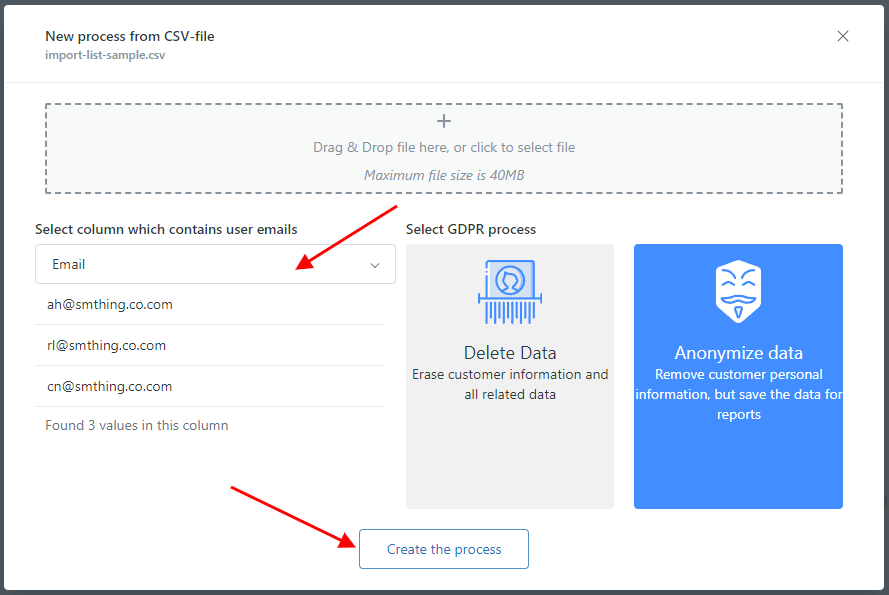
Note: select only the column with users' email addresses to match with emails in Zendesk. Otherwise, the process will be failed.
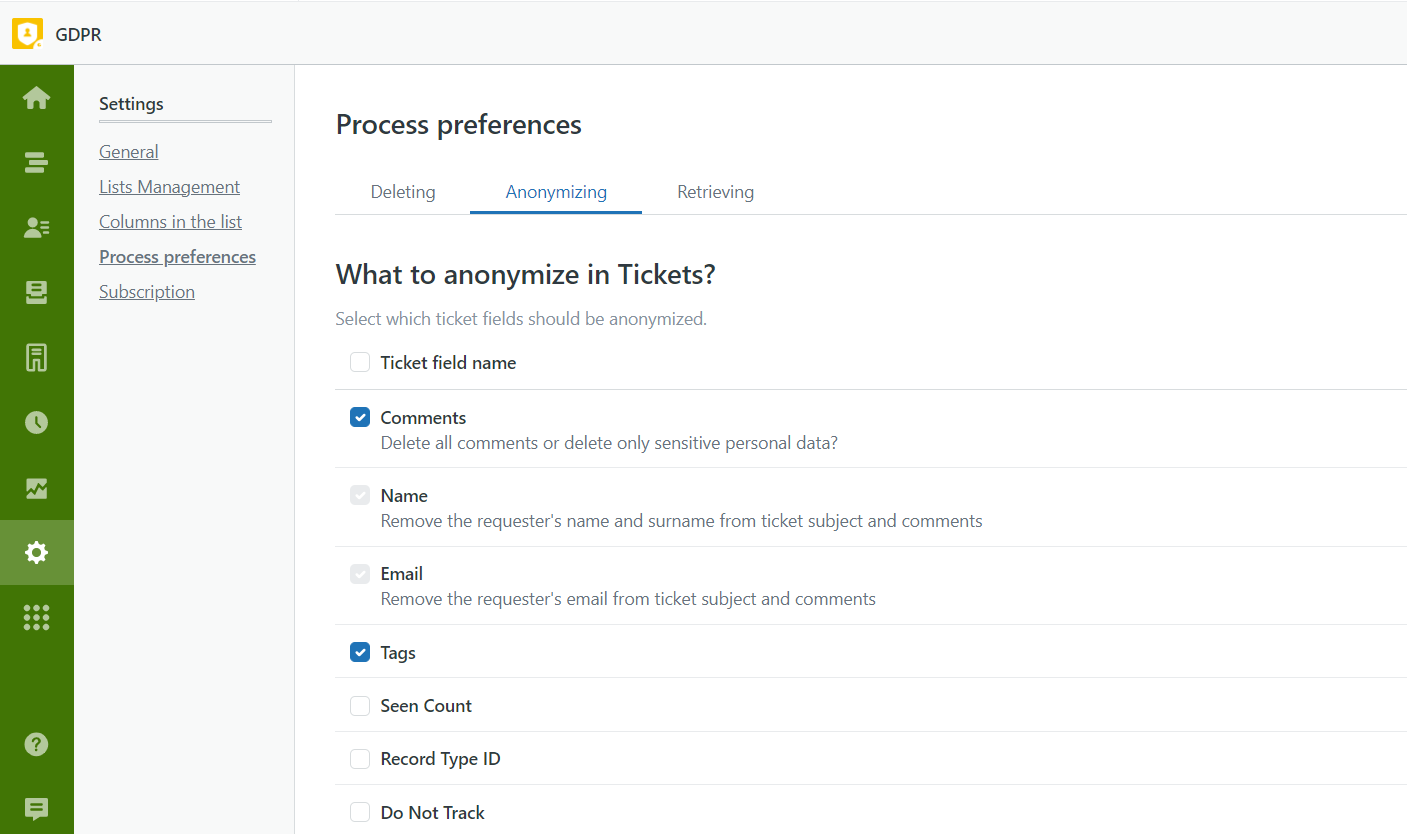
Leave tags after the anonymization
Another company is another ecosystem, and that's impossible to create a universal solution for everyone as known. However, we are client-oriented and try to bring our add-ons closer to your company's needs. And our customers are the best idea generators in that challenge. They help us implement what we never thought was required but match their needs, so leaving tags after the anonymization is another idea that was implemented.
To configure tag anonymization, you need to go to the Settings page -> Process preferences -> put the checkmark in the front of the Tags option. If you remove the checkmark, you'll see tags in the anonymized tickets.
Easily find tickets in Zendesk after the processing
Users often get confused after the ticket anonymization as it seems impossible to find tickets in Zendesk, and they are dropped among thousands of requests. So that's not a big thing anymore, and you can follow a few steps to deal with it. Check out the details here.
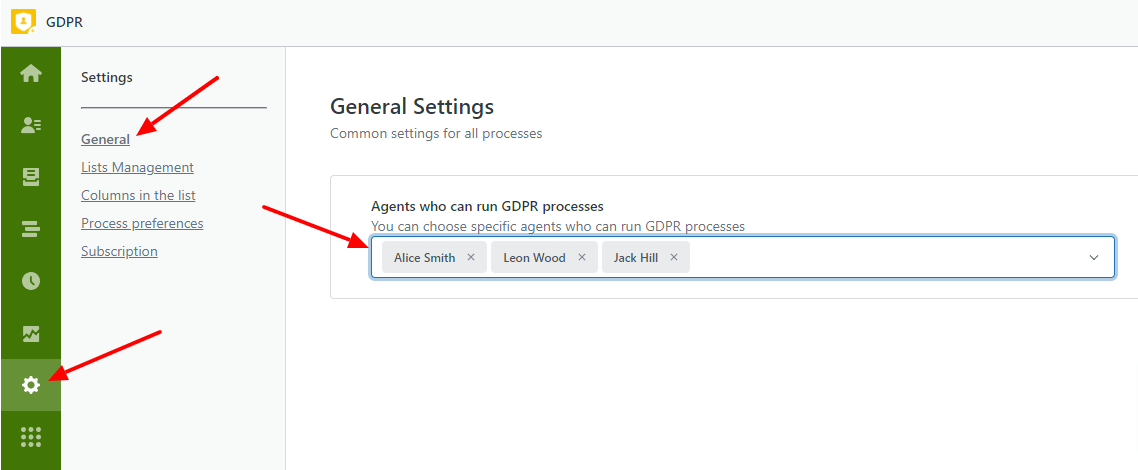
Access for processes launching without admin rights
Previously only the admin could run GDPR processes, which means agents could only start a retrieving process or send a request and wait for the admin’s approval if they need to delete and anonymize. From now on admin can select specific agents to start data treatment. Select General on the Settings page and choose one or several employees to perform on the agent’s behalf.
New condition in GDPR Compliance for Zendesk
Sometimes our clients demand the mass deletion of suspended tickets hanging in their Zendesk, so we decided to respond to numerous requests on this issue. So, create a target user list and select the condition.
Is suspended - Is - Is suspended (Switch the toggle)
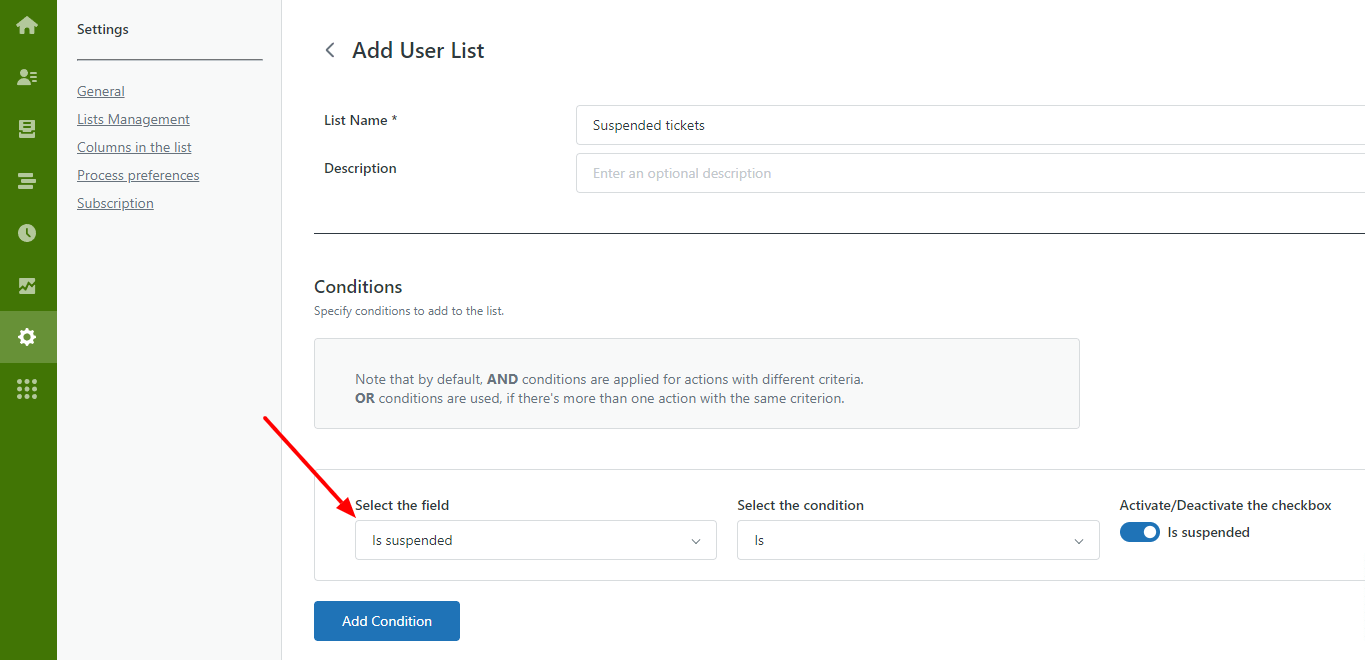
Then continue as usual. We described the process of bulk ticket deletion and creating a ticket and user list in our help center’s articles, so follow the link to see the details.
Test our awesome apps!
GrowthDot apps are the best tools to perform different activities in Zendesk. For example, email marketing (Proactive Campaigns, Email Tracking), sales (CRM and Deals), data processing (GDPR Compliance), and video ticketing (Video Reply). Moreover, we provide a trial period to any of our Zendesk apps for you before deciding on purchasing. Also, we guarantee the total safety of your data.
By the way, we are the service provider and theme creator for Zendesk! So feel free to implement, customize, develop or integrate your customer support with us to create a flawless customer experience.


