The Proactive Campaigns app for Zendesk is your universal helper for bulk messaging. Sometimes, our clients share their opinions that the app has everything for email marketing, especially in union with Email Tracking. However, the Growthdot team continues making it a more powerful Zendesk tool, and updates in Proactive Campaigns have become our daily activity.
So, now we want to share with you other improvements. Let’s see what we got here.
Simplified Placeholder Search and Input
We were always getting a lot of questions and reported issues regarding using placeholders in campaigns. The most common questions were:
Where to find placeholders? How to format placeholders correctly? How to use a placeholder for a custom field? How to access a custom field key/ID if I’m a light agent?
It became clear that the process required too many steps and wasn’t accessible to everyone. So we built a solution that makes personalization effortless: Placeholder Auto-Input.
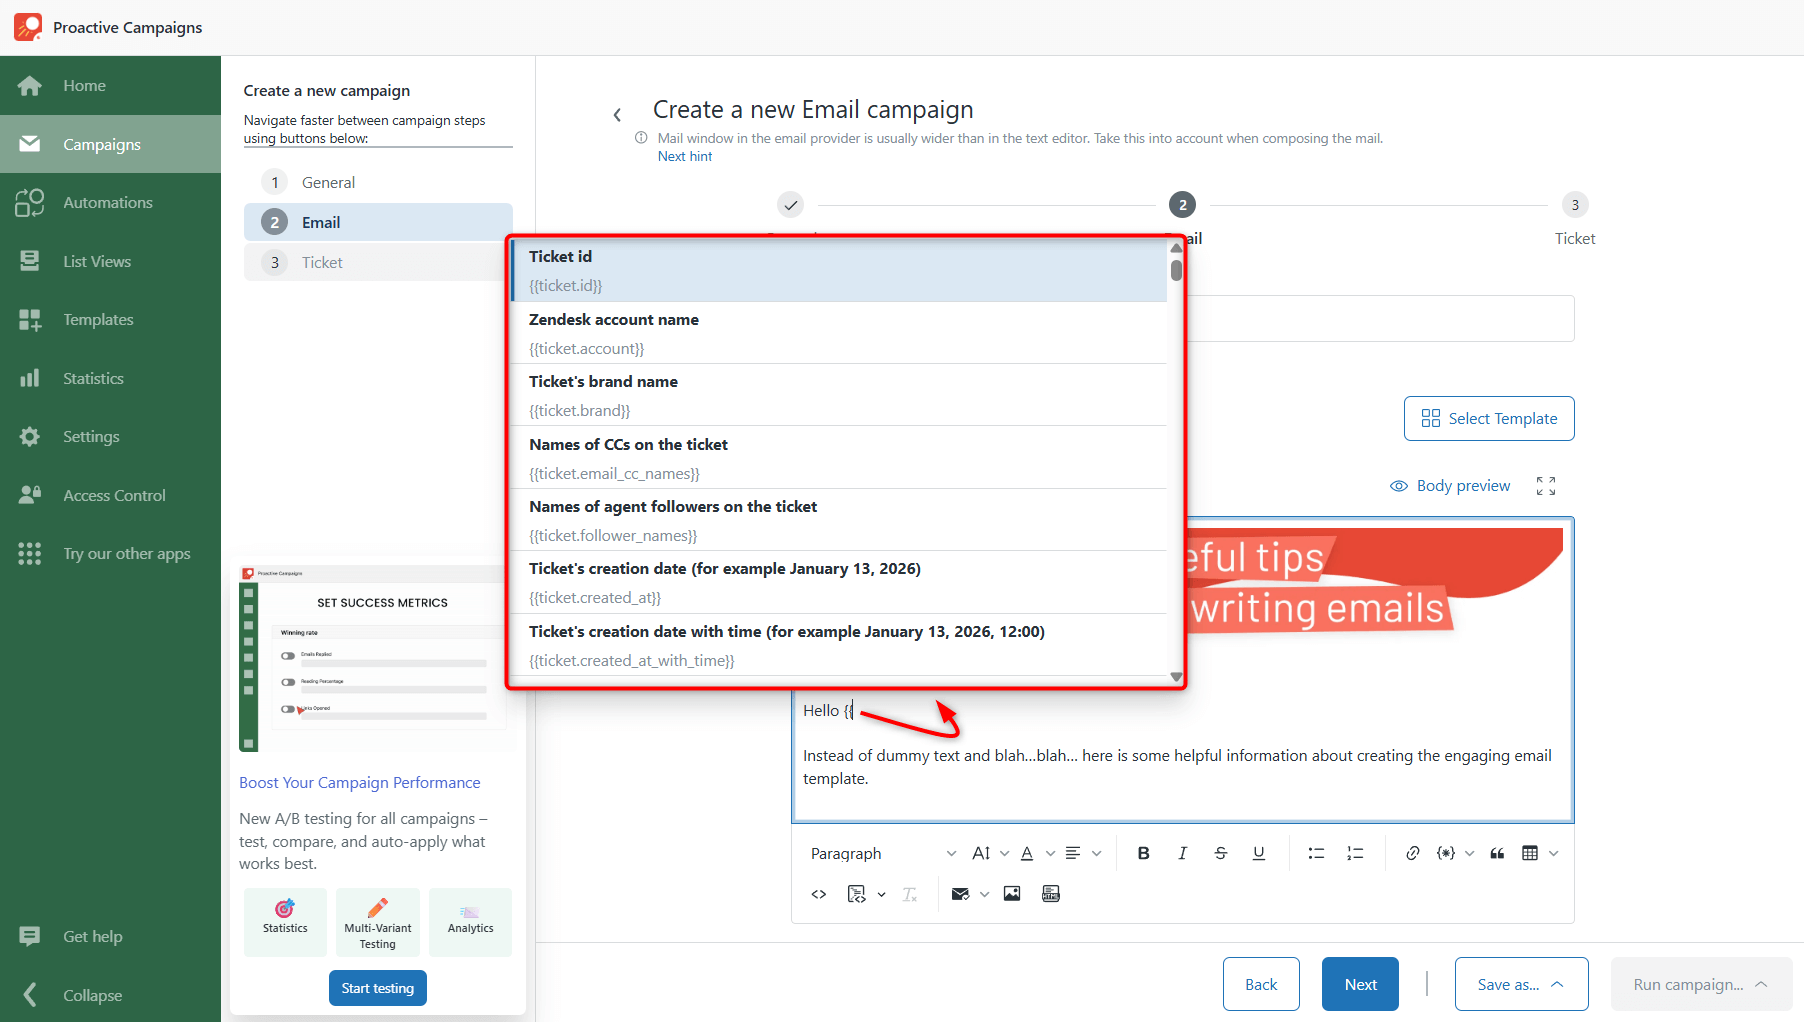
Now, when writing an email or editing a template, simply type {{ and a dropdown will appear with every available placeholder, including those from custom fields. You can scroll through the list or start typing to filter results, then insert the placeholder with one click.
Or, click on the placeholder icon in the toolbar and use the search bar to find any placeholder you need.
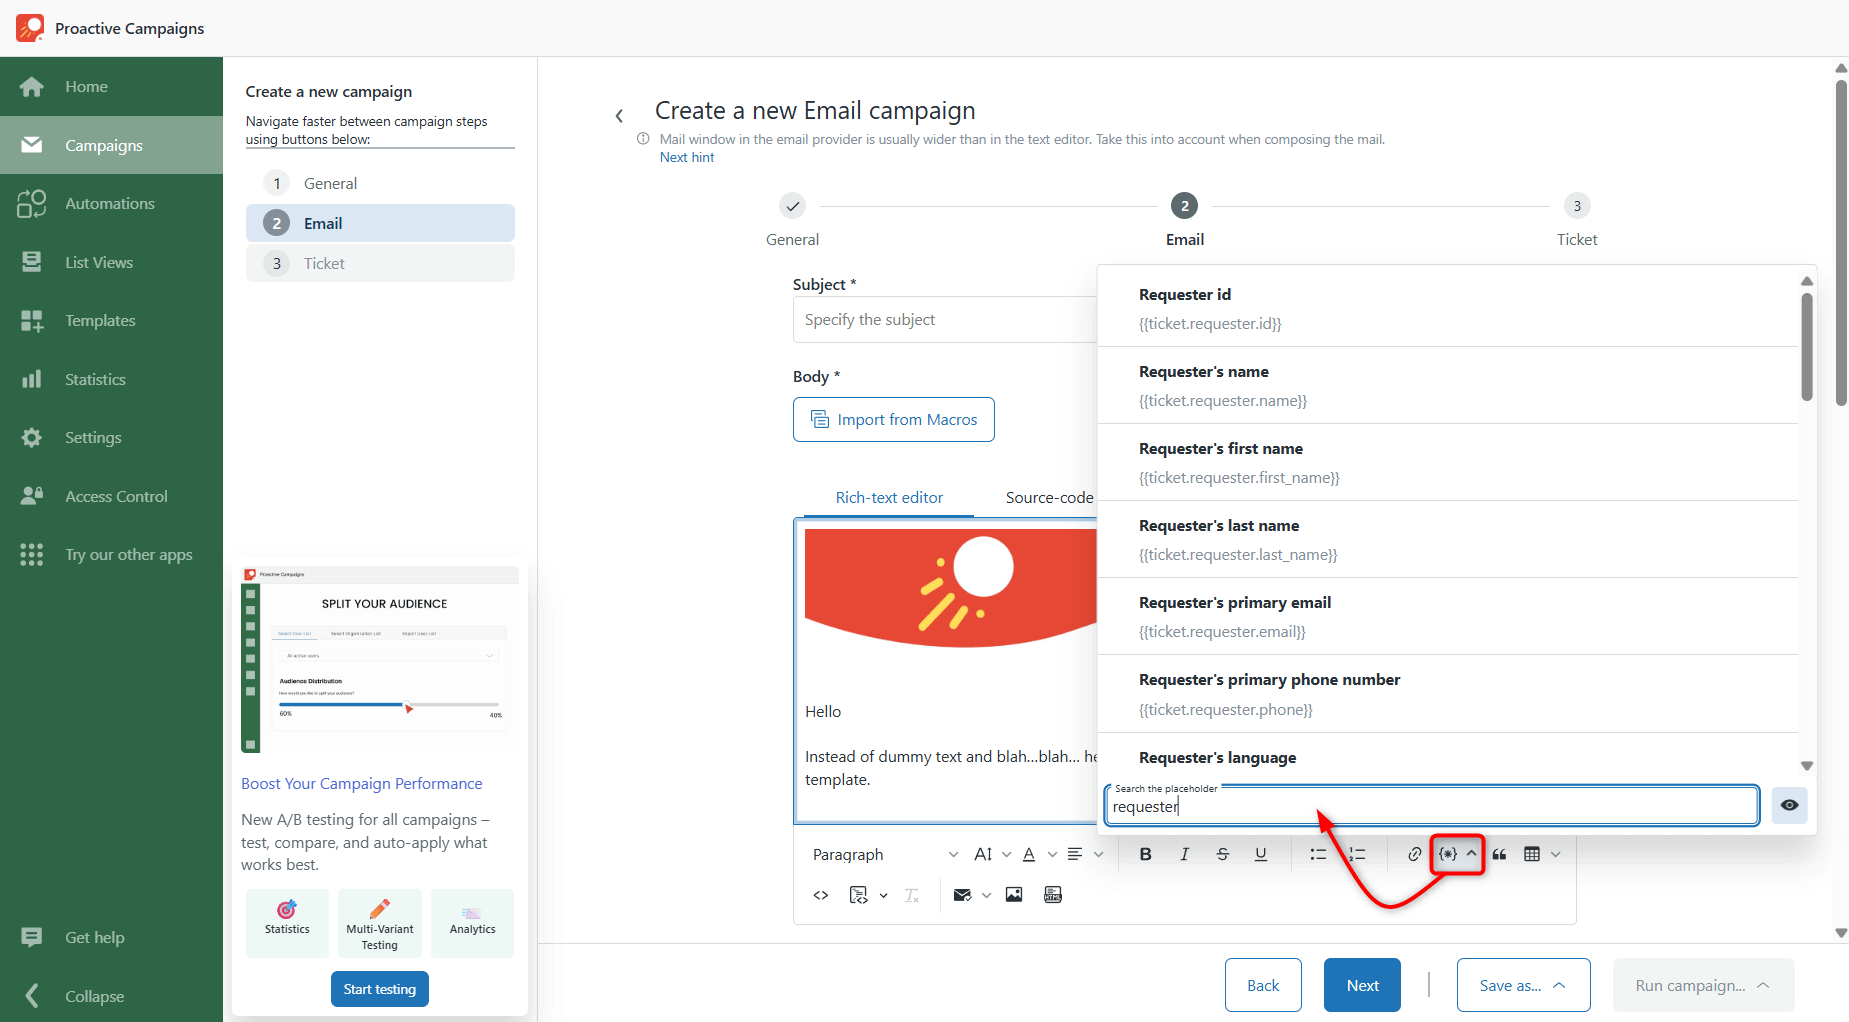
This update makes it faster and easier for all agents to personalize emails accurately, without switching tabs, searching documentation, or asking managers for field IDs.
Smarter Campaign Validation
We’ve improved how the app validates campaigns before sending. Now, potential issues that could block emails are detected early, and a clear warning is displayed to the user. This helps you catch problems before they affect your audience.
No more wasted time troubleshooting or tracking down errors — campaigns are sent smoothly and reliably, saving you time and effort.
Lookup Relation Fields for Segmenting Lists
Here’s our new update: Proactive Campaigns now lets you search by lookup relation fields for users, tickets, and organizations.
When creating your list, simply choose the lookup relation field in the conditions and set the value you need, just like you would with any other field.
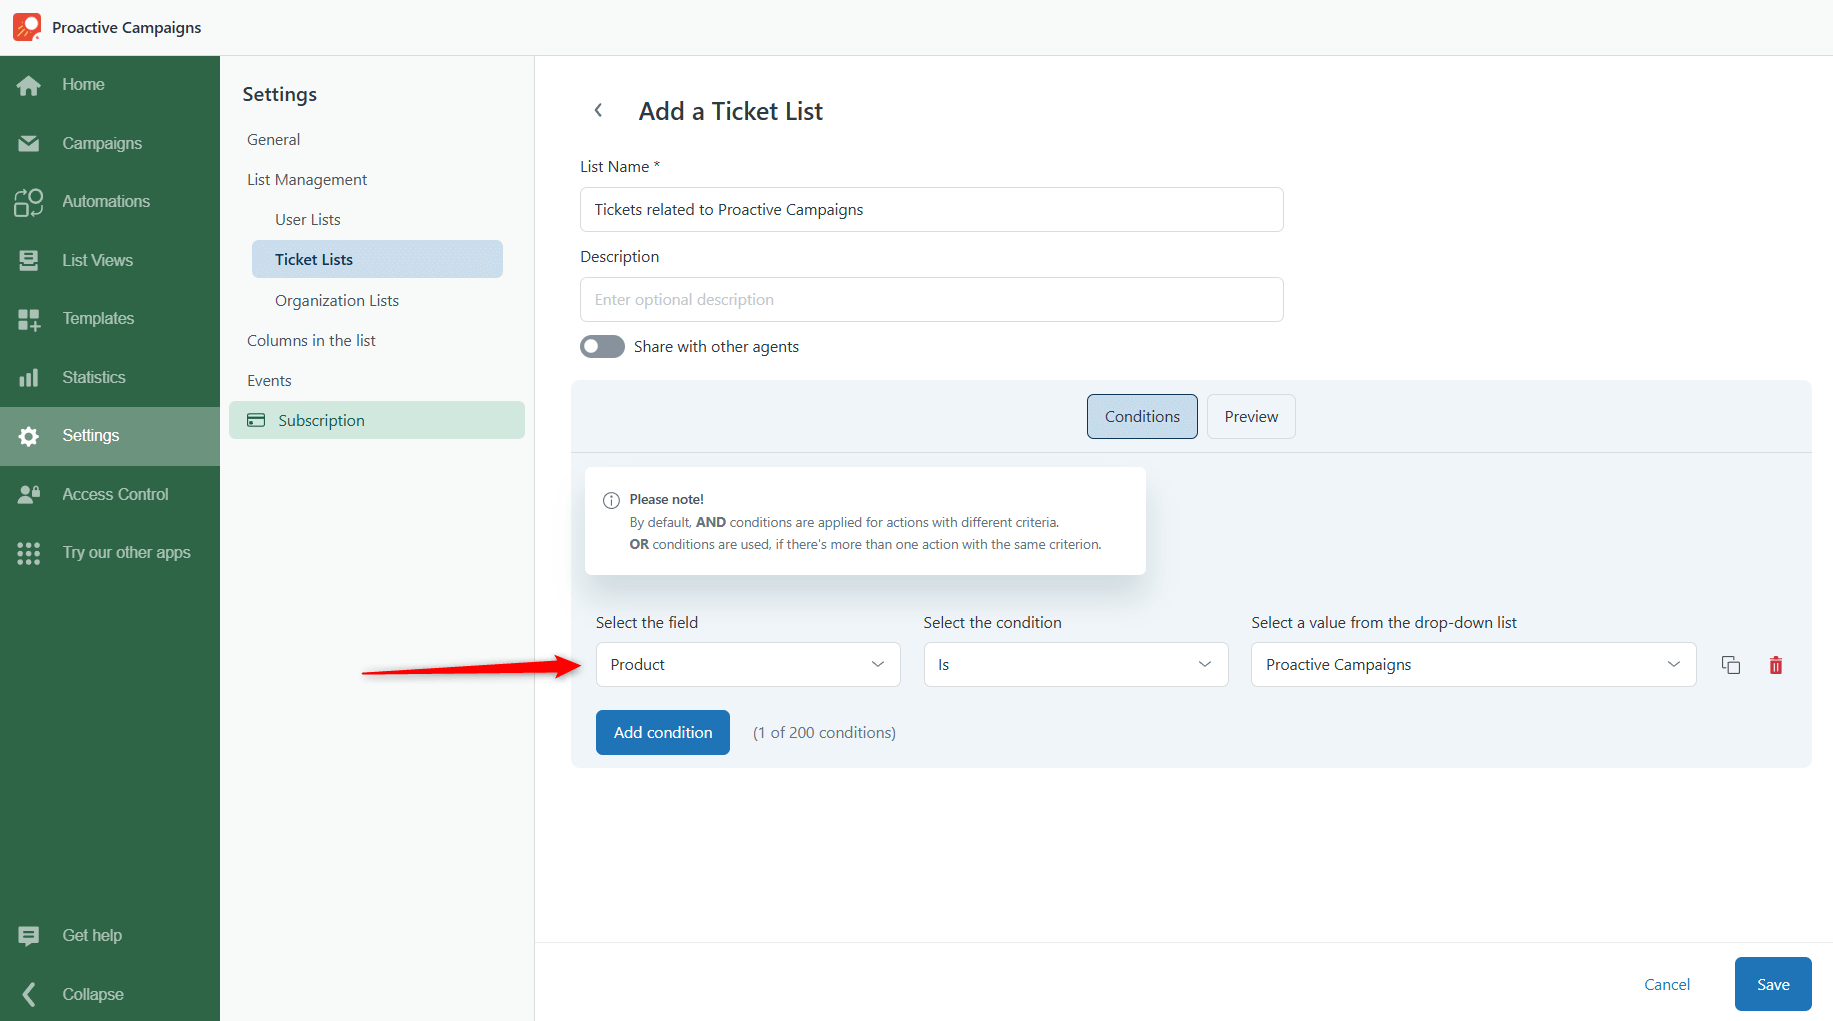
For instance, imagine you have a custom object called Product (with its own fields like name, price, and other details) and tickets reference these products through a lookup field. You can now quickly find every ticket connected to a specific product and send a tailored email to those customers.
Lookup relation fields can also be used for other scenarios, like filtering users by subscription plans or organizing messages by departments, giving you more flexibility for targeted campaigns in Zendesk.
Improved Unsubscribe Functionality
If you're giving your audience the option to unsubscribe, now you can be sure it works perfectly. Recipients can unsubscribe from any campaign, even if it was created by an agent with limited permissions. This ensures a smooth experience and gives recipients full control over their communication preferences.
New All-in-One Dashboard for Smarter Campaigns
No more plain home screens! Proactive Campaigns now greets you with a dynamic, action-packed dashboard.
From the moment you log in, you’ll get a real-time snapshot of your outreach efforts and instant access to the tools you use most.
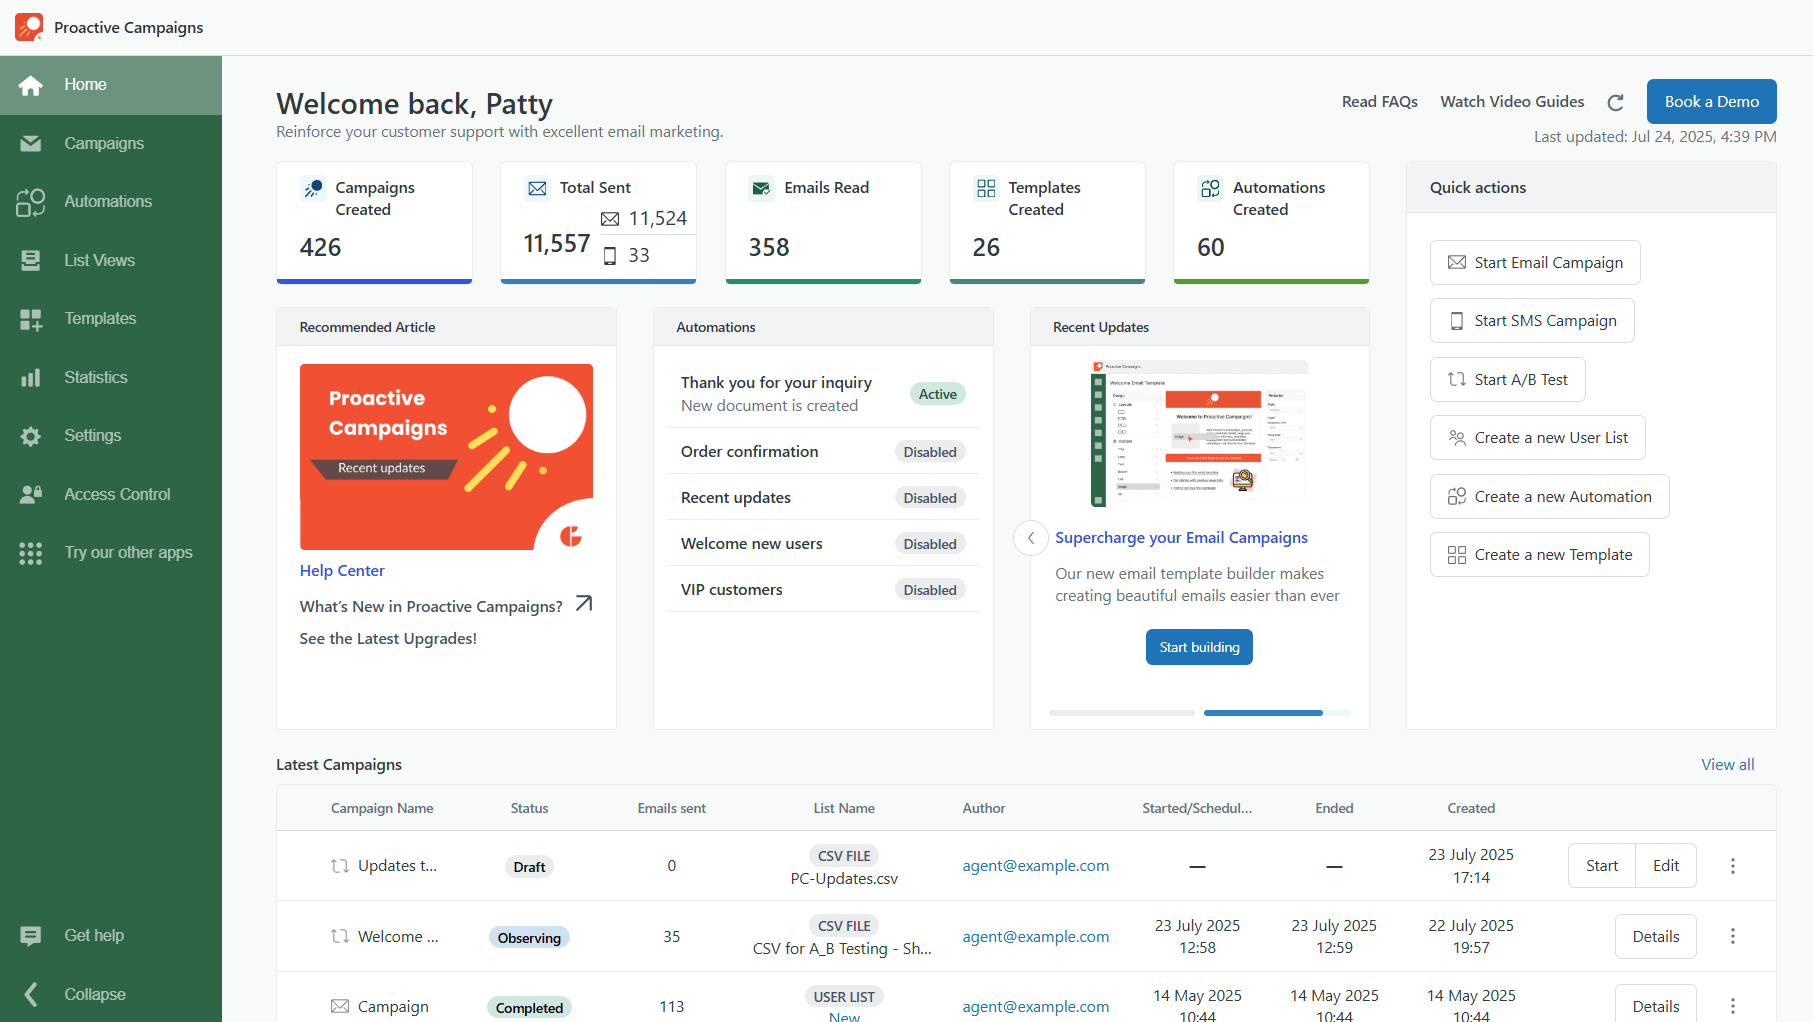
📊 Live Campaign Insights
Get real-time stats on campaigns, emails sent and opened, templates created, and automations running.
⚡ Quick Actions, No Extra Clicks
Launch email campaigns, create automations, test A/B variations, and build user lists—all right from your dashboard.
🔄 Automation Check-in
Quickly toggle automations on or off to stay in control of what’s running.
🕒 Activity Tracking Made Simple
See your most recent campaigns with their status, send dates, and performance at a glance.
📚 Helpful Content Within Reach
Access guides, updates, and best practices to sharpen your strategy anytime.
This redesign cuts down clicks, saves you time, and gives you full visibility into your campaign efforts.
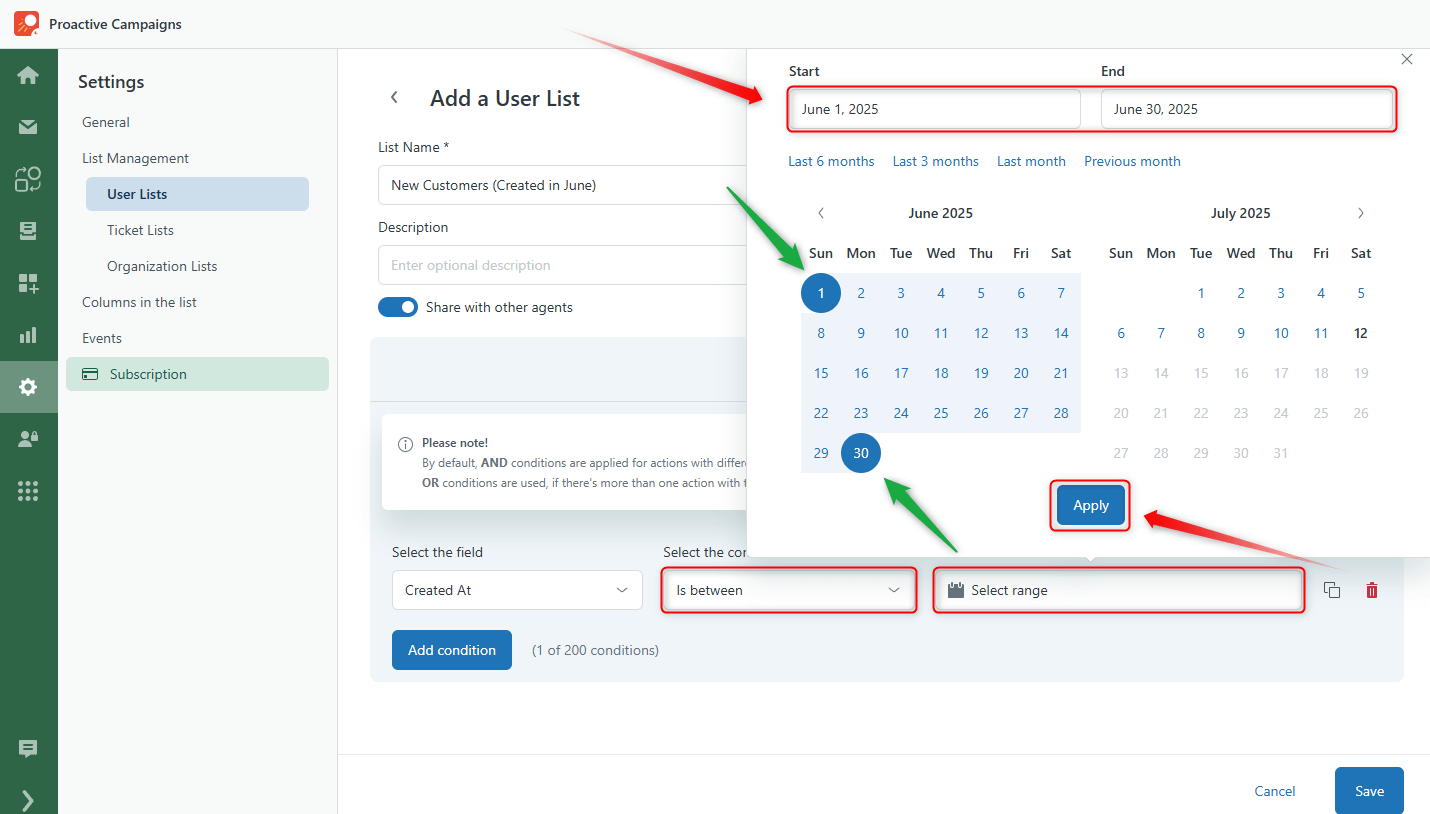
Improved 'Is between' Condition
Select an accurate time range by choosing specific dates using the Created at/Updated at condition. Also, the improved 'Is between' condition can be used with any custom field with a date field type.
It allows you to select two dates: a start date and an end date, without creating any additional conditions or workarounds.
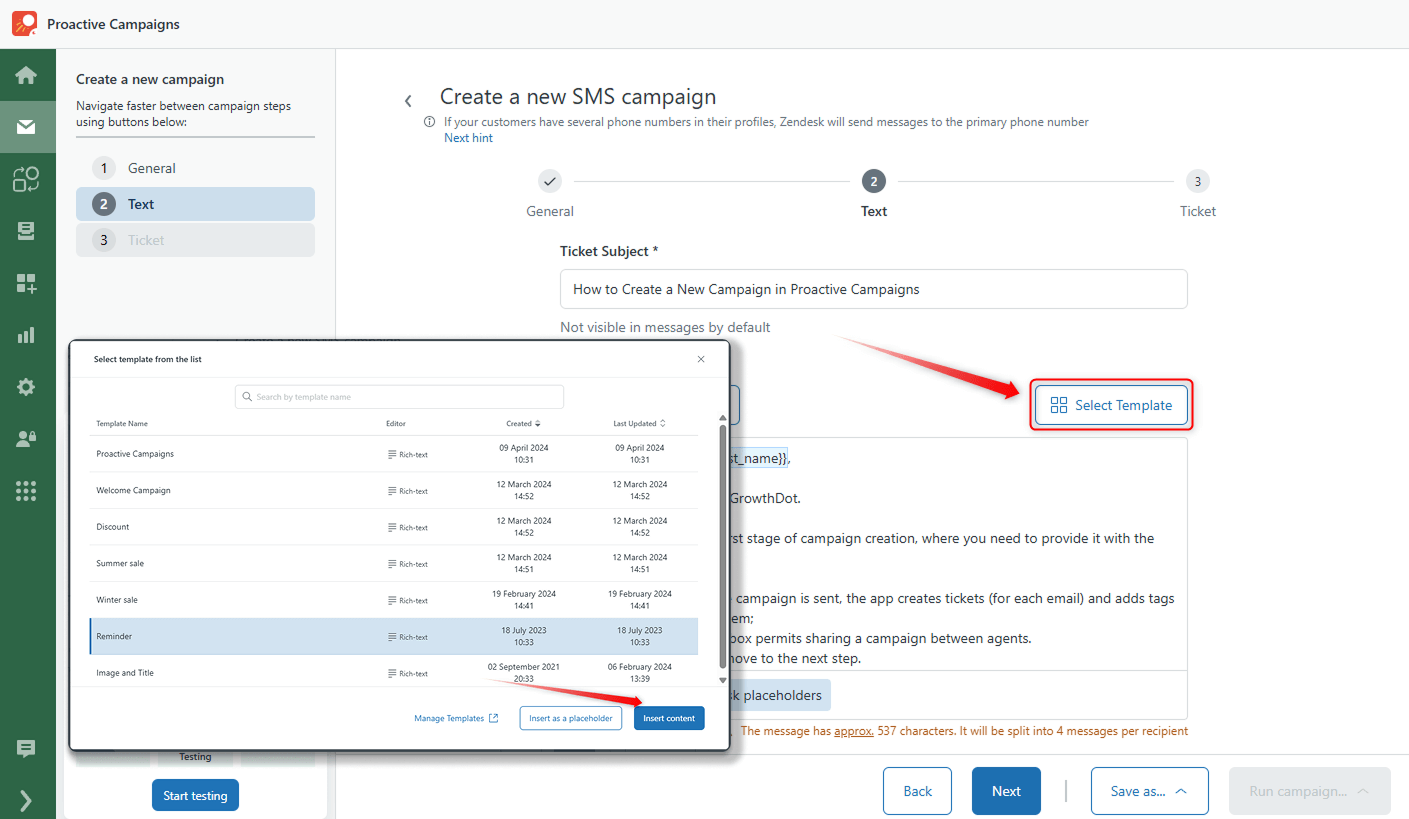
Templates for SMS Campaigns
Now you can use templates to improve the readability of your sms. So, in the Text section of your SMS campaign, you can select Rich text templates as shown on the screenshot below.
Powerful A/B Testing - Just Launched
It’s official — A/B testing has arrived in the Proactive Campaigns app for Zendesk!
Now you can stop guessing and start testing. Whether you're working on support updates, promotional emails, or onboarding campaigns, this feature lets you compare two email versions and make data-backed decisions based on how your audience responds.
Easy & Quick Setup
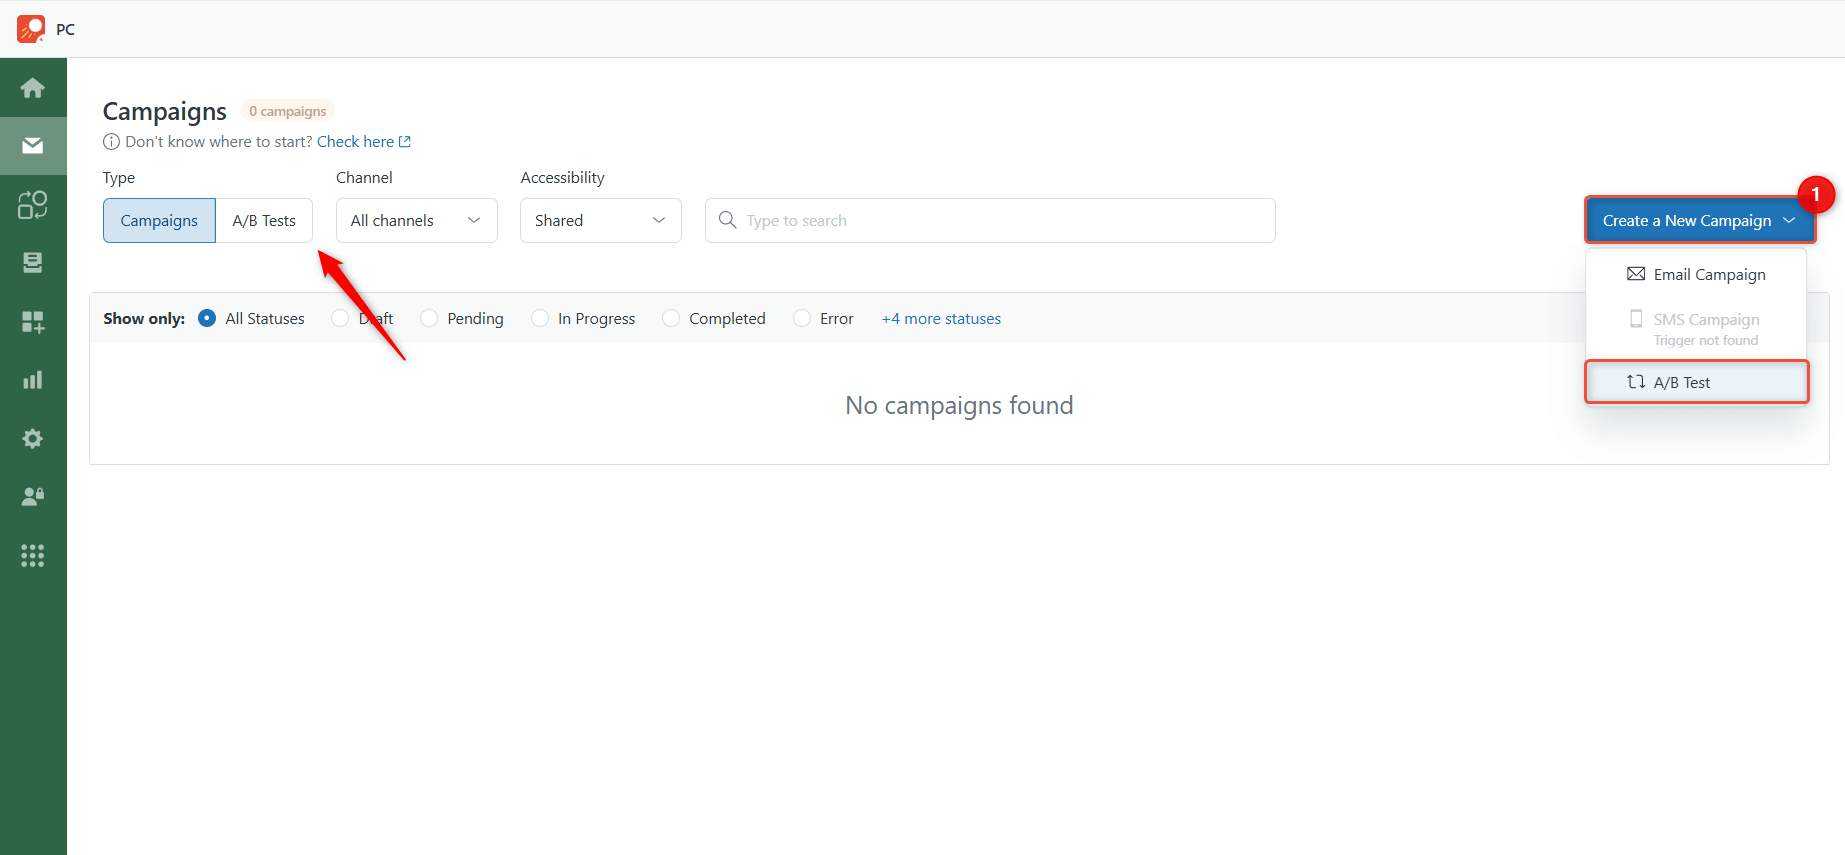
1. Start by creating a campaign and selecting A/B Test. You’ll notice a new ‘A/B Tests’ tab on the Campaigns page — this is where all your tests will be listed.
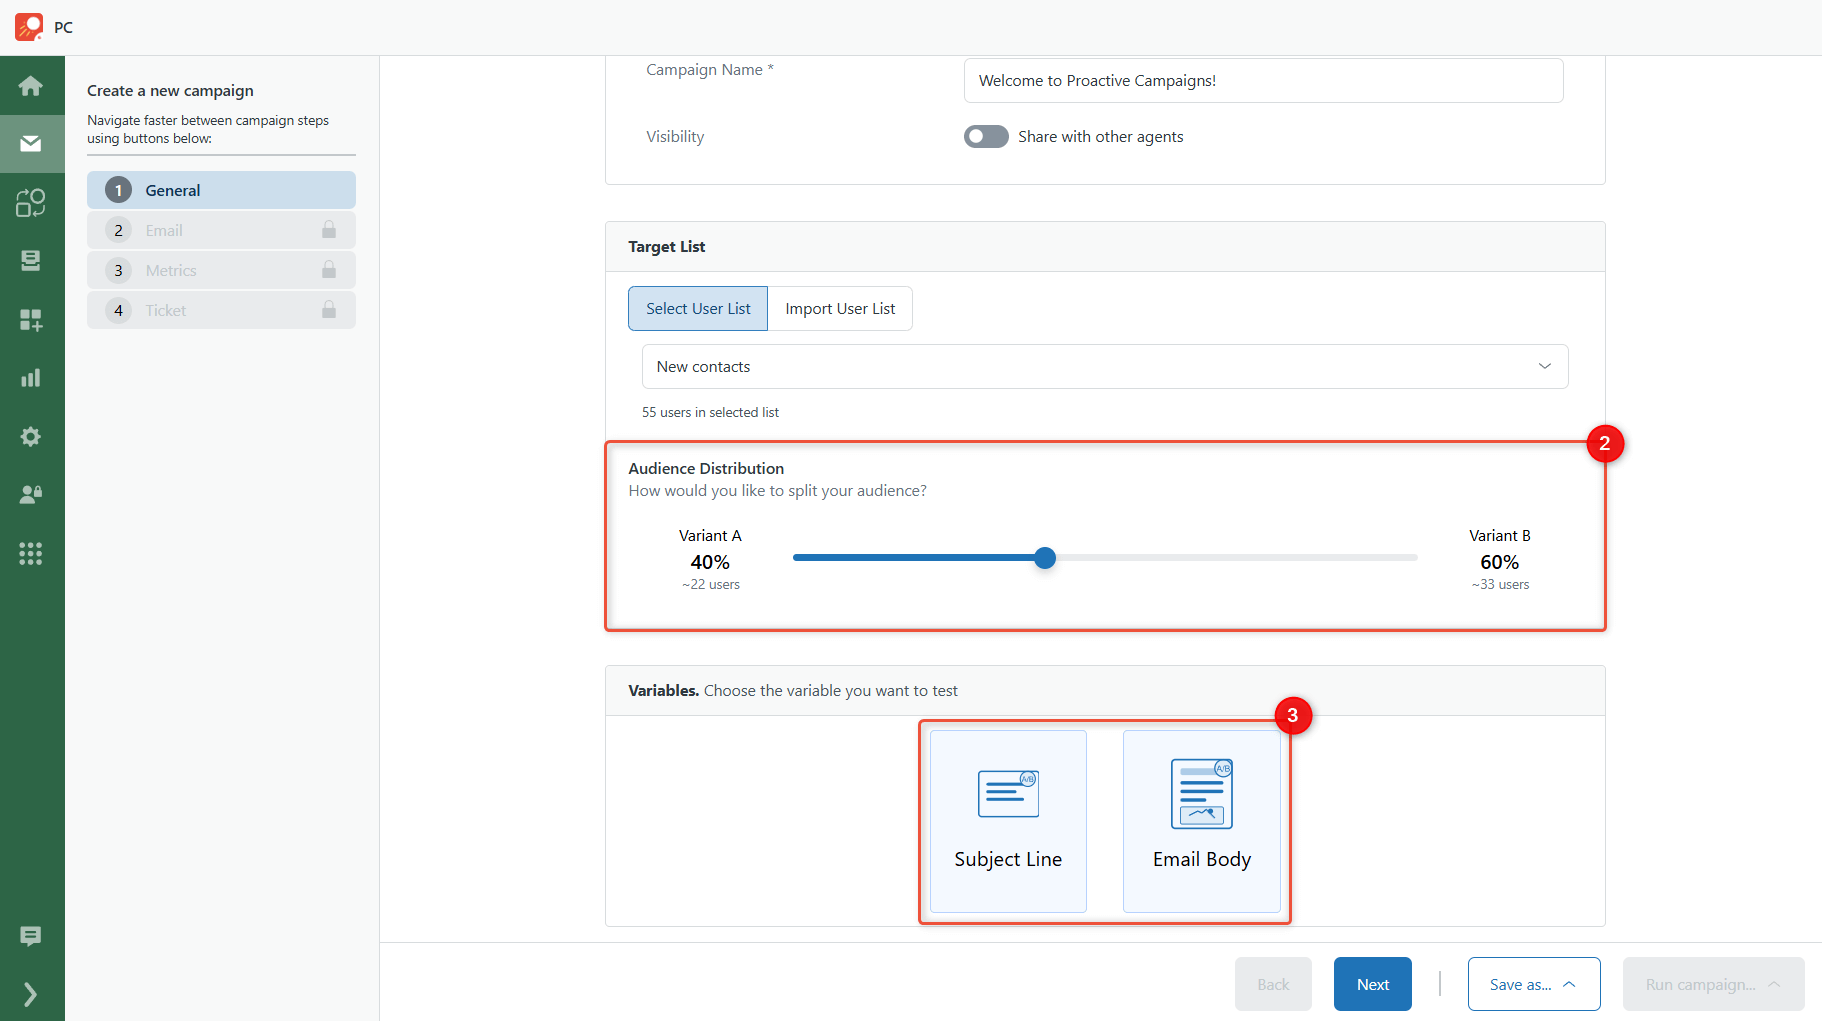
2. Select your user list or import a file, then set the A/B group ratio.
3. Choose what to test: subject line or email body.
4. Create content based on your selection:
- For subject tests: enter two subject lines with a shared email body
- For body tests: provide one subject and two email versions
5. Set the observation time and winning rate to determine the better version.
6. Proceed with the usual ticket configurations and launch the campaign.
Once live, track results in real-time, find out the better-performing version, and use the insights to improve future sends.
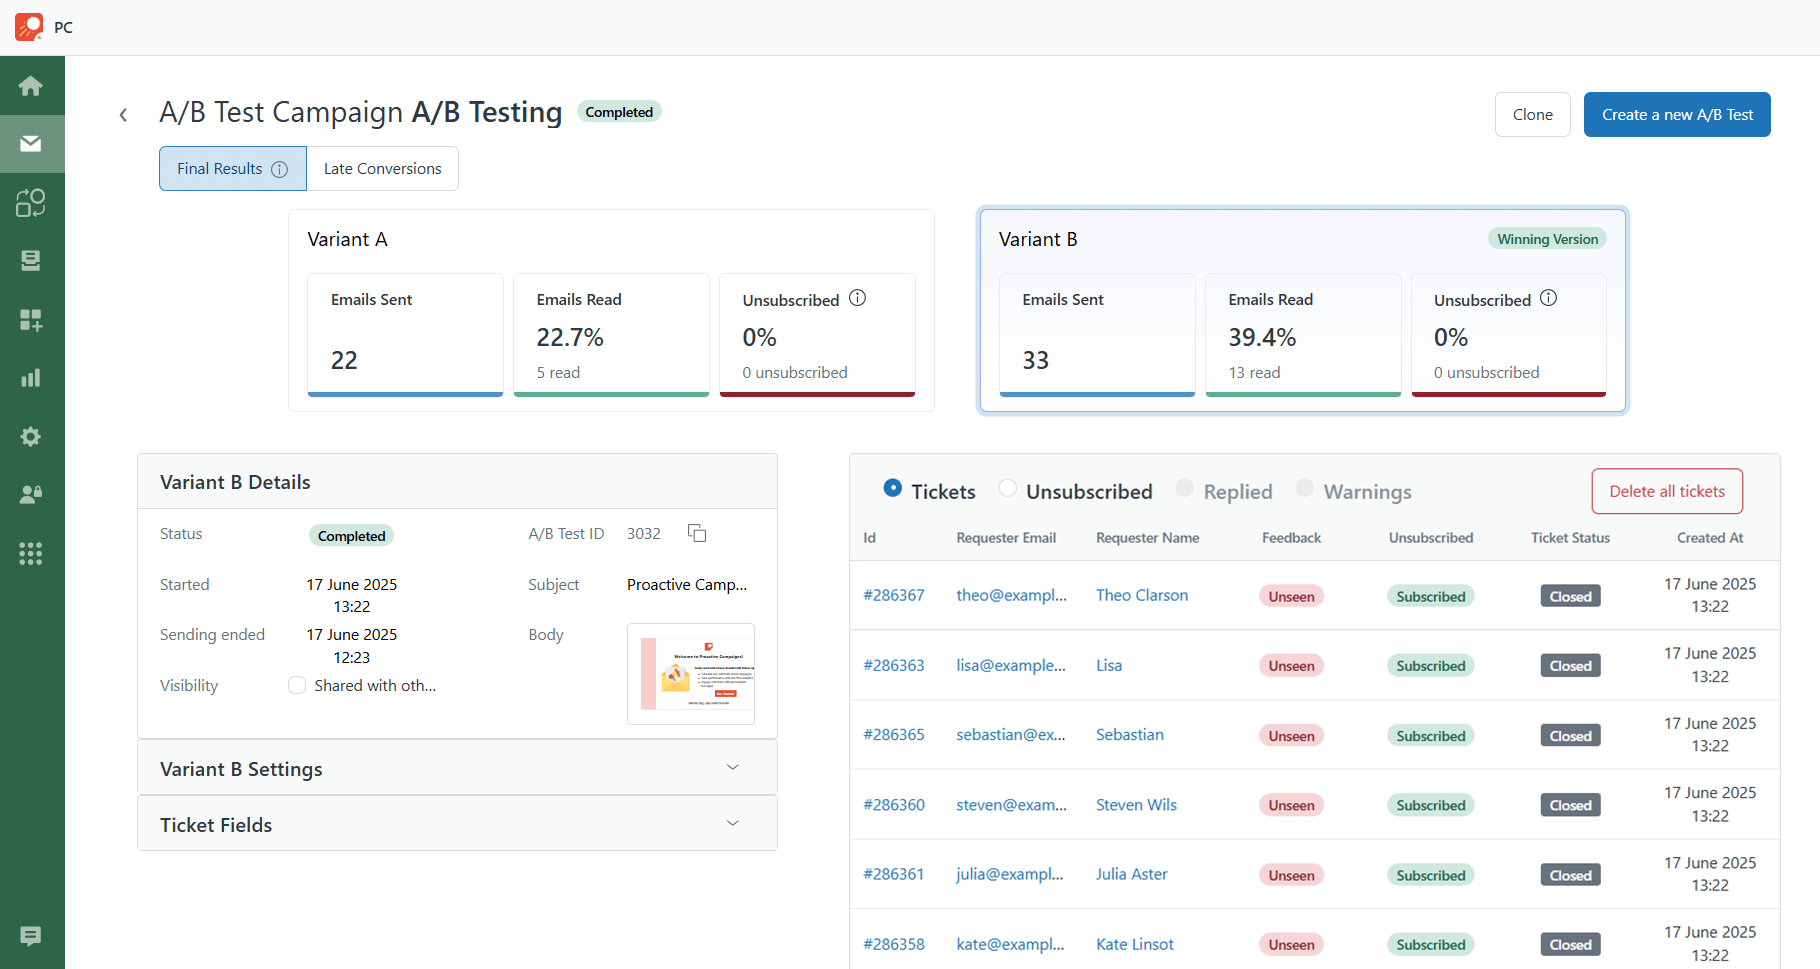
No extra tools needed — it’s all built into your Zendesk workflow.
New Visual Indicators for Placeholders
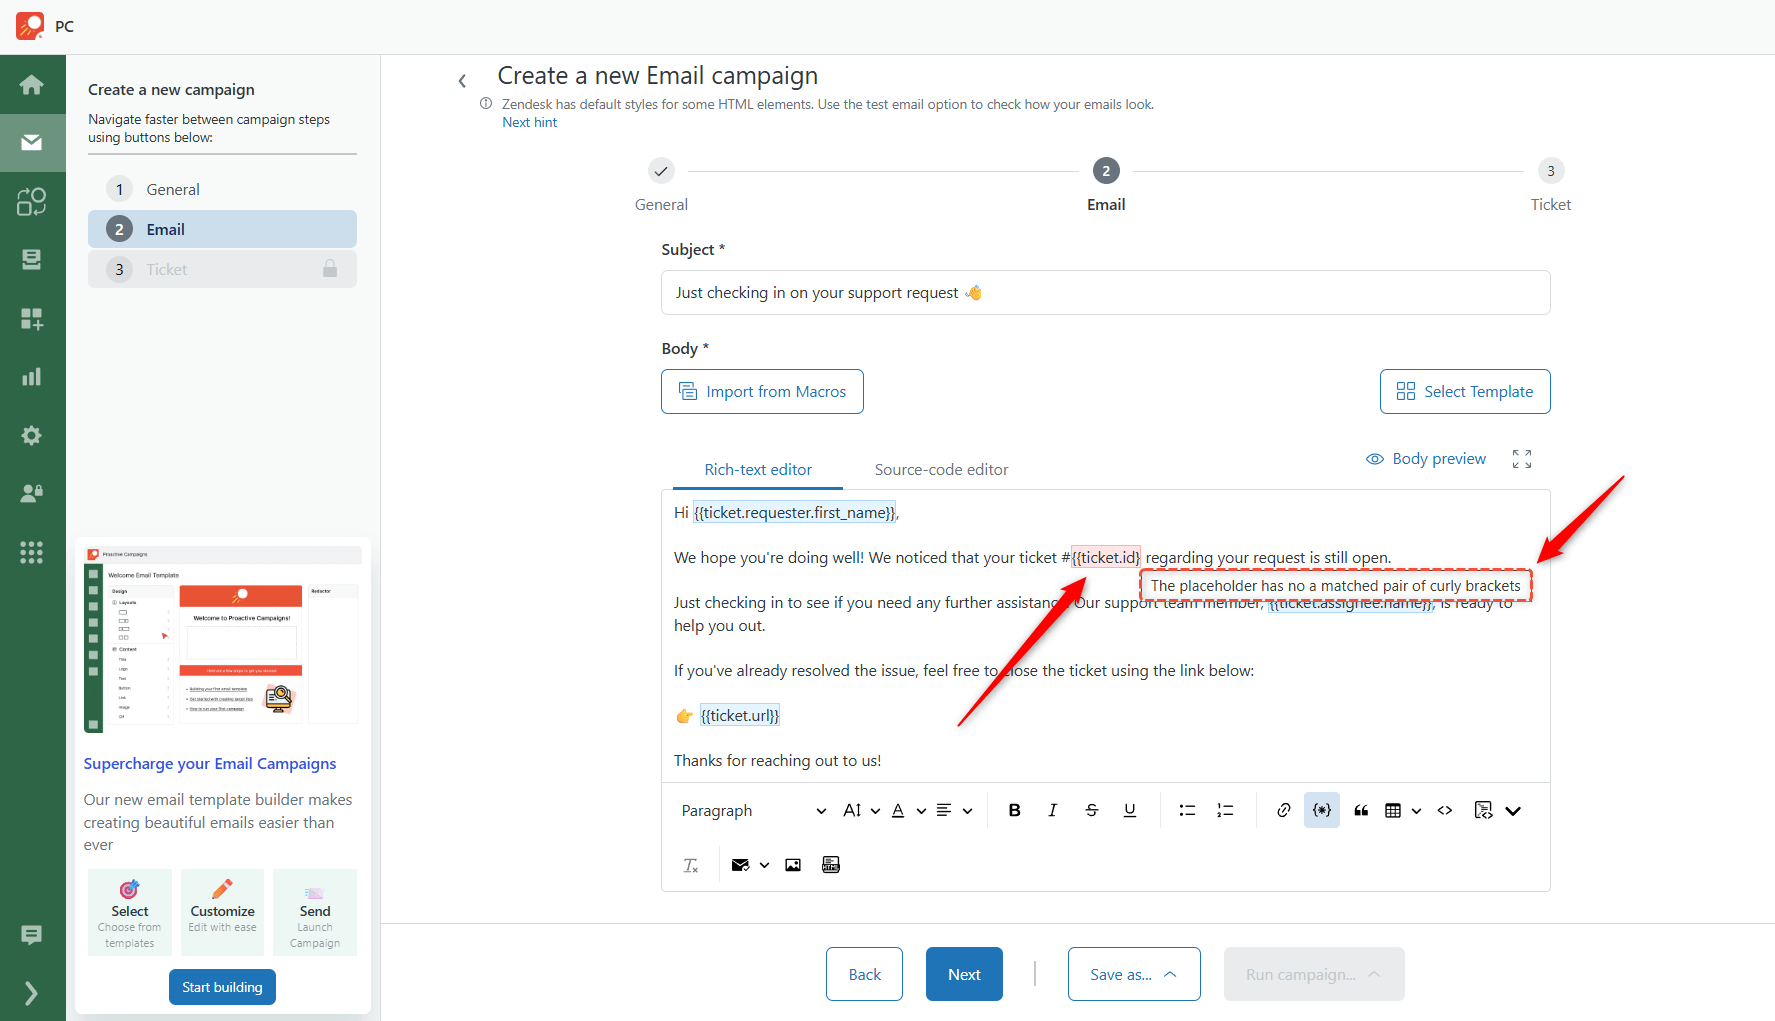
We’ve added a helpful improvement to make working with placeholders easier. Now, when composing your email in Proactive Campaigns, you’ll see visual cues to validate your placeholders:
- Valid placeholders are highlighted in blue.
- Invalid ones are marked in red, so you can spot issues immediately.
If something’s off, just hover over the red placeholder to see a hint explaining what’s wrong, like incorrect formatting or a missing bracket. This update should save you time and help avoid the common issue of placeholders not working properly.
Core update: Zendesk Email Template Builder is live now!
No more coding or reassigning email template creation to developers! Fasten your email marketing by creating eye-catching and well-structured email copy in Zendesk on your own. Just in a few clicks! The feature is available for Pro plan (up to 100 saved templates) and Enterprise (unlimited templates) Proactive Campaigns users.
So here is what how you can use template builder:
- Create emails effortlessly: No need for any technical skills or third-party tools. Just use a drag-and-drop editor and move email layouts where you need. Do everything within the Zendesk platform!
- Full Customization: Add almost any content type: images, text, gifs, links, and buttons. Set colors, sizes, padding, and more. Tailor every detail of your email to align with your brand perfectly. Stick to your own style and be recognizable!
- Live Previews: Preview your email in real-time to ensure it looks perfect before sending.
- Reusable Templates: Save your best designs and reuse them for future campaigns.
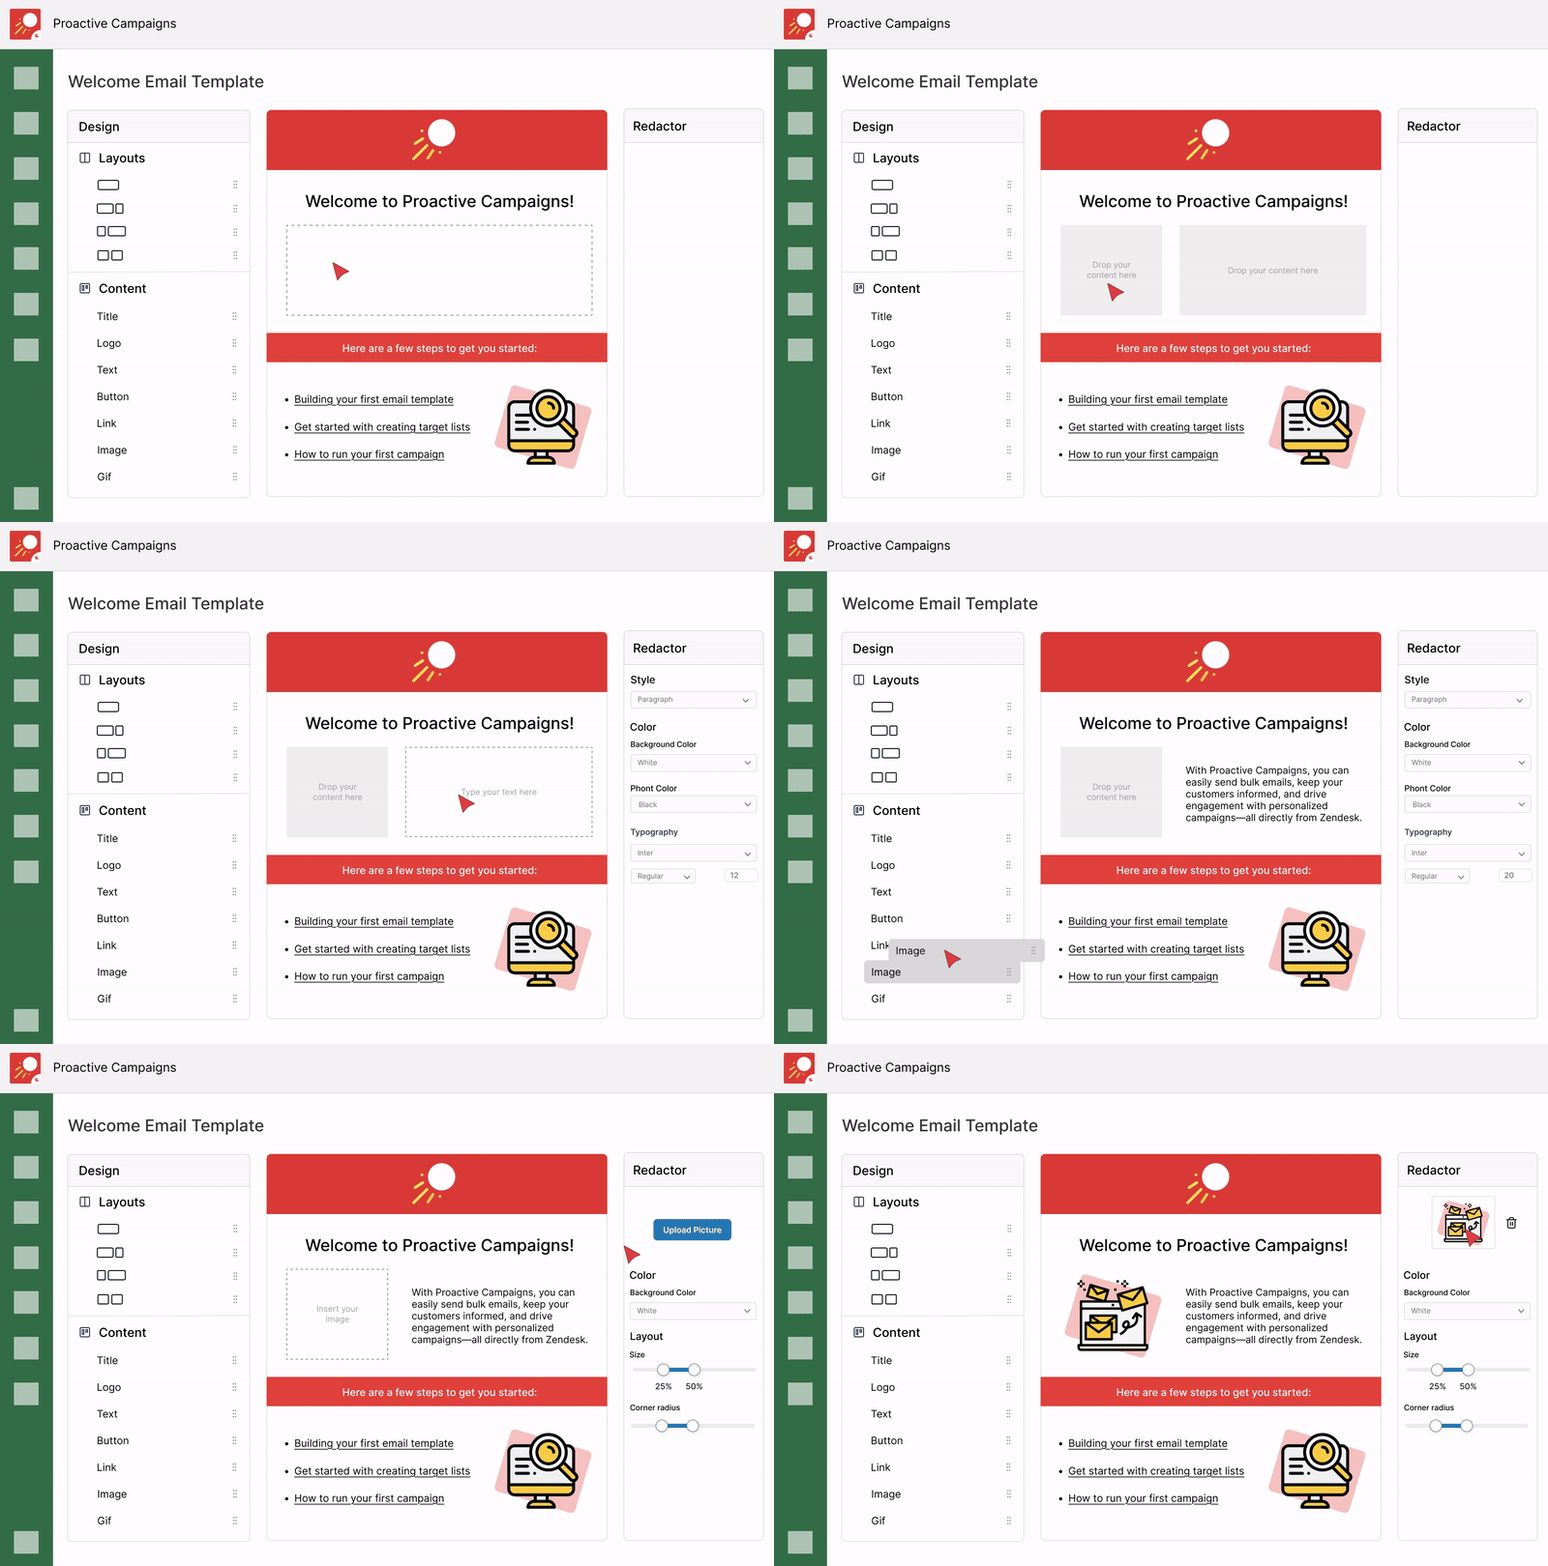
It's not only about creating visually appealing emails; it's about crafting emails that lead to real results. Our new template editor streamlines your workflow, saves time, and ensures brand consistency.
Update Custom Ticket Fields with a CSV File
We received many requests for this feature, and it’s finally here! In Proactive Campaigns, you can map custom ticket fields when uploading a CSV file. This thing automates ticket field updates during a campaign, saving you time and manual effort.
Here's how it works:
1. Add a column to your CSV file with the ticket field data you want to update.
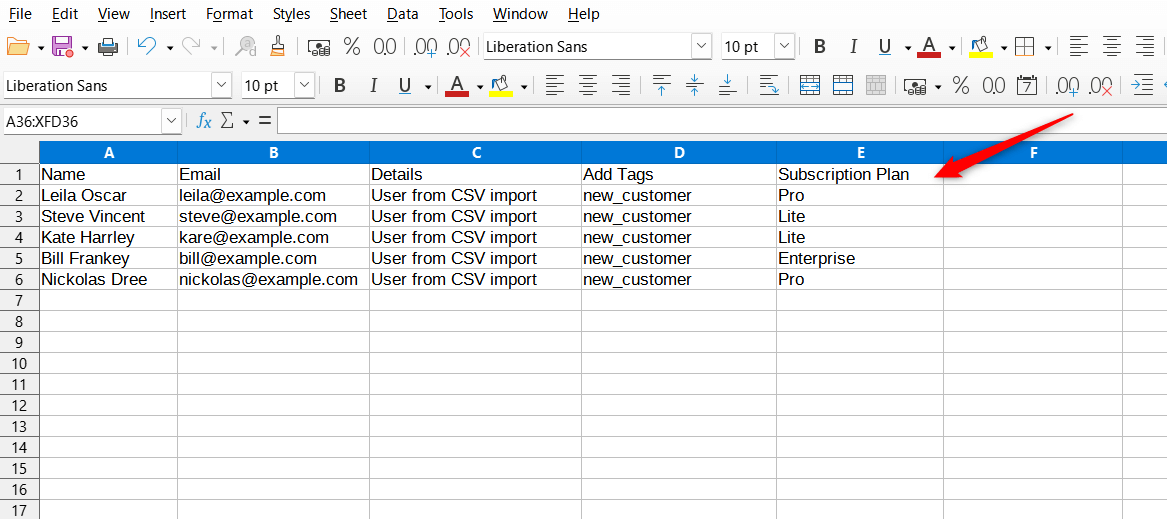
2. Upload your CSV file during the email campaign setup process.
3. Map your fields – In addition to user fields, you’ll now see an option to select ticket custom fields.
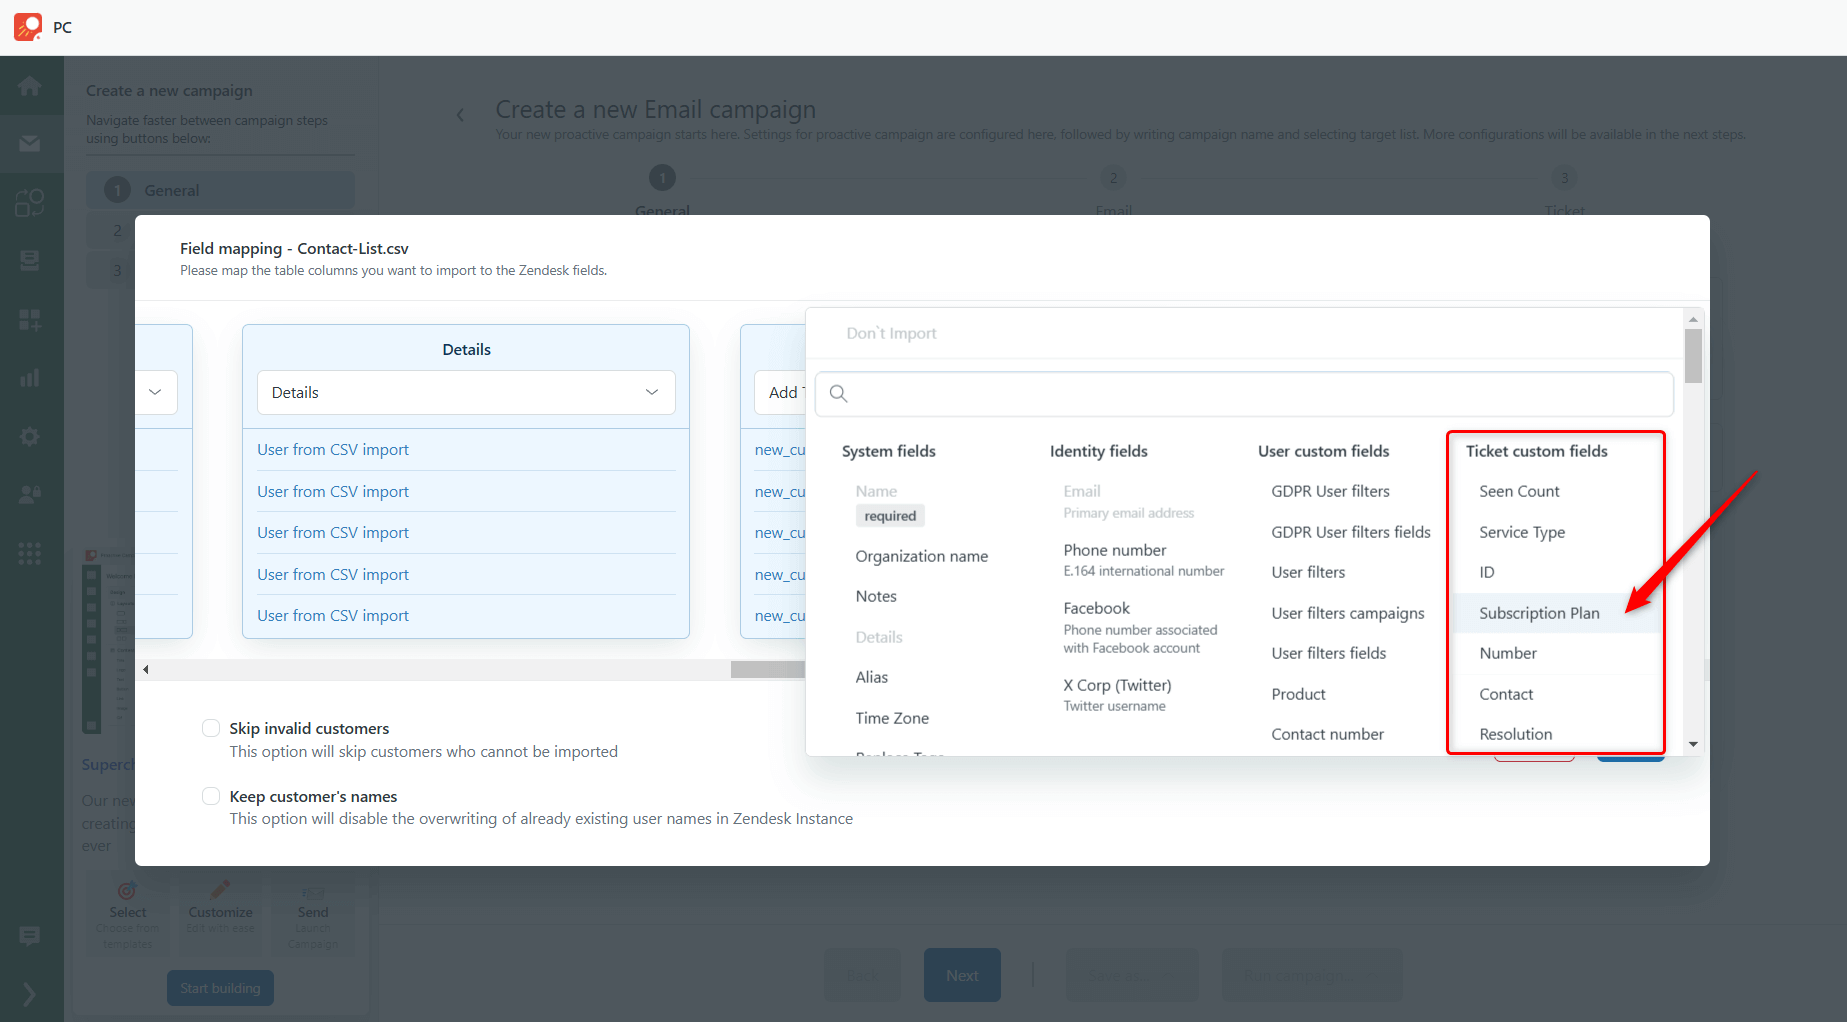
4. Launch your campaign – The mapped ticket fields will be automatically updated.
No more manual updates—available now for Pro and Enterprise plan users!
SMS Campaigns with Improved Flow
We’re excited to introduce an upgraded SMS Campaign experience in the Proactive Campaigns app for Zendesk! This update makes it faster and more effective to set up, send, and track SMS campaigns, allowing you to easily reach customers directly on their mobile devices.
Enjoy a seamless workflow: simply select SMS as your channel, craft your message, and launch your campaign with ease!
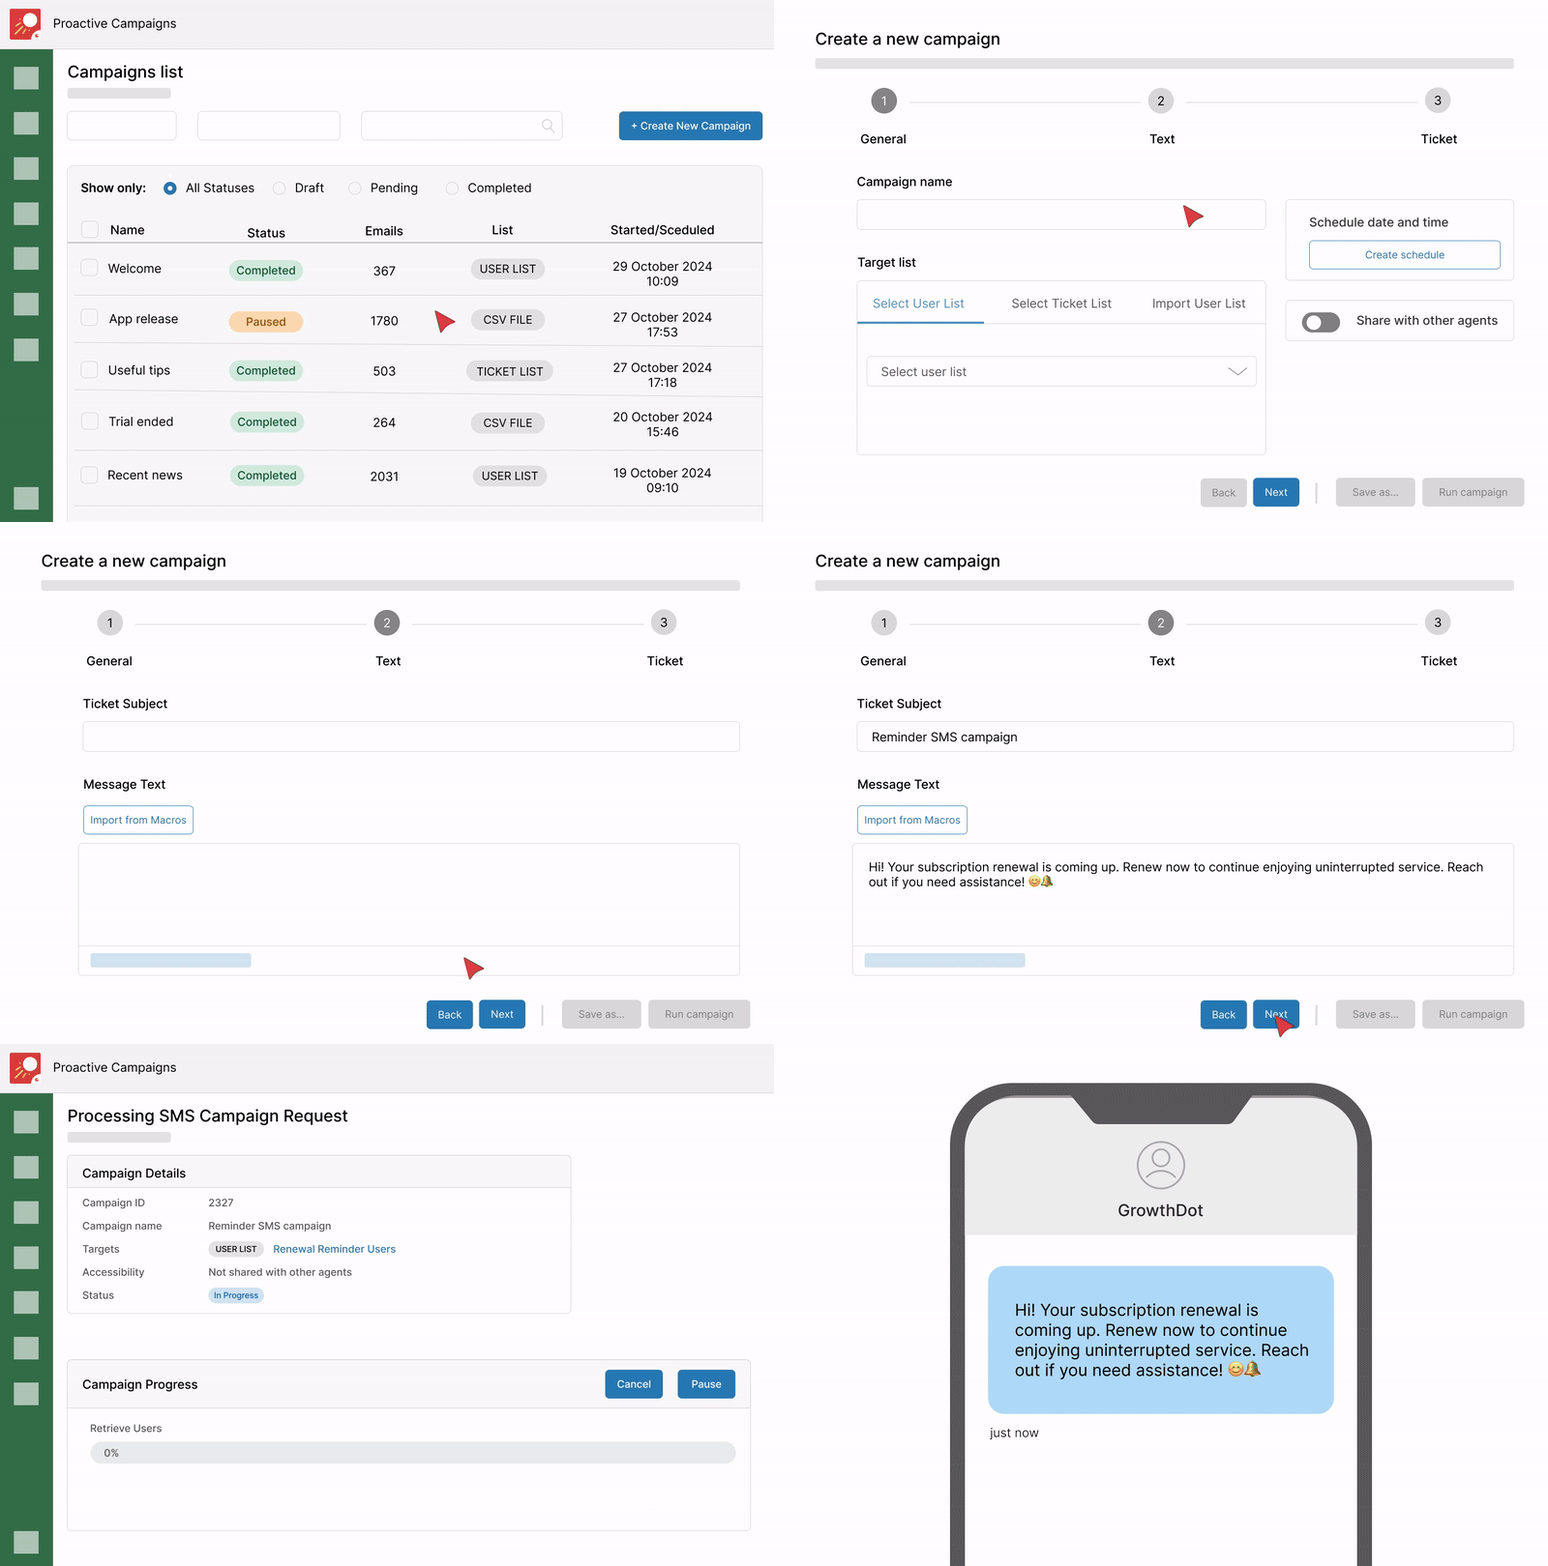
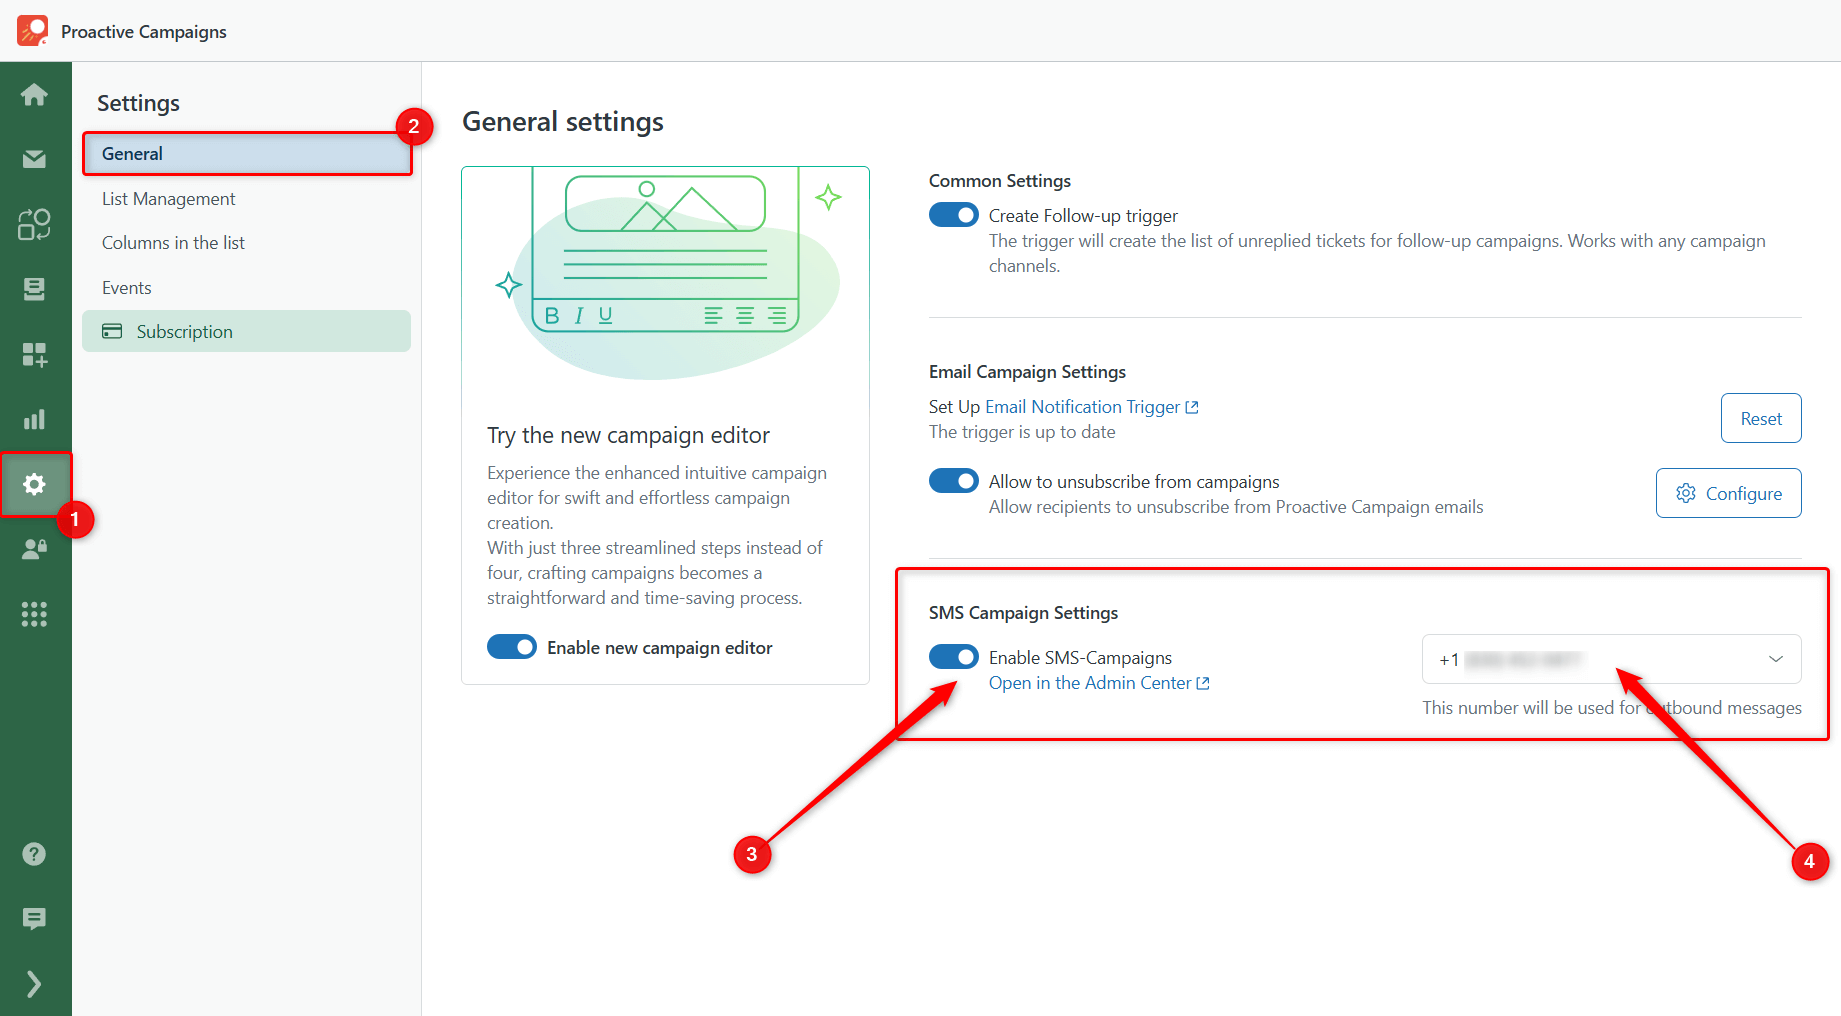
To get started, just enable SMS Campaigns in the app’s settings. From there, you’re ready to connect with customers through their preferred channel.
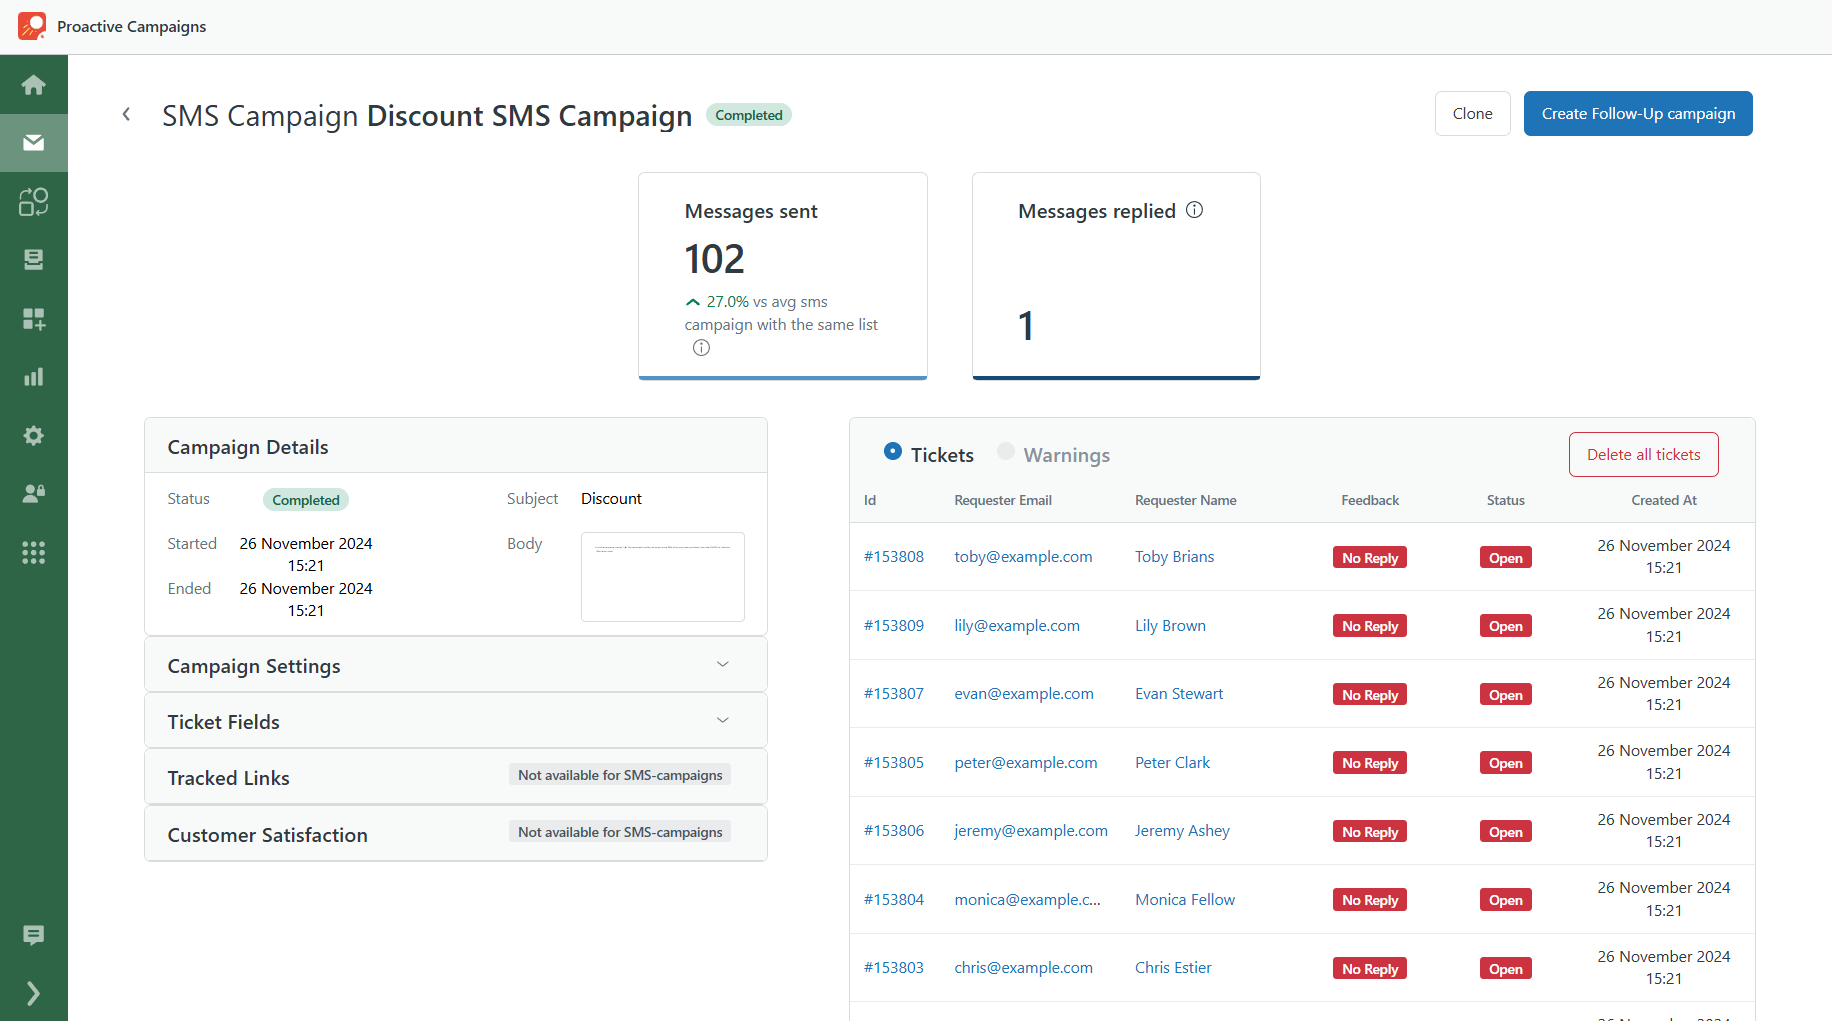
Finally, you can track the success of your campaigns with detailed stats. Monitor sent messages and reply rates to measure engagement and refine your strategies for even better results.
New Look and Feature Upgrades
To stay ahead of the curve and improve your experience, we’ve made significant design and functionality updates to the Proactive Campaigns plugin. We aim to make the app more modern, intuitive, and user-friendly, ensuring it remains as efficient and appealing as ever. Here’s a breakdown of the key changes:
All Lists in One Place
We've combined the Ticket, User, and Organization lists into a single tab for easier navigation. Instead of switching between multiple pages, simply head to List Views and select the list type you need.
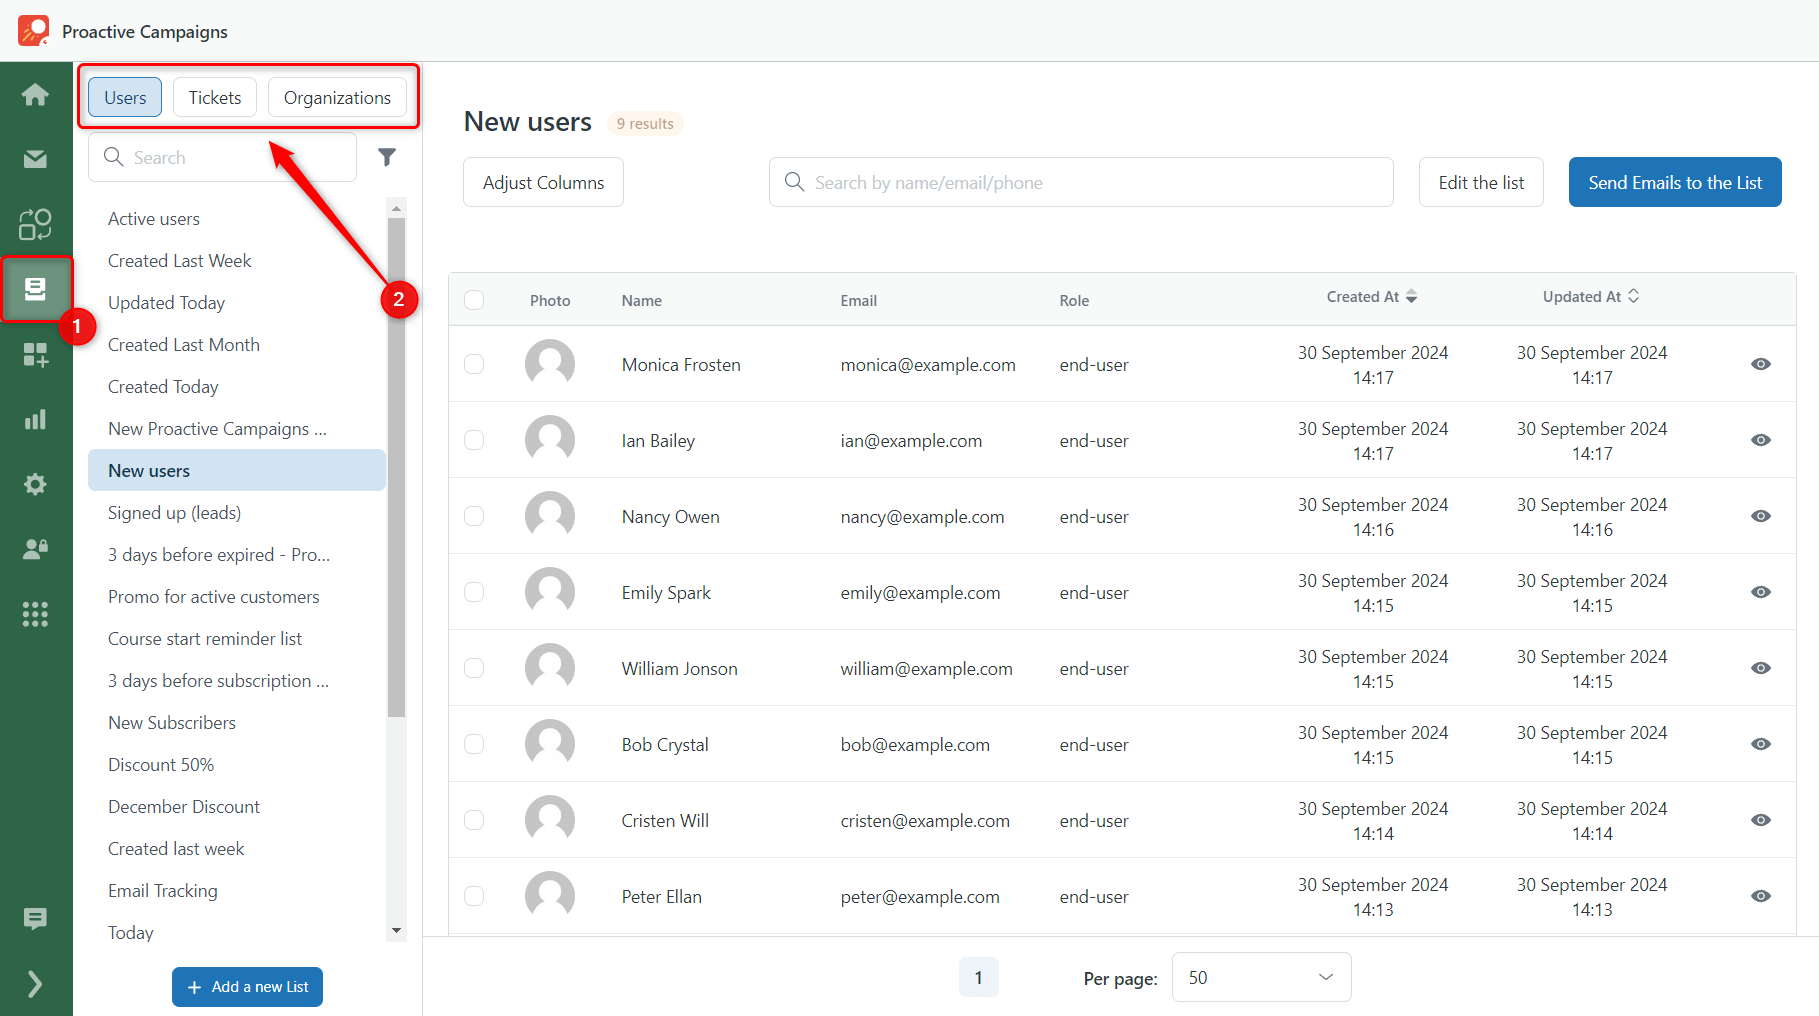
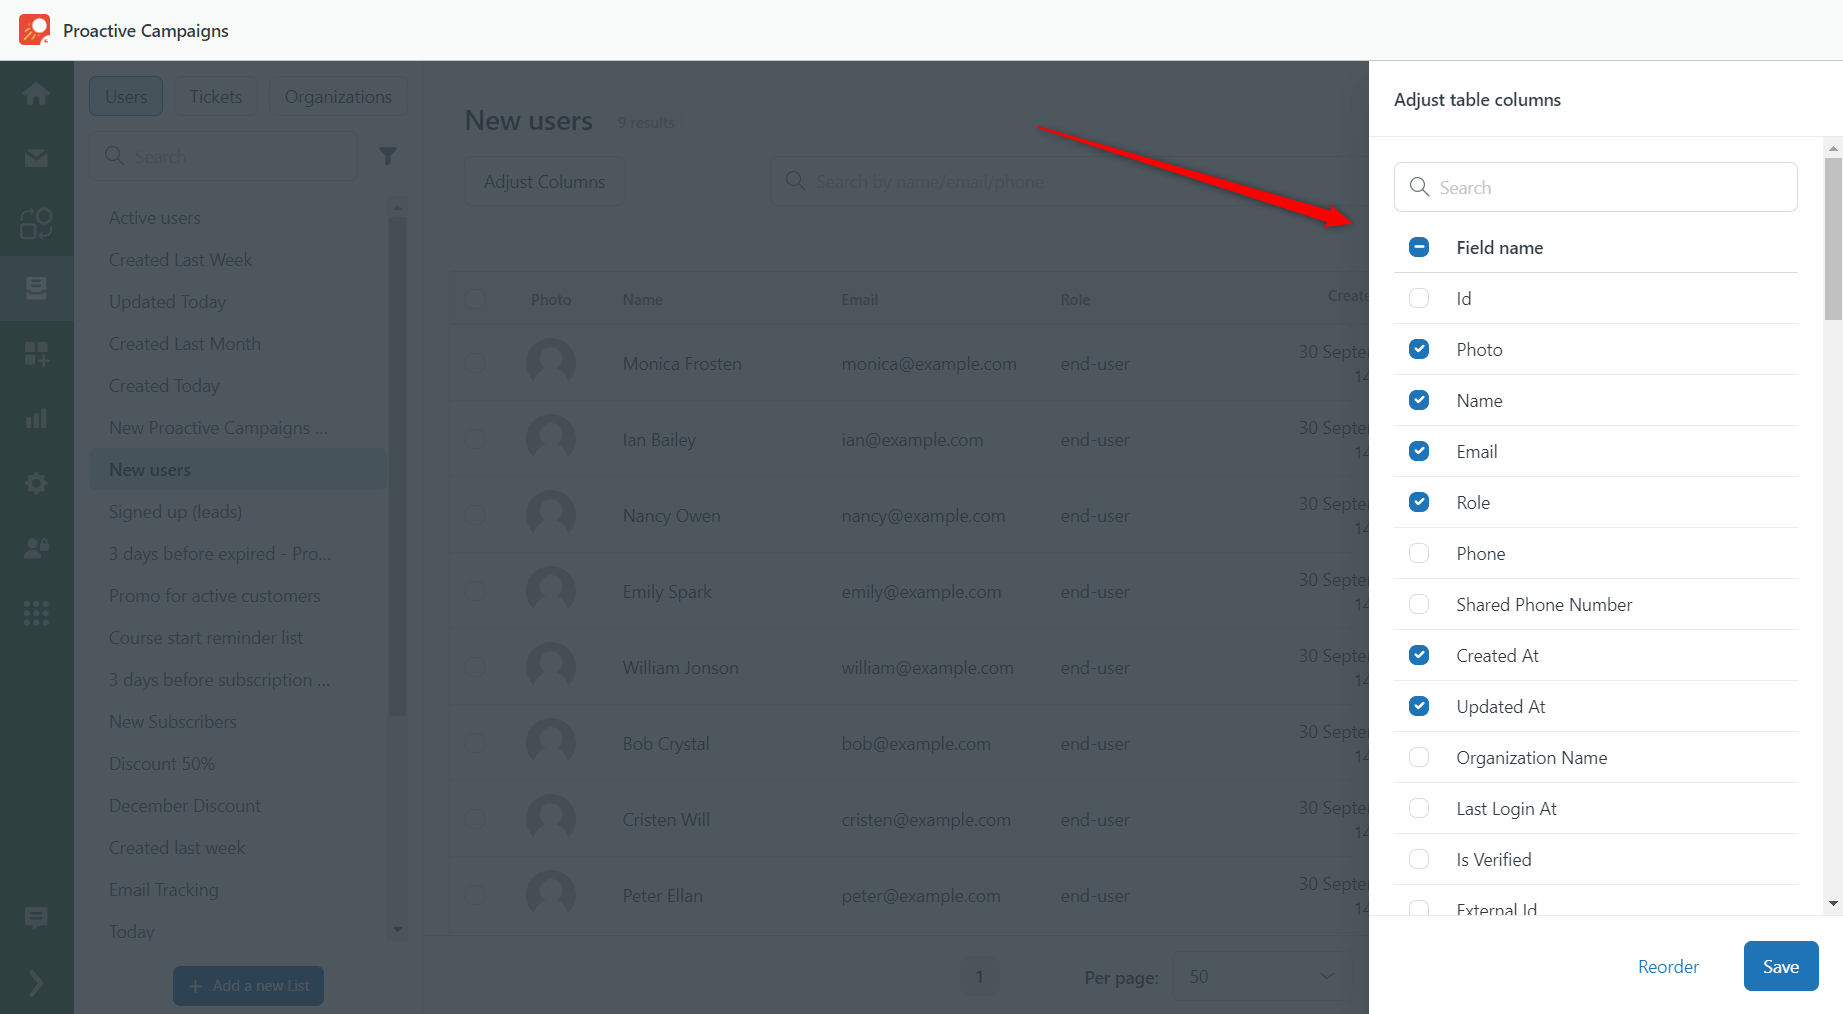
We've also made it easier to manage your list views by allowing you to customize and rearrange columns directly from the list itself. An Adjust Columns option is now located right below the list name for quick customization.
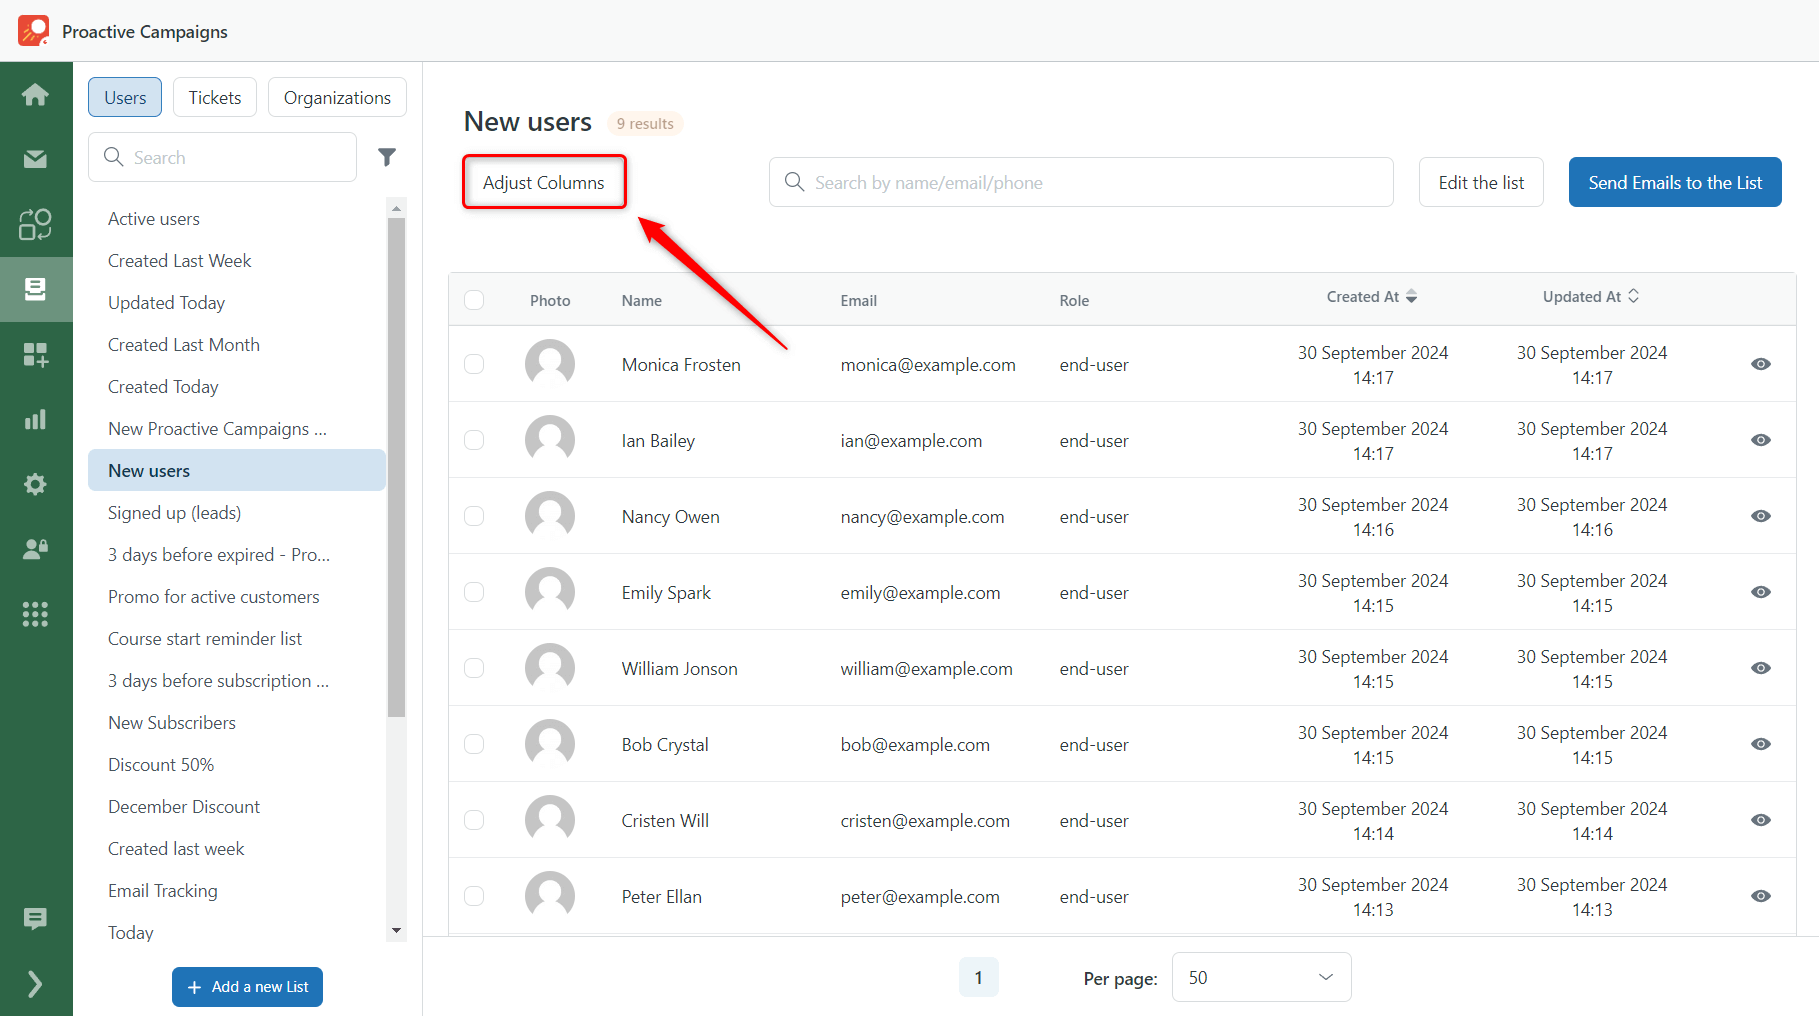
Click on that button, and a sidebar will open where you can easily configure your display.
Campaigns List with Improved Filtering
Alongside the design improvements, we've upgraded the Campaigns list with a filtering option. You can now easily filter campaigns by status (drafts, completed, pending, etc.) and find exactly what you need faster.
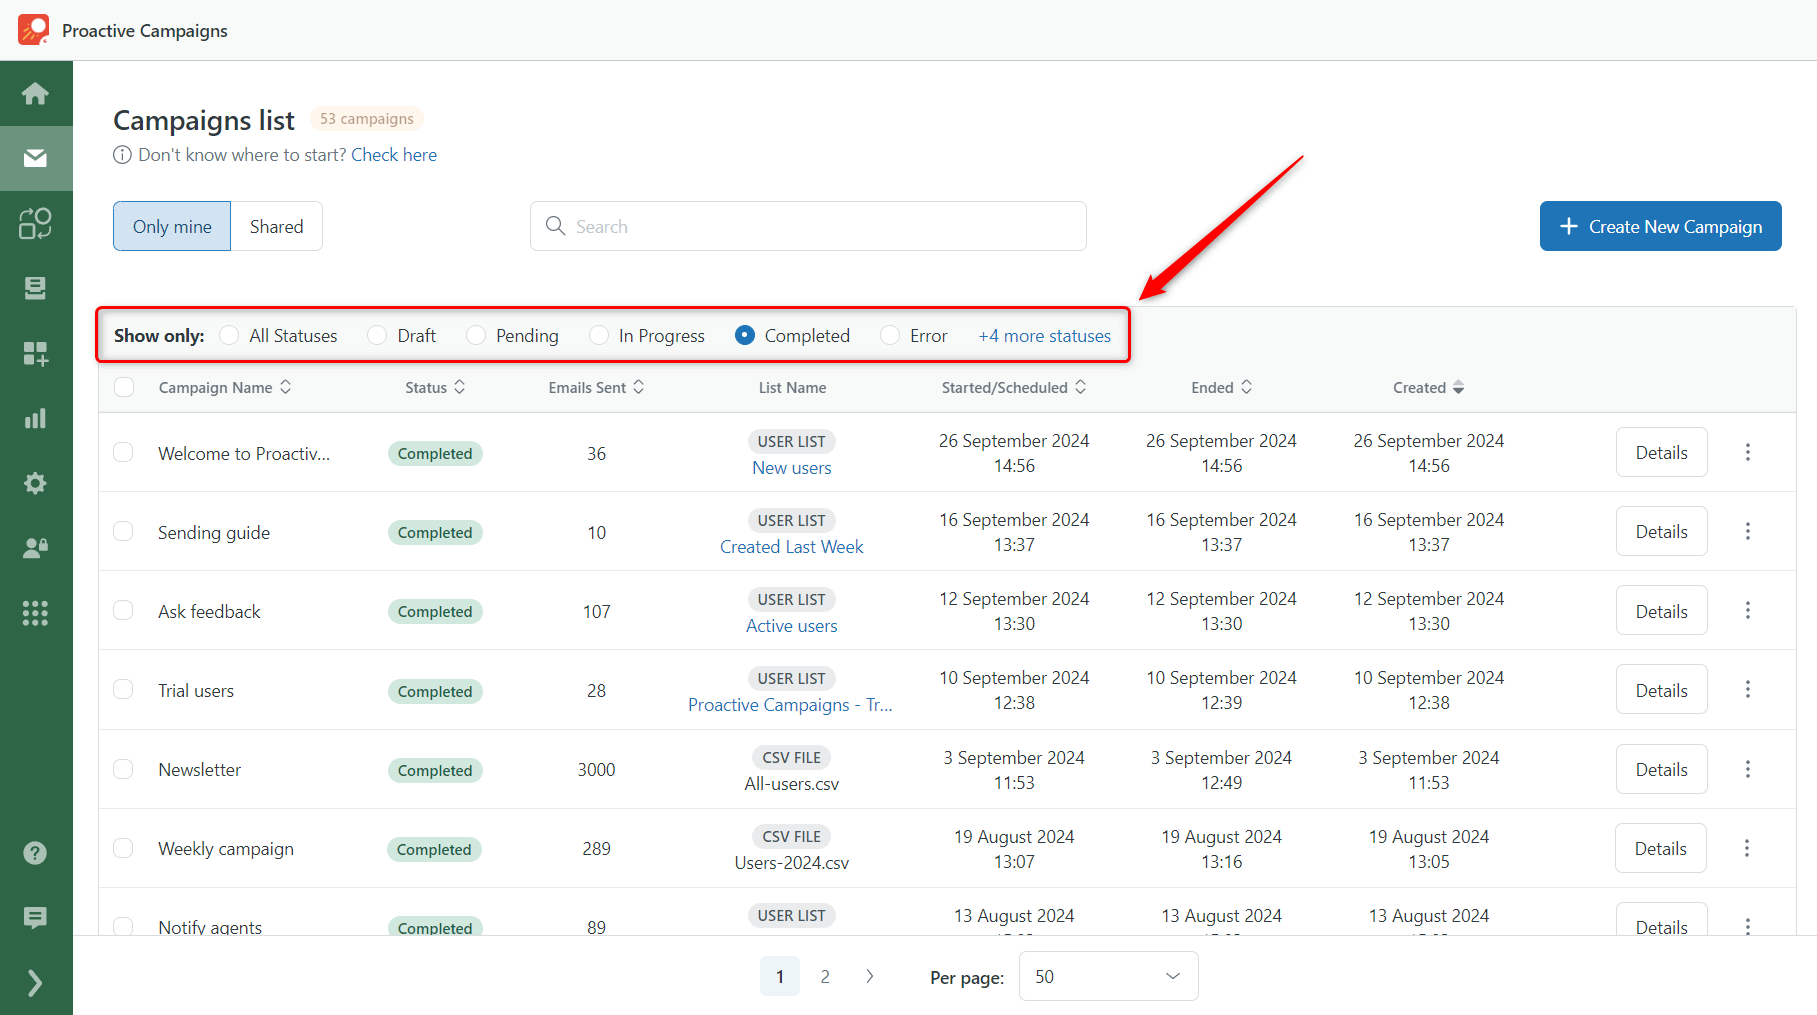
This simple yet powerful update streamlines the way you track and organize your outreach, helping you stay on top of your campaigns with minimal effort.
Enhanced Campaign Details
To offer a more intuitive experience with deeper insights, we've made significant updates to the Campaign Details page.
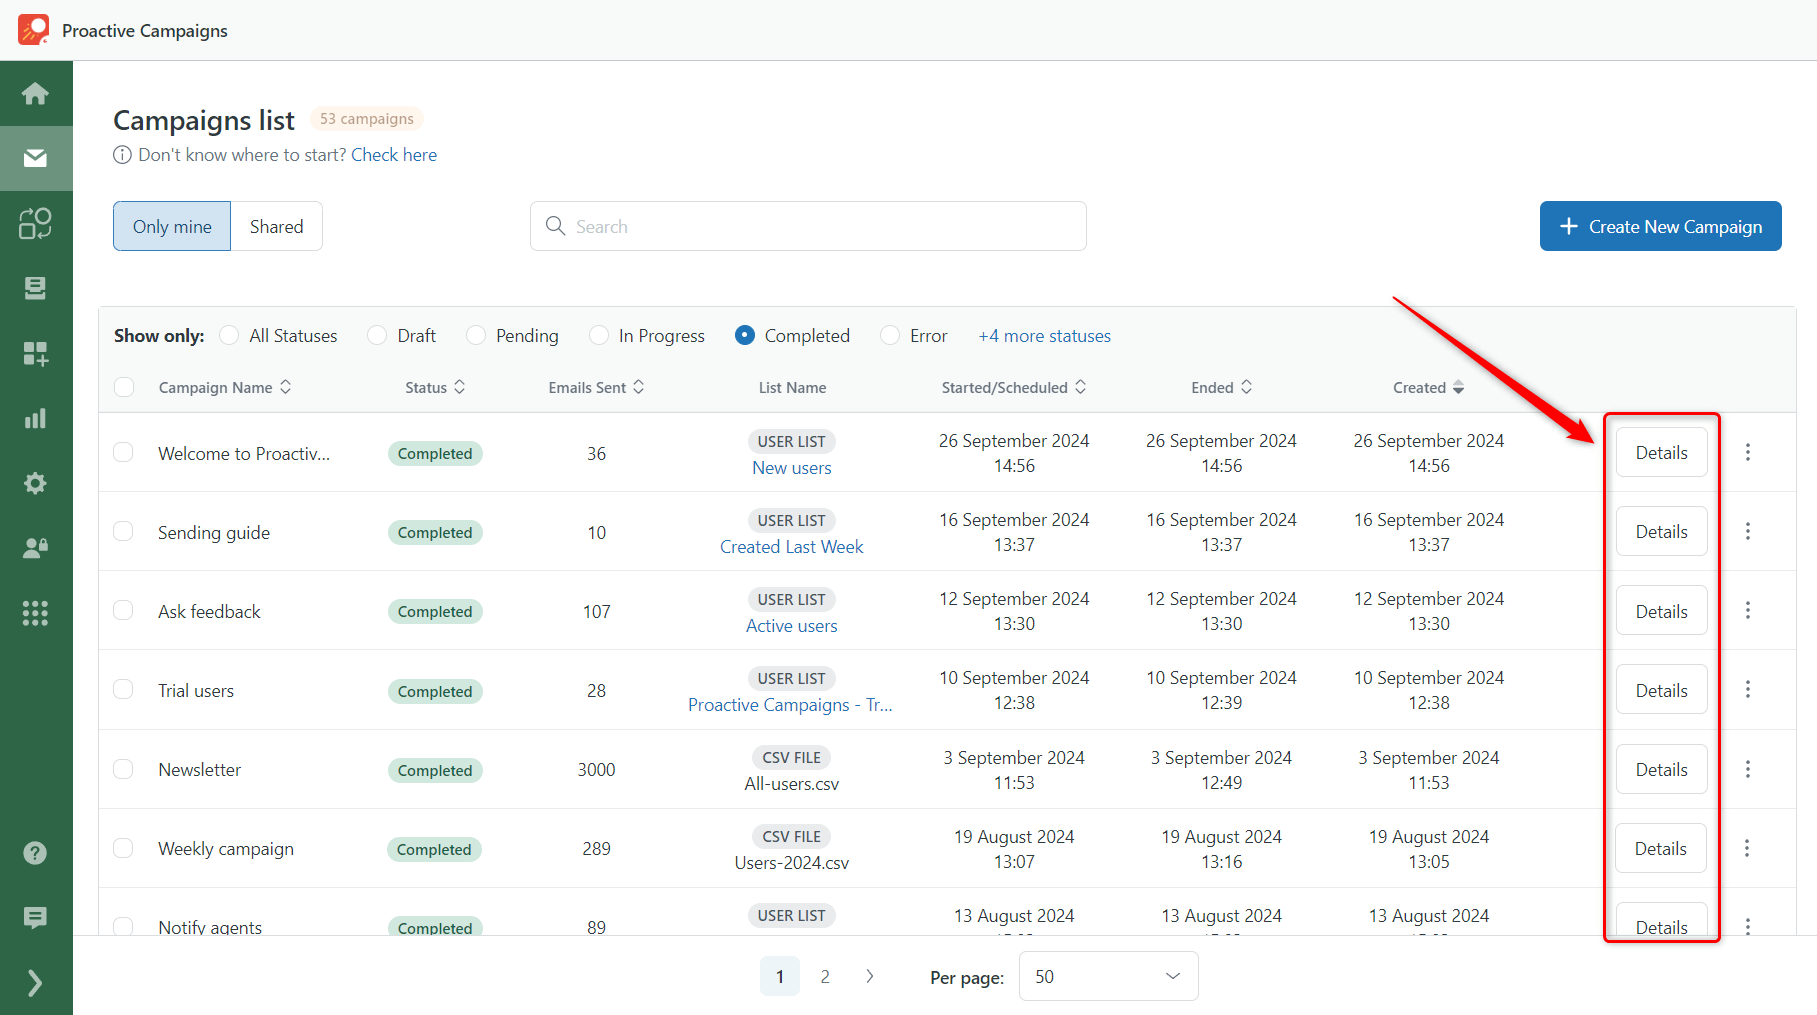
First, we've placed the Details button right next to each campaign so you can quickly review the specifics without searching around.
Once inside, you'll notice the page is more intuitive, guiding you seamlessly through the key metrics that matter most. Here's what's new:
- A comparison to the average number of emails sent with the same list now gives you valuable context to evaluate your campaign’s performance.
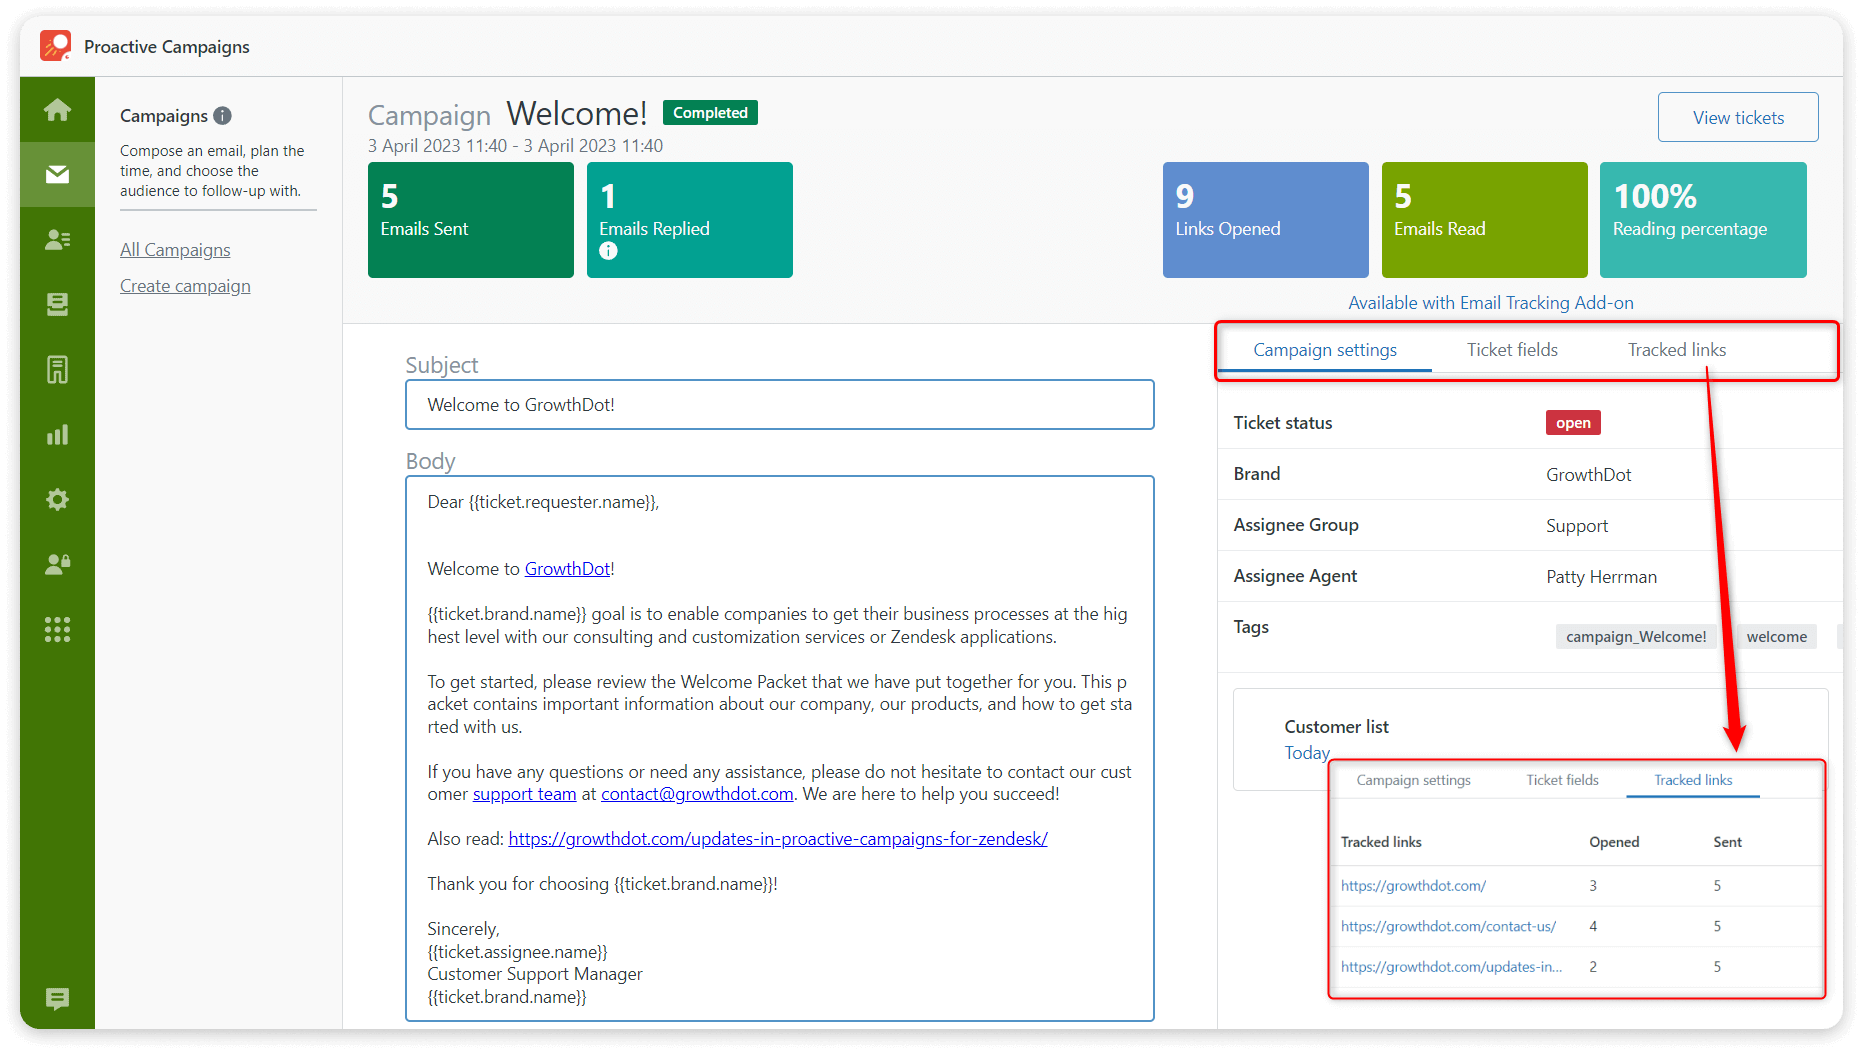
- Tracked Links section shows how your email links are performing.
- Customer Satisfaction section helps analyze customer feedback directly from the campaign details, making it easier to assess engagement.
- Campaign Tickets are now displayed on the same page, giving you a complete overview in one place.
- Warnings tab displays detailed error information if any issues arise during your campaign.
- Create Follow-up Campaign button is now also located on this page, allowing you to launch a follow-up campaign easily.
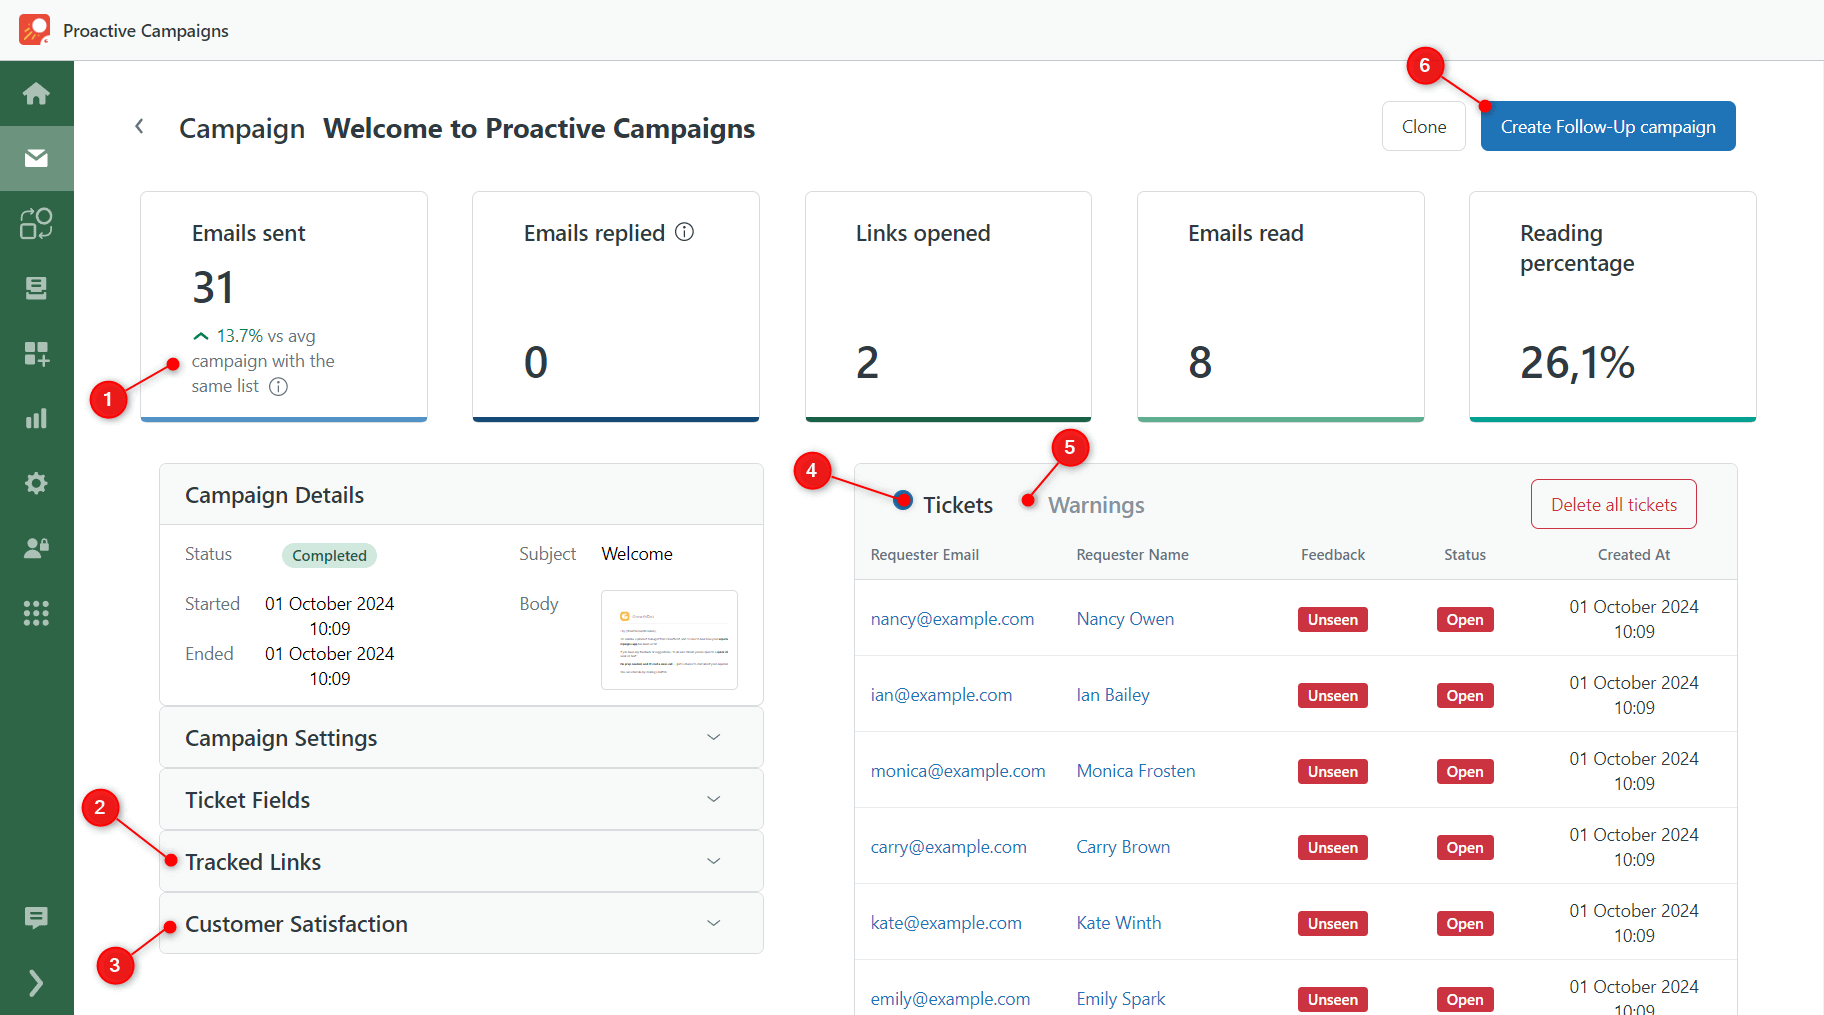
As you can see, the layout has been refined to provide you with quick access to all the essential information in one place.
Refreshed Statistics Page
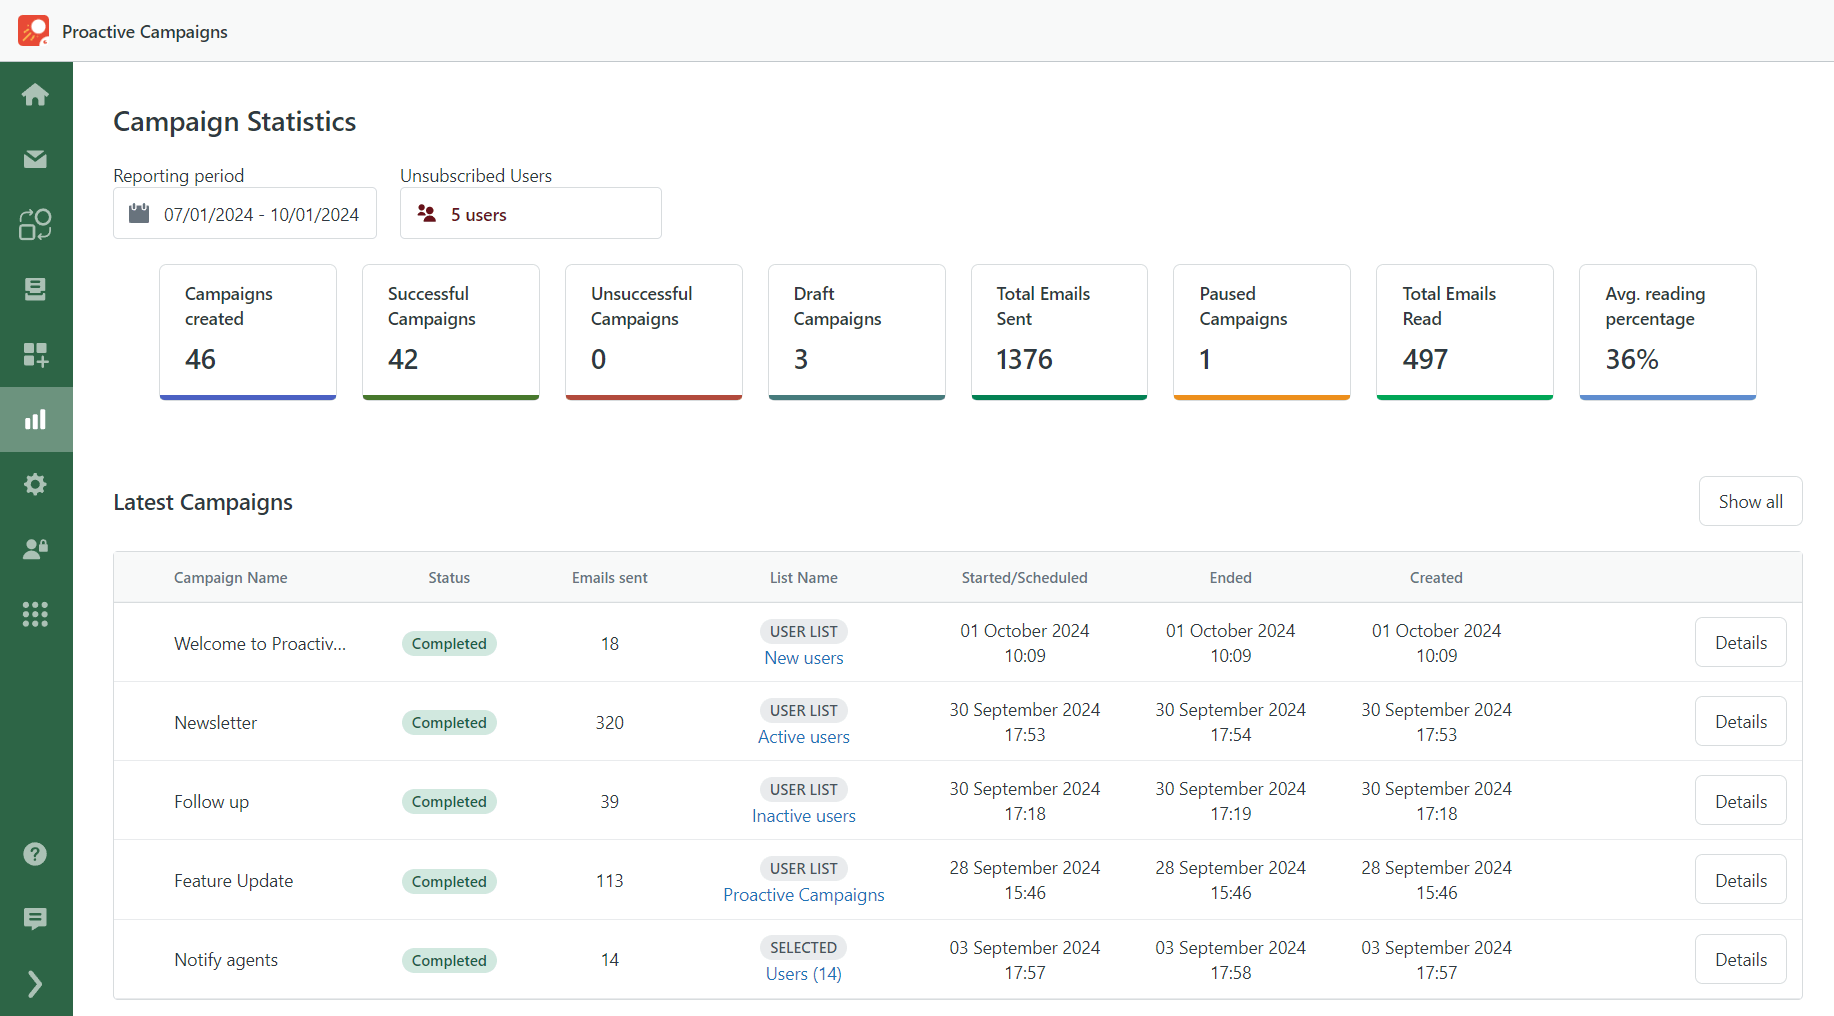
One more page that received a major upgrade is the Campaign Statistics. While the core functionality remains the same, we've given it a fresh new look to enhance readability and make it more visually appealing.
Updated Navigation in Settings
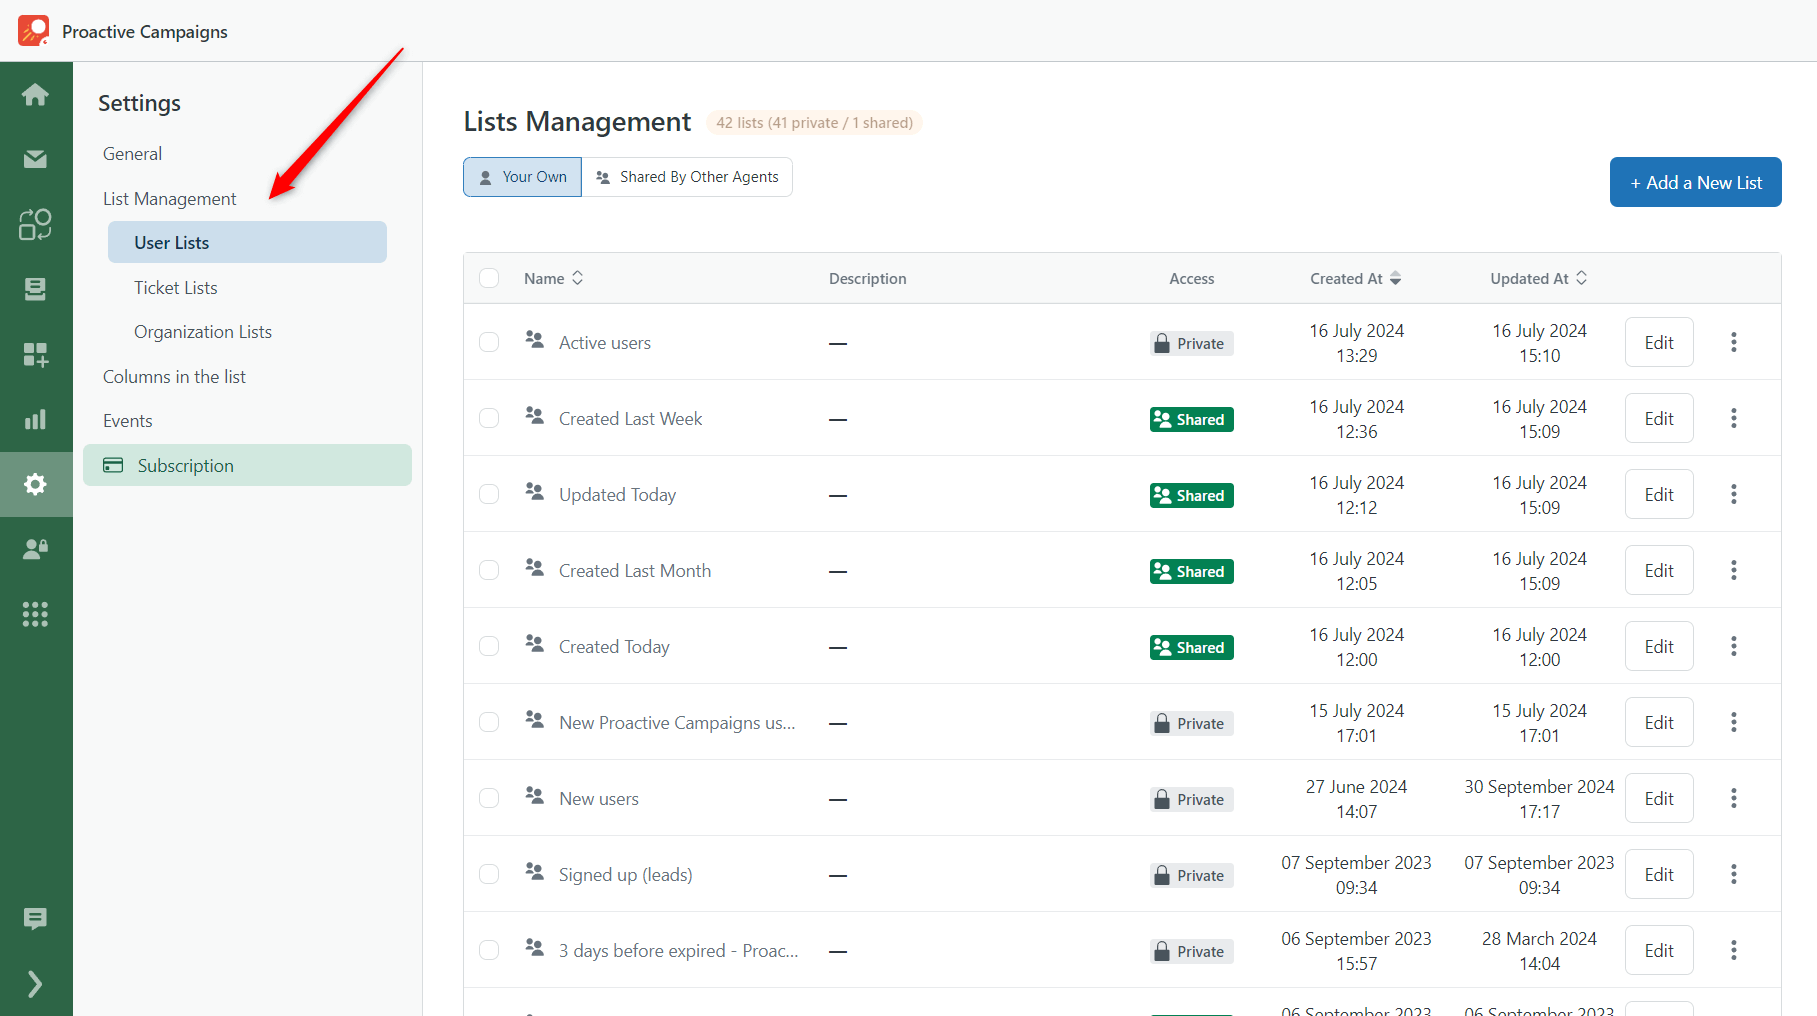
If you head over to the Settings page, you’ll find a more streamlined navigation experience. One notable change is within the List Management section. Now, when you click on it, a dropdown in the sidebar will allow you to select the type of list you want to manage easily.
Automation Improvements for Better Control
Email automations are a powerful tool in your marketing arsenal, and the latest update to the Proactive Campaigns app further amplifies this power. These new features give you greater control and flexibility to optimize your email workflows. Explore the recent changes:
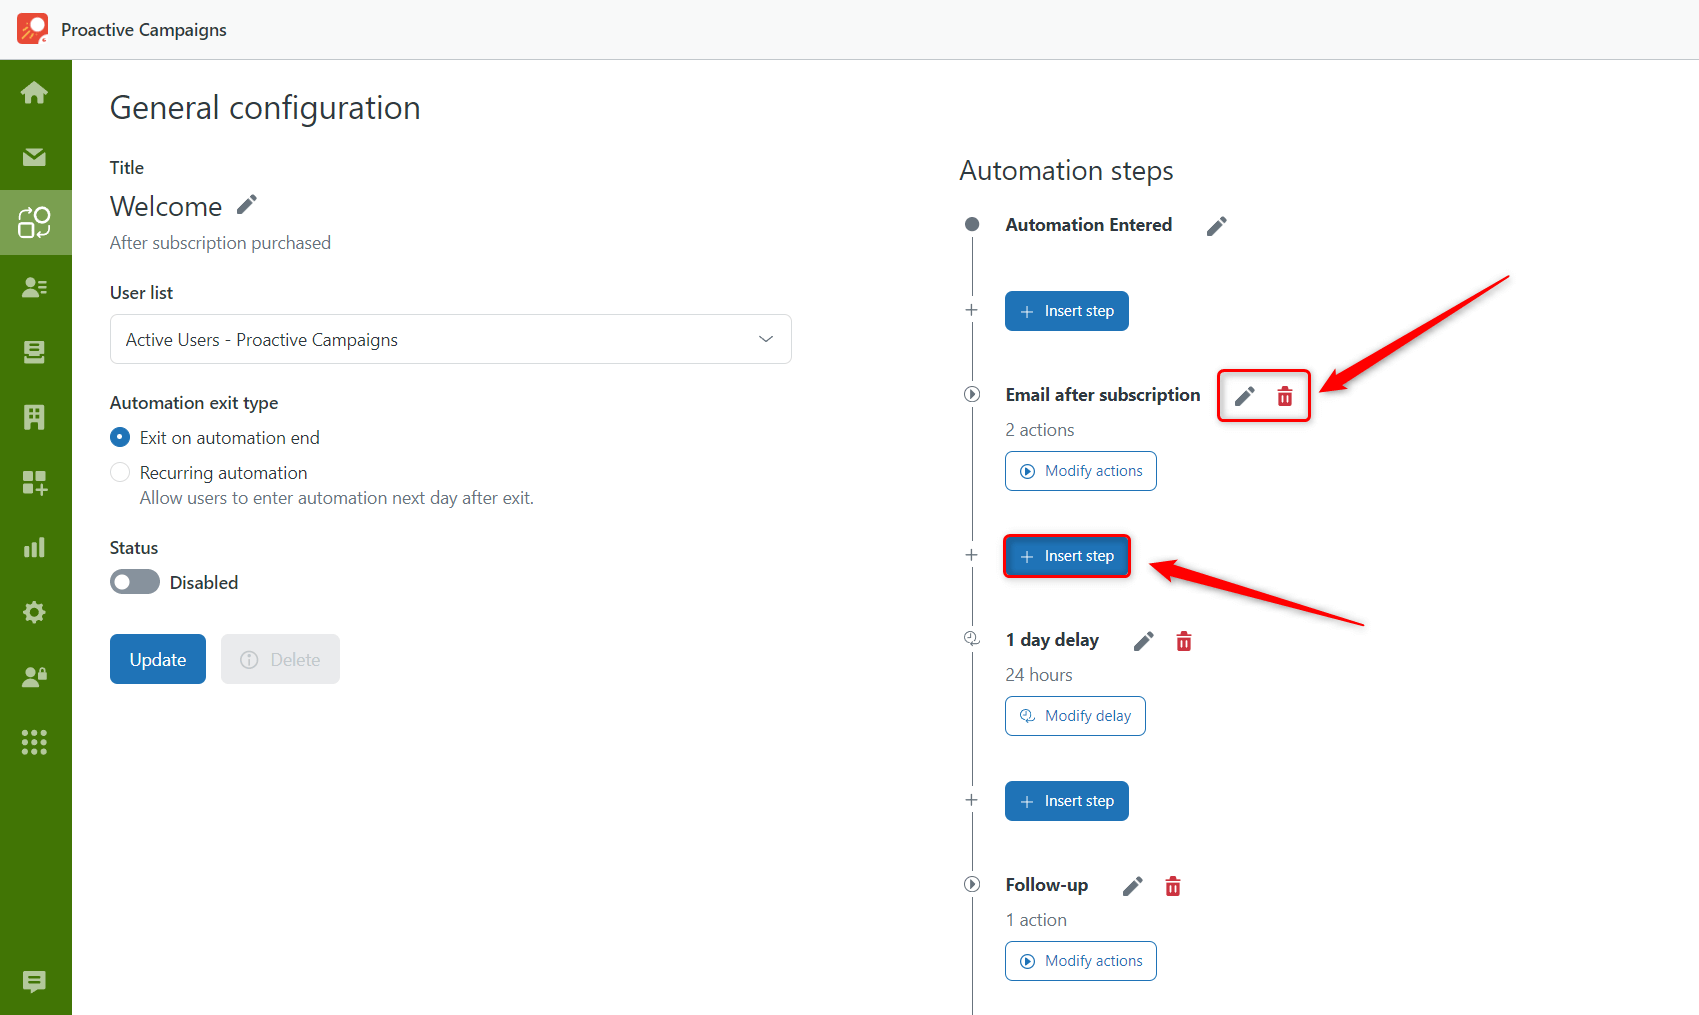
- Rename steps: Change the names of your steps to keep everything organized and easy to understand.
- Insert steps anywhere: Need to add a step in the middle of your flow? Now, you can place new steps exactly where you want them — not just at the end.
- Delete any step: Whether it's the first, middle, or last step, you can now delete any step you don't need.
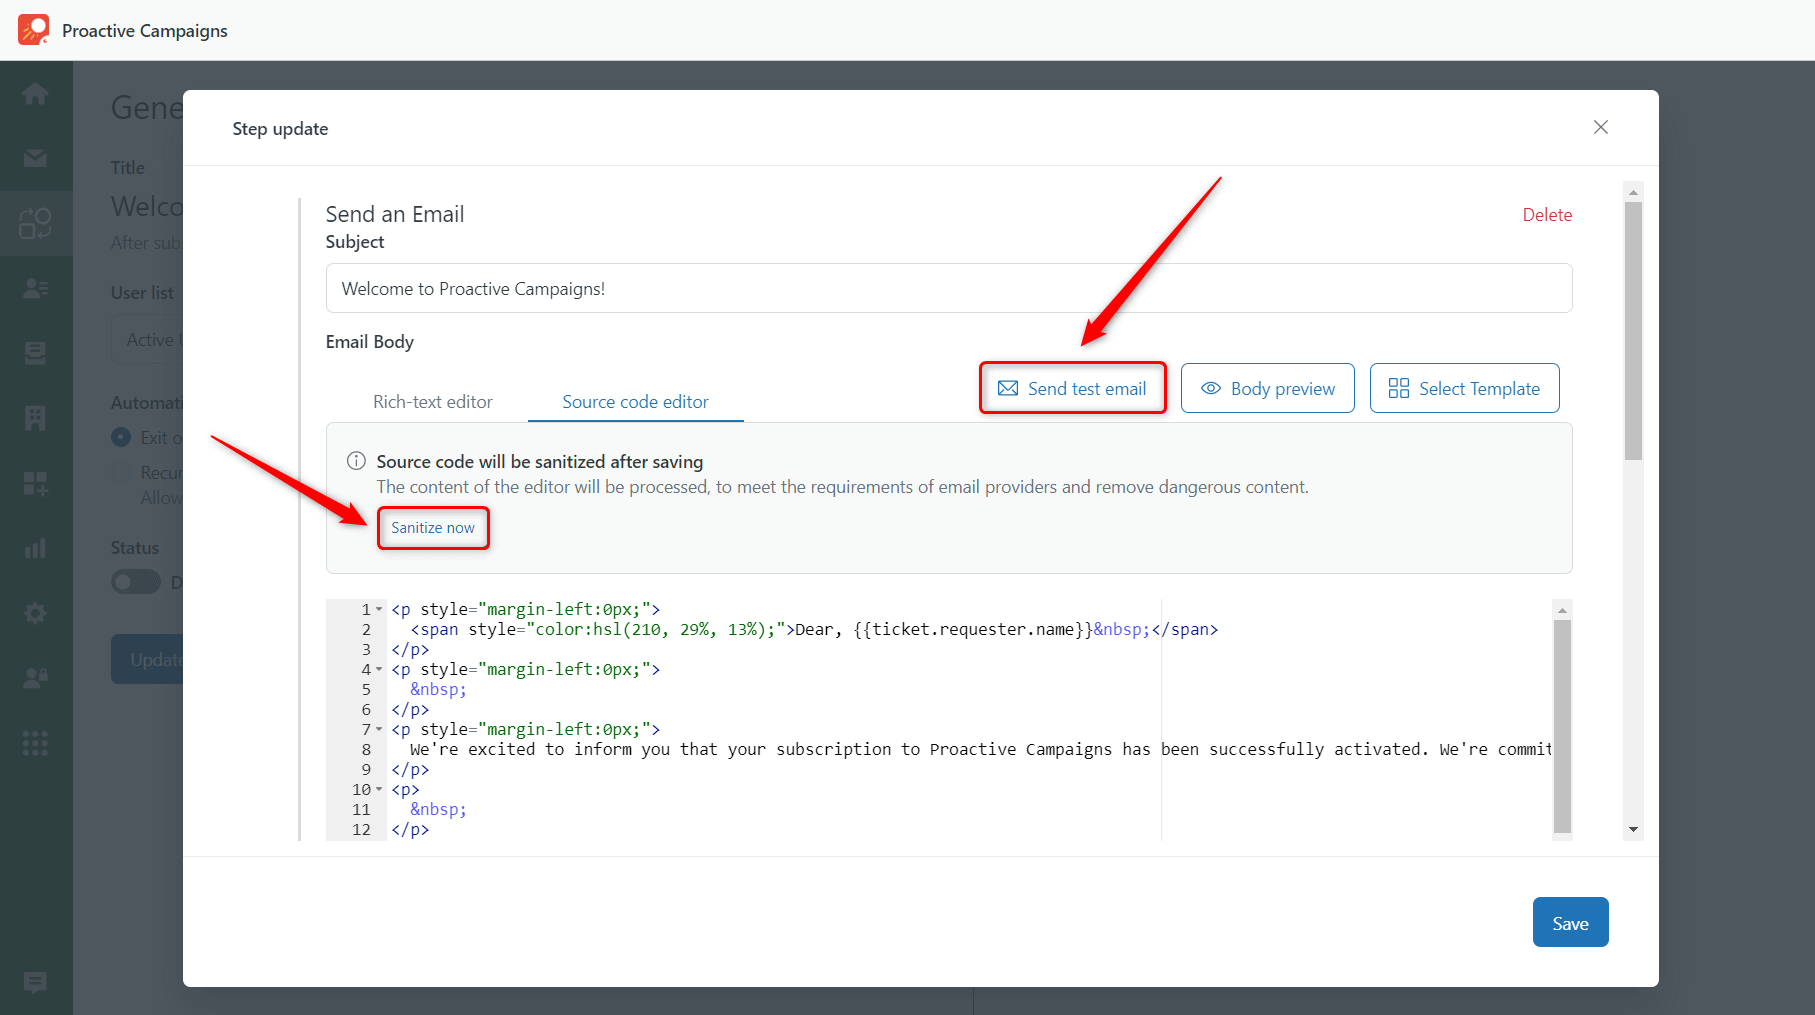
We've also added testing capabilities to automation. You can now send test emails to see exactly how it will perform before launching. Additionally, we've added the option to manually sanitize your emails, ensuring they remain clean and error-free whenever needed.
These updates make it easier to adjust your workflows on the fly, so your automations are always optimized for your goals.
Manage the Order of Columns in the Lists
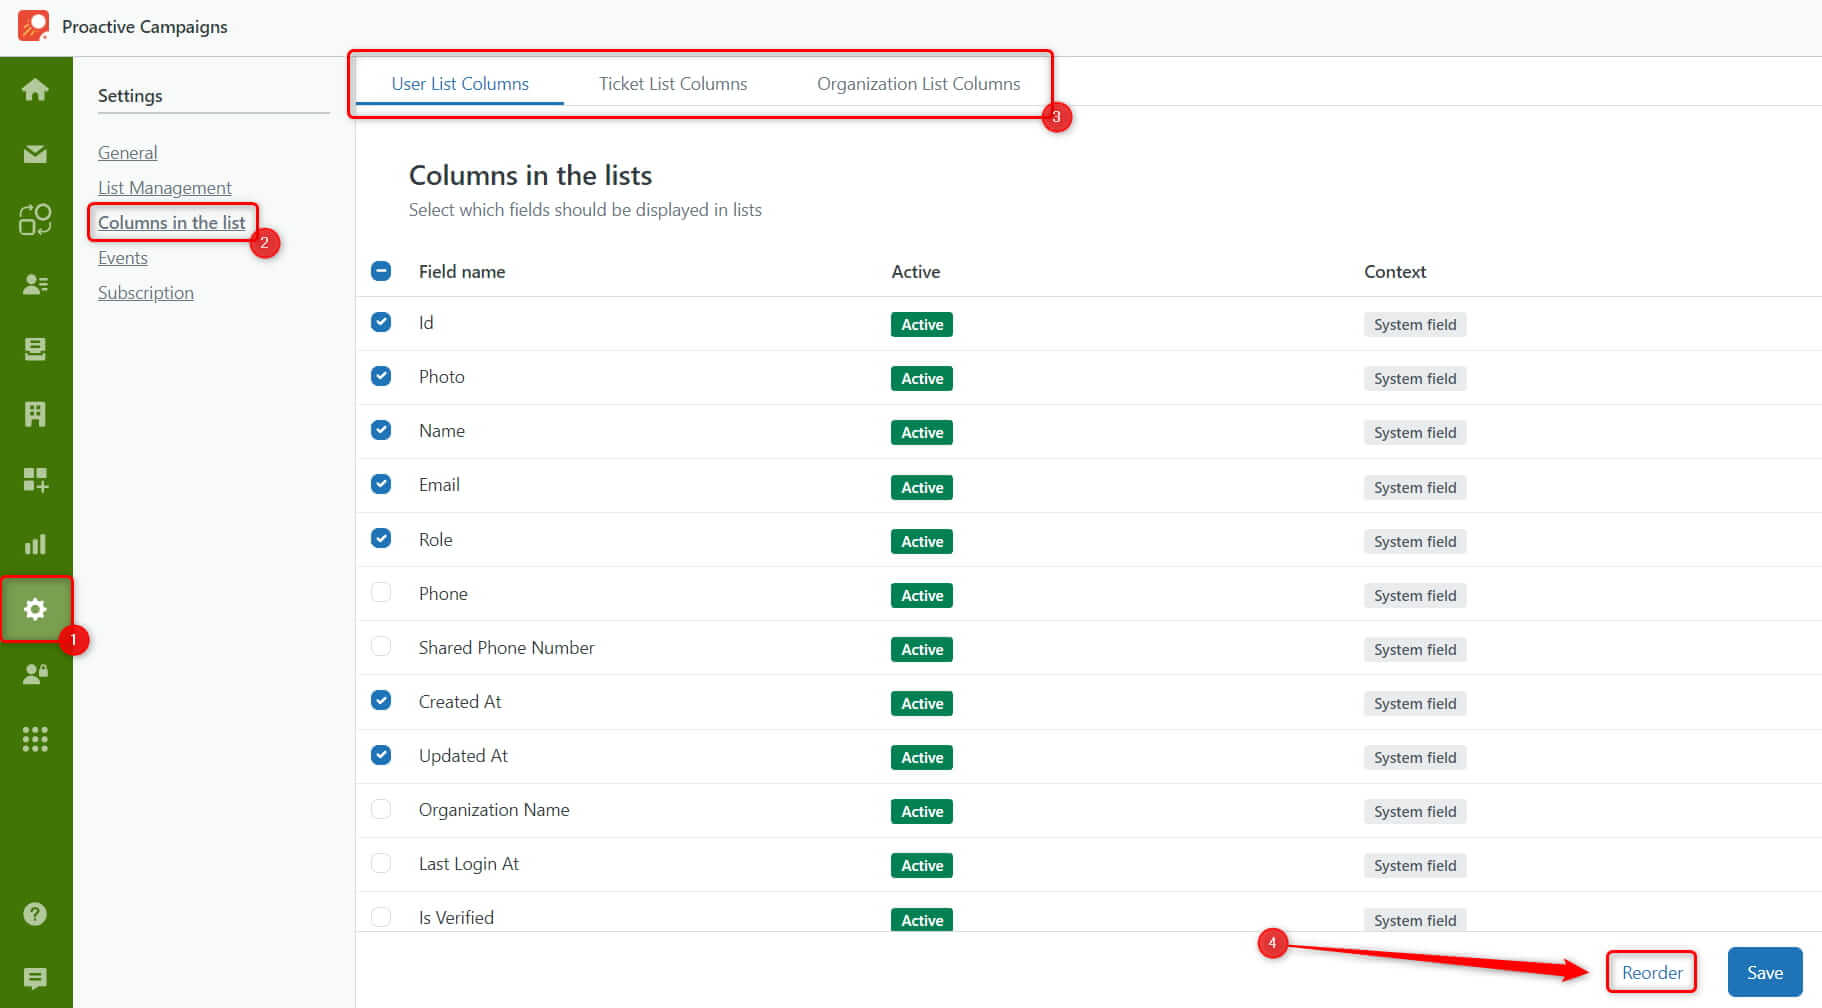
You know that it’s possible to choose fields for the list preview. But now you can also rearrange them in the order you need. To do so, go to Settings > Columns in the list > User/Ticket/Organization List Columns and click Reorder at the bottom of the page.
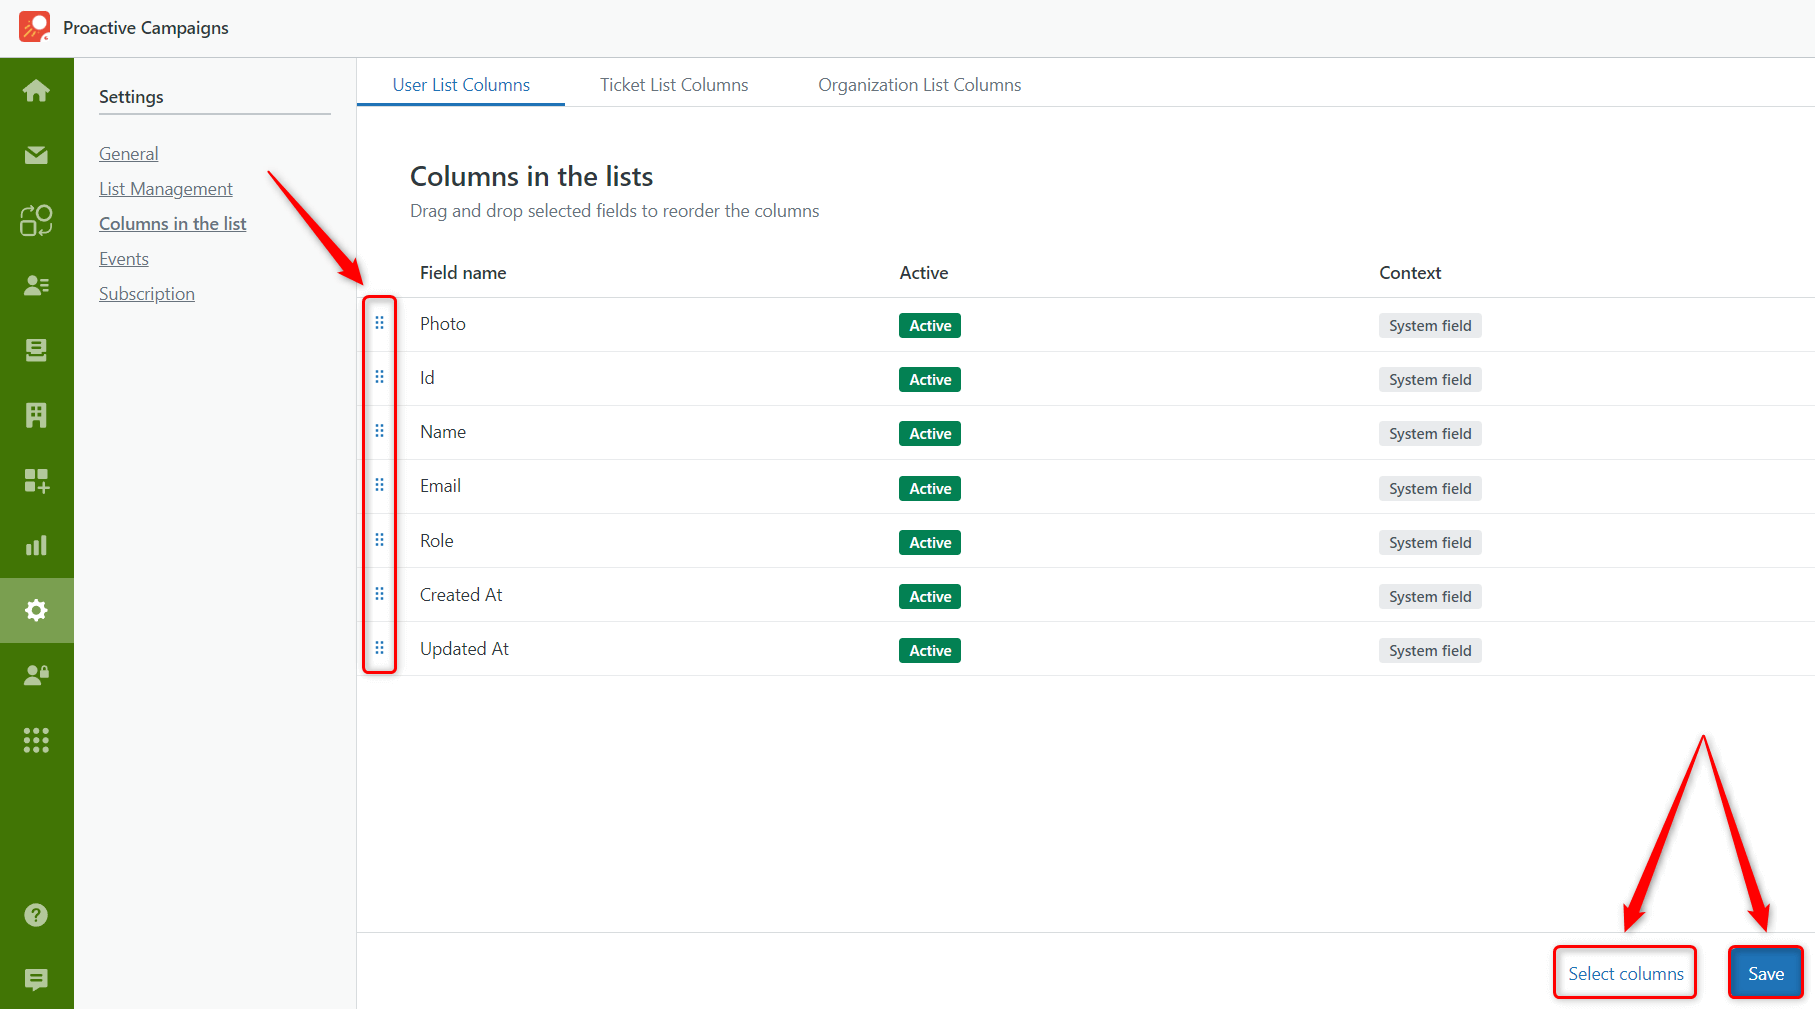
After that, you can drag and drop selected fields using the drag handle icon. When you’re done, click Save, and then click Select columns if you need to return and choose more.
Plus, we’ve added new fields to choose from:
- For User Lists: Organization Name.
- For Ticket Lists: Organization Name, Custom Status Name, Ticket Form Name, Group Name, and Brand Name.
List Preview
Creating an accurate target list is an important step in your email campaigns. Therefore, we decided to provide you with an instant list preview. Now, while editing or adding a new list, you’ll have two tabs: Conditions and Preview.
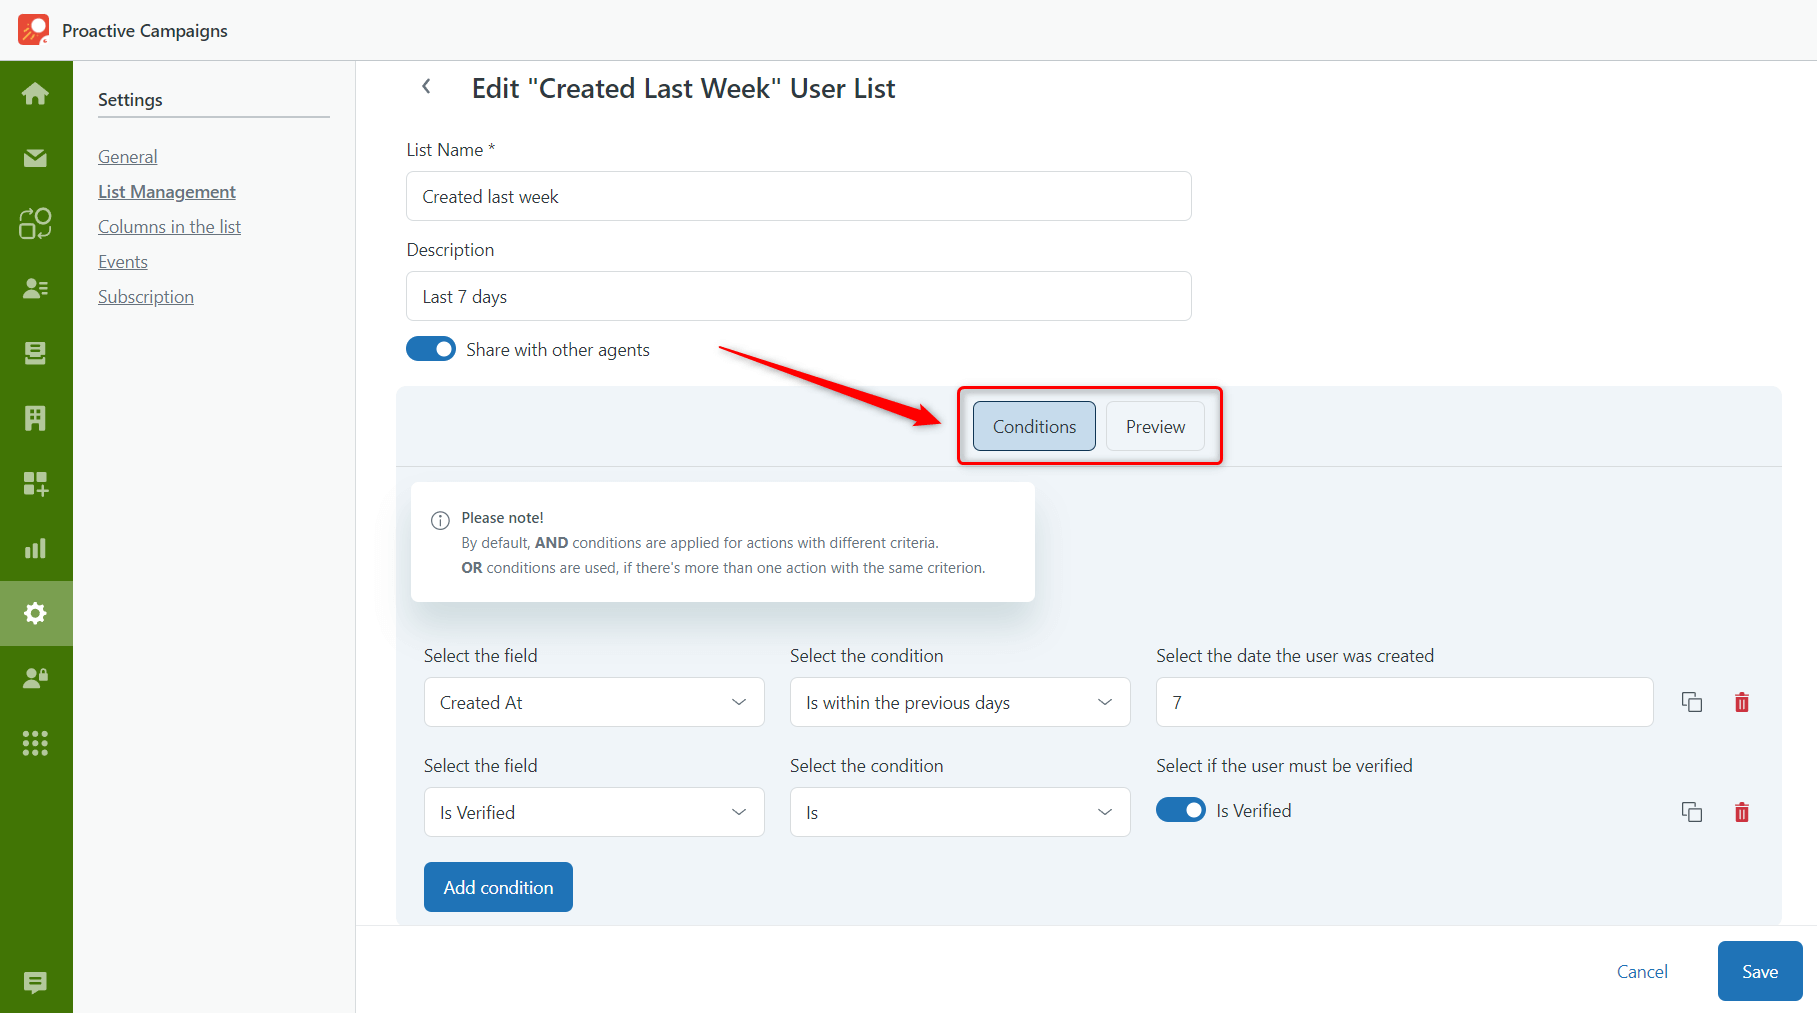
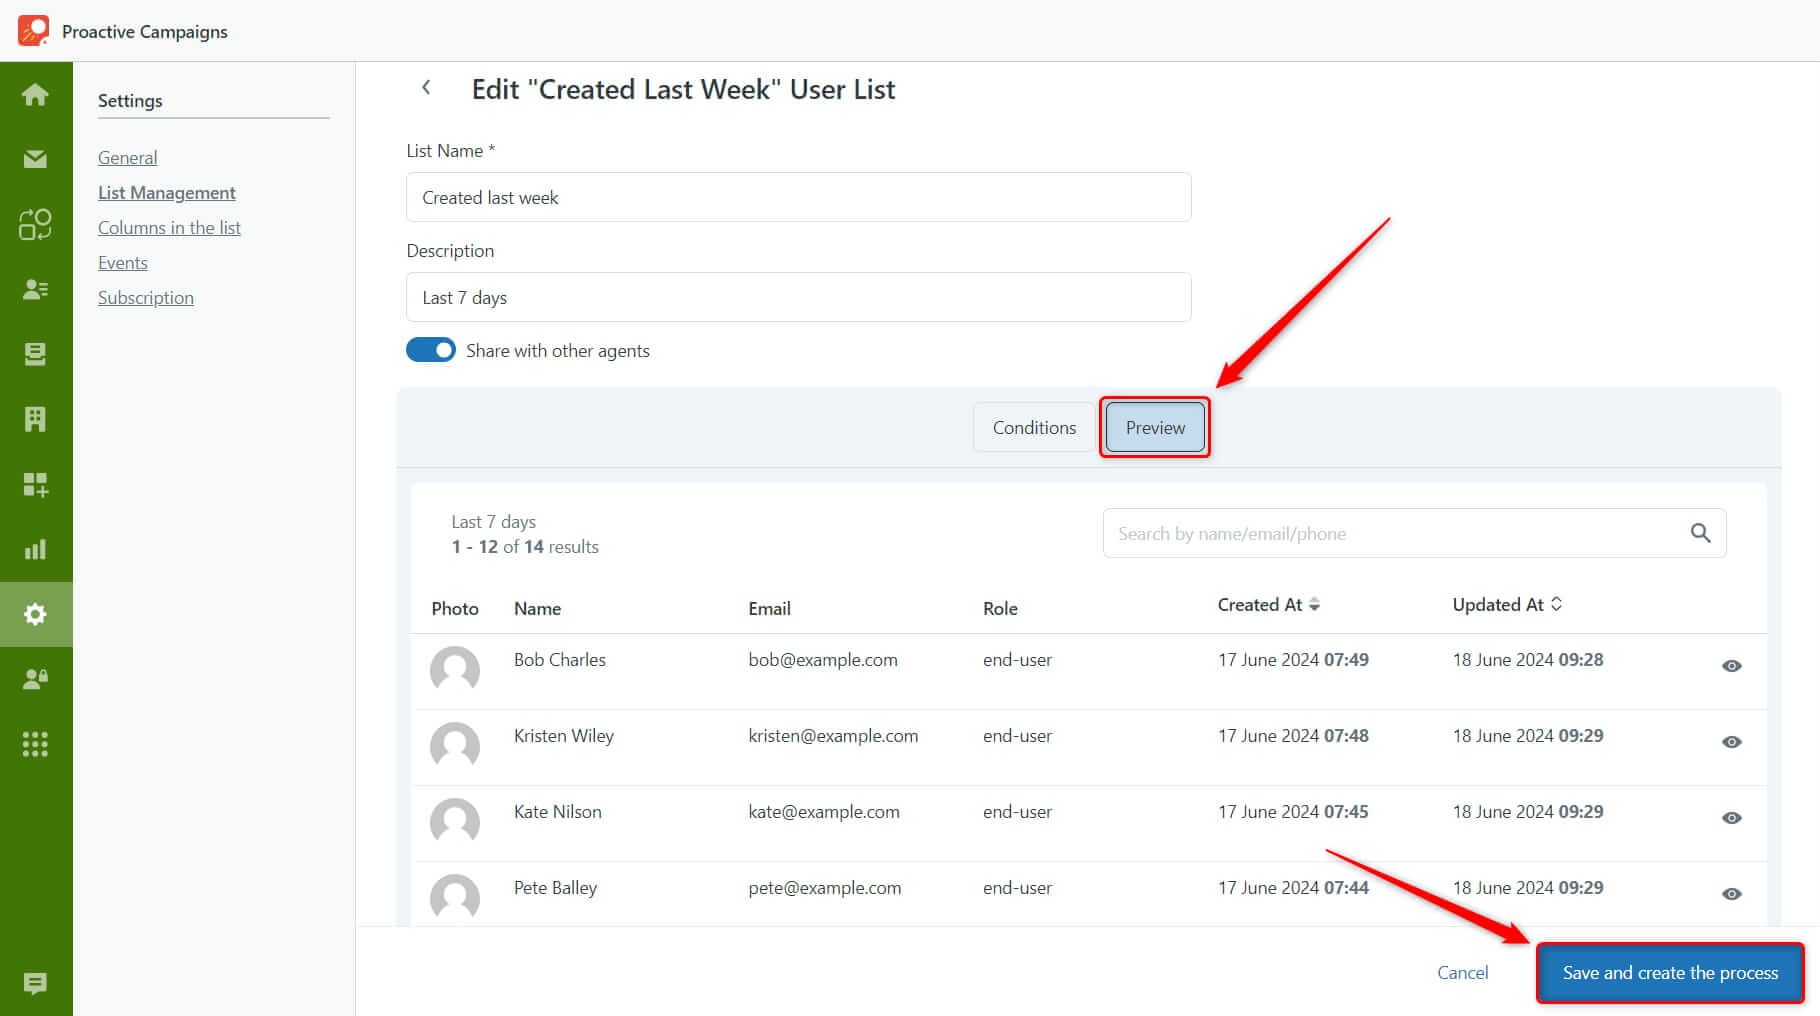
As before, the first tab allows you to add various criteria to filter users, tickets, or organizations. To check if your conditions work correctly, go to the Preview and see the result. This makes it much easier to control your list management and send your emails to the right audience.
If you click Save and create the process from the Preview tab, you'll be taken directly to creating a new campaign with this list.
Upgraded Fields for List Conditions
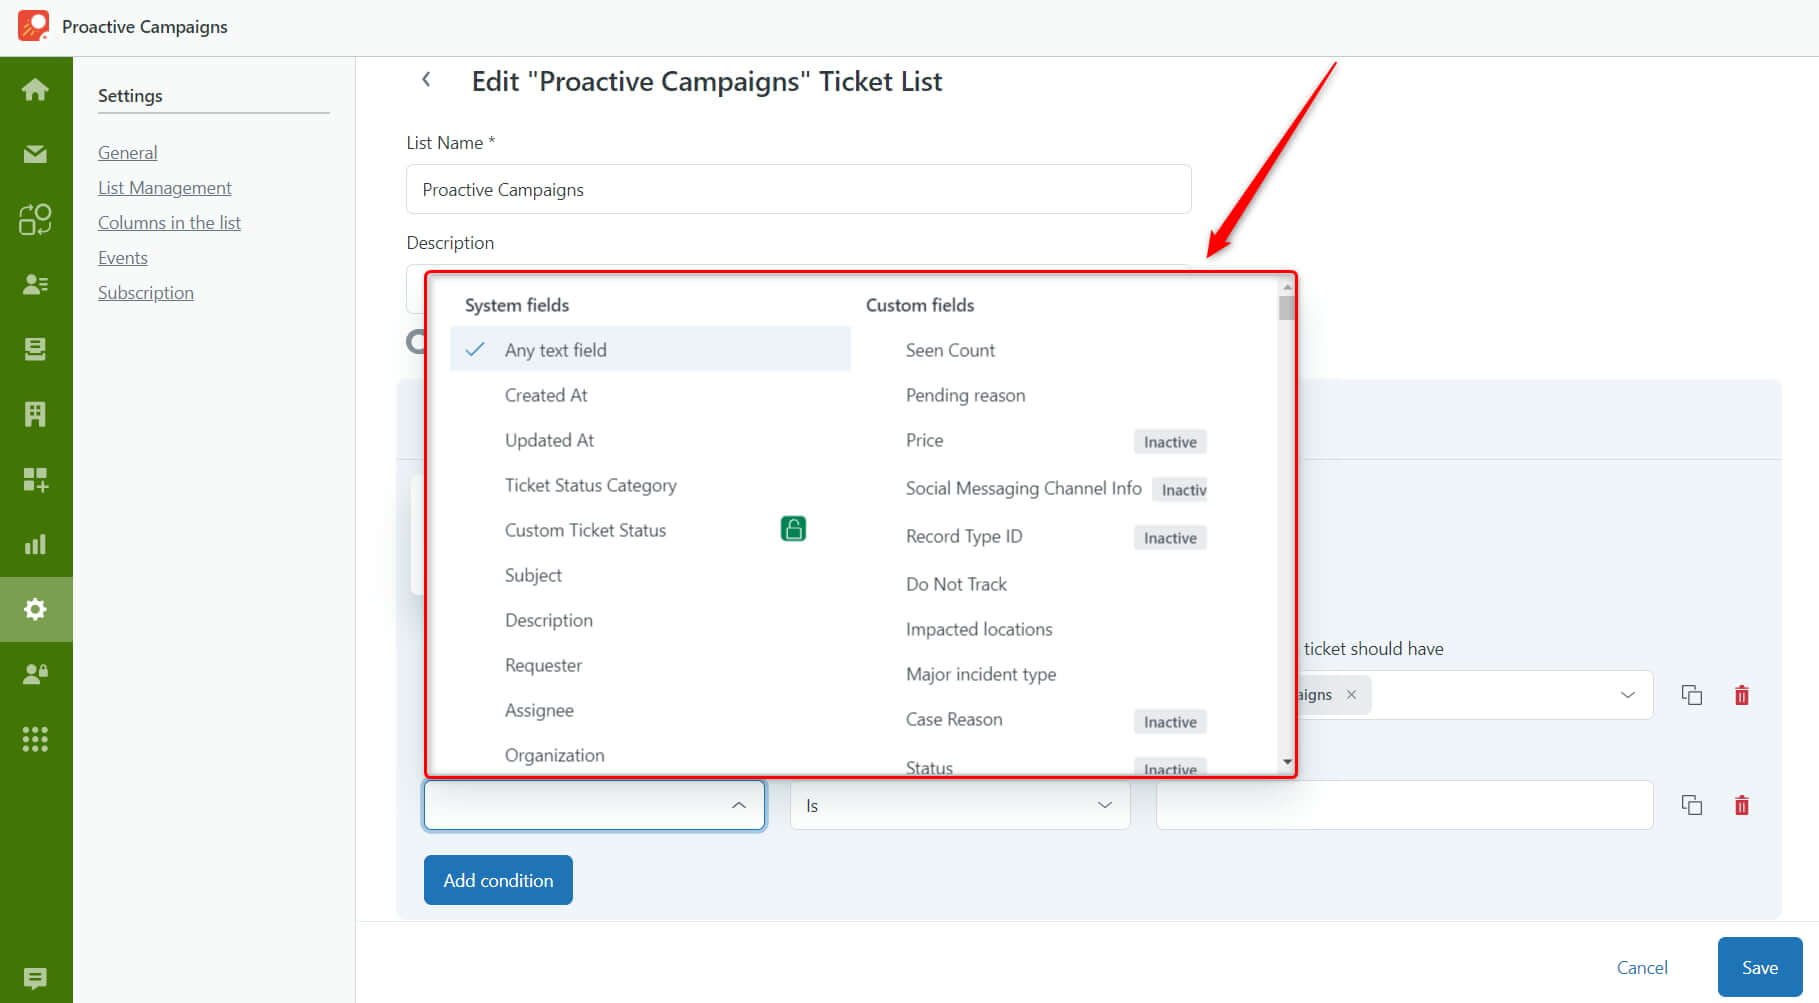
Now, when setting up conditions for a list, you can easily find the necessary fields since we’ve divided the System and Custom fields into two columns.
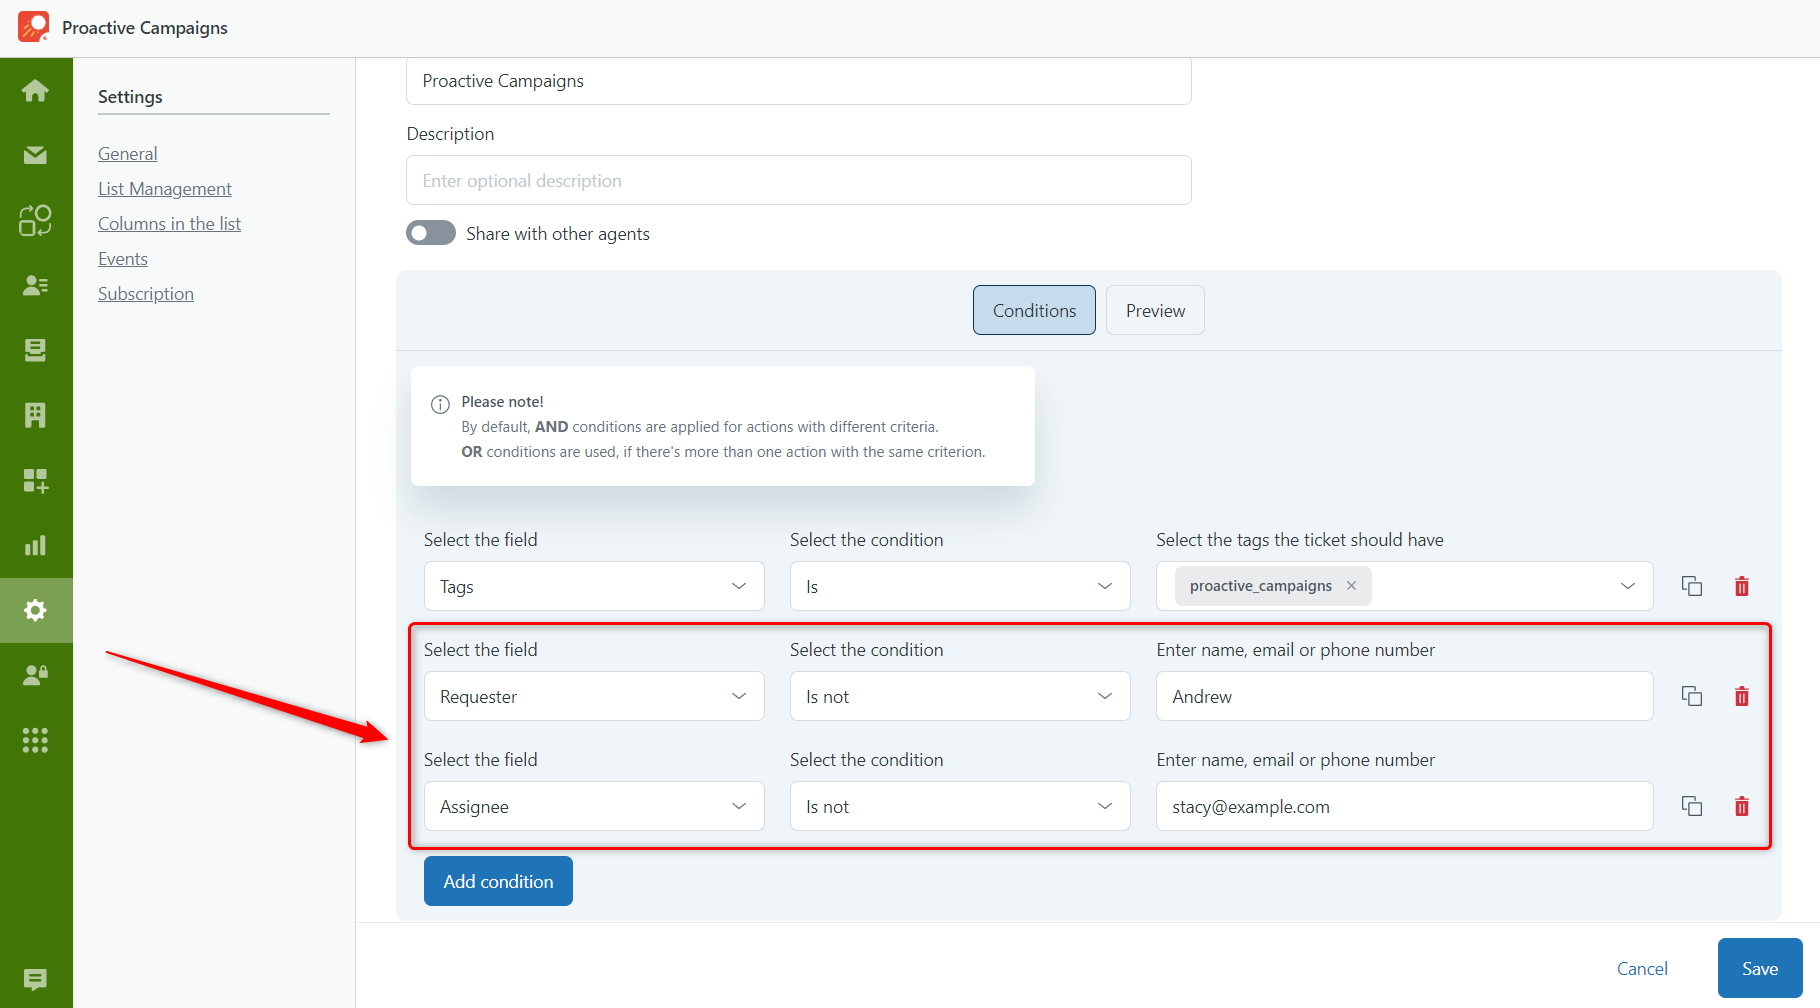
Also, selecting the value for the fields becomes more specific and intuitive. For example, we changed the fields Requester Name, Requester Email, Assignee Name, and Assignee Email to simply Requester and Assignee. You can enter their name, email, and phone number there, and the system will automatically recognize the required value.
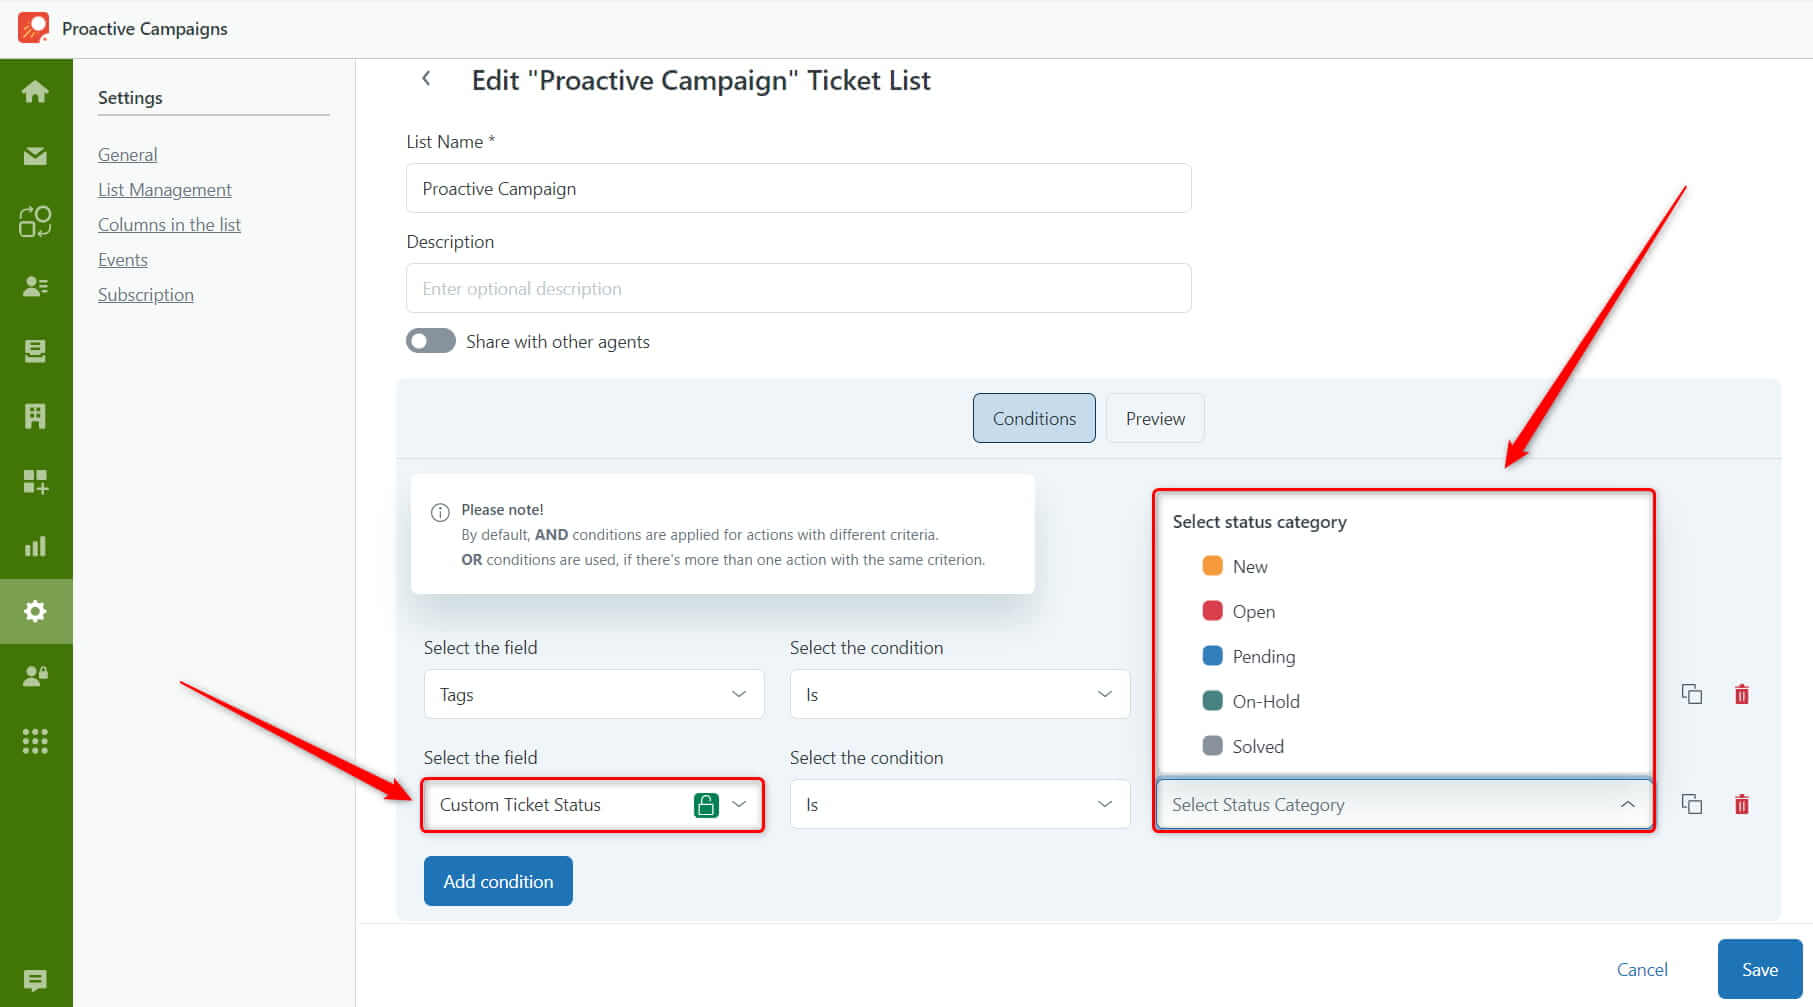
Speaking about specific fields, we have also added a Custom Ticket Status to the conditions.
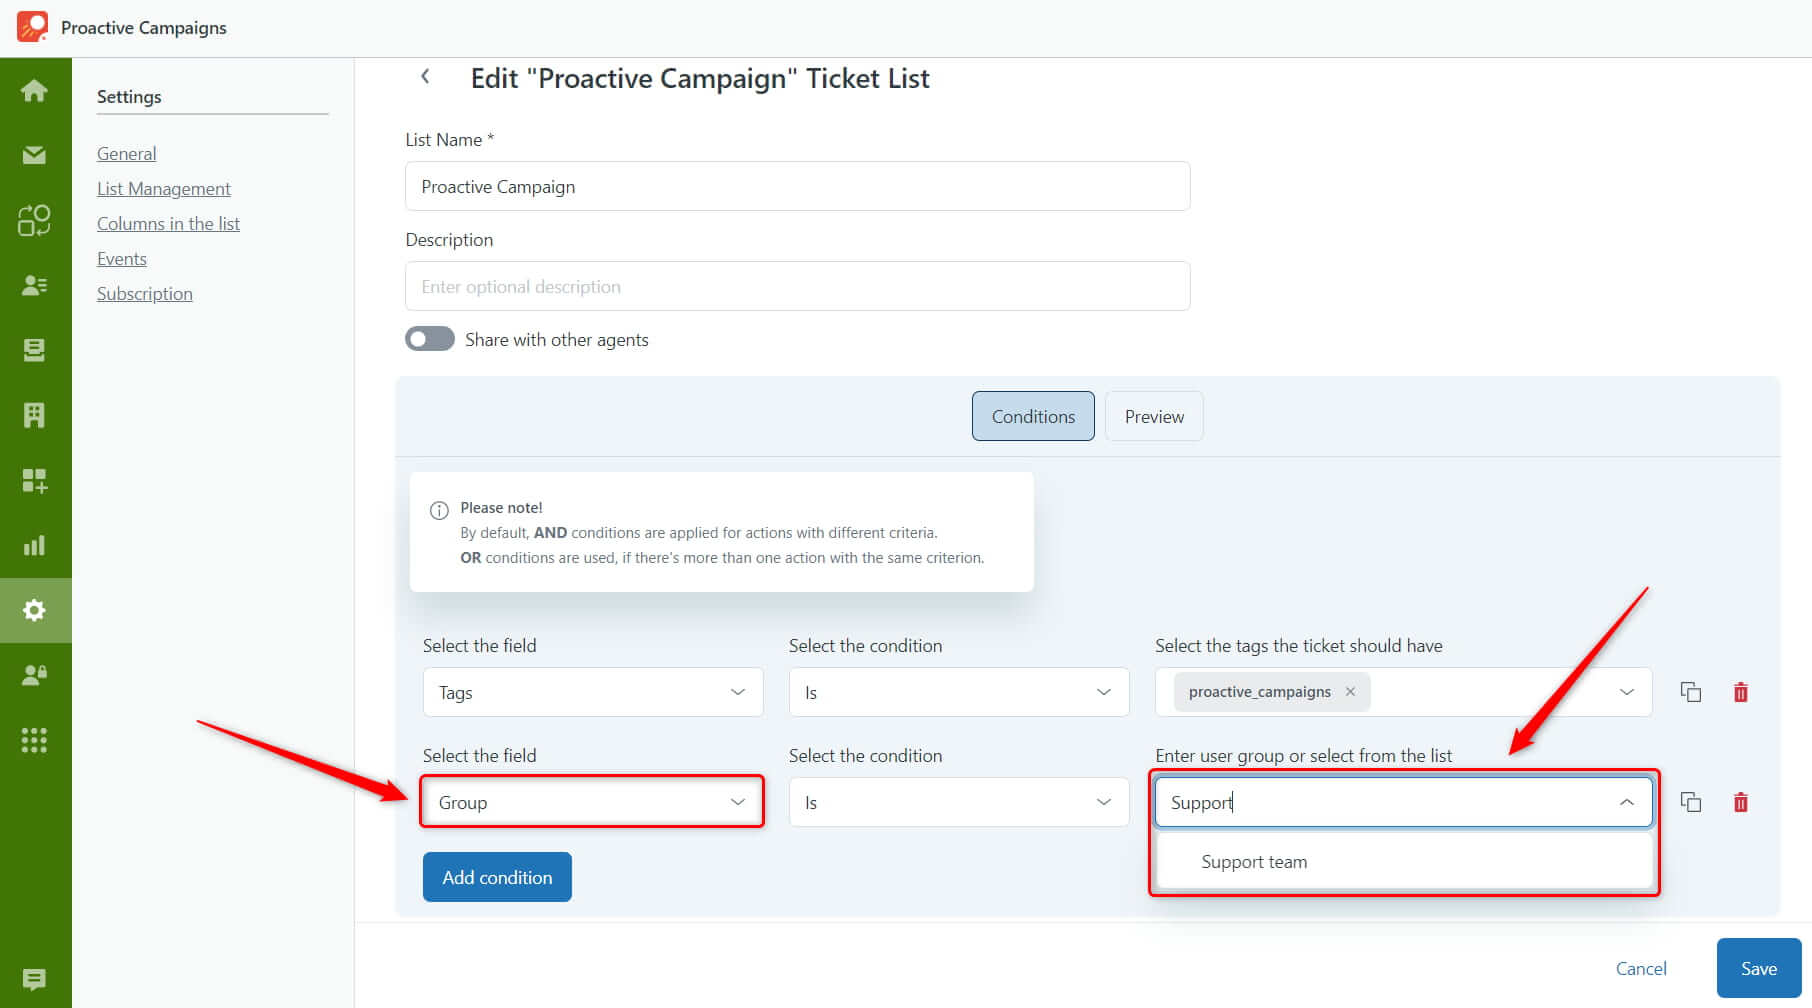
In addition, in the Group and Organization fields, you can either type in the value or select it from the dropdown.
Introducing New Campaign Editor
The GrowthDot team wants to ensure you get the best, most seamless experience out of our apps. That’s why we decided to create a new, even better campaign editor with three simple steps. While the core functionality remains unchanged, we've streamlined the workflow to enhance intuitiveness.
To access this new feature, simply enable it from your settings. For now, you can switch between the old and new editors at any time.
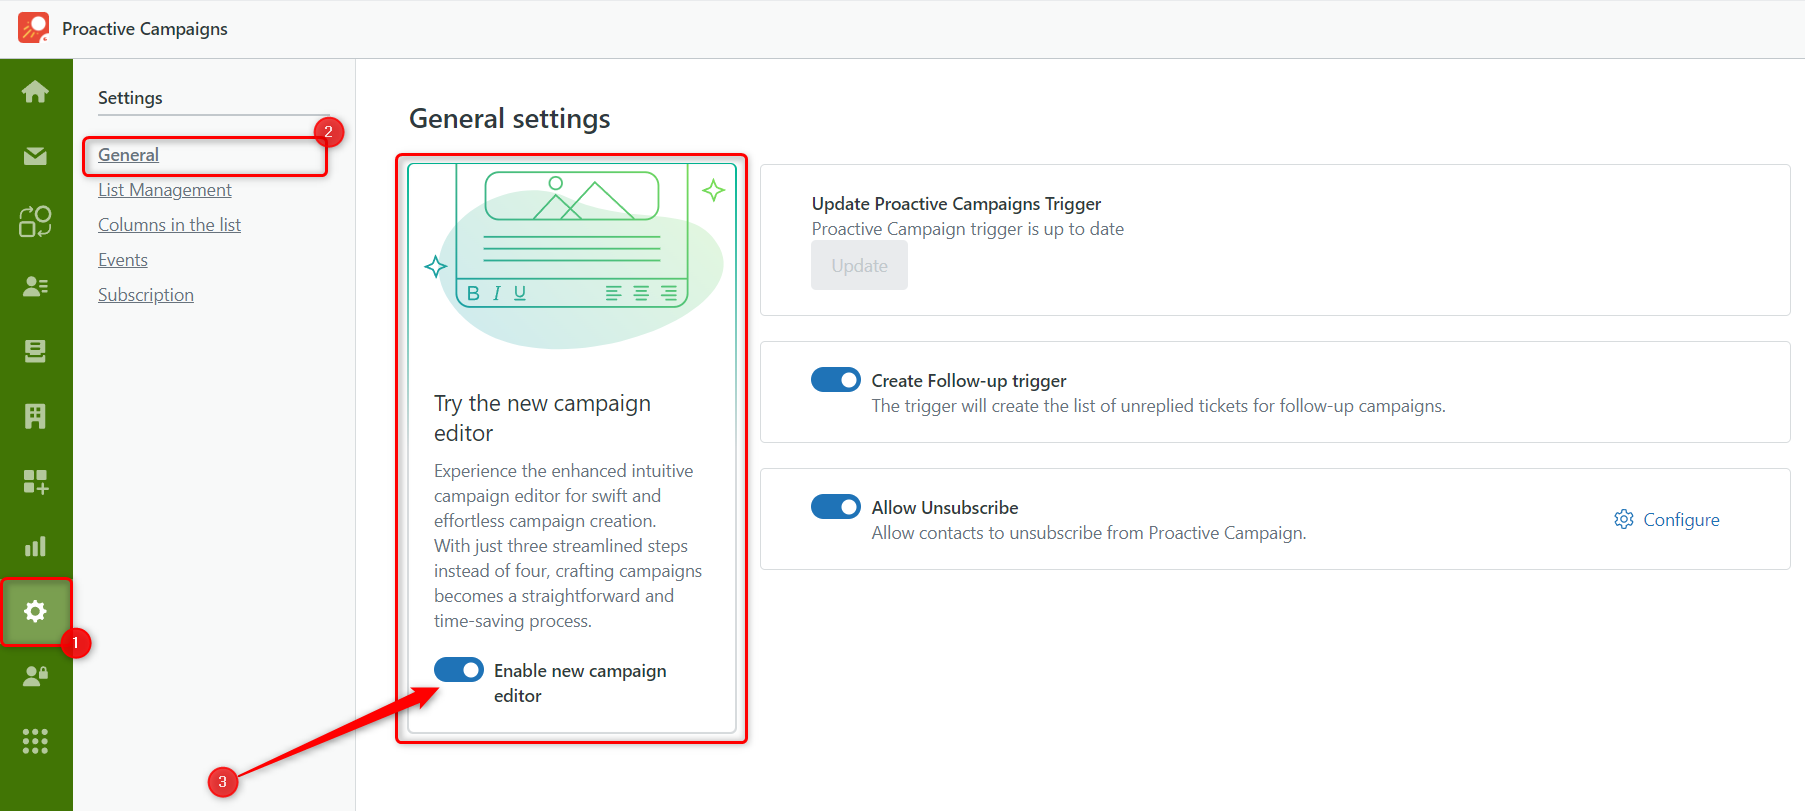
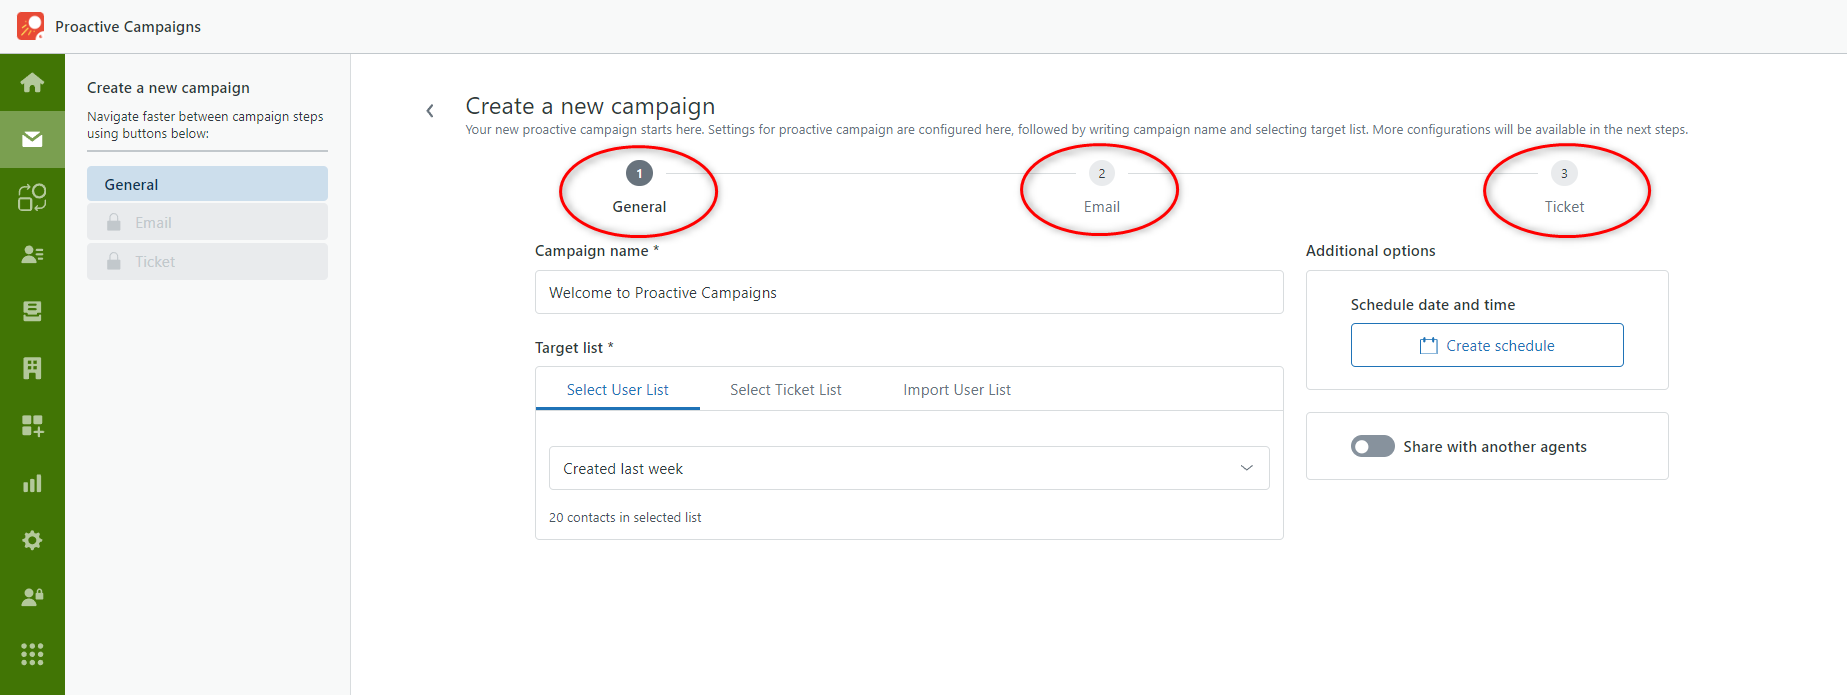
Once enabled, creating a new campaign becomes easier, with just three straightforward steps:
- General: Set the overall parameters of your campaign.
- Email: Customize your email content and design.
- Ticket: Tailor your campaign's ticketing details.
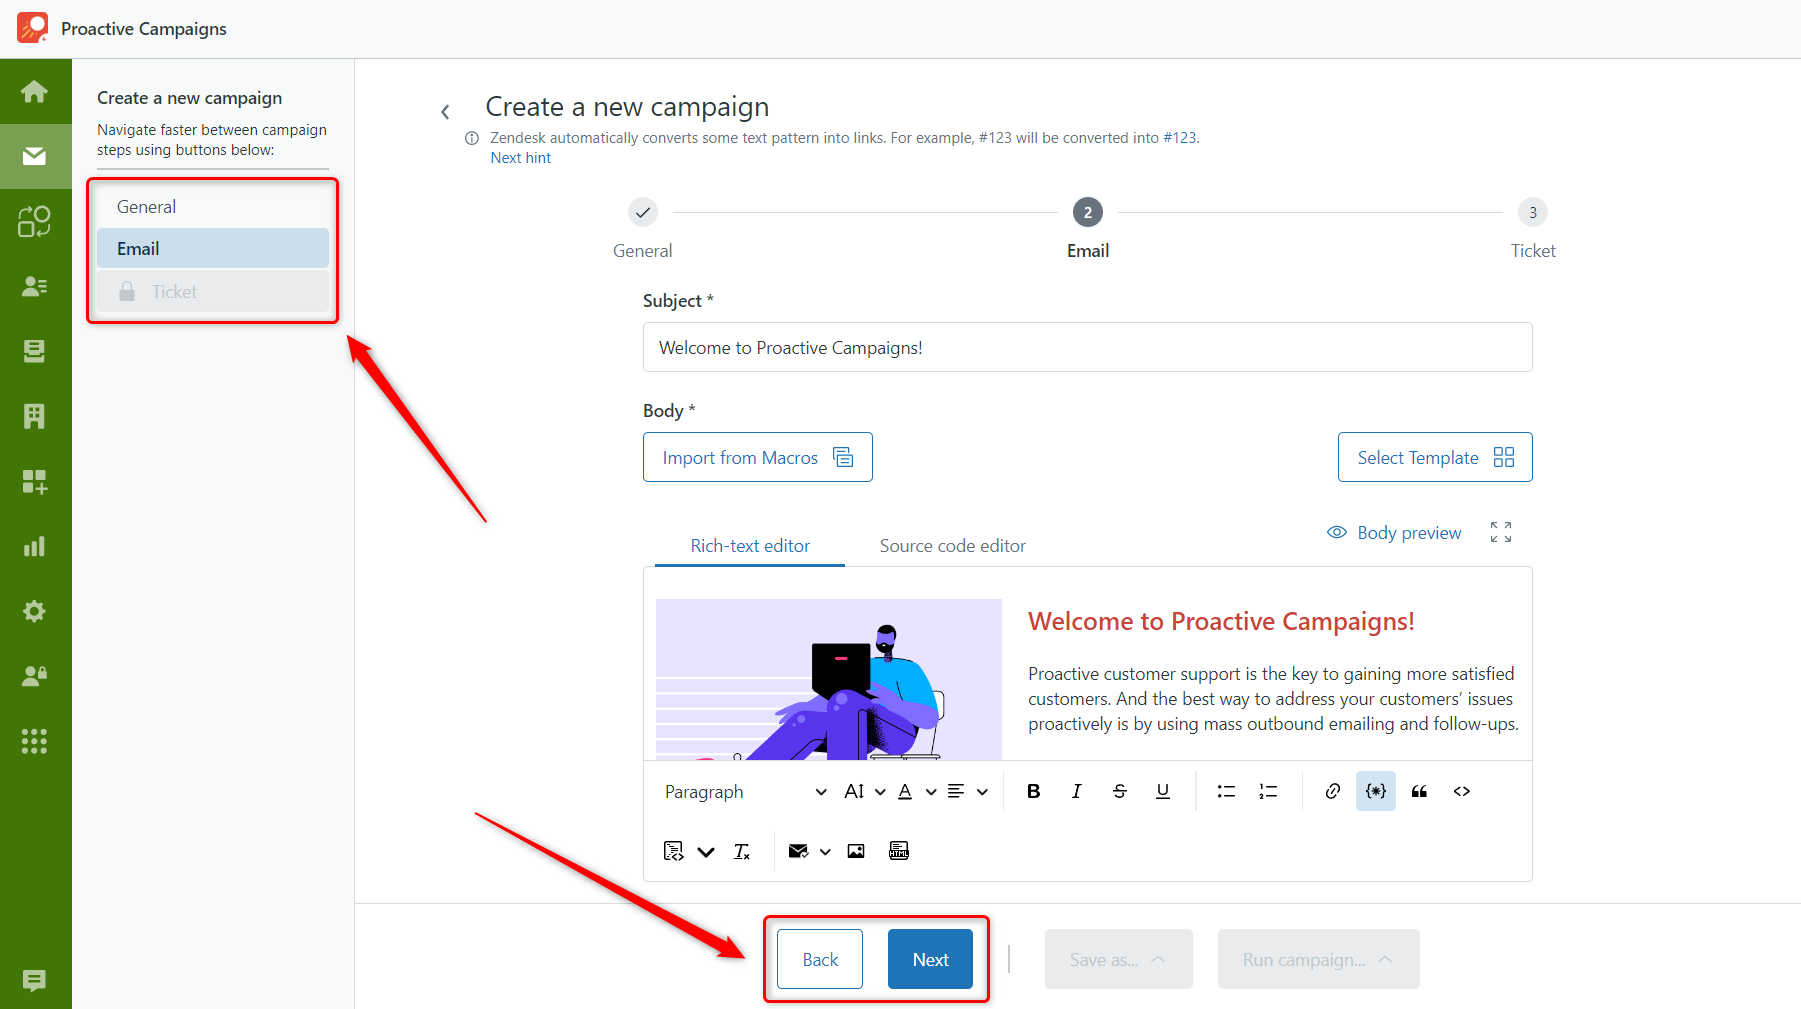
We have also improved navigation between steps. Utilize the bottom navigation buttons to move forward or backward or easily jump to any completed step from the sidebar.
Read the full guide on creating a campaign with a new enhanced editor here.
Custom Unsubscribe Link
We all know that having an unsubscribe link is obligatory for all mass email campaigns, but it doesn't mean you cannot make it more appealing or personal. With a new update in the Proactive Campaigns app, you can customize your unsubscribe message by adding:
- Any text you need
- Zendesk placeholders
- Dynamic content for translation
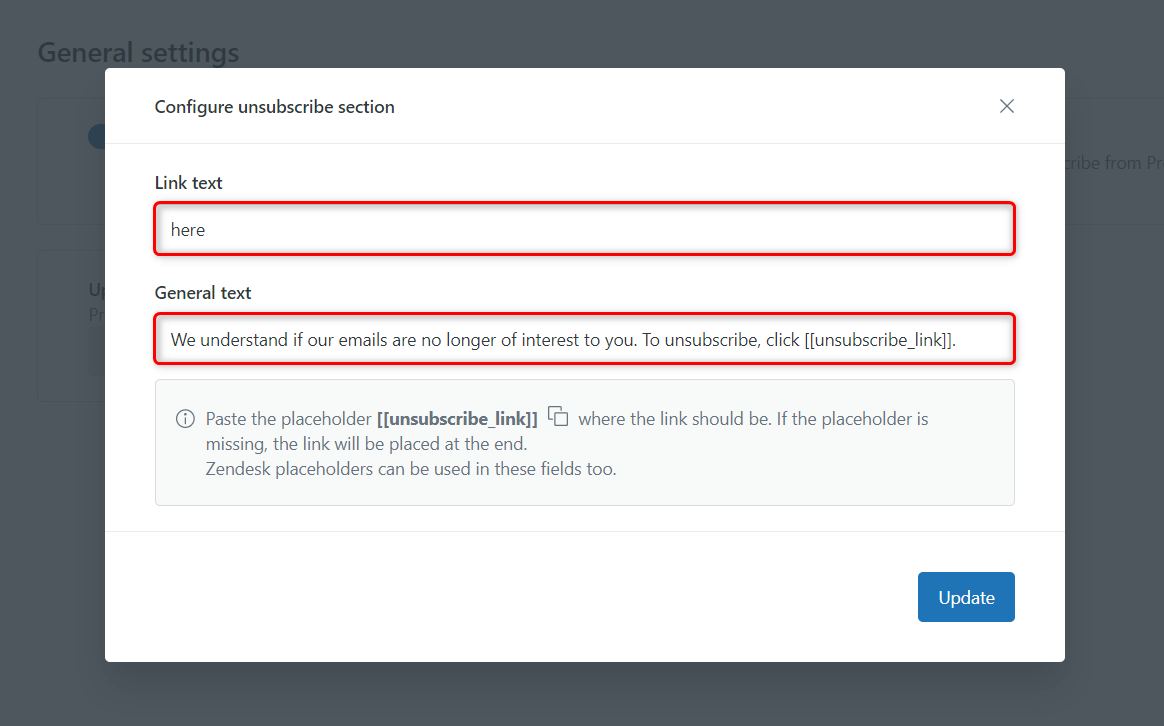
To do so, go to Settings > General, check if you enabled Allow Unsubscribe, and click Configure.
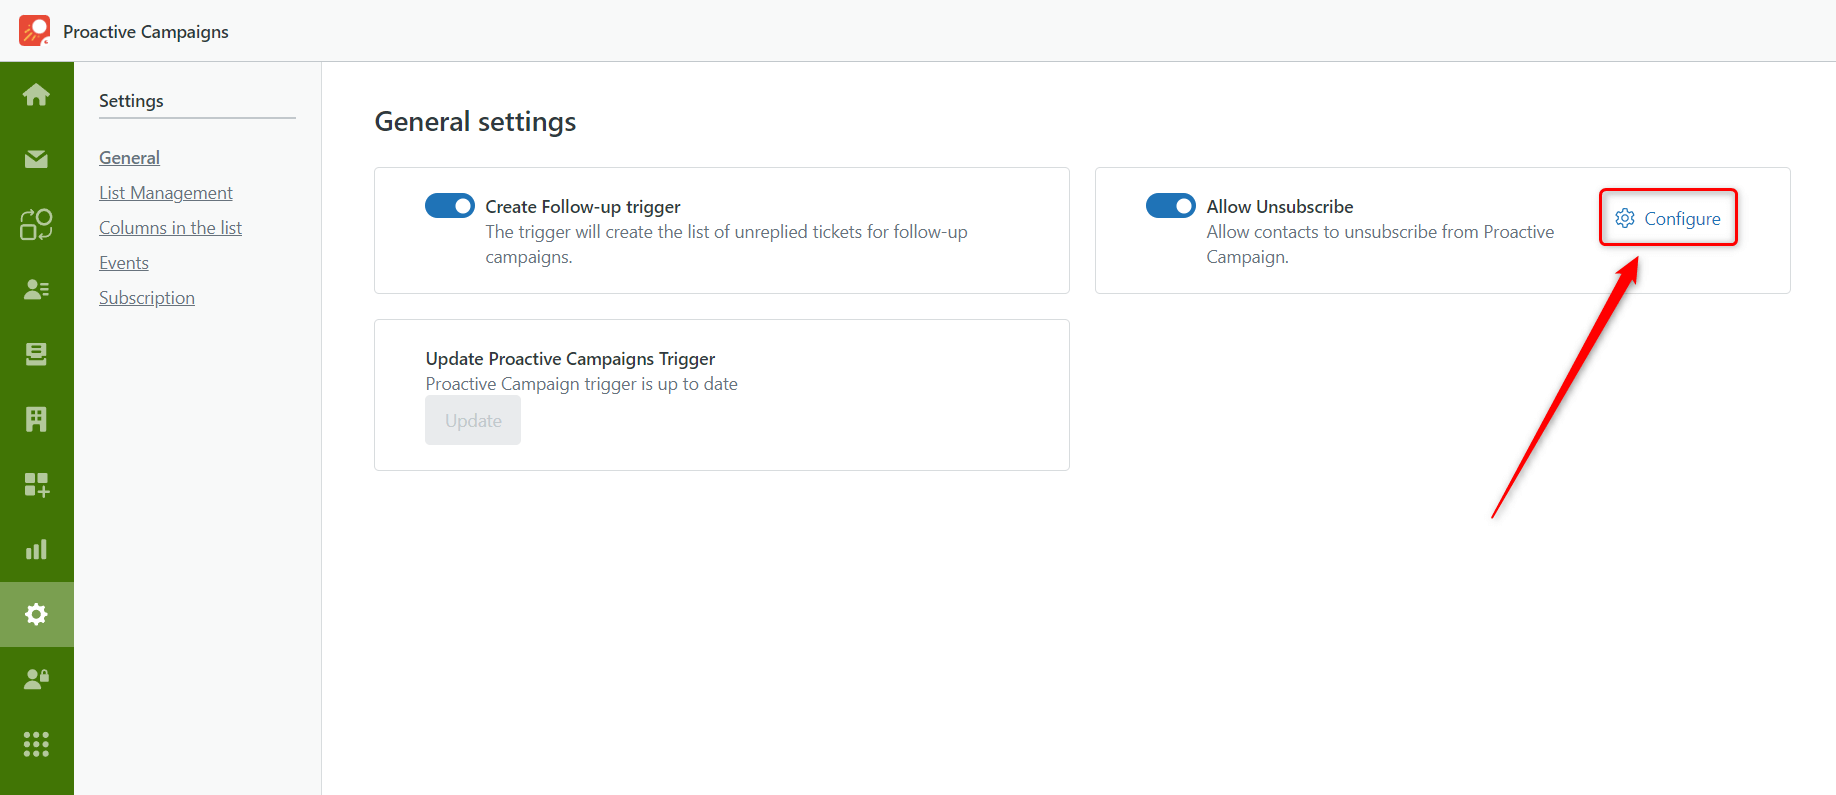
Type in the text you want to be displayed as a link (the maximum length is 255 characters) and the main message. Remember to include the placeholder [[unsubscribe_link]] where you need it. Otherwise, the link will automatically appear at the end.
And that's how it looks in the email itself.
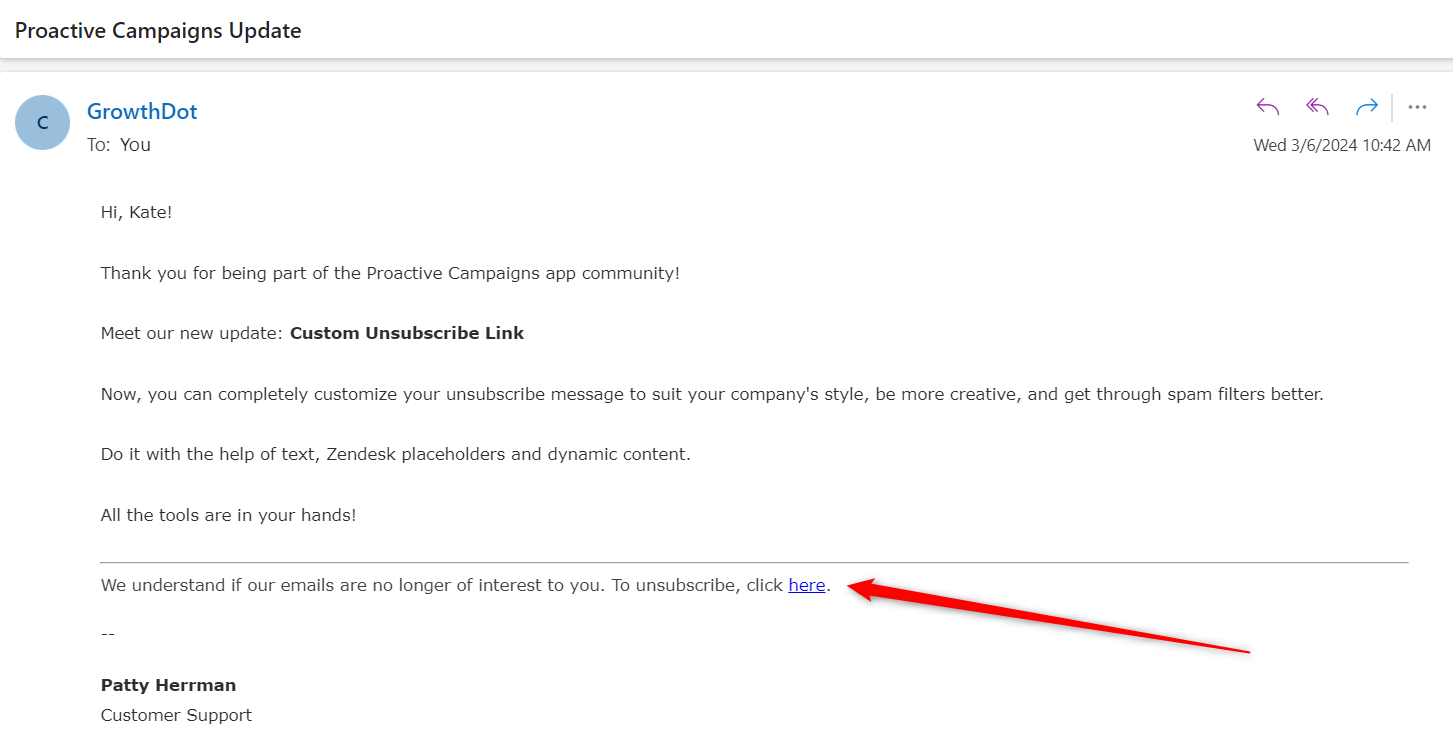
Such custom unsubscribe buttons can make your campaign more pleasing, reduce unsubscribes, implement a personal touch, and even prevent your emails from going to spam.
High-speed Campaign Sending
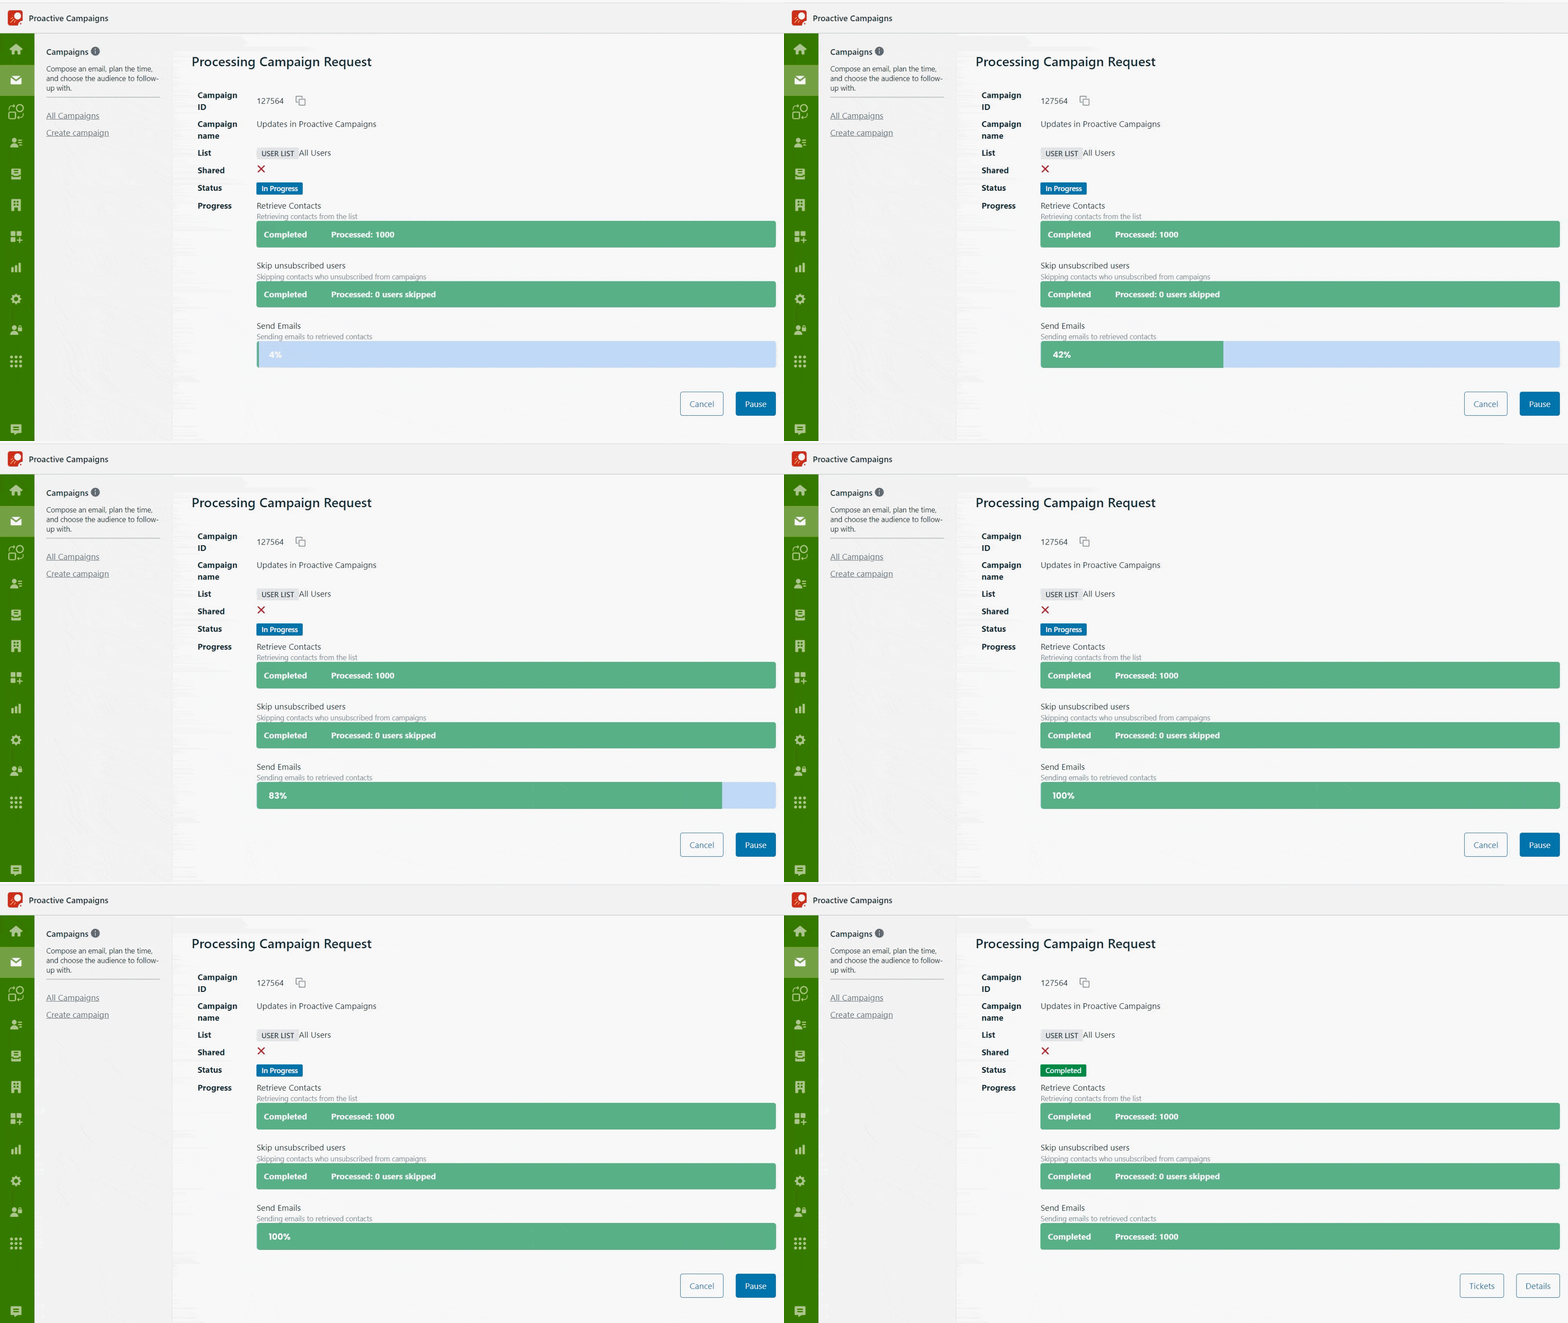
Say hello to the big update that can turbocharge your outreach efforts: high-speed campaign sending in the Proactive Campaigns app.
This enhancement, available exclusively with the Enterprise plan, gives your business the flexibility and efficiency you need to connect with your audience quickly. Whether broadcasting time-sensitive announcements or generating leads at scale, our app ensures your message reaches its destination with unprecedented speed and accuracy.
Filter Ticket Lists by Attachments
To make list management even more precise, we're introducing a new update that allows you to create ticket lists for your email campaigns based on the presence of attachments.
You can add this 'Has attachments' condition to the already existing ticket list or create a new one. Toggle on the button to include tickets with attached files, and toggle it off for tickets without attachments.
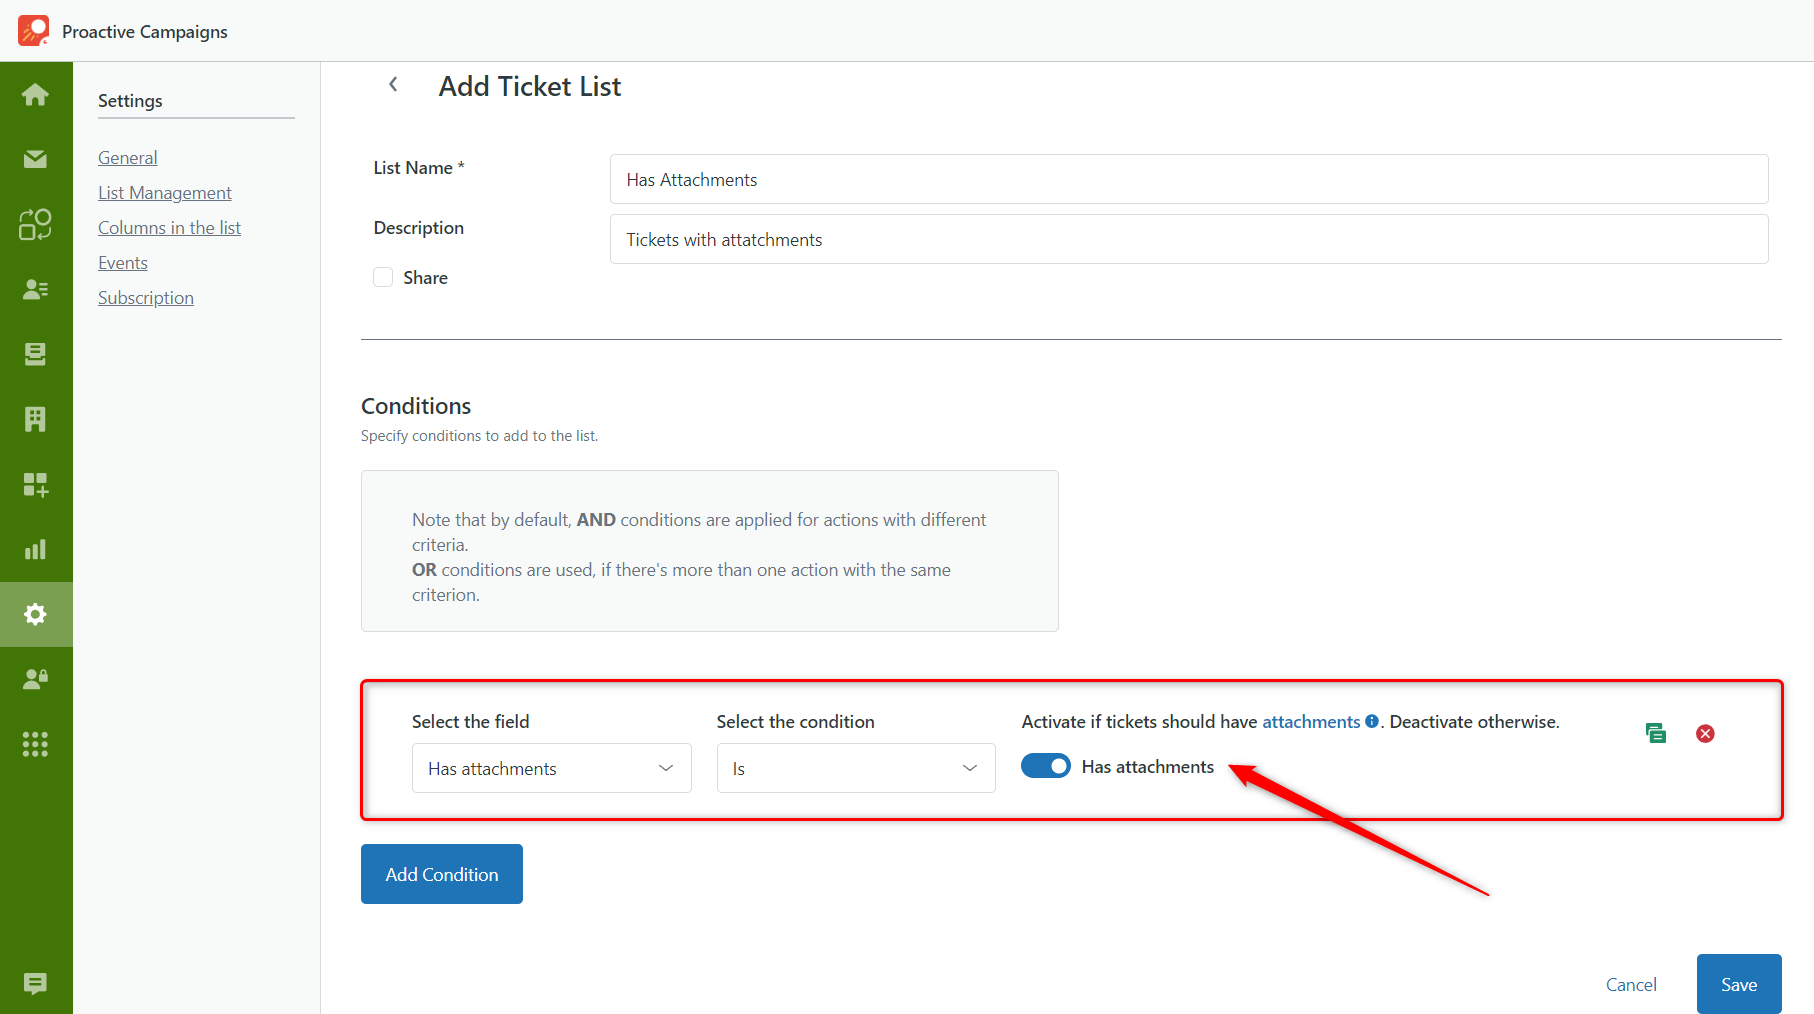
This feature allows you to filter and organize tickets more efficiently, keeping your campaigns tailored to your specific needs.
Possibility to Share a Campaign
Sometimes there can be technical issues or some restrictions from the company that require the admin's approval of all email campaigns before launching them. For that purpose, we made an update that can be handy for any support team. So now, any agent can craft a campaign with Pending status in the final stage as it is shown in the screenshot below.
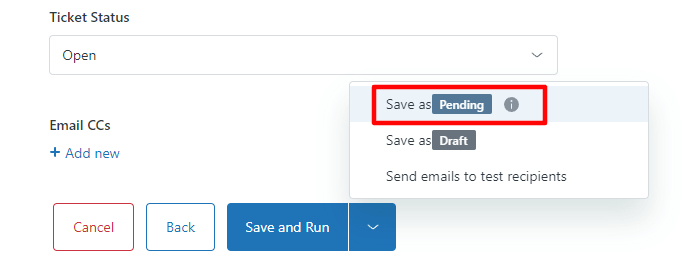
Then the campaign will be held under this status until the admins' approval on the Campaigns tab and Pending Campaigns bar. Admins can approve as many campaigns as needed and they see the following bar with all pending email campaigns.

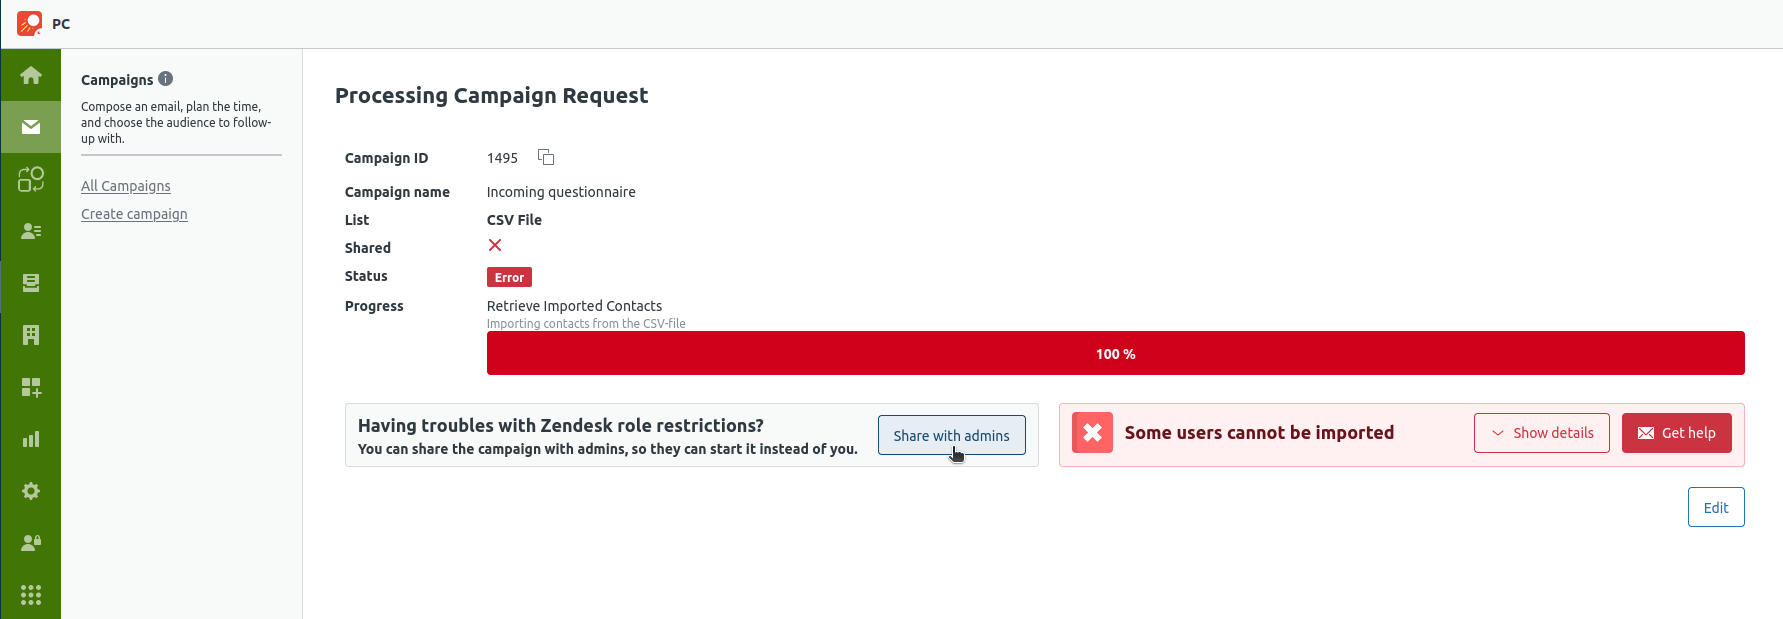
Moreover, agents can share their campaigns even after they notice they failed. Just click Share with admins button as you can see on the screenshot.
Automation Tracking
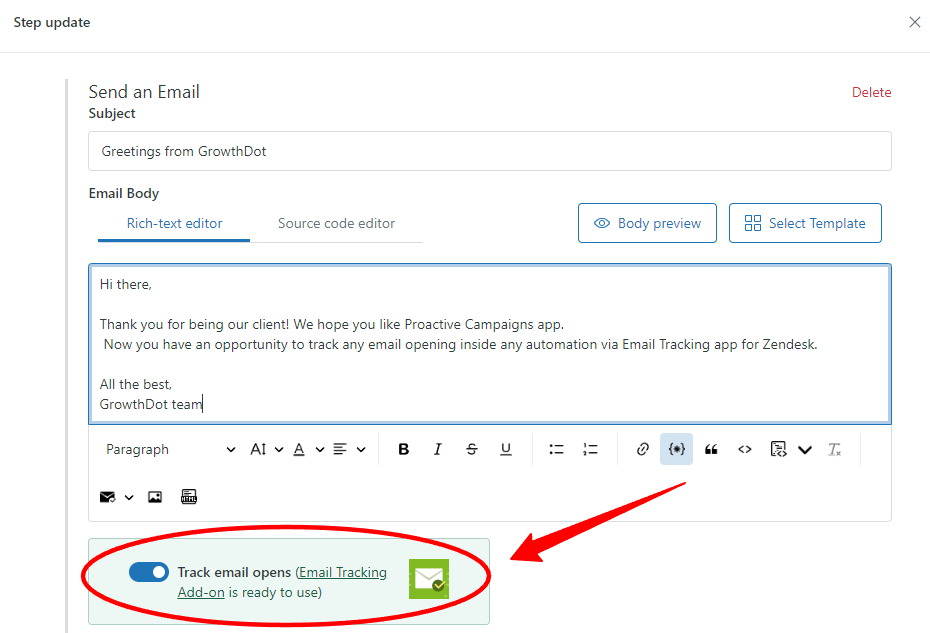
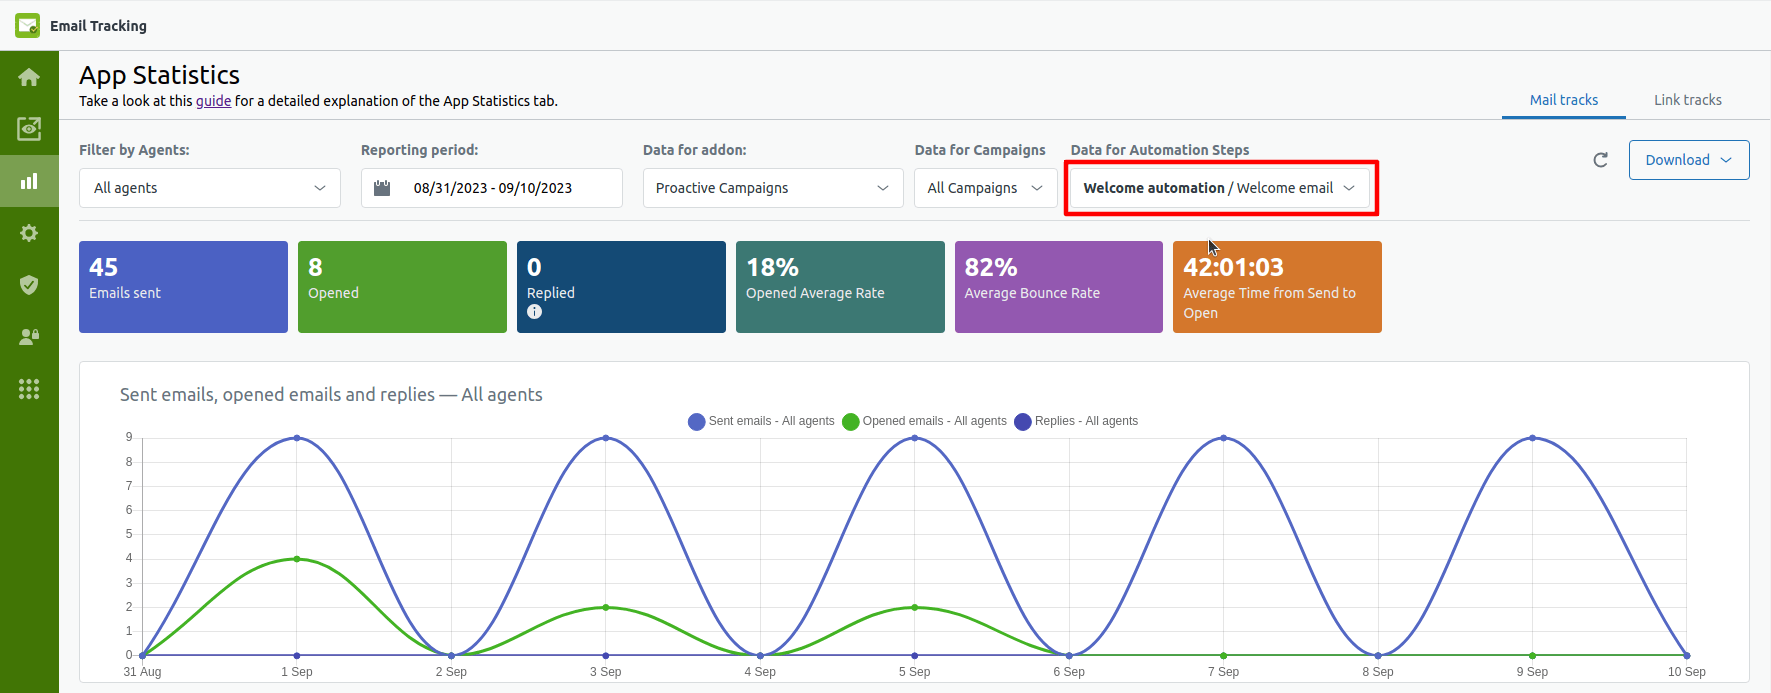
Now, you can easily track every automation's statistics via the Email Tracking app. Just switch the toggle inside the email editor and you will see the charts and indexes for any step of the specific automation.
Here is how statistics look on the Email Tracking Statistics page. Besides, the Email Tracking app sends the read receipt to the ticket when the email is opened.
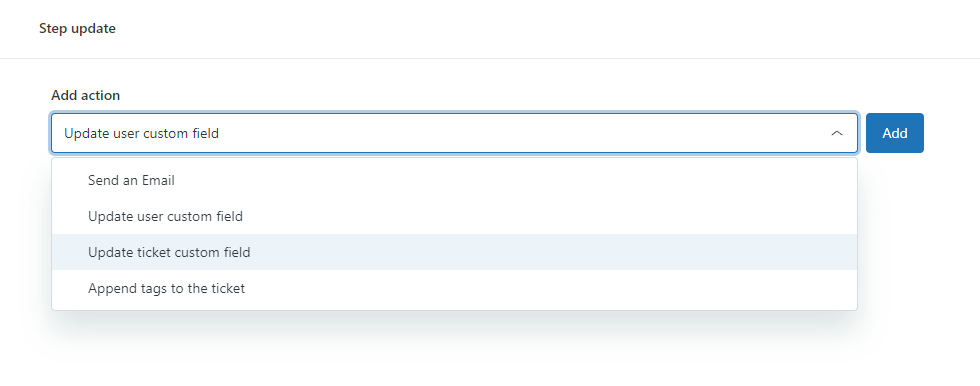
Automatically add a tag and update the ticket custom field
Previously, you could only update the contact custom field via Automation after an email was sent, but now you can do actions with tickets. So, we added 2 more options such as:
- Update ticket field
- Append tag to the ticket
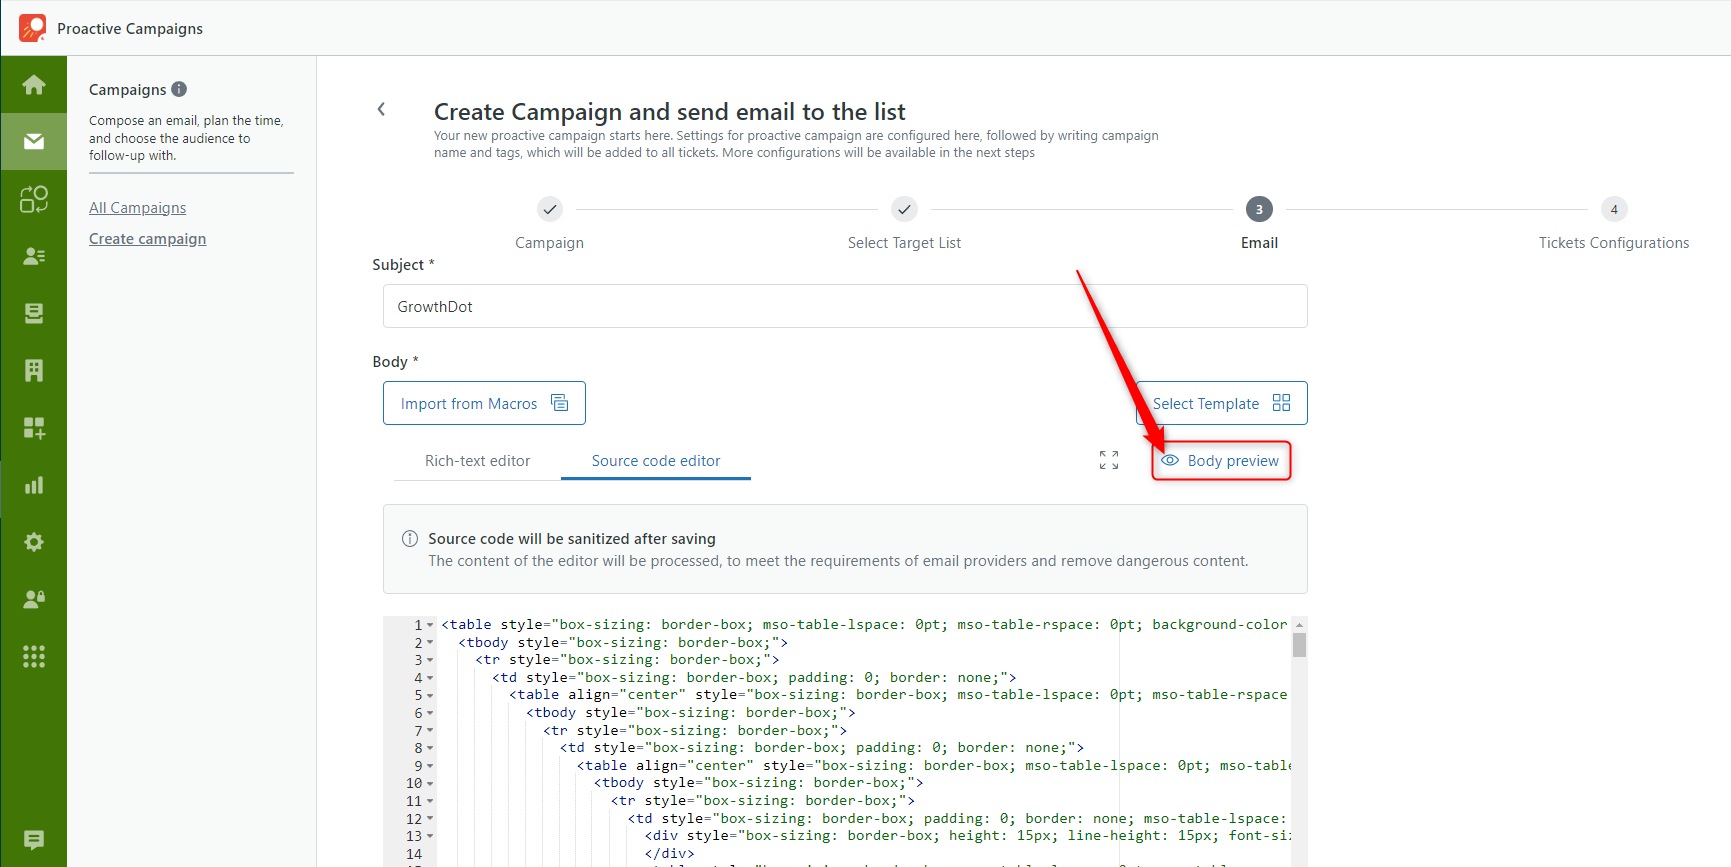
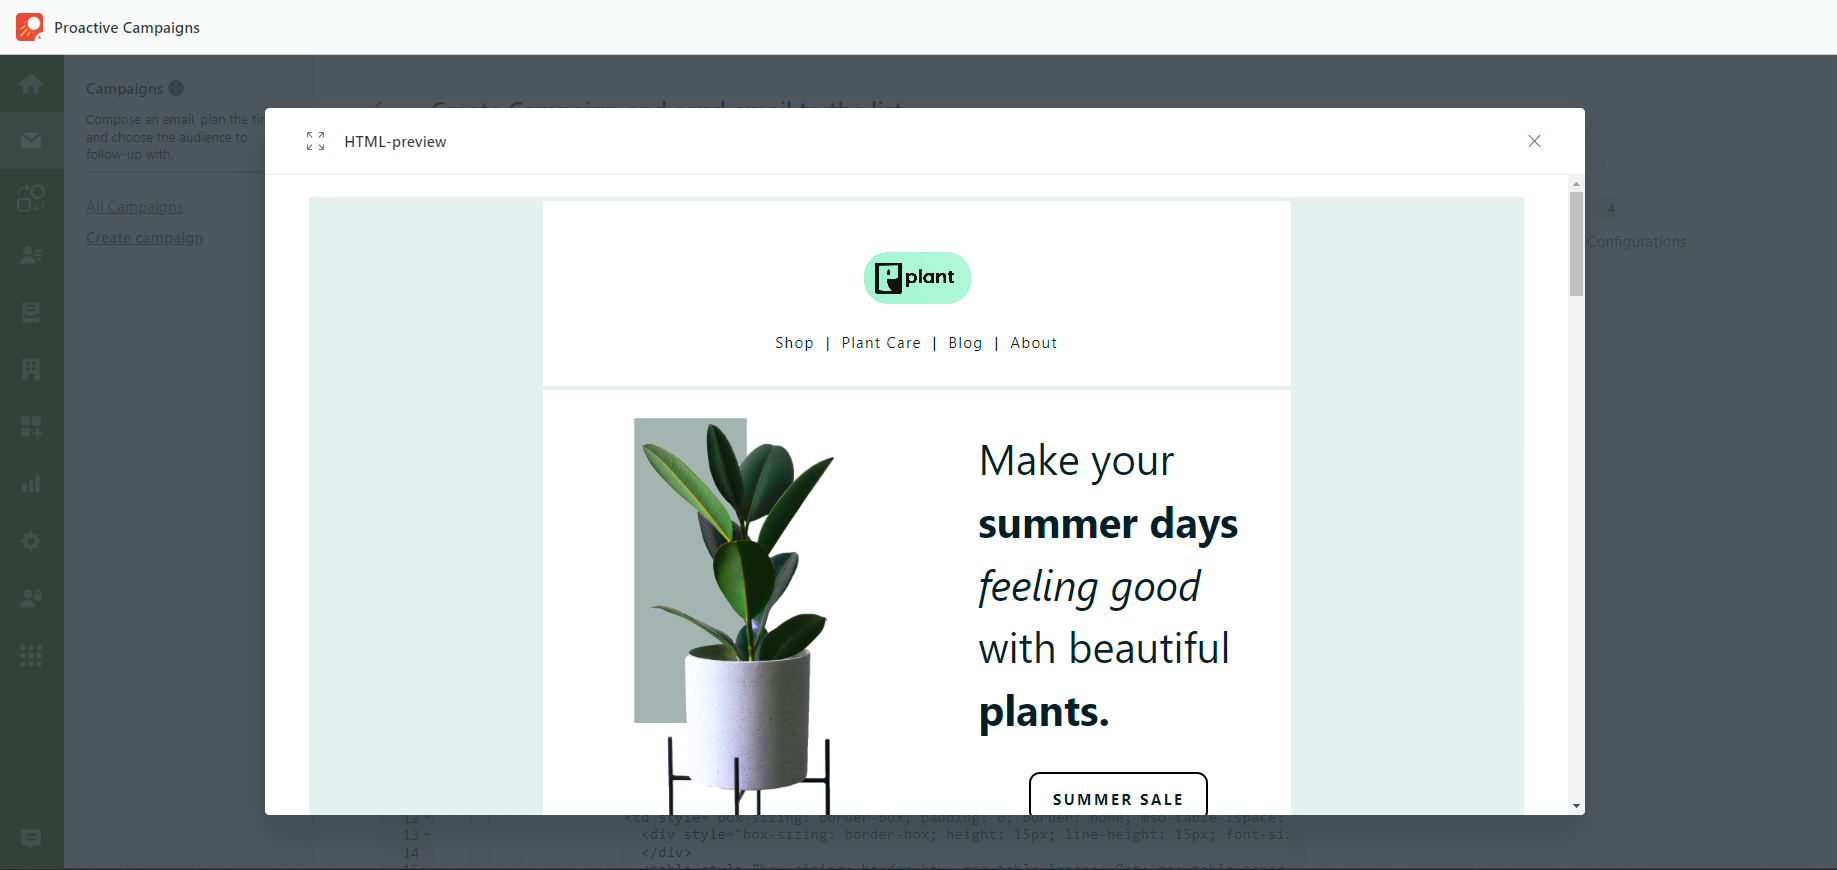
The HTML Preview Mode
If you are a frequent HTML code user and prefer creating emails through the Source code editor, the Body preview option would definitely be helpful. So, after you create an email or select an HTML Template, click the eye button, and you will see how a recipient will view the email. Besides, this option is also available on Automations and Templates tabs.
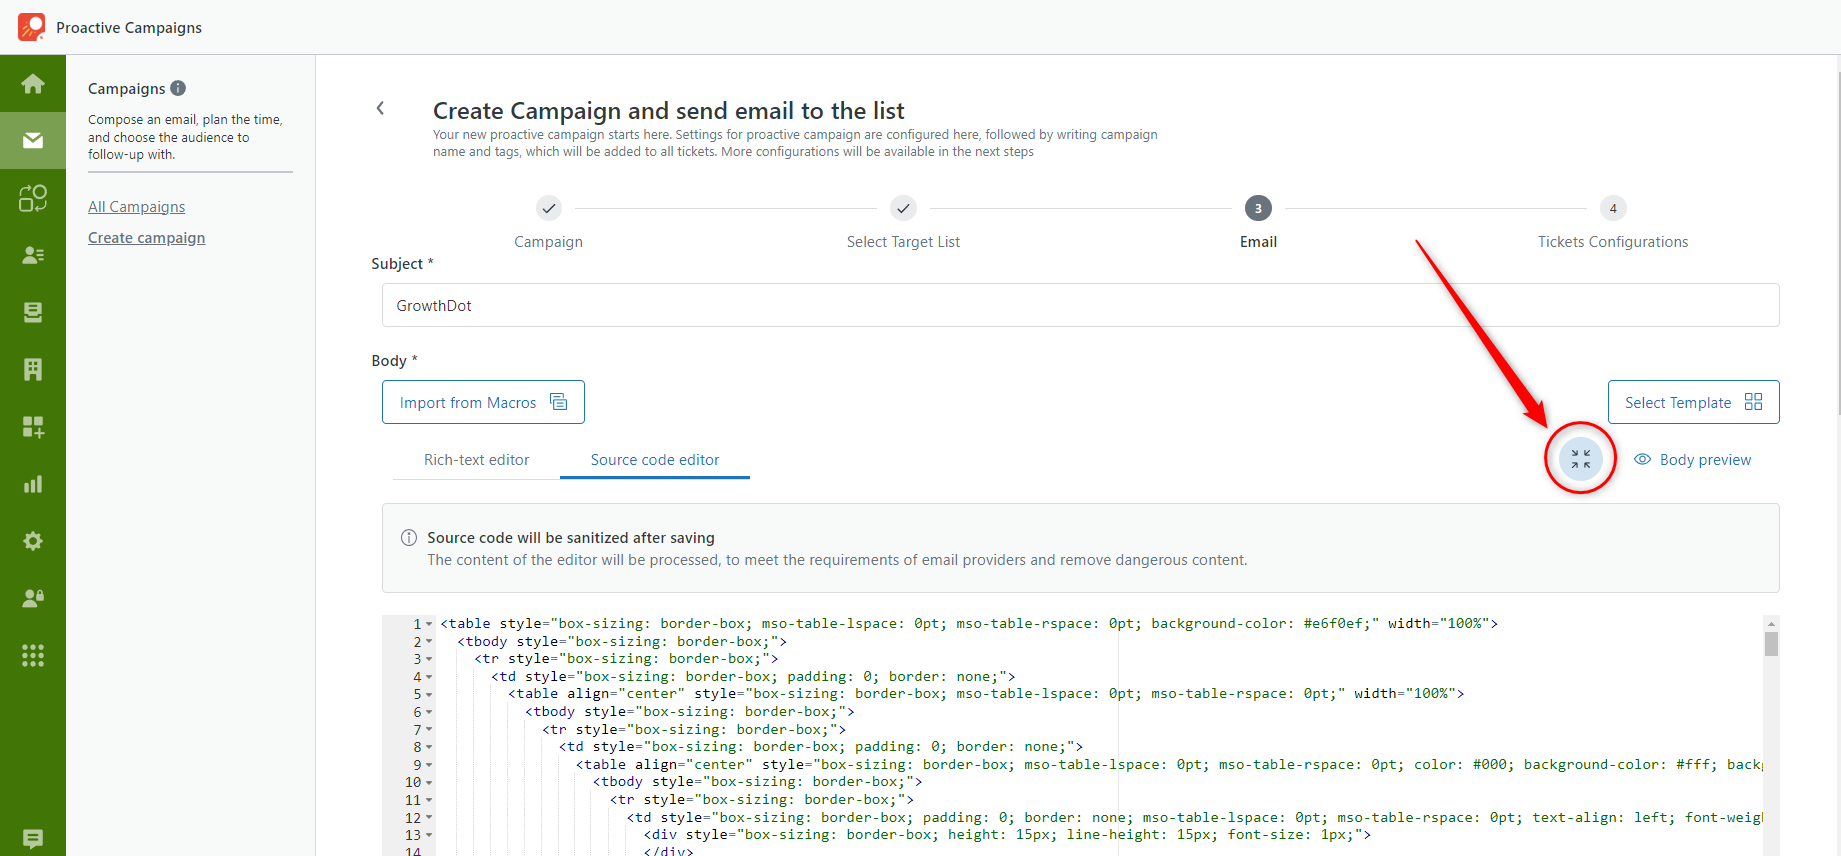
Expand the Editing Area
Another small update we want to share is the Expand editor feature. For more convenient work with Proactive Campaigns editors, click the button shown in the screenshot below to make the editing space wider.
Meet our Core Update!
We have recently announced the core Proactive Campaigns update - Automations. Now we are happy to inform you that you can are the first who can try this feature. You will find a new tab on the application sidebar, as shown in the screenshot below. So, go to the Automations tab and click Start a 7-day free trial. That’s it. Create your own automation and make communication with your customers more reliable and efficient.
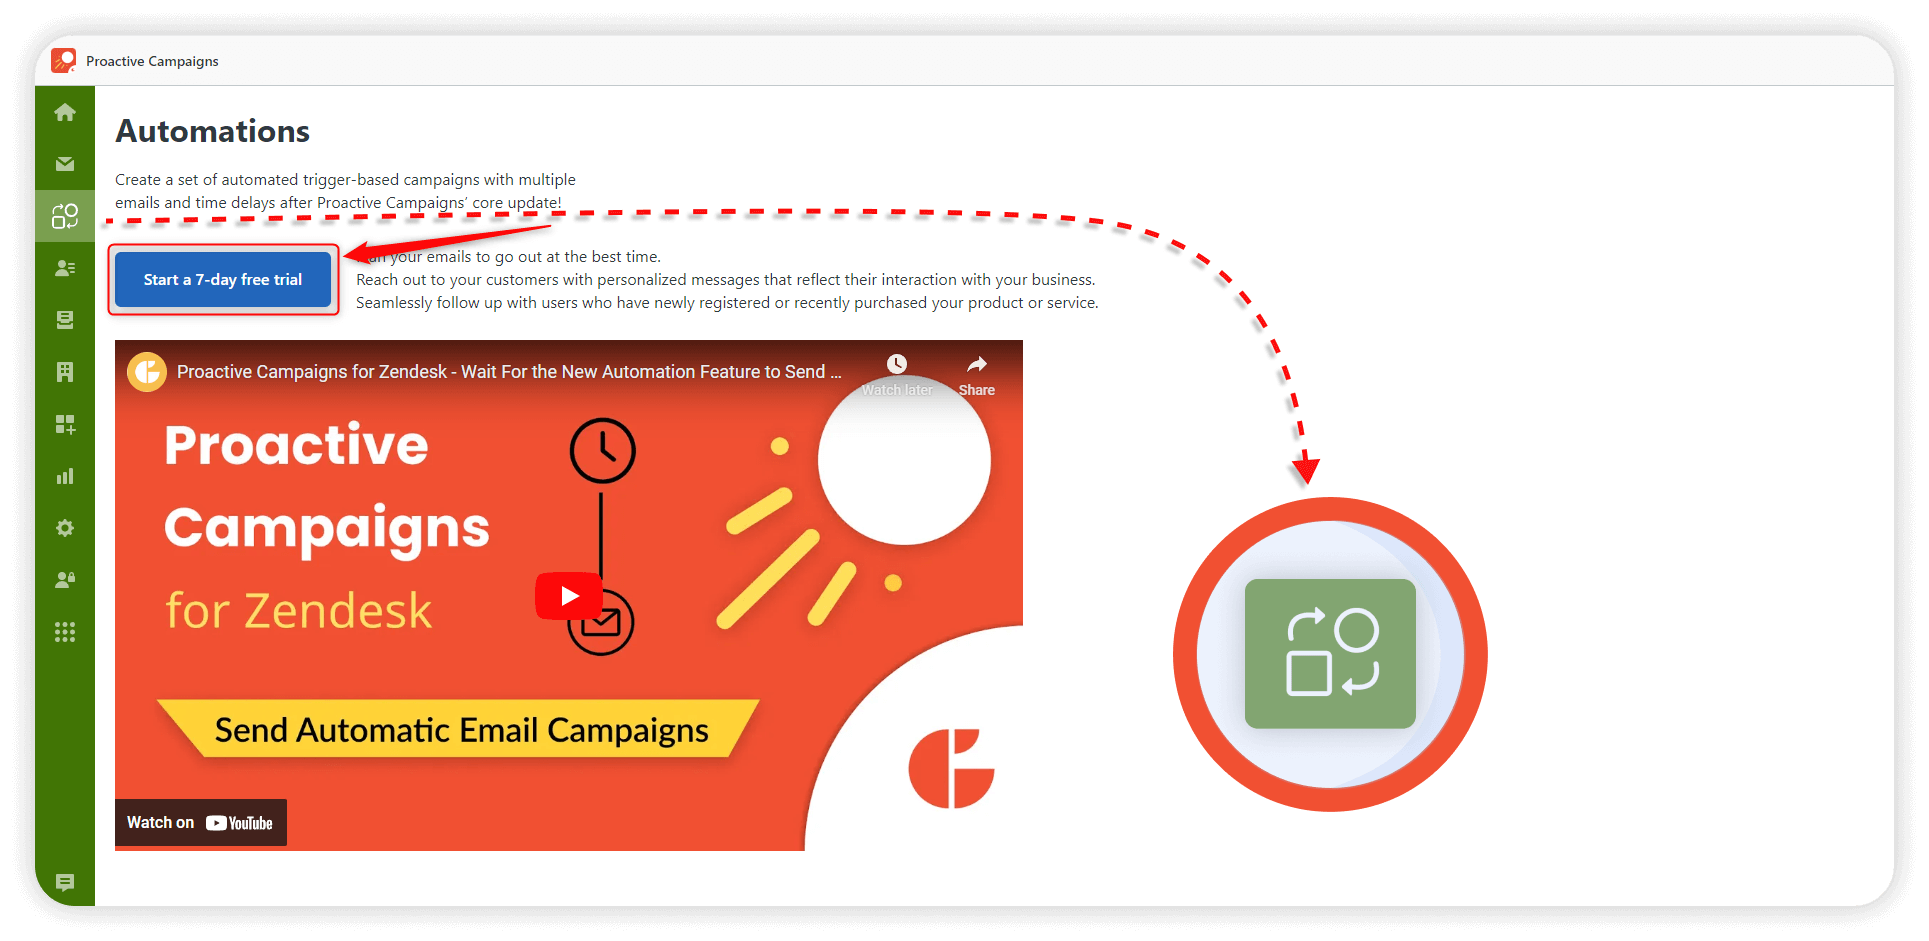
The Comming Soon Feature - Automations
You most likely have ever gotten an automated email after the program purchase or payment transaction is done. Unfortunately, Zendesk does not provide an option to send automatic mass emails, and considering that, we started developing such automation as a part of Proactive Campaigns. This core update will give you the opportunity to create the whole path of your customer interaction and adjust sending emails. Besides, you are also will be allowed to delay sending emails and automatically update user fields.
You will be the first who can try this feature, just monitor the application sidebar, and you will see the new tab there!
Surely, we will inform you about the automation feature when it is launched.
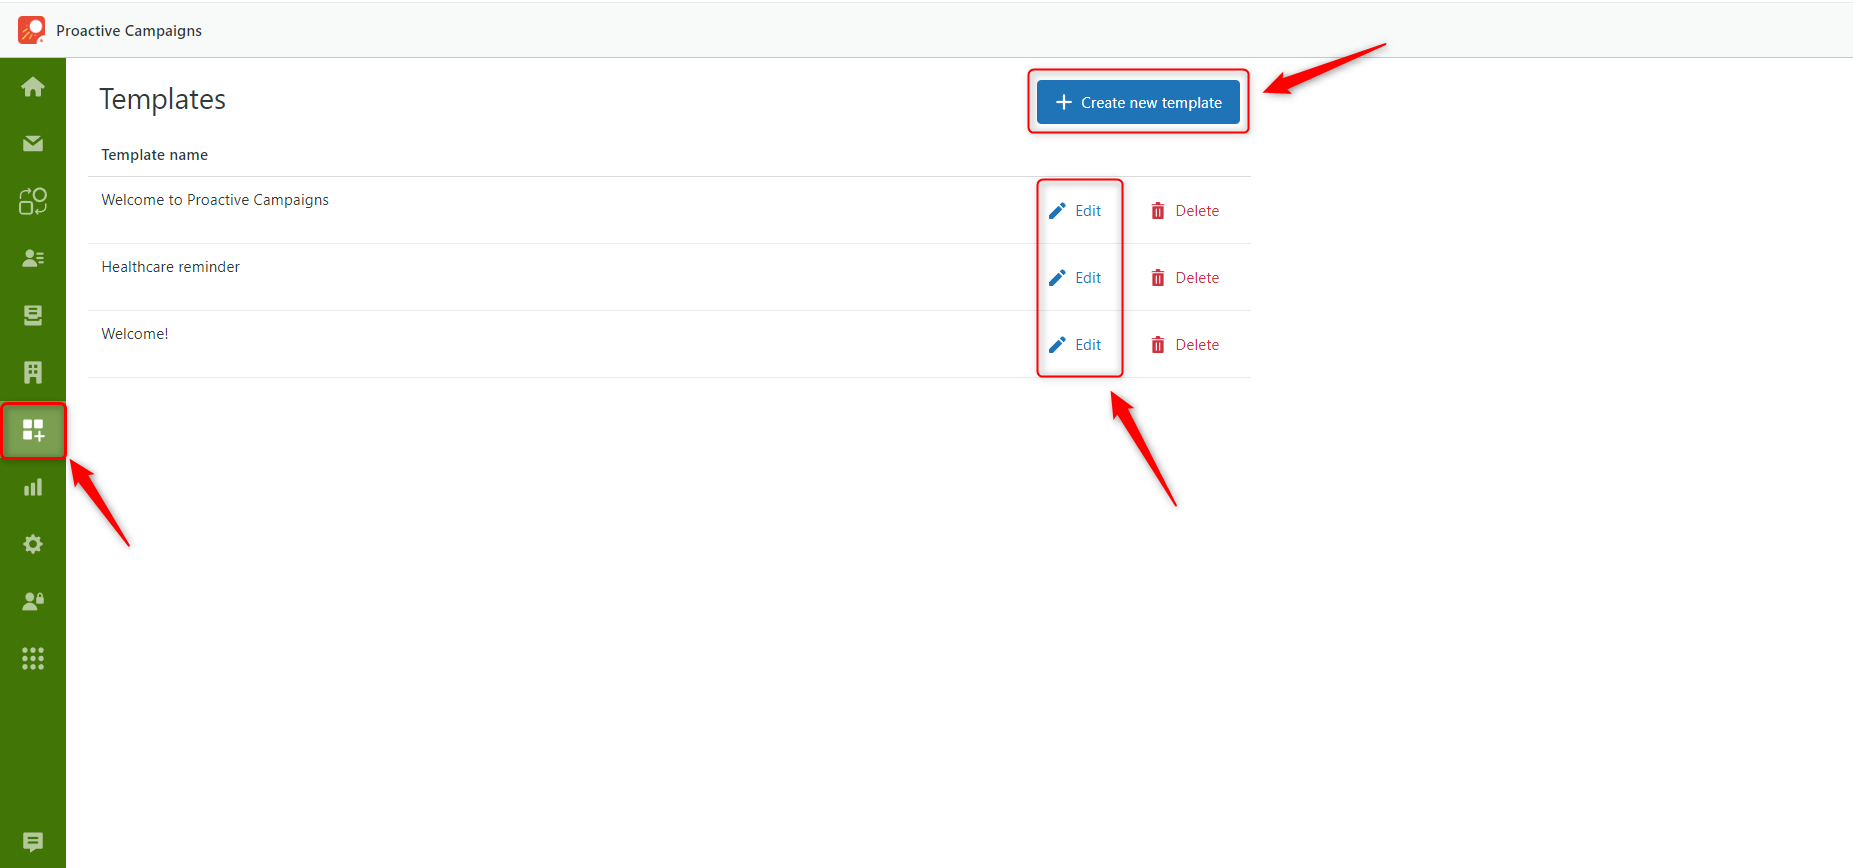
Keep all templates in one place
For your convenience, all templates you can find on a separate tab in the Proactive Campaigns sidebar. So now, create and manage templates in one place. No worry, as at the third stage of the campaign creation, you will be able to click the Select Template button as before and upload the requirable item.
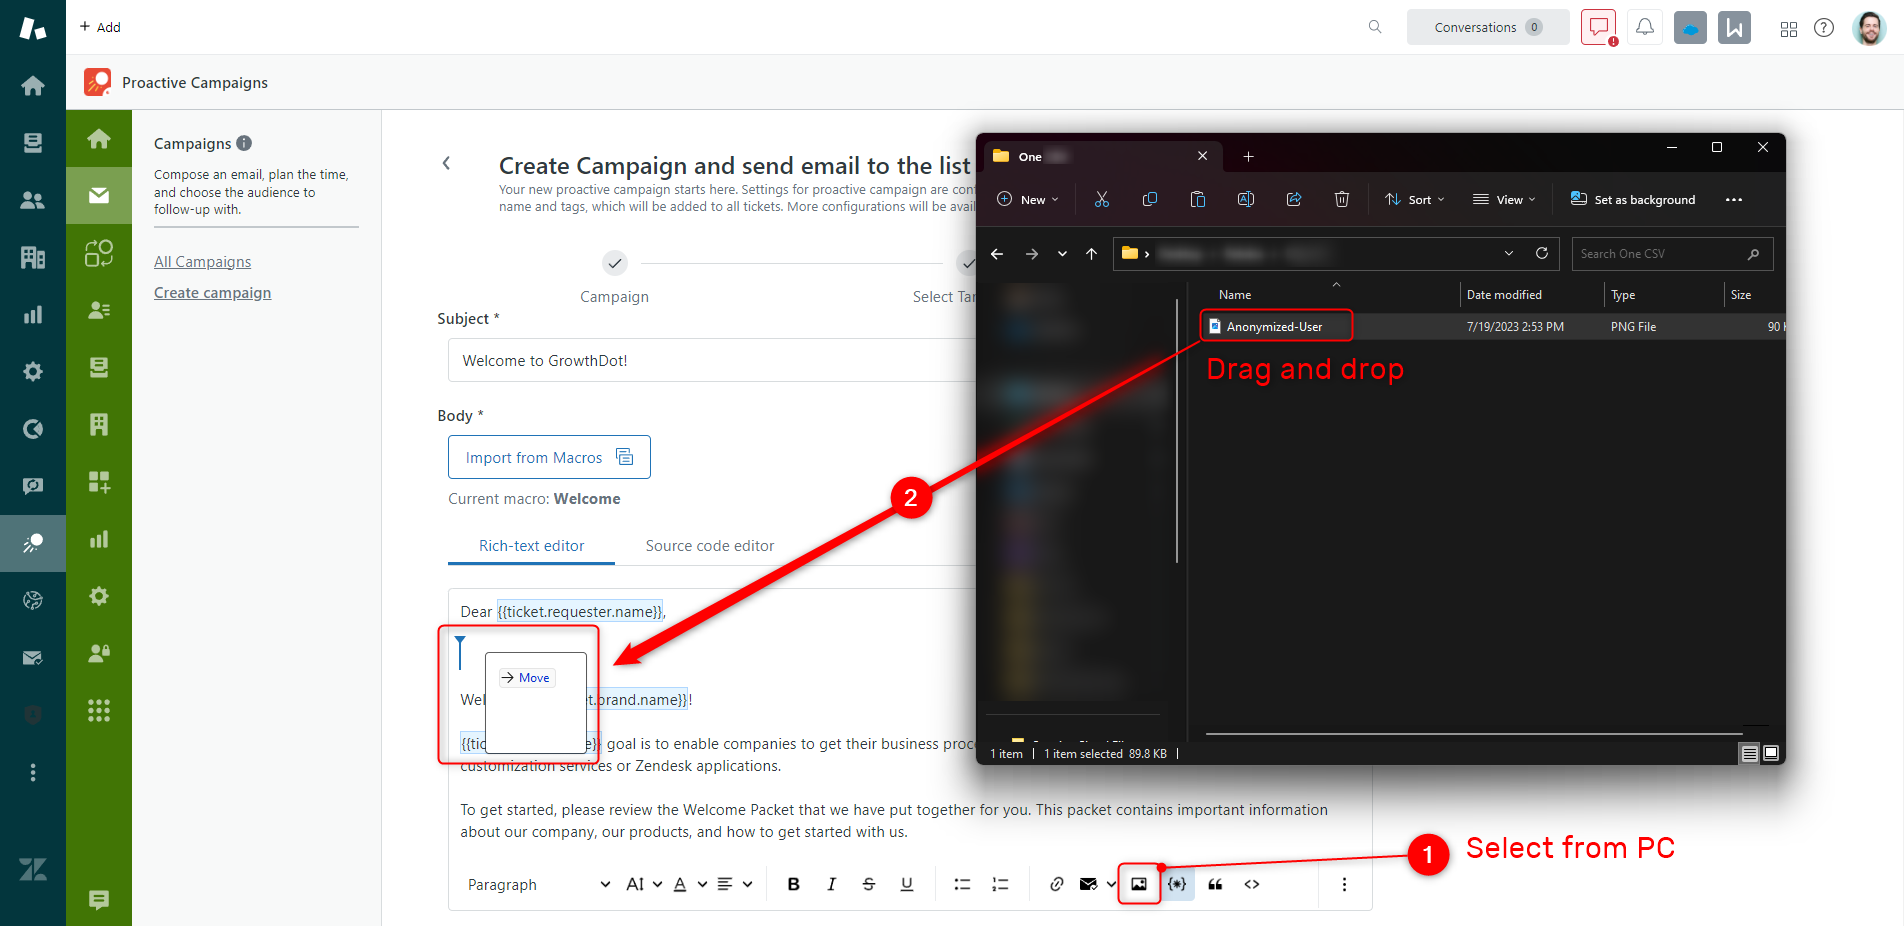
Upload Images to emails
A new important update allows you to upload images to your emails in most in-use formats. There are several ways to do so. For example, you can click the Insert image icon on the tools panel or drag and drop a required file into the email body area.
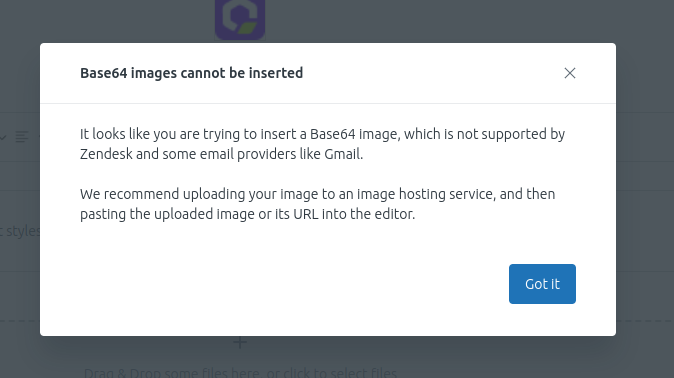
Besides, you also can insert an image in Base64 format but only with the Pro Plan subscription. In case the image link is being tried to be replaced with the Base64, you will see such an alert.
The Text length in the Description
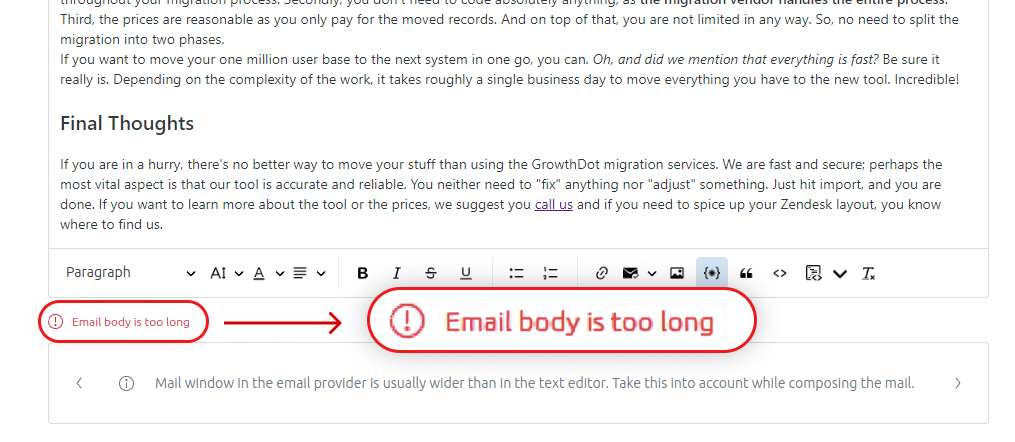
From now on, the number of symbols you can type in the Body field is 65 535. Therefore, make sure that your text consists of symbols that are not over then this number. Such changes help optimize the workflow of the application.
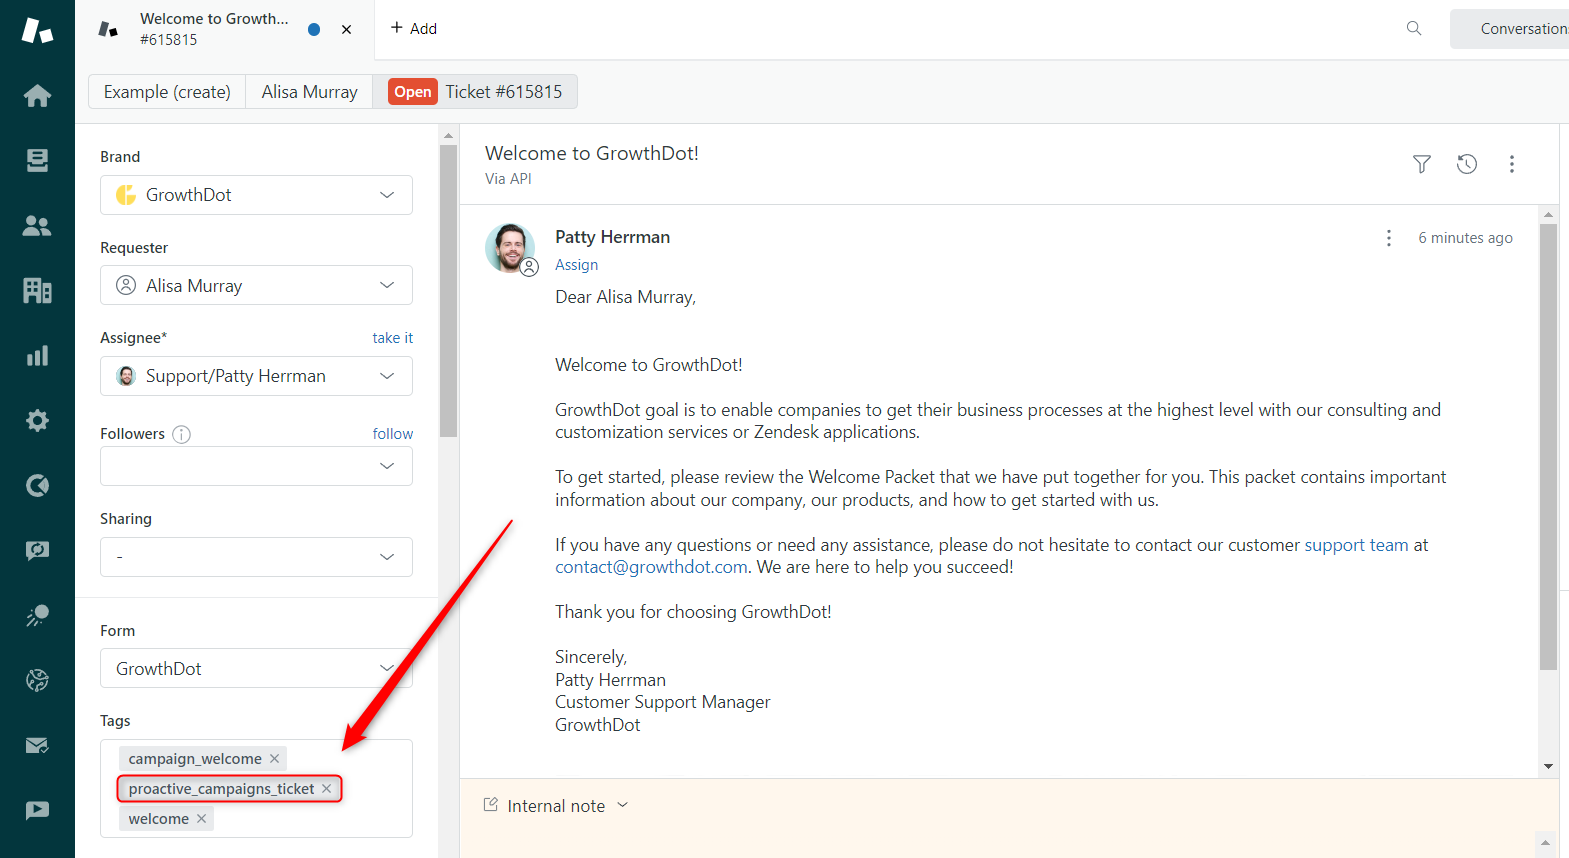
Identify Proactive Campaigns’ tickets easily
Have you considered how you can monitor email marketing performance when using the Proactive Campaigns app? Now it is possible to filter tickets that were created within all companies. So how does it work? When the application creates/updates tickets, it also adds the proactive_campaigns_ticket tag.
Small hint. Based on this tag, you can create reports in Zendesk Explore and analyze the success of all campaigns.
Free application on Sandbox
To give you more opportunities in campaign testing, we now offer a free version of the Proactive Campaigns app! All you need is to have the Zendesk test platform. As this integration is for your Sandbox account, you can launch campaigns and test other features. To get the free application, contact our support team!
Updated Homepage Interface
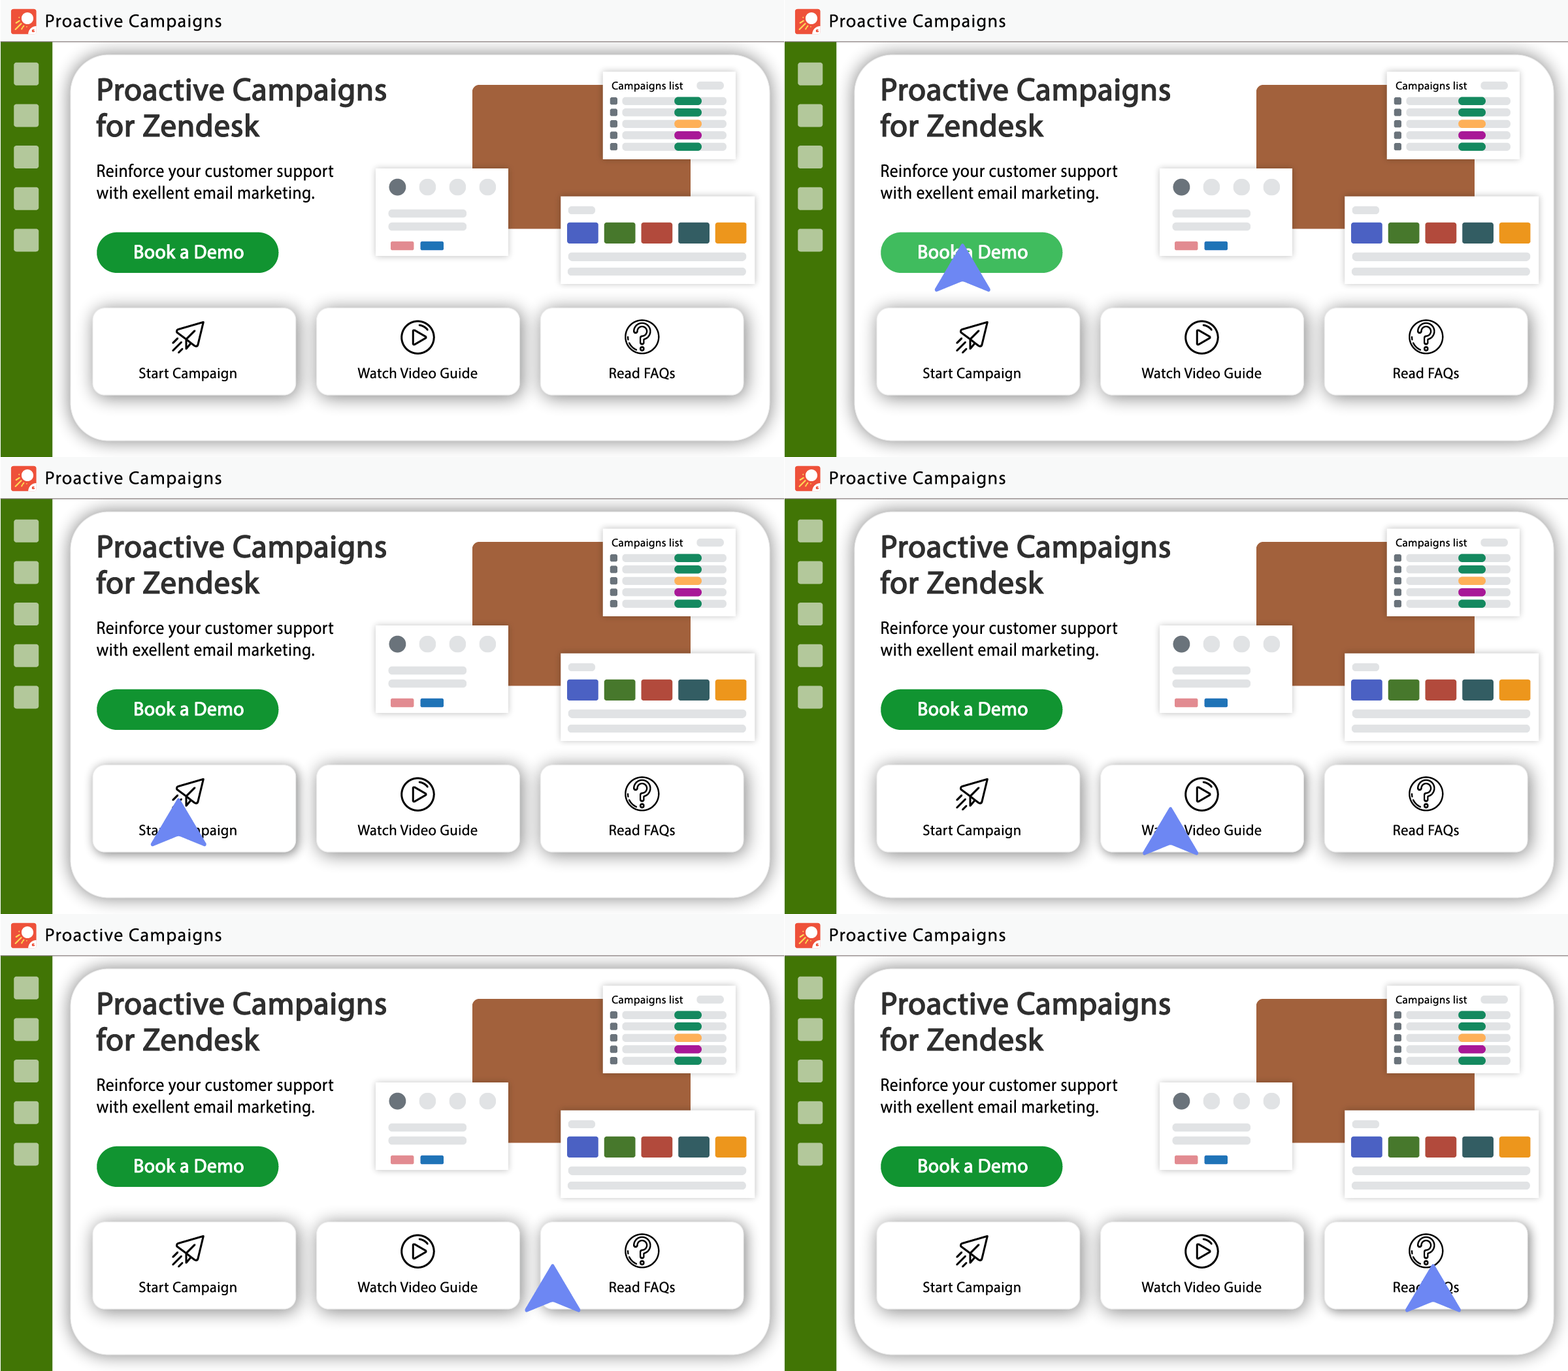
We work on the app's improvements daily as we want you to have a positive experience. Therefore, we have the new look of the app's first page. Here you can book a demo with our support team, start your first email campaign, view video tutorials and read the related articles and guides. Simply click on the thematic box, and you will be taken to the required topic.
Link tracking for Proactive Campaigns
If you are a user of both Proactive Campaigns and Email Tracking, a new update will make customer interaction more informative. So, now you can not only track email campaigns but links applied to them. To turn on the link tracking option:
1. Directly click on the link and select an Envelope Icon from the appeared menu.
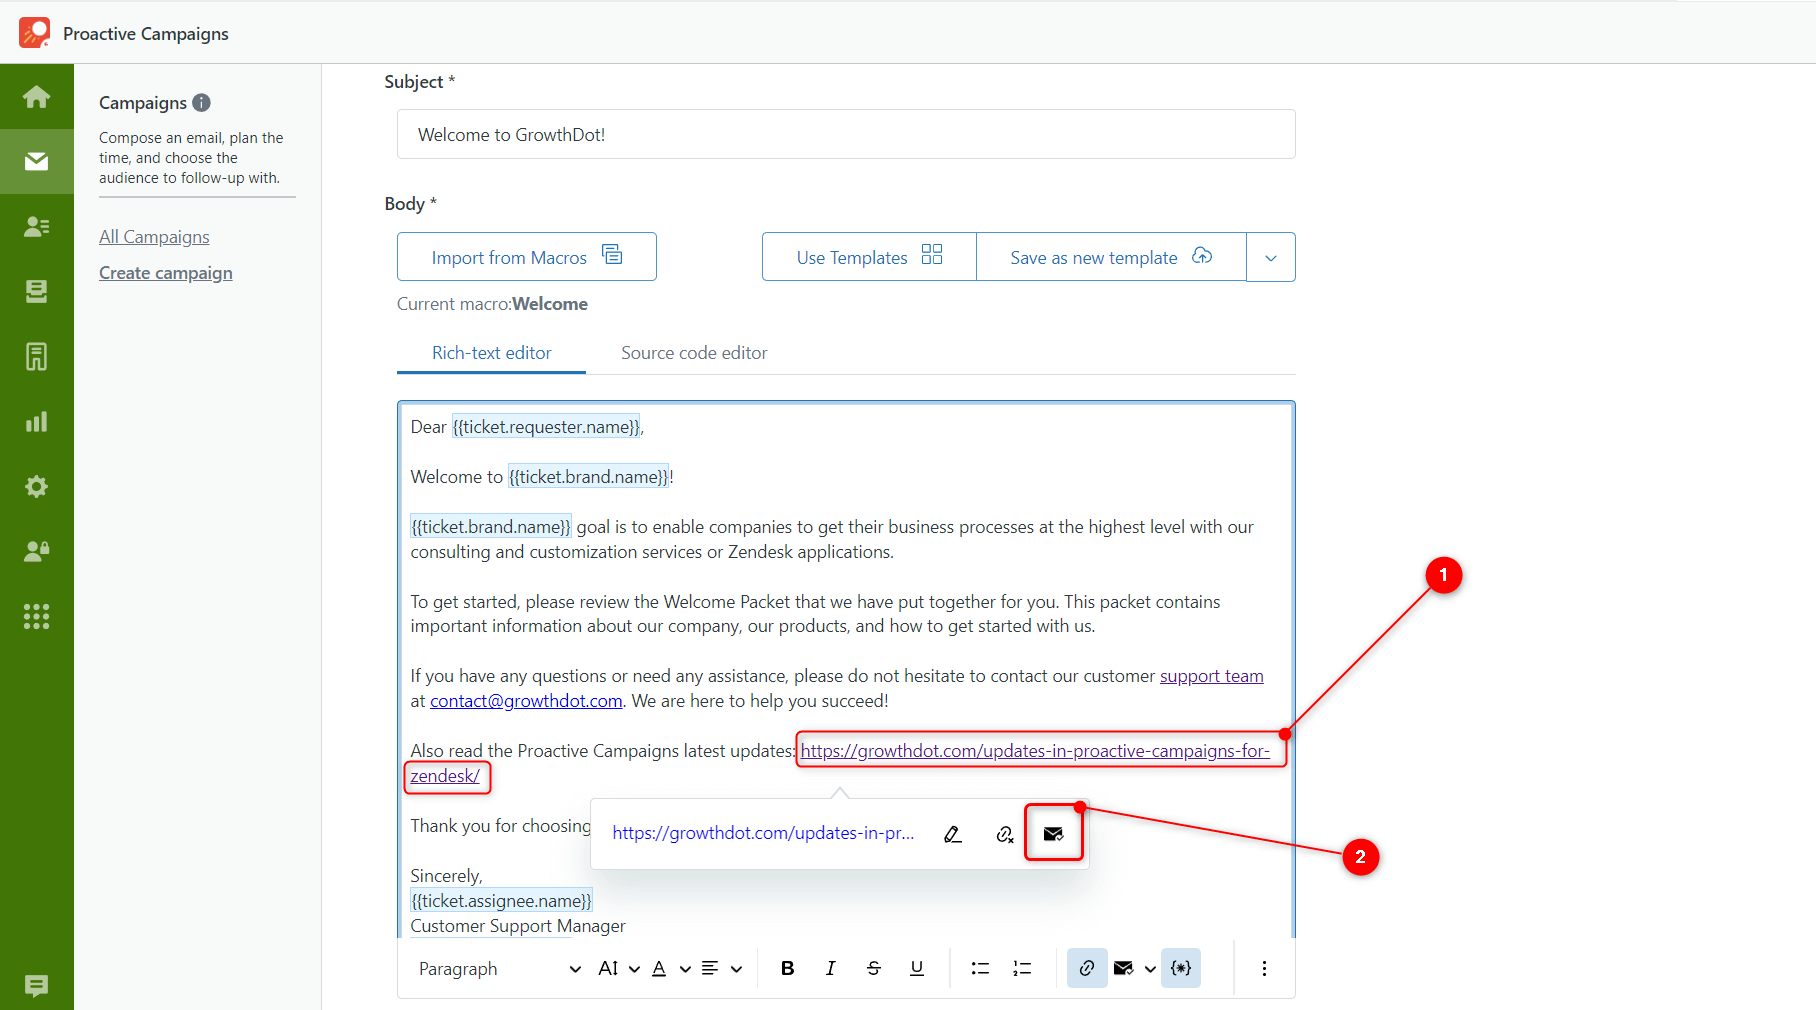
2. In case you need to track several links at once, click the same icon on the instruments panel of the body section. Then, select the requirable items, or put the checkmark next to the ‘Track all links,’ depending on your purpose. To see what links were followed by recipients, open the All Campaigns tab, find a necessary campaign, click on the Three Vertical Dots next to it and select Details from the proposed options. Then, find a Tracked links tab on the opened page.
![]()
The Campaign Details Page Improved
The campaign Details page got some changes. So now, you will see the blocks with general campaign statistics on the upper part of the page. The email Subject and Body are on the left. Besides, the configurations that were adjusted while creating a campaign are laid out on three tabs on the right (Campaign settings, Ticket fields, and Tracked links). Note that the Tracked links tab activates when the Email Tracking Add-on is installed, as well as statistics blocks with the email tracking info.
Field Mapping in Import Users is Updated
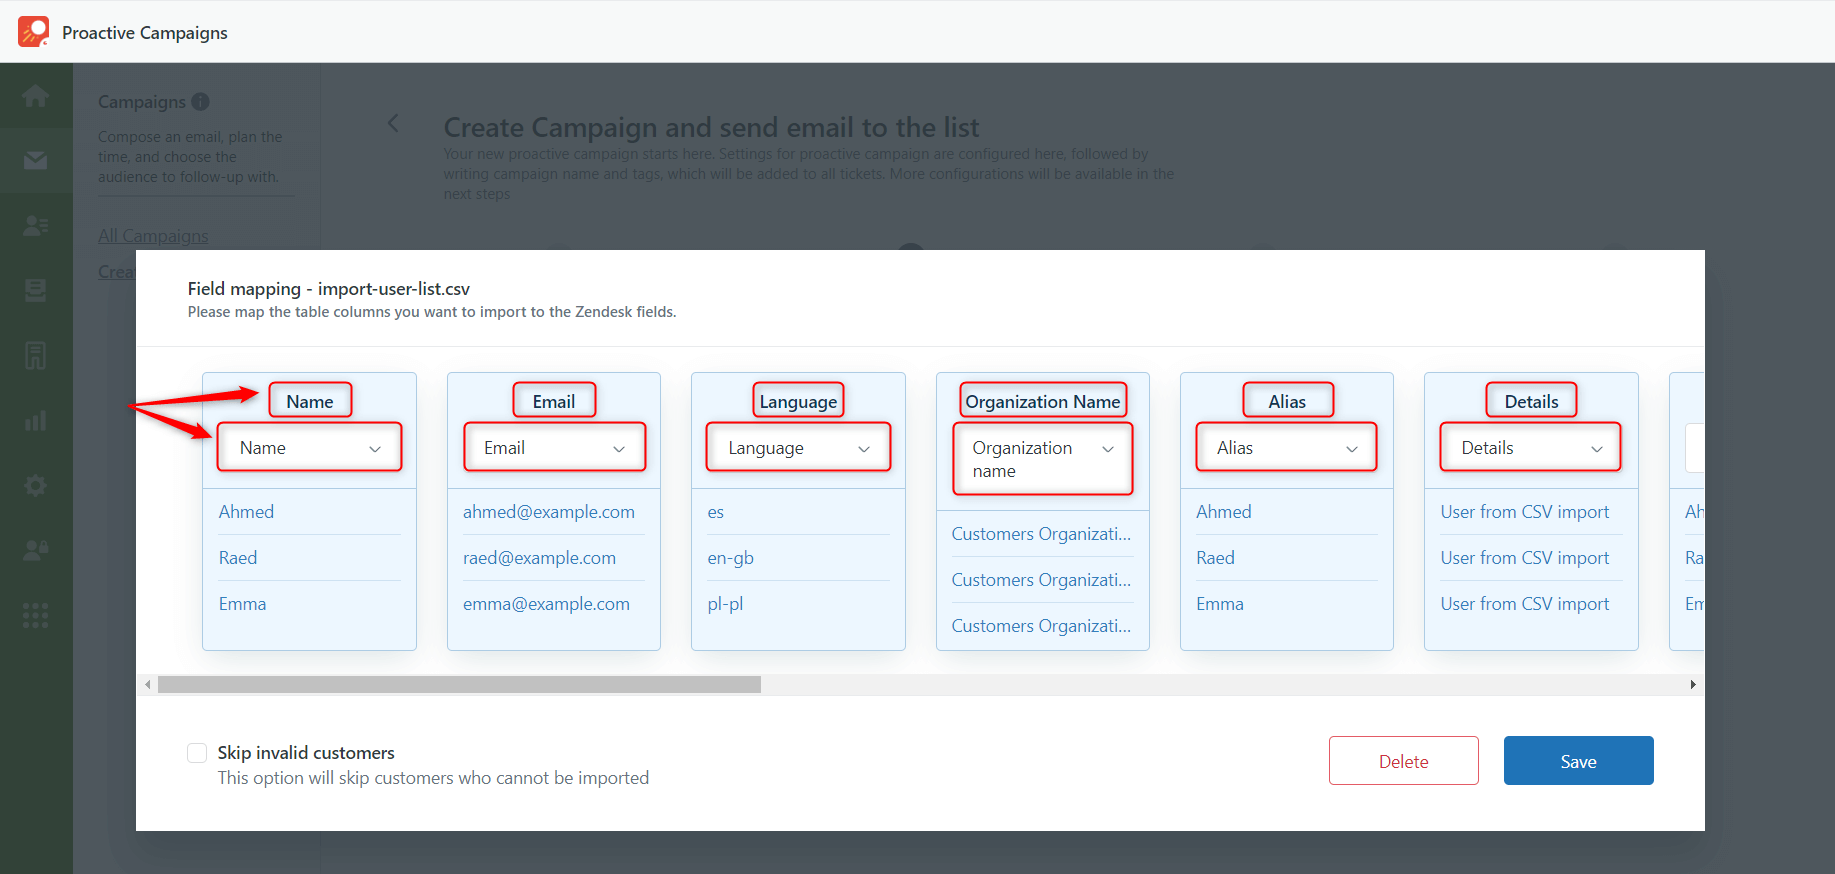
To improve your user experience, the field mapping now has an improved interface and enhanced options. After you import a CSV file in the second stage of the campaign creation, you see the Field mapping modal window. If column names in your document are the same as system and custom field names, then the mapping process will go automatically.
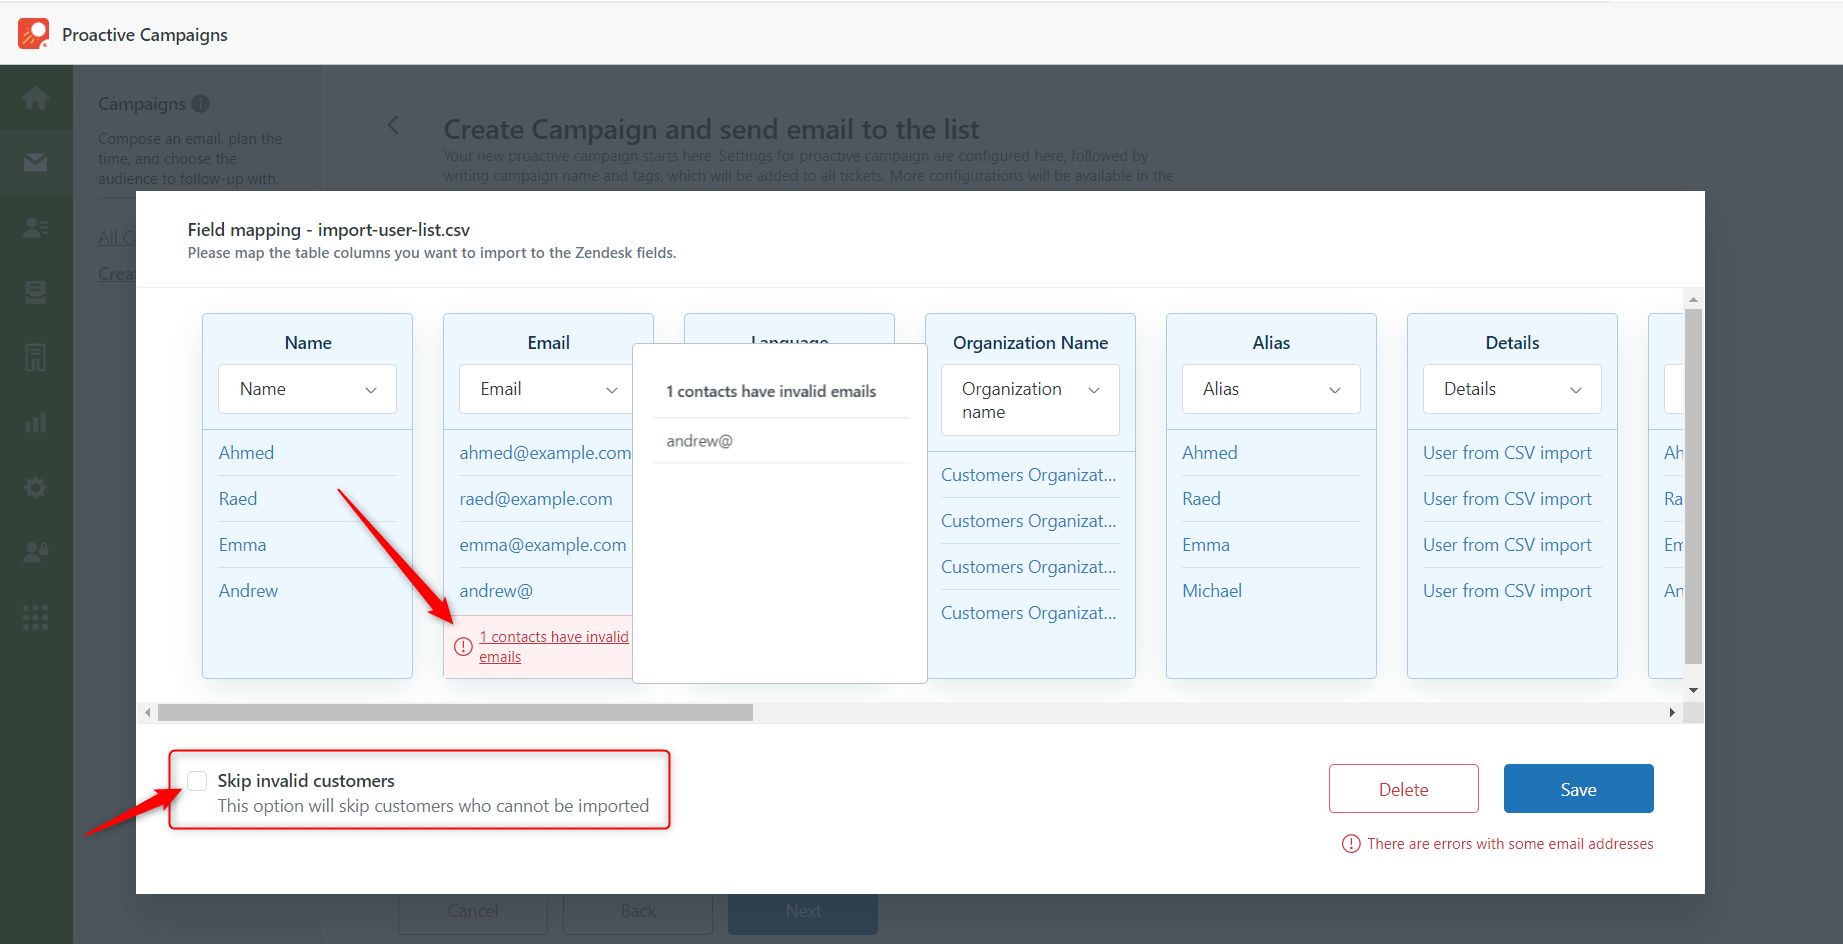
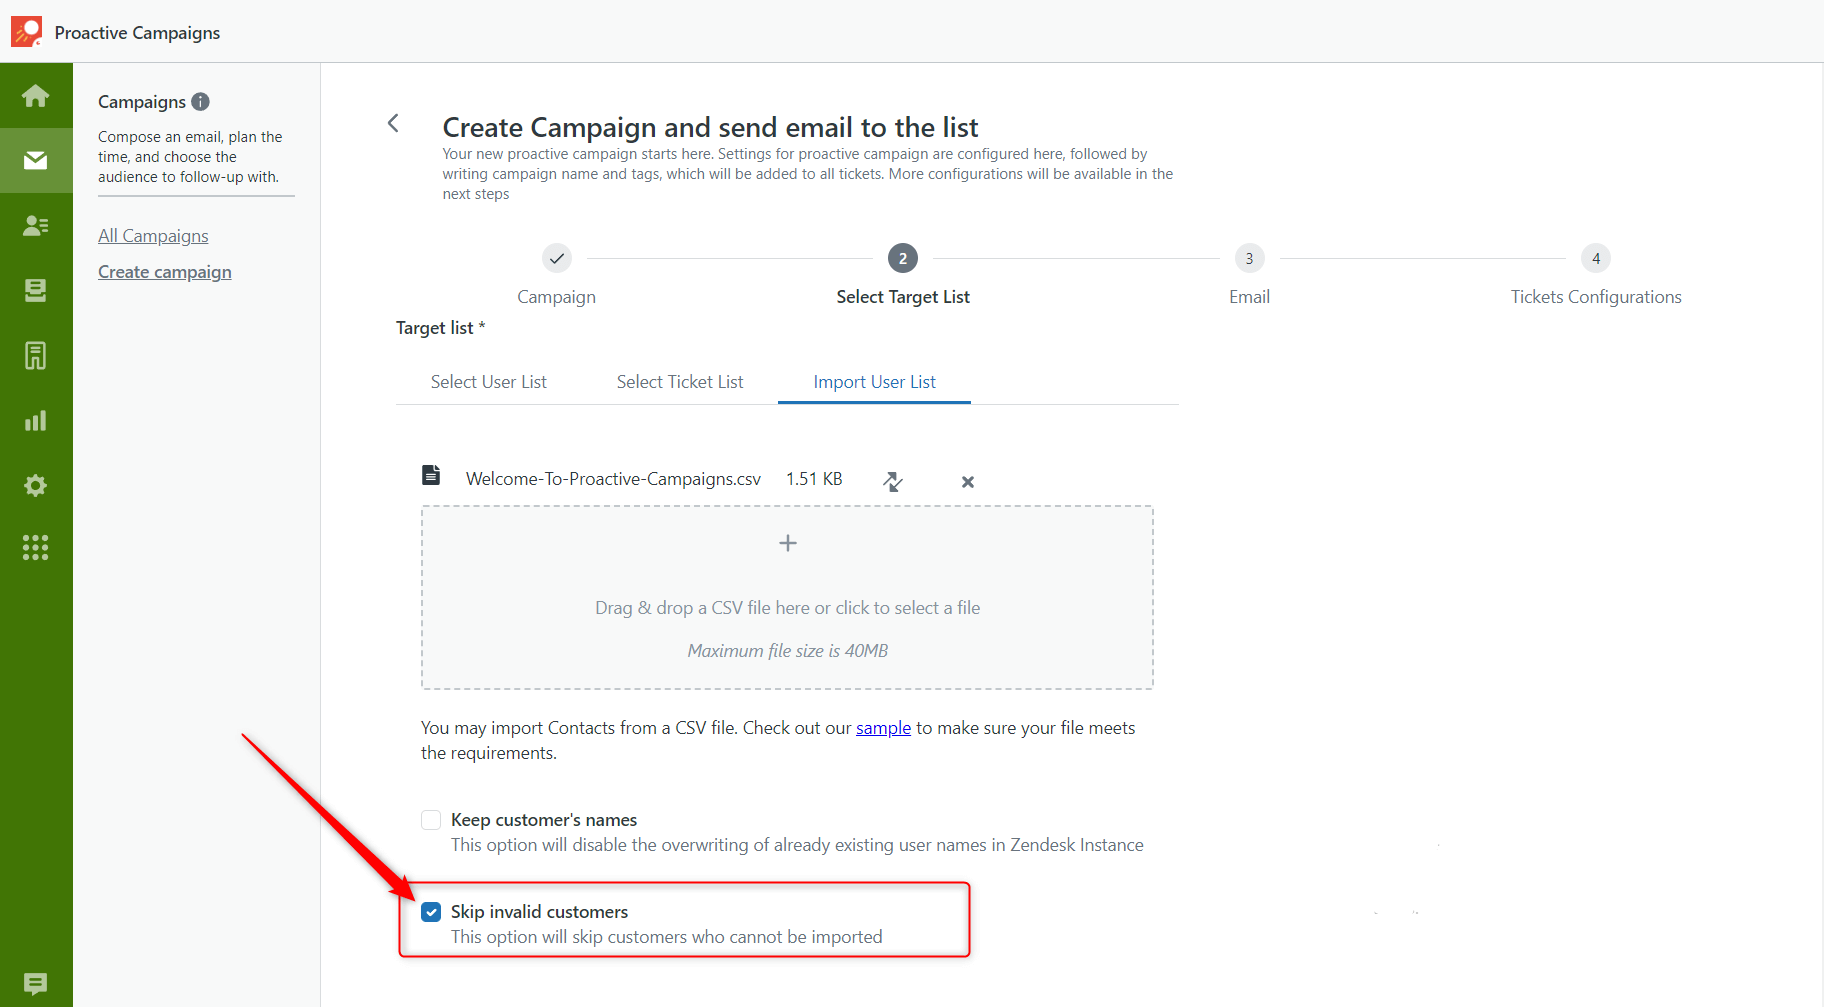
Possibly, you can see the red alert after saving the CSV file. It will inform you of the document's incorrectness, like the invalid name or/and email address. To overview what items are incorrect, simply click on the red alert. If you want to skip invalid contacts, and send a campaign to the proper ones, select 'Skip invalid customers' in the lower left corner of the modal window.
Besides, you can also import Facebook or/and X identities by creating separate columns in your CSV file.
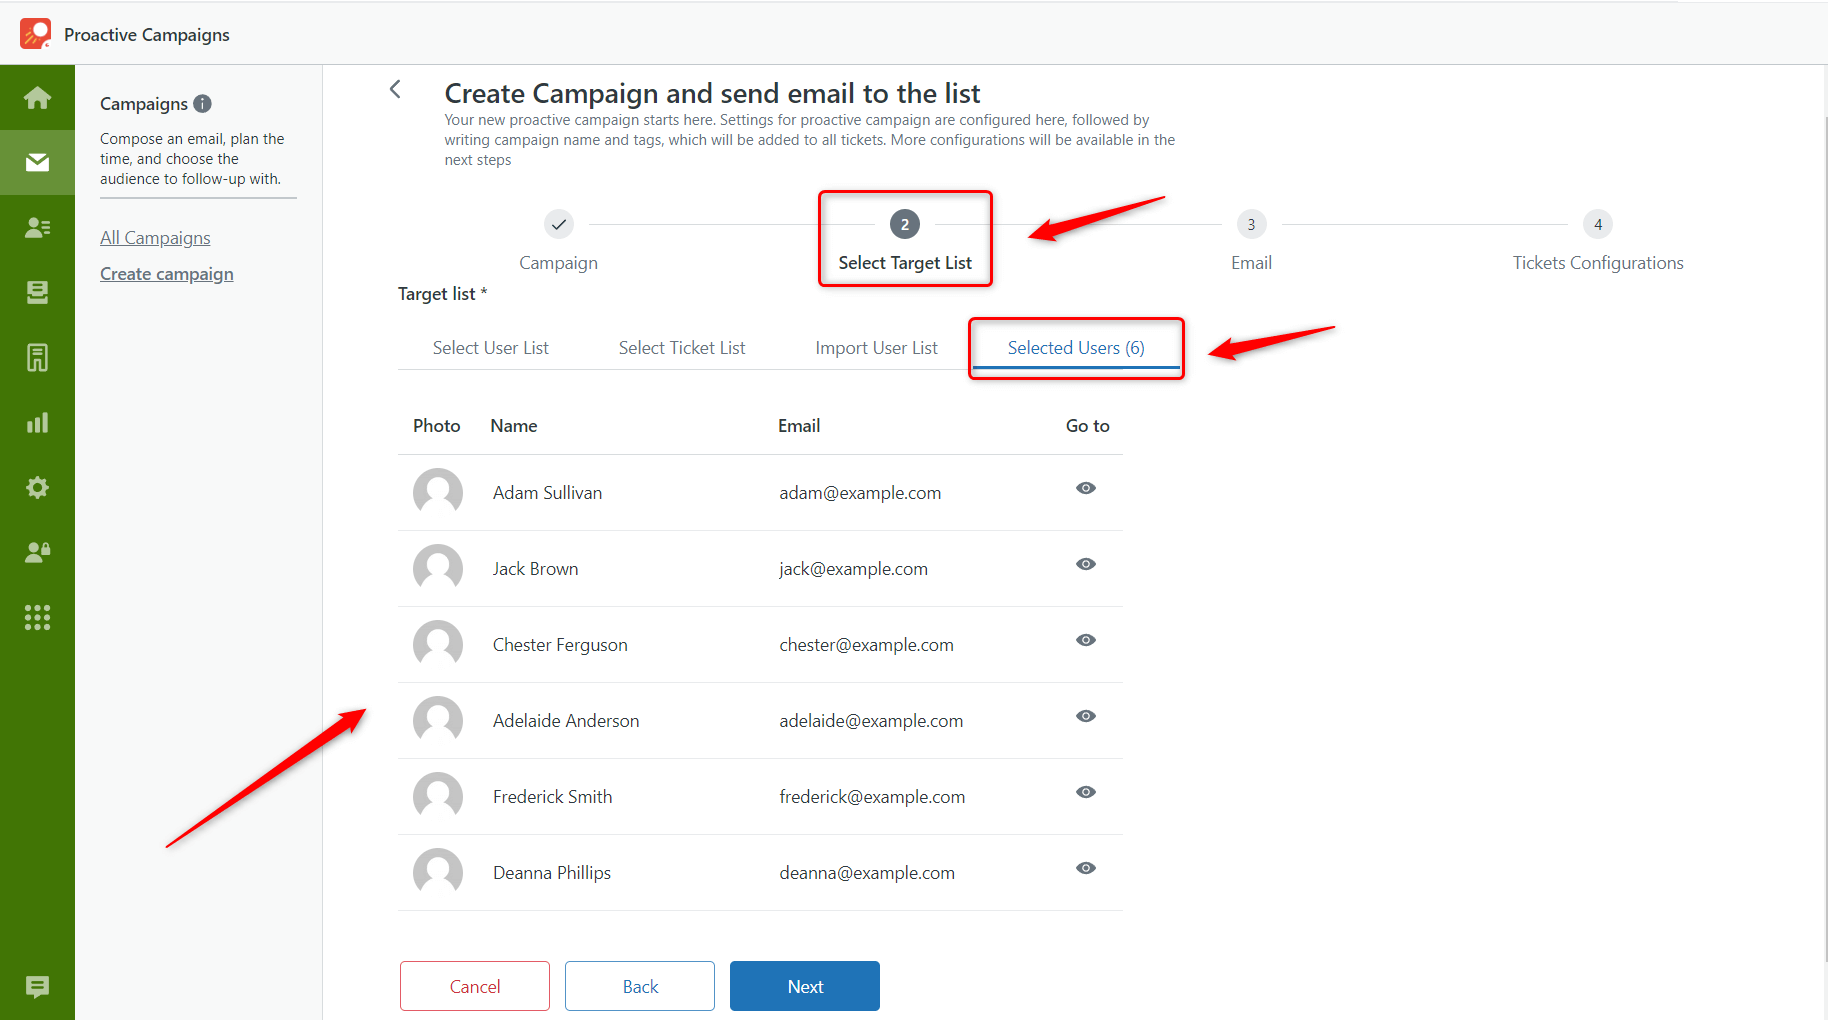
Select several items from a list
After this update, the selection process gets variety. Now you can open any list in the app and manually choose contacts, tickets or organizations to send an email campaign. There are a few steps you should pass. First, go to the Contacts, Tickets or Organization tab and select a list. Then, put the checkmark next to the necessary items, click 'Send Email to…' and choose Selected Users > Proceed in the modal window opened.
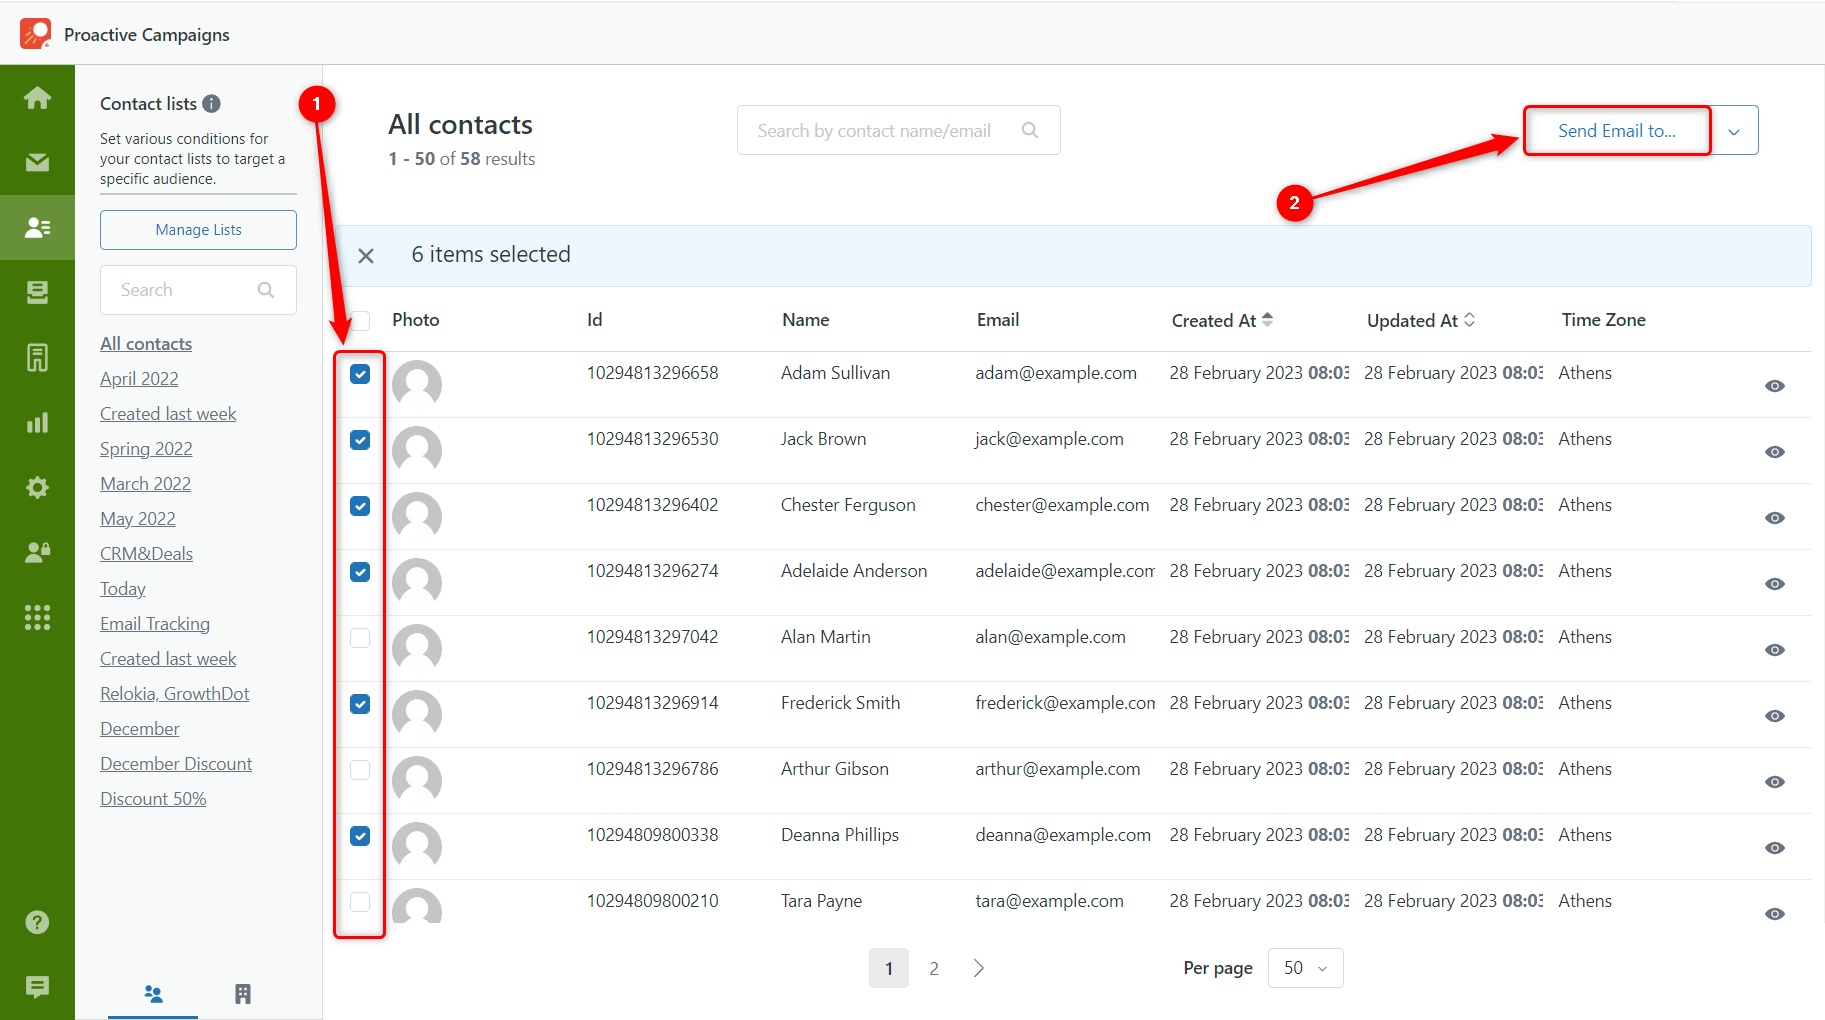
After, you will be taken to the Campaigns page, where you need to continue the creation. However, in the second stage, you will see a newly generated tab – ‘Selected Users.’ Just check out the list and go ahead as usual.
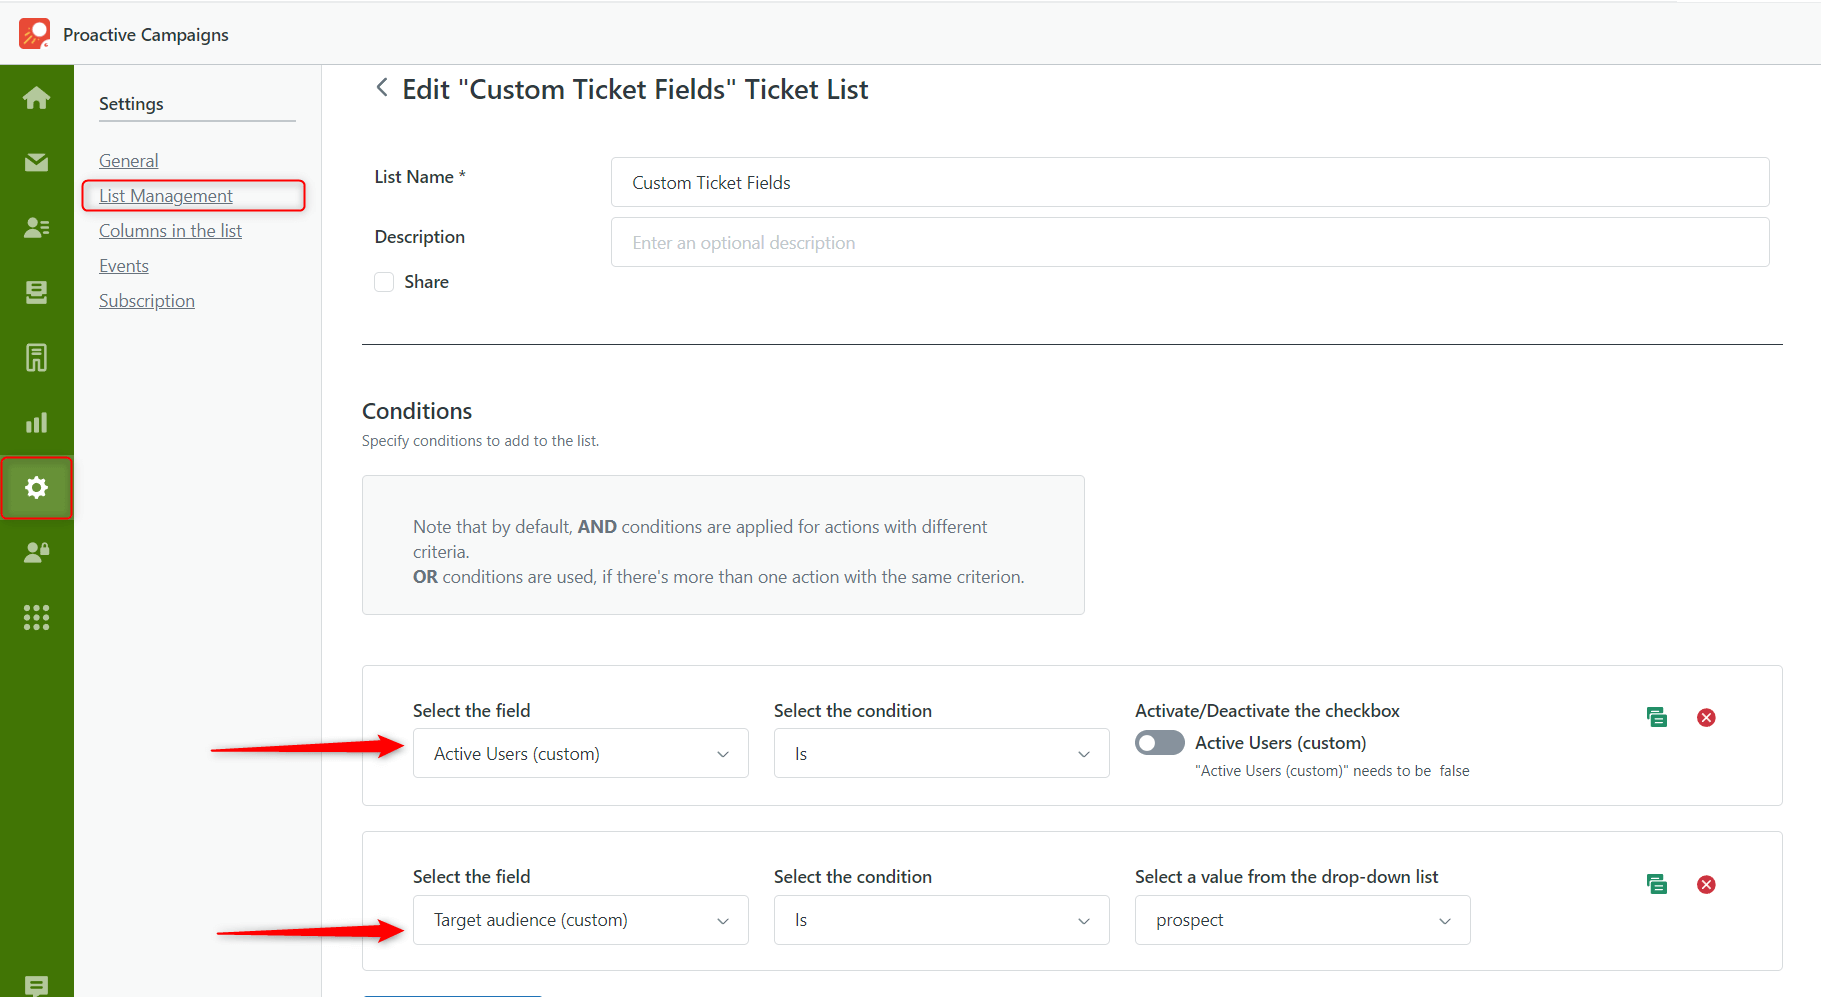
Custom Fields for Ticket Lists
We launched a new feature that expands the filtering capabilities of ticket lists. Previously, the application proposed creating lists based on system fields. But now, you also can use custom fields to make unique lists and segment tickets precisely.
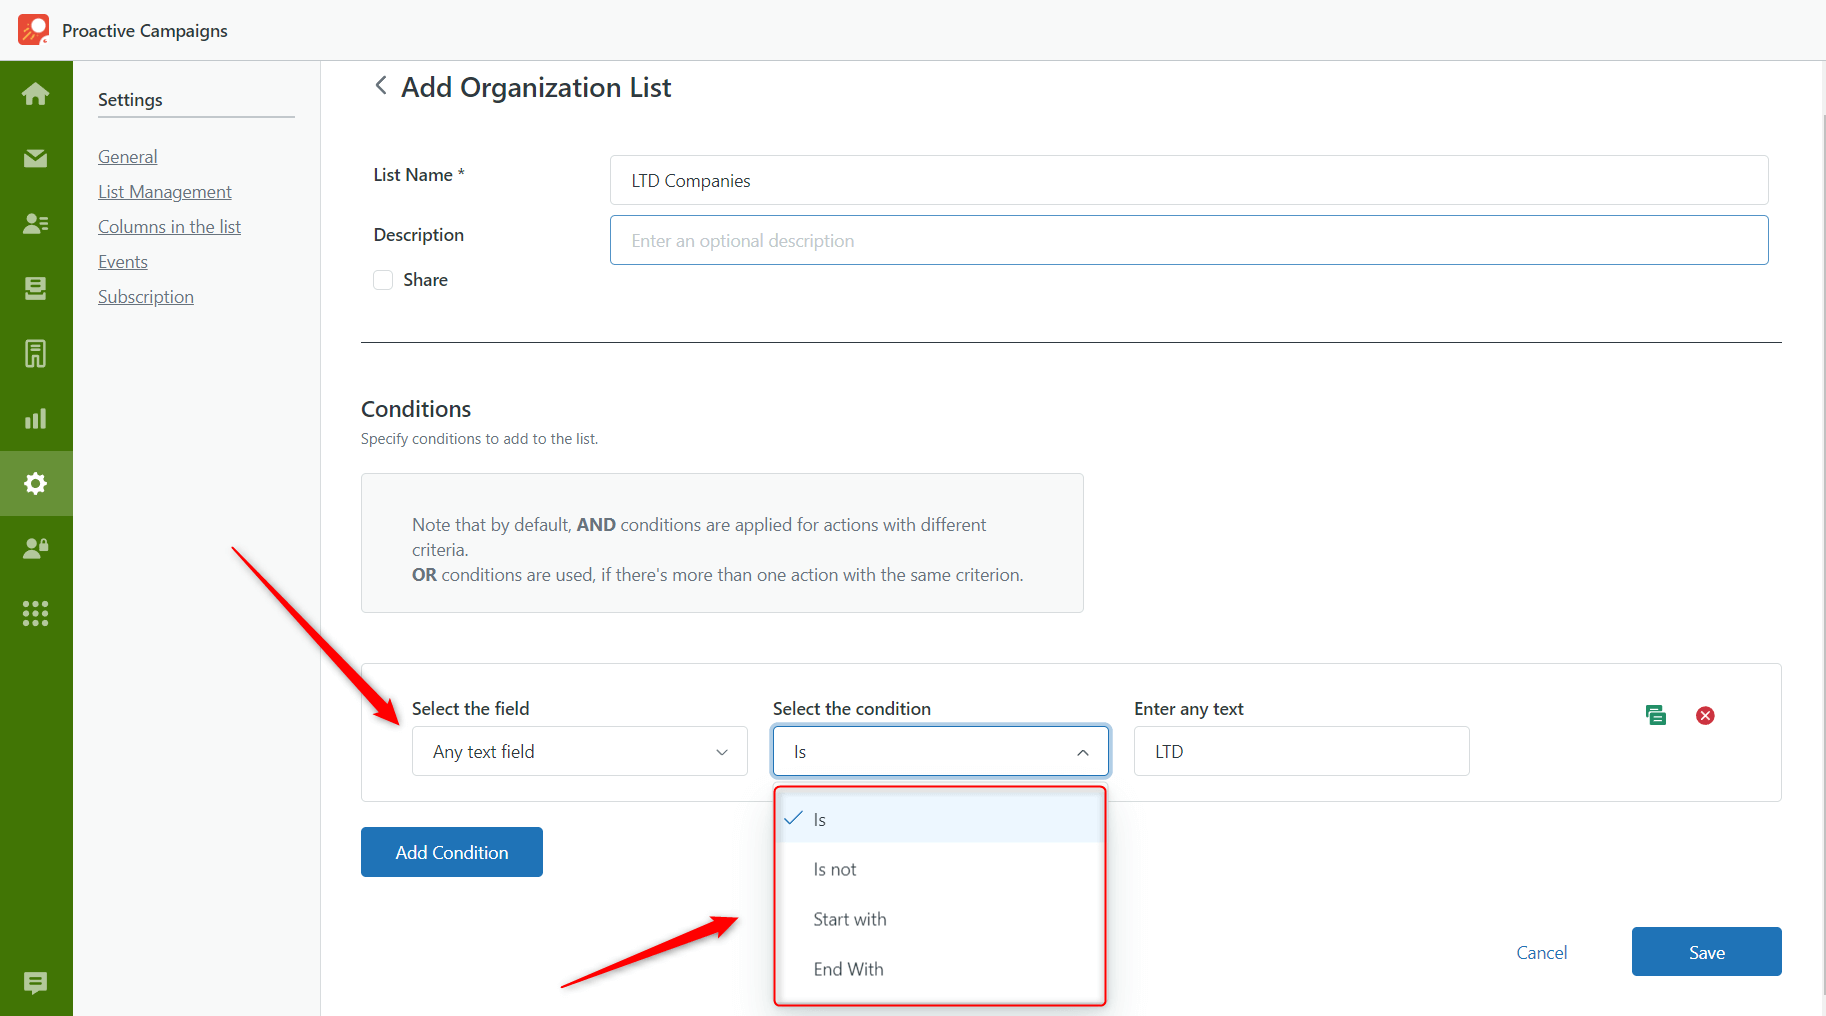
Fields Improvement
We want to mention our little updates. You can now use the Any text field for Ticket and Organization lists that finds items by keywords in all text fields.
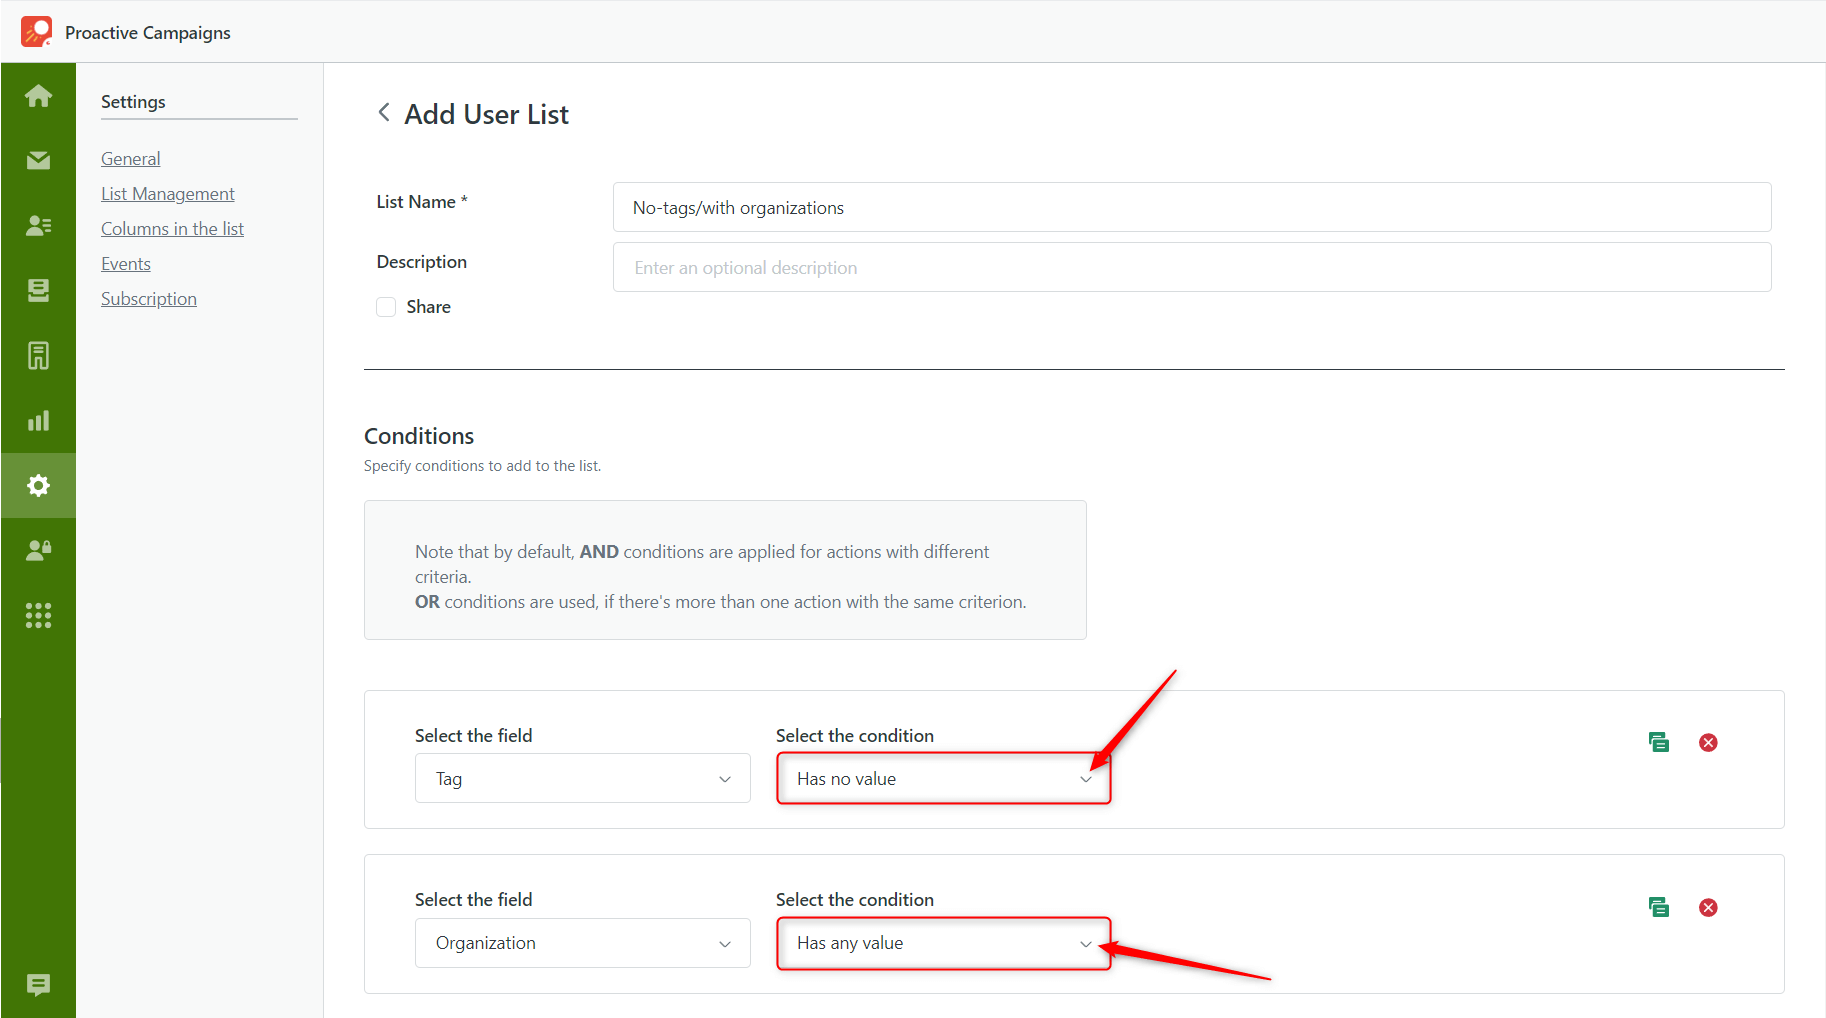
Another improvement regards creating lists using no-value fields. For example, you can filter contacts that have no tags. Therefore, the condition will be: ‘Tag’ - ‘Has no value.’ At the same time, the condition ‘Organization’ - ‘Have any value’ will include customers who have any organizations connected to them.
Send Attachments to Test Recipients
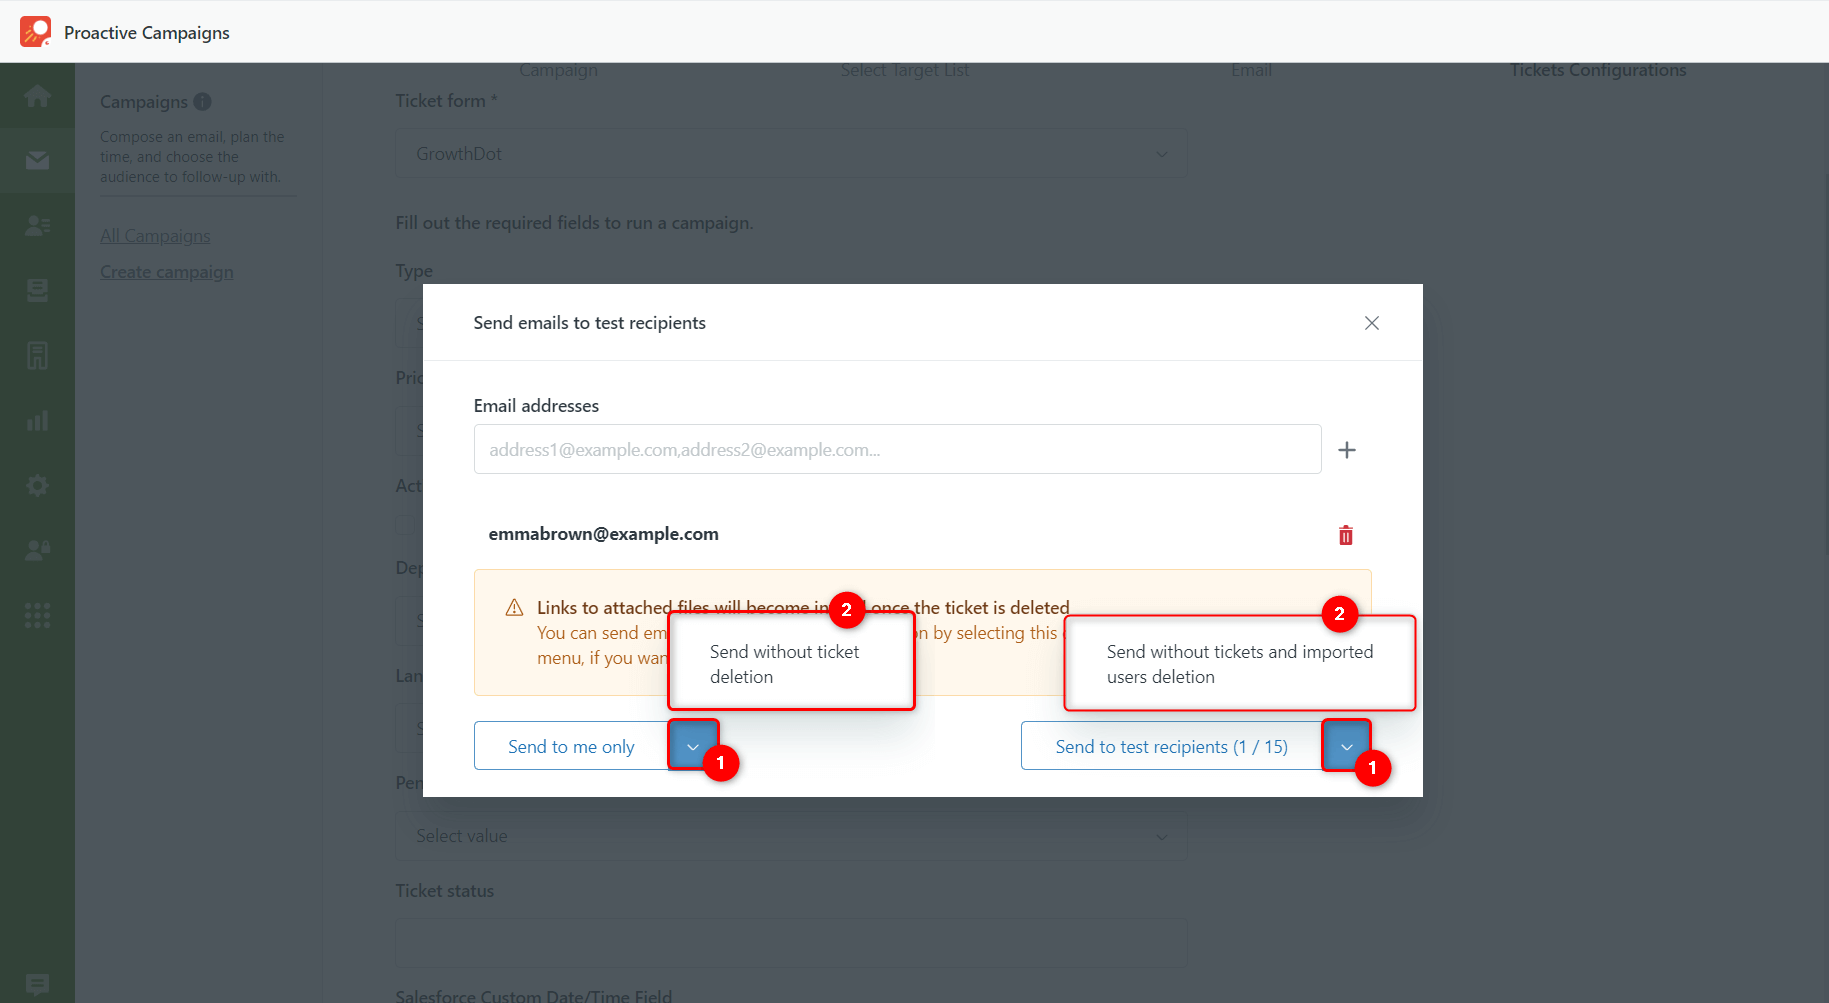
If you need to check how your recipient sees the attachment in the email, now it is possible! We applied some improvements to the app, allowing you to test a campaign with included attachments. If you send emails to check them out using Send to me Only or Send to test recipients buttons, then you will see the link with the attachment, but empty.
To overview the realistic look of the attachment, click the arrow next to these buttons. Then, select Send without ticket deletion/Send without tickets and imported users deletion. This way, tested tickets won’t be automatically deleted, preserving the actual view of attachments. So you will be able to check them out in your email inbox.
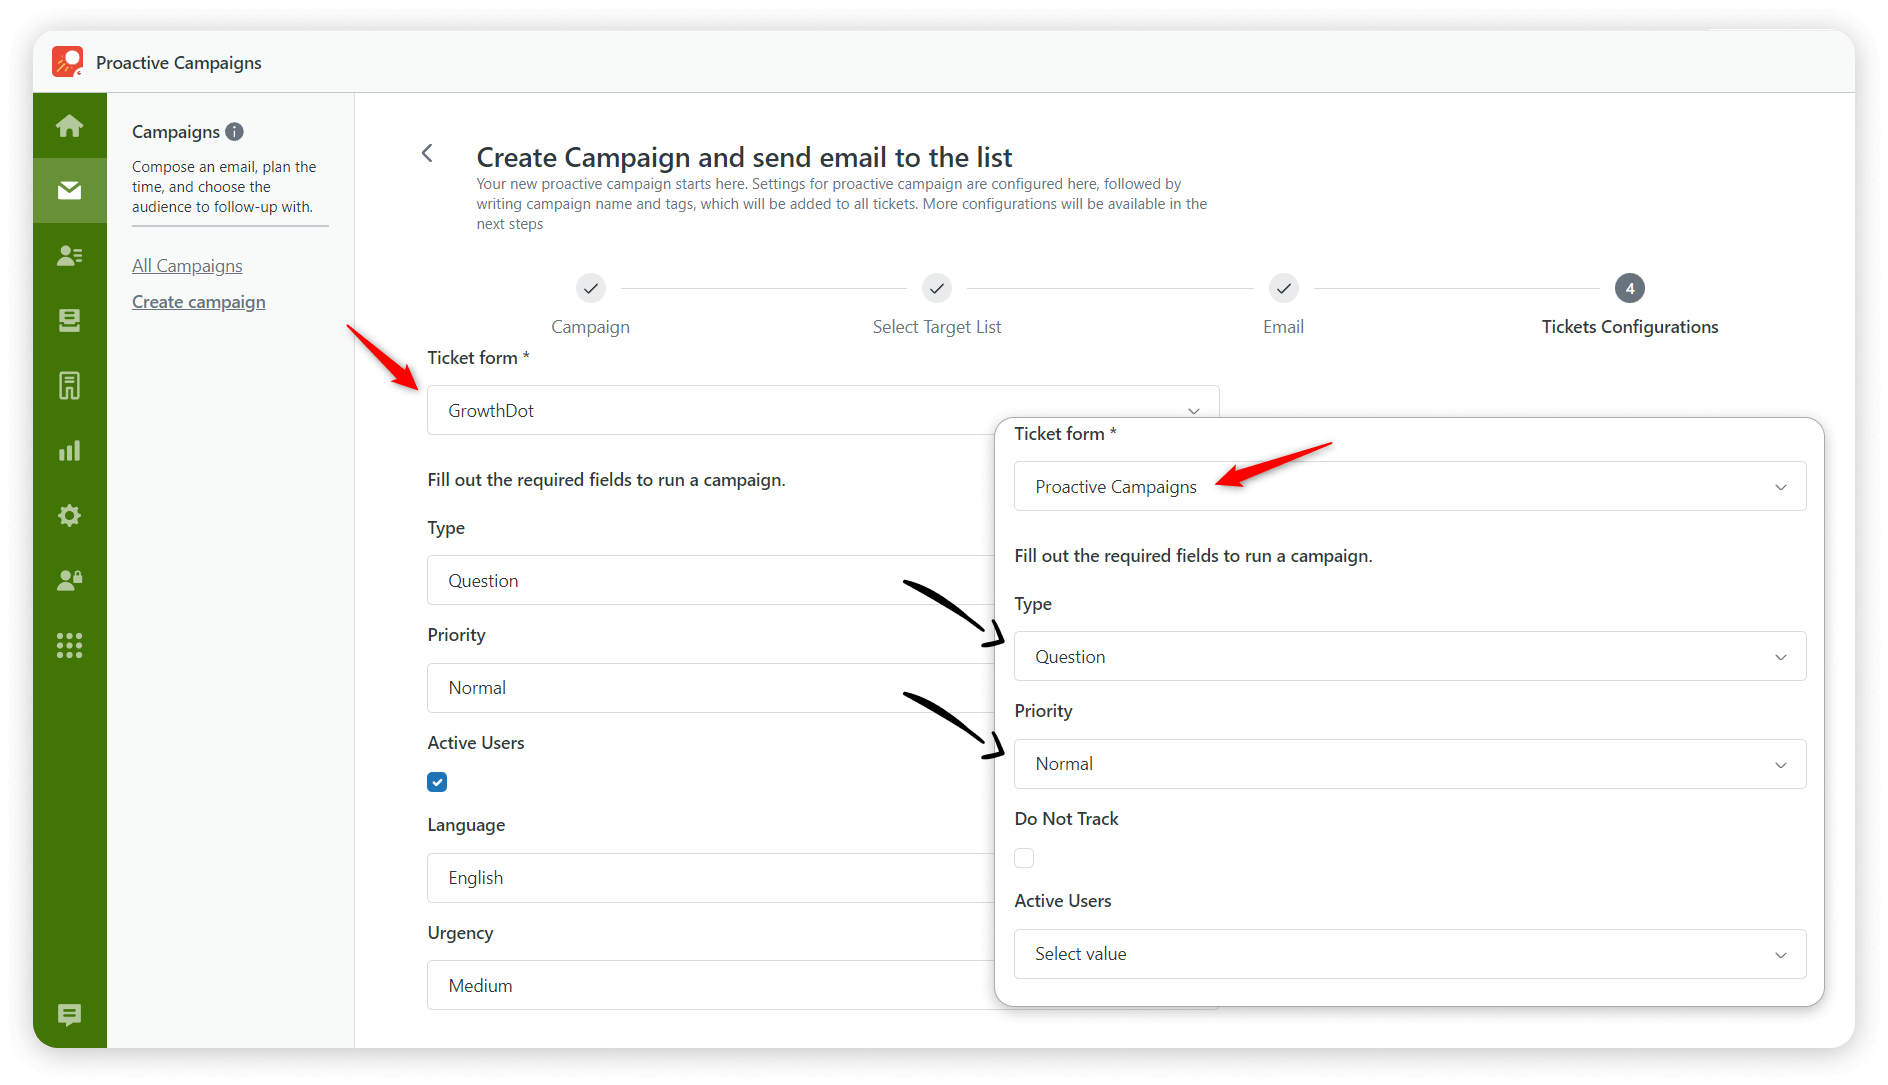
Ticket Forms Improvements - Clone and Edit
After cloning the campaign, the used ticket form with filled fields will also be duplicated. The previous application's functionality didn't allow doing this. Moreover, the new update will make your work faster. So, the information contained in fields is saved after you change the ticket form. Sure, the key condition is that both ticket forms must have the same fields. Only this way the data will be transferred from one ticket form to another.
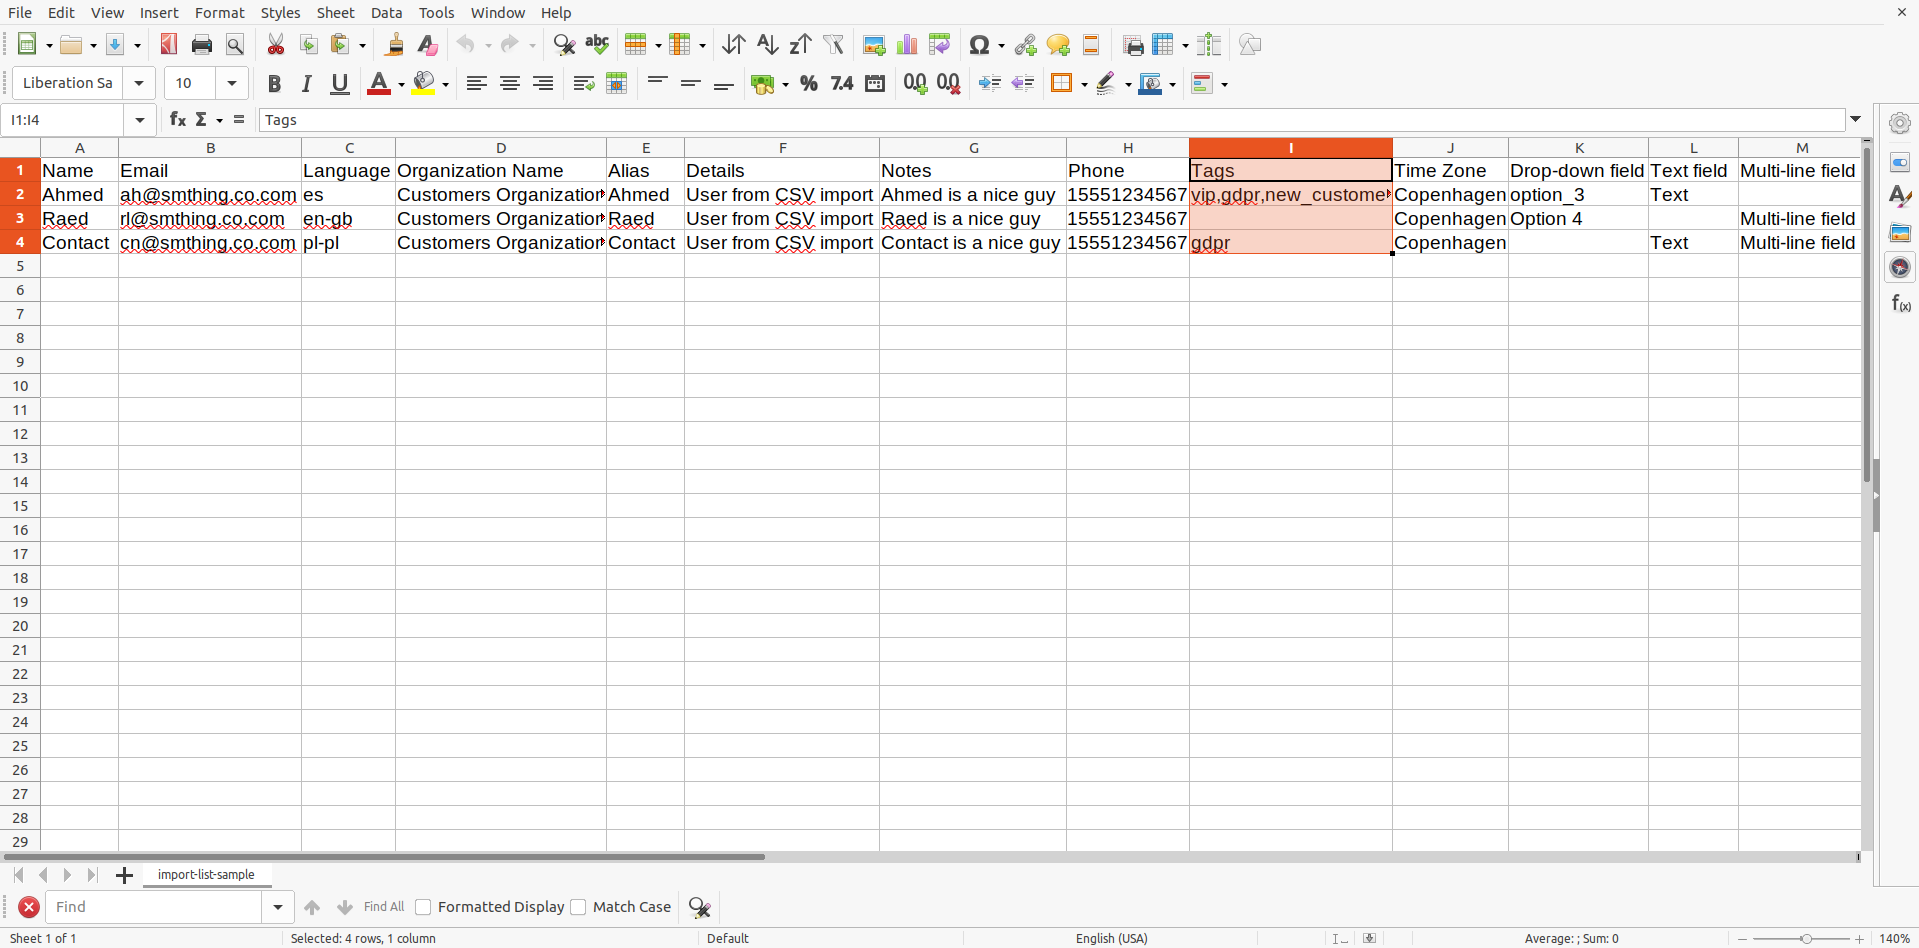
Import Tags with a CSV file
Previously, you couldn't import tags with contacts using a CSV file. However, now we improved such an option, and it is possible to import tags. Before uploading the document, make sure the input data is correct. So, if one contact has more than one tag in the field, they should be divided by commas, like in the screenshot below.
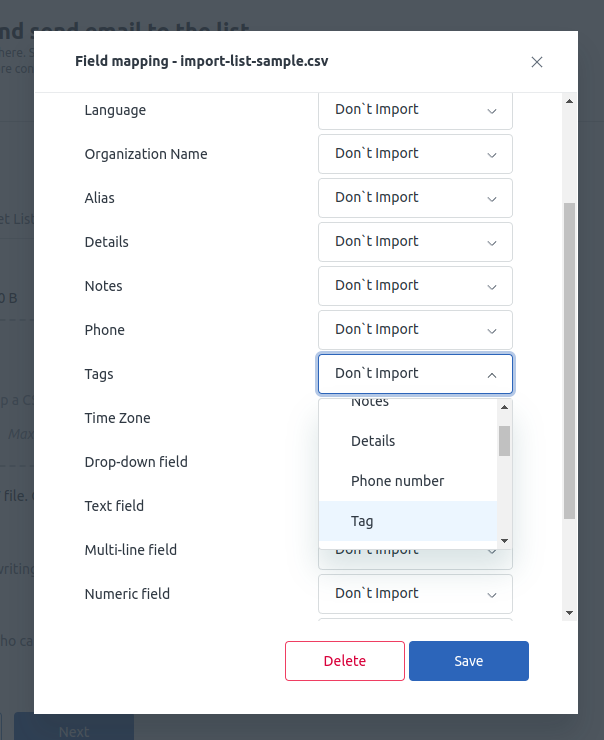
When you are sure in a prepared file, create a new campaign > on the second stage of the campaign creation – 'Select Target List,' open the Import User List tab > drag and drop the file > select fields and continue as usual.
The Events Feature Added
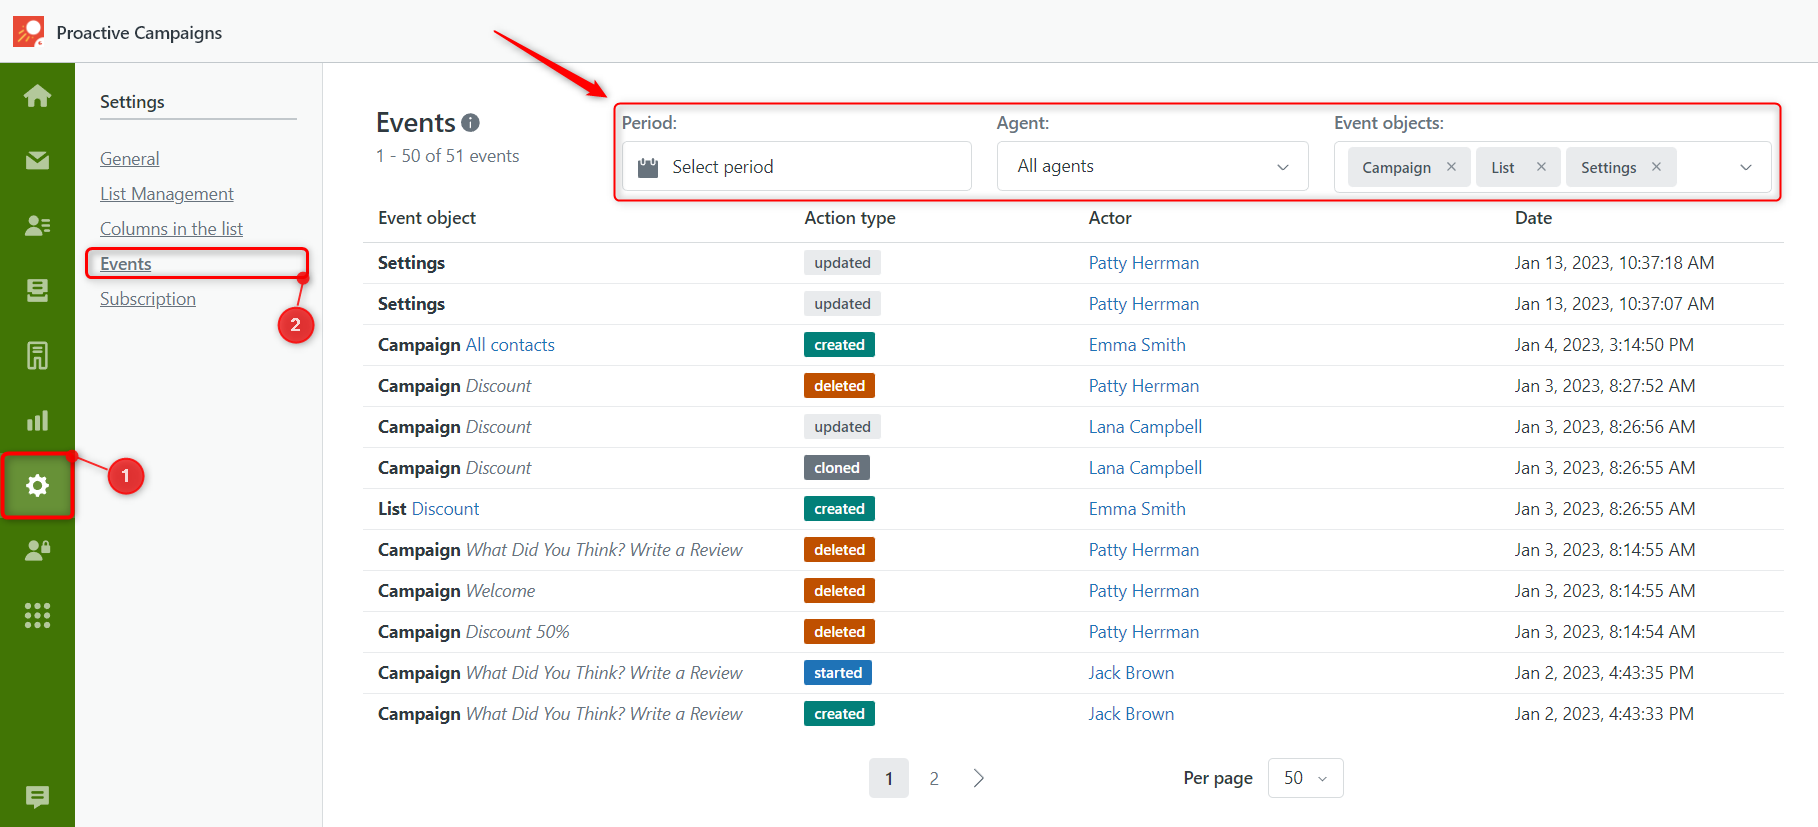
From now you can easily monitor actions you and your agents perform with the help of Events. To see the whole list of events that occurred with campaigns, lists, and settings, go to the Settings page > Events tab. There you will find the event objects (campaign, lists, settings), action types that may differ from each other, the name of the agent responsible for actions made, and the accurate date of each one.
Besides, you use filters to make the search quicker and more precise.
Set different access levels for agents
If you need to segment the access levels for agents, then Access Control Management is what will help you. With the new update, you can entirely or partially restrict the agents' rights in the app or grant full access to some of your coworkers. Just click the Access Control Management icon on the Proactive Campaigns's sidebar and set the required permissions. Additionally, admins can specify what access new agents will get as well as change the current restriction levels for each agent.
![]()
Skip Invalid Customers in a CSV
We are all people, and it's not a secret we can make mistakes, primarily if we work with massive documents. Counting it, we decided to optimize the app and added an option of omitting invalid users from a CSV file. Thus, in the second stage of campaign creation, when you upload a CSV doc, mark Skip invalid customers to activate this function.
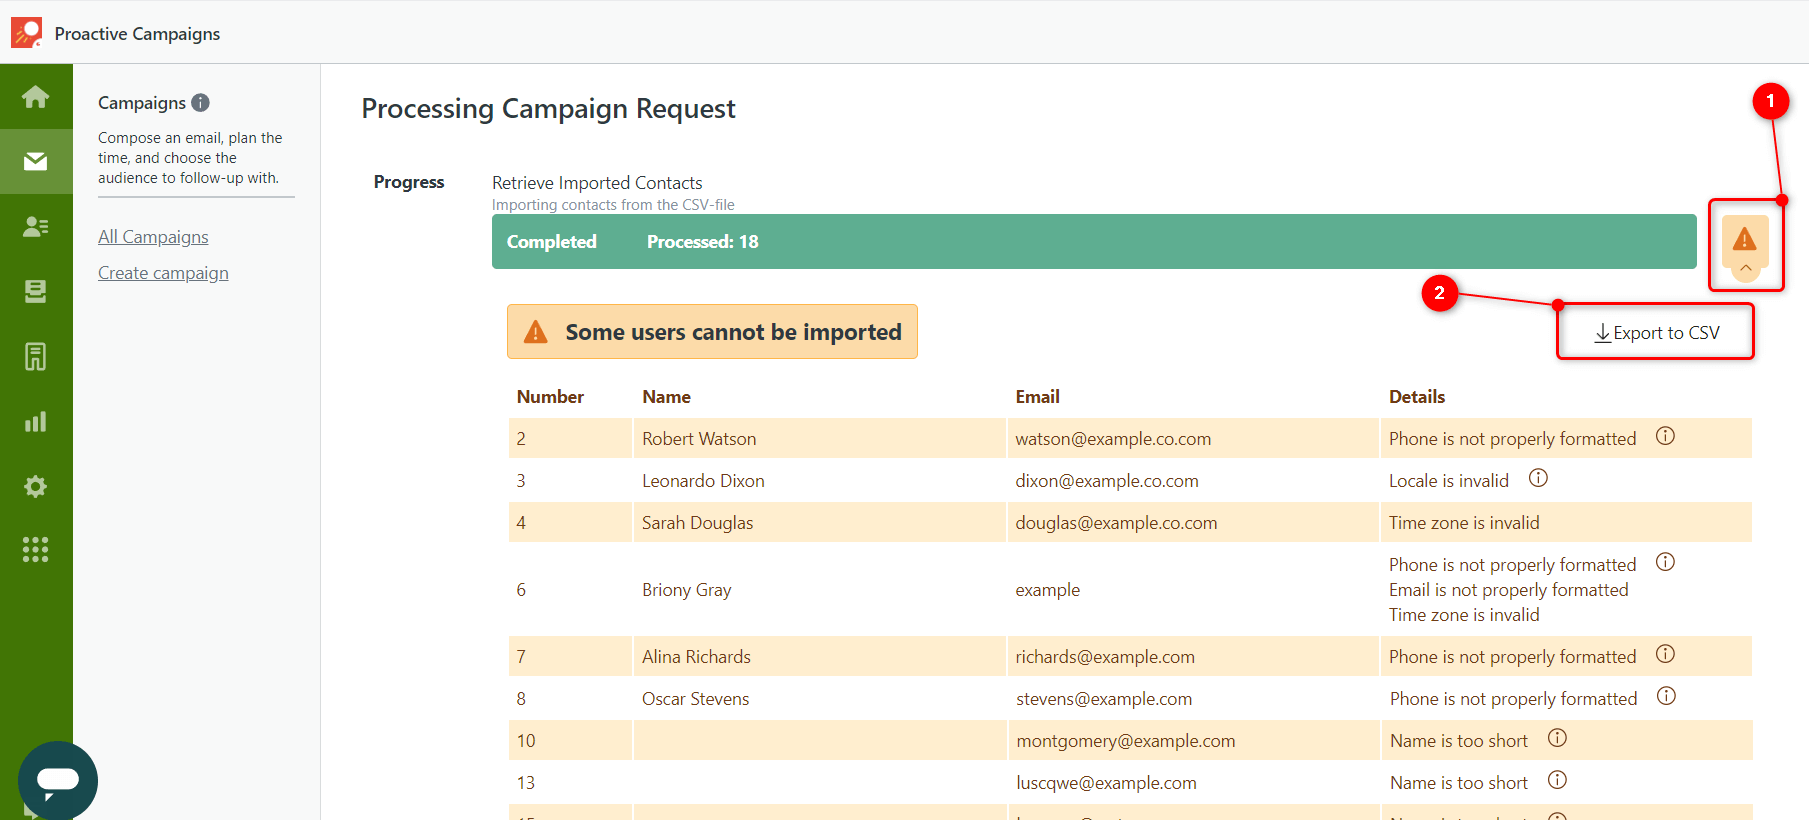
After launching a campaign, the app will inform you if there are skipped users. You also can click Export to CSV to download missed users and edit invalid fields.
The Highlight Placeholders and Remove Format Options
Sometimes, agents meet cases when a placeholder needs to be fixed in Proactive Campaigns. Usually, a placeholder breaks because of the wrong formatting copied from a third-party resource. Our team developed new features to recognize invalid placeholders and clear unnecessary formatting.
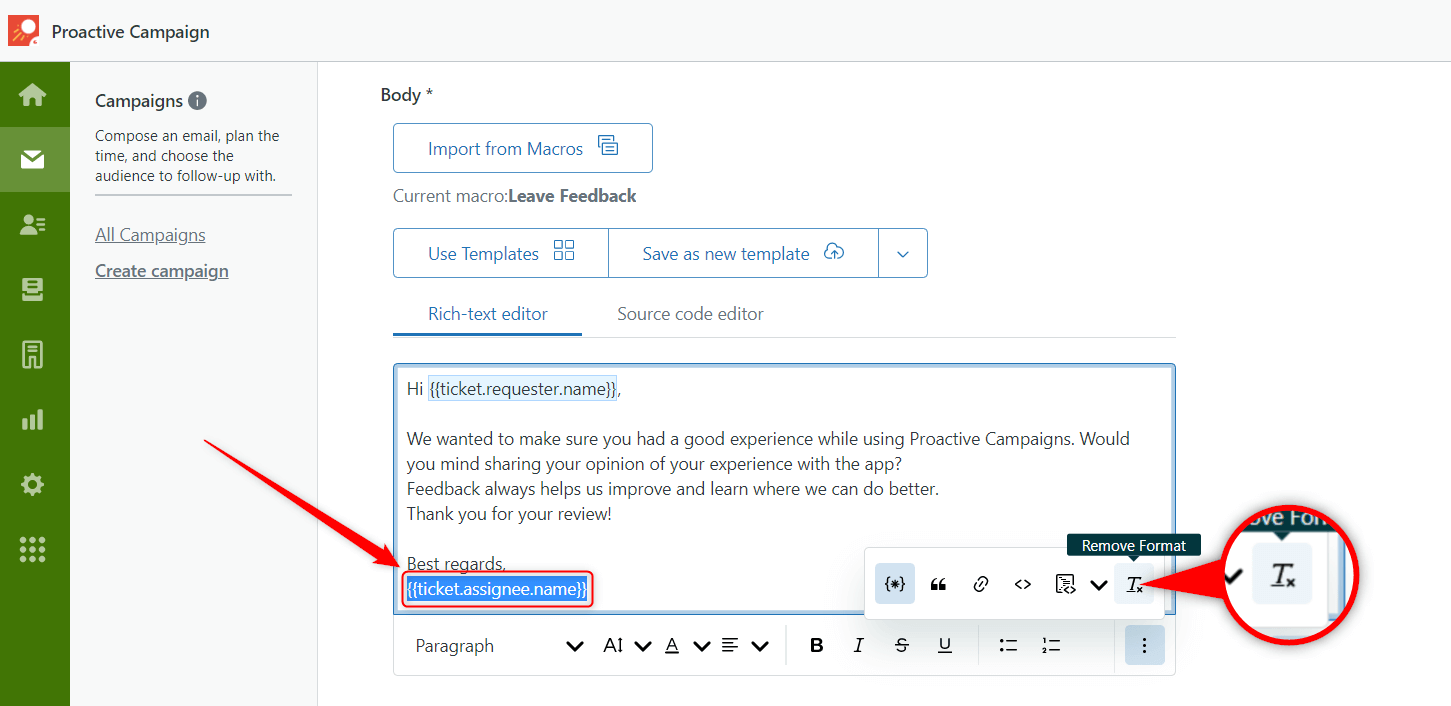
So, we move to the third stage of campaign creation. Here, we enable the {*} Highlight valid Zendesk placeholder button on the Body edit panel and insert two placeholders. As you can see, the first liquid markup is highlighted, which means it is a valid placeholder.
However, although the second one looks like a valid liquid markup, the app considers it a broken one. Why? Because the formatting is applied only to the text in curly brackets. If you need to color dynamic content, be careful to select the entire placeholder, including brackets. Therefore, if you copy a placeholder from, for example, Zendesk Knowledge Base, remember that it can be broken with the applied formatting.
Consequently, if you see a placeholder is not highlighted, then use the Remove Format option.
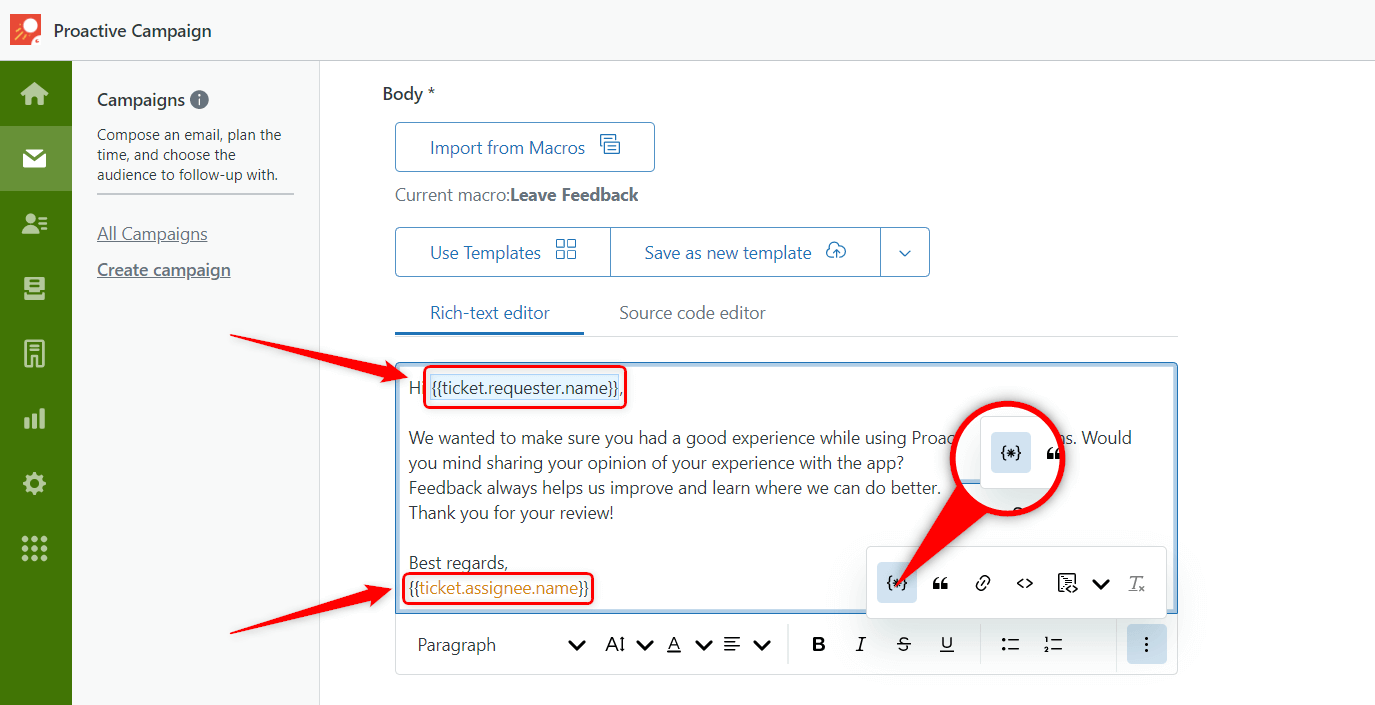
This element on the edit panel helps get rid of the color or other text styles. For this, we select the whole placeholder and click the Remove Format button, as shown in the screenshot.
Friendly App Hints
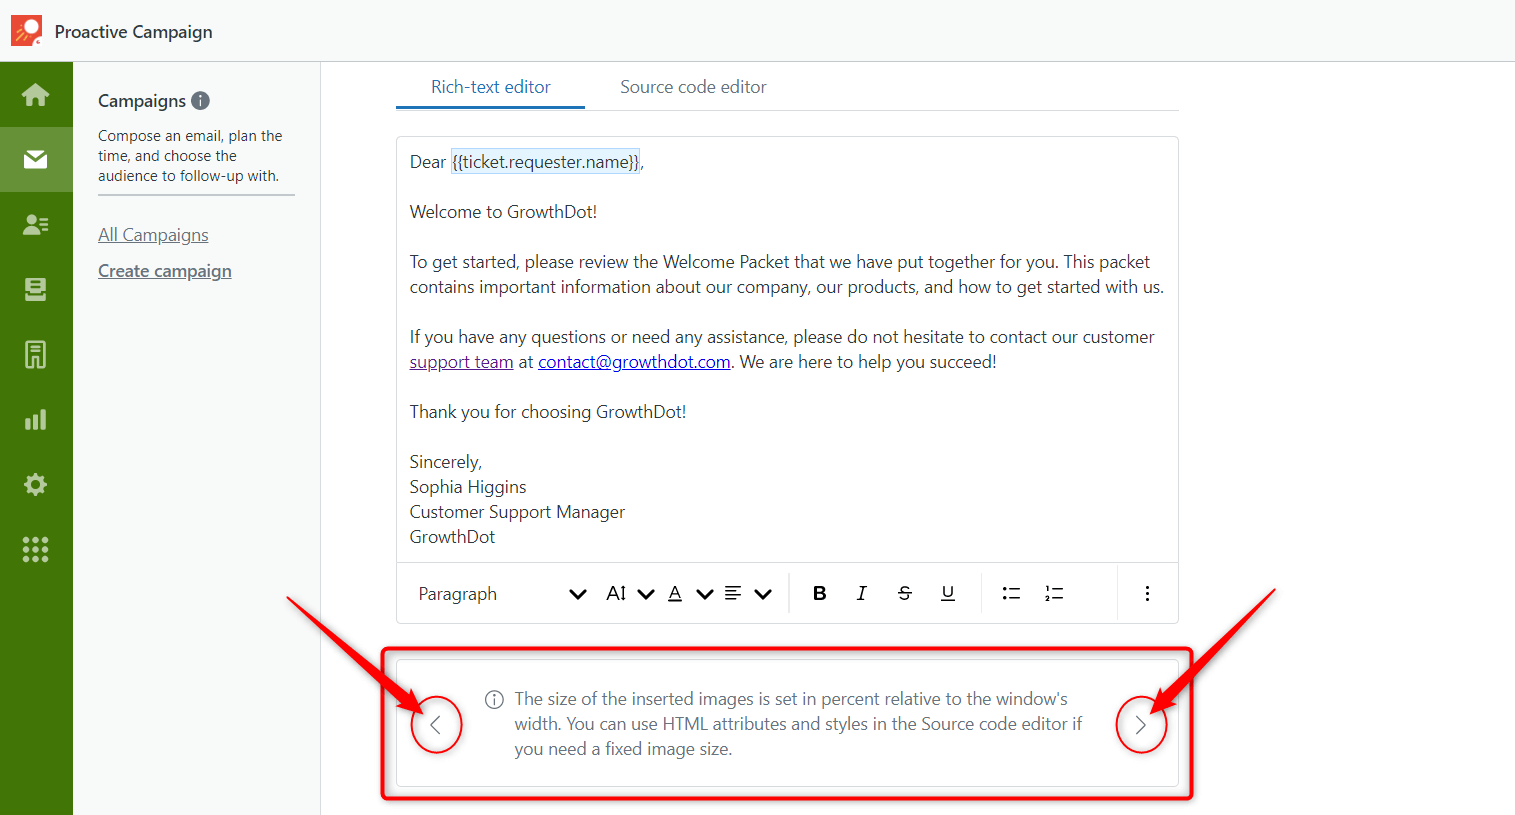
This time it’s not a new-released feature but some app improvement that will be handy for you. Therefore, we would like you to pay attention to our hints bar. It is located below the Body editor section, and its purpose is to inform you on how to make proper emails.
It works pretty simply. Just click on the side arrows to move hints back and forth. Also, keep in mind that we constantly update the hint bar, so check it periodically.
Create Organization Lists
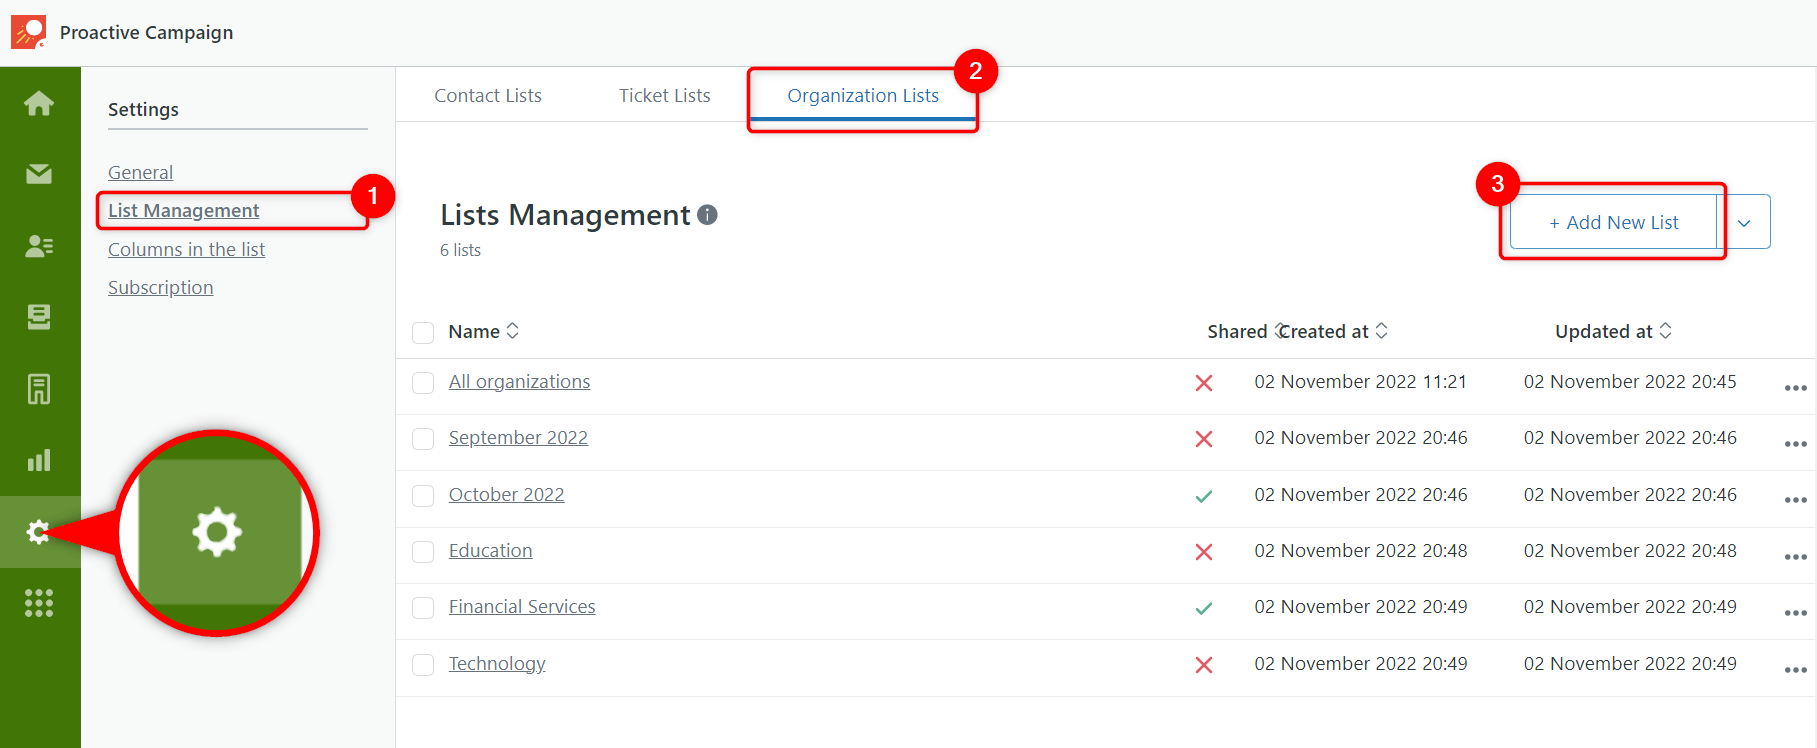
If you need to sort out your contacts or tickets by organizations, this option is definitely for you. Now, you can create an Organization list similar to a Ticket or Contact list from Settings > List Management > Organization list > +Add New List > set the List Name and necessary conditions > Save. And when it's done, you will get several options to use this list.
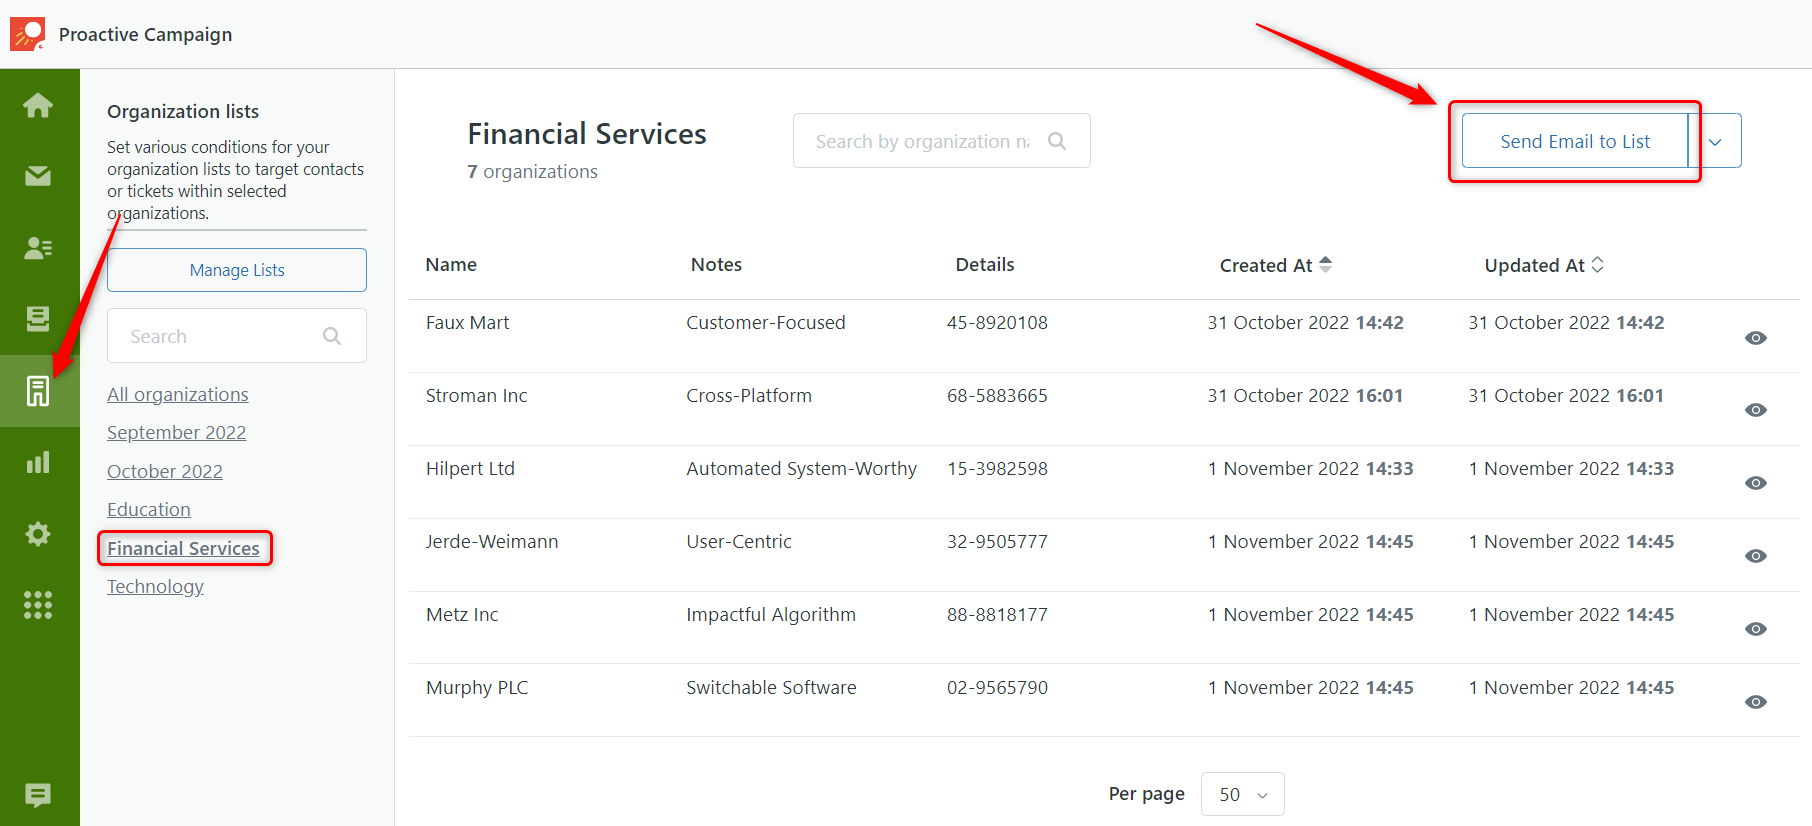
1. If you go to the Organization Views tab, you will see all organizations from the list filtered by the app. So, when you click the Send Email to list button on the top right-hand corner of the page, the app will select contacts who relate to these organizations from the list.
2. To see a ticket list whose requesters belong to organizations of the recently created list, go to the Ticket Views page and switch on the tab to the organization list (at the bottom of the page). After clicking the Send Email to list, the app selects unique ticket requesters for the email campaign. Moreover, you also can update existing tickets. All you need is to checkmark the Update existing tickets instead of creating new ones at the second stage (Select Target List) of the campaign creation.
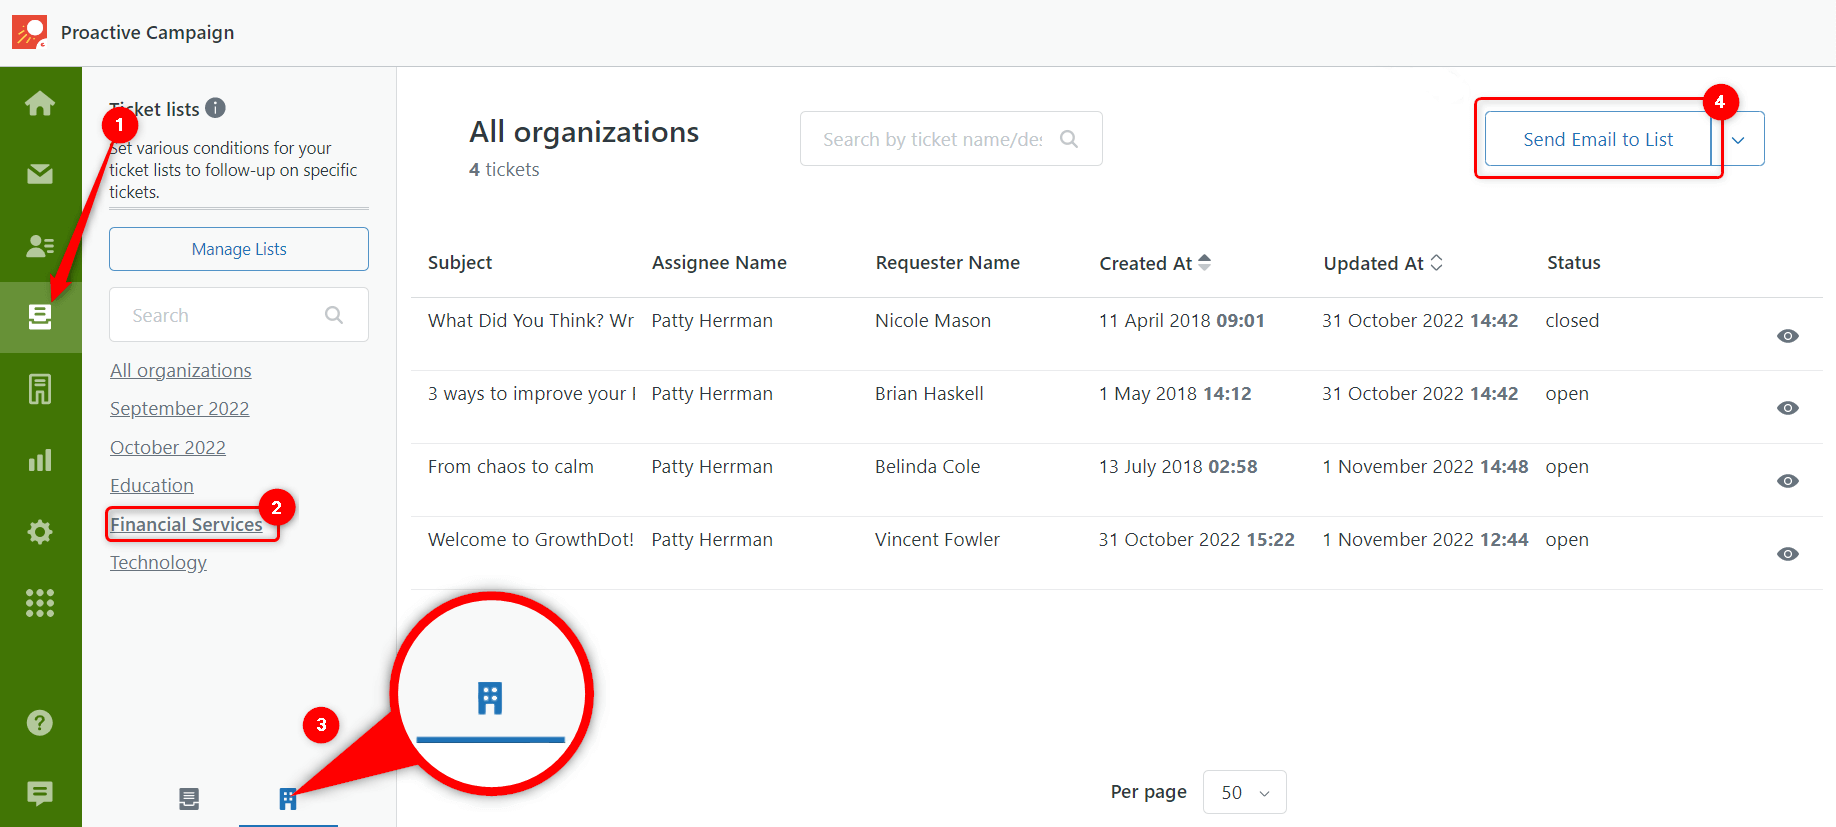
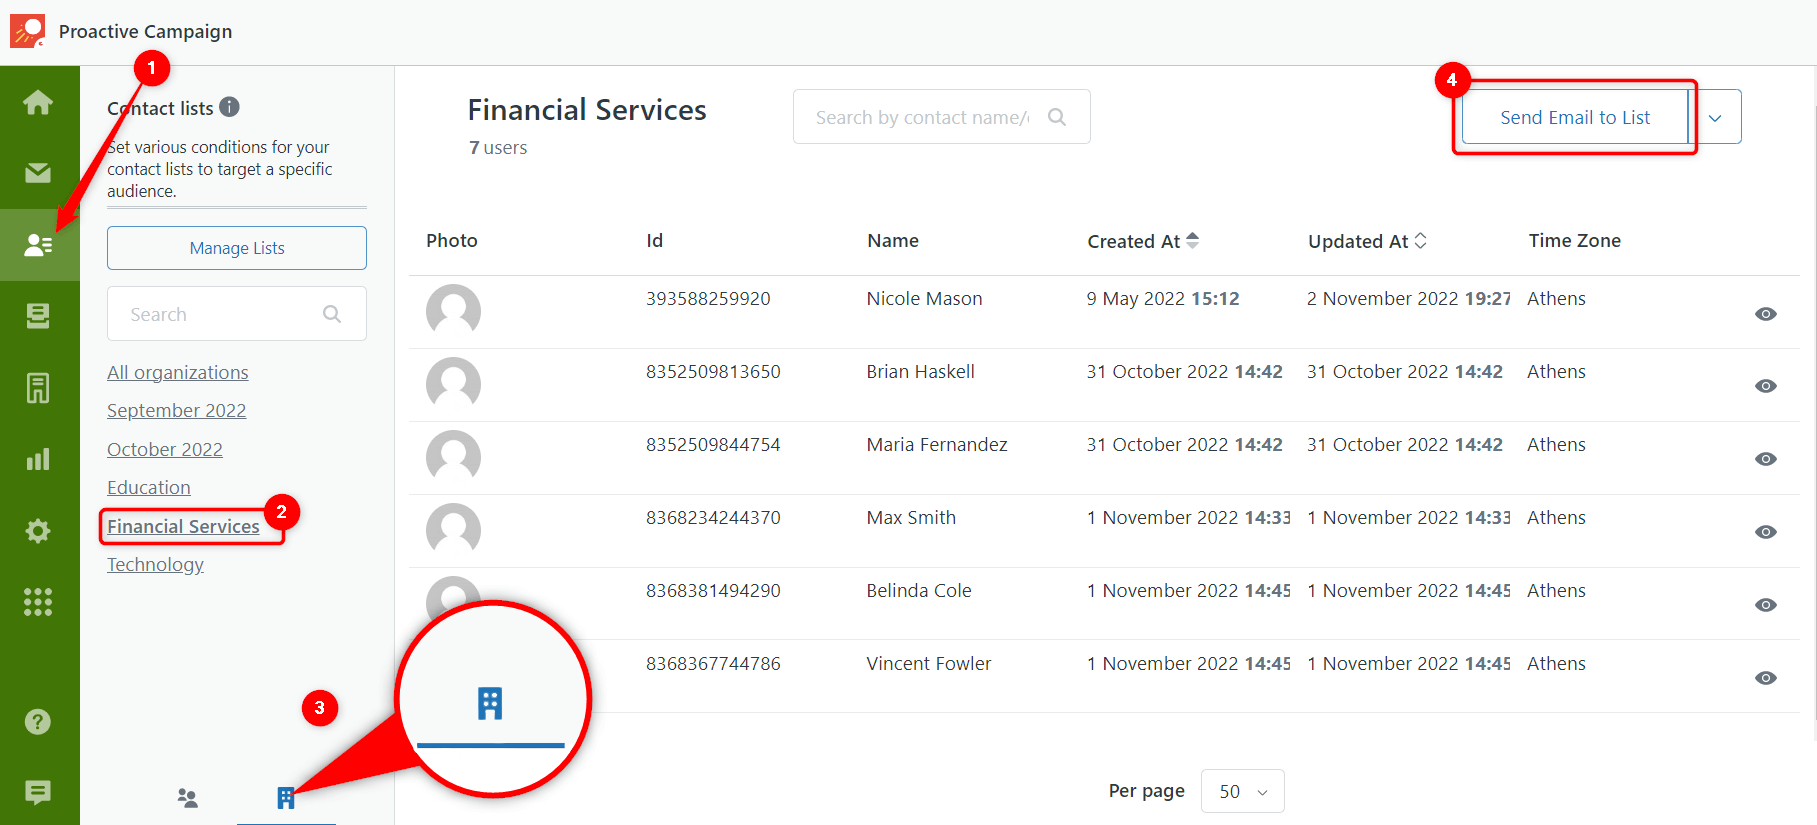
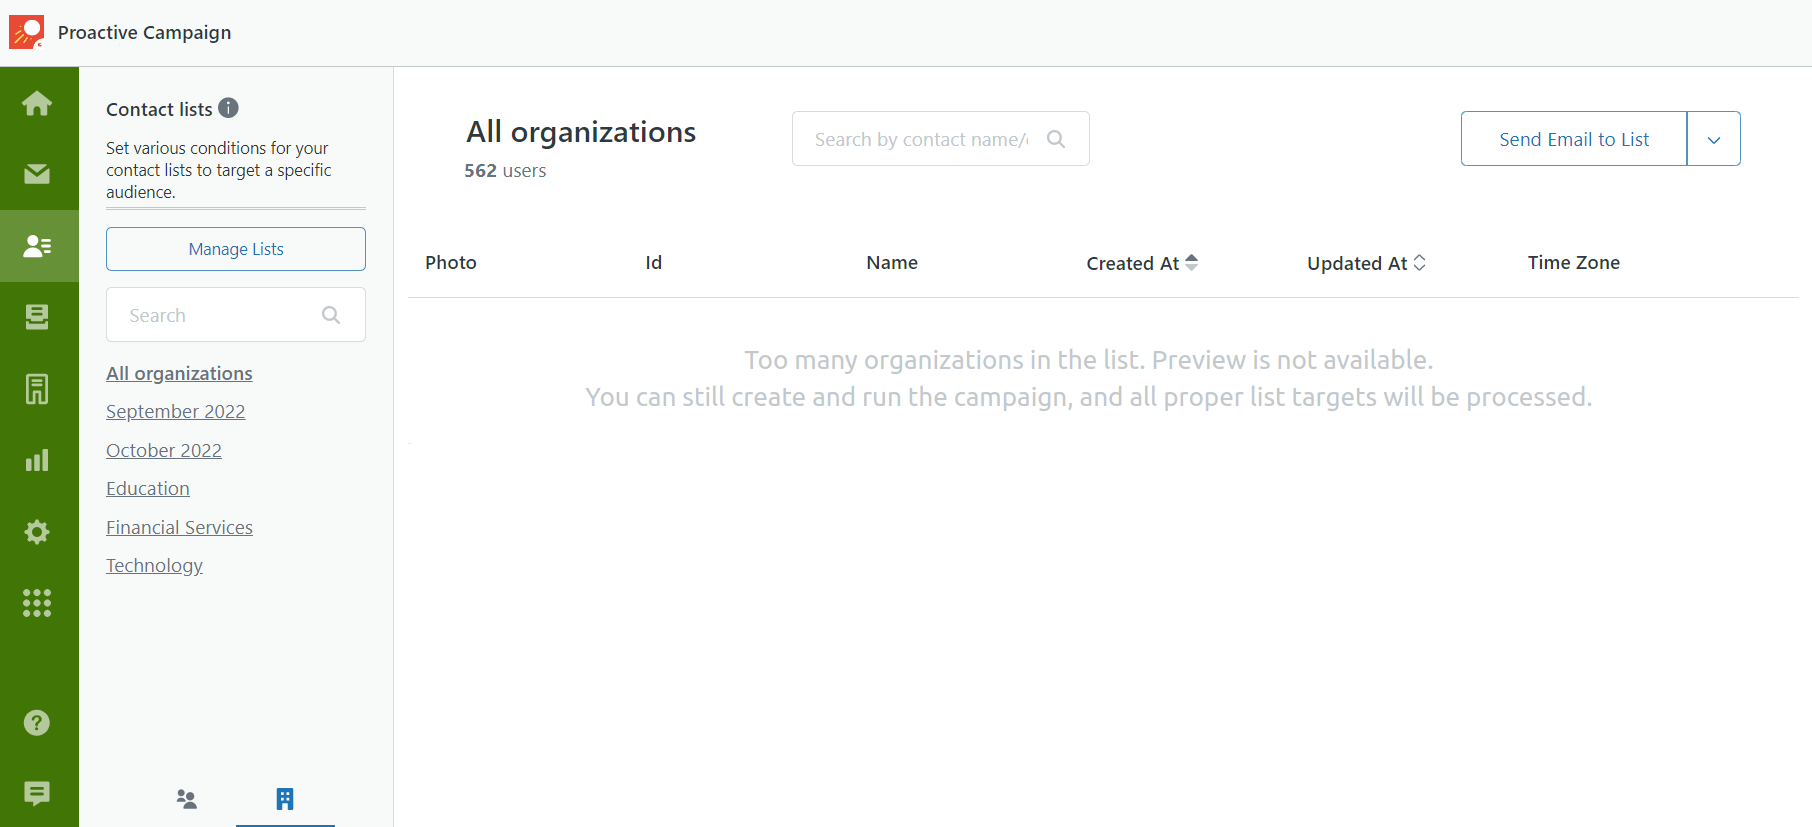
3. In case you need to view the complete list of contacts related to specific organizations, here is an option. Visit the Contact Views page and click the organization lists tab at the bottom of the page. Except for seeing the whole contacts from organizations, you can create the campaign by clicking Send Email to list.
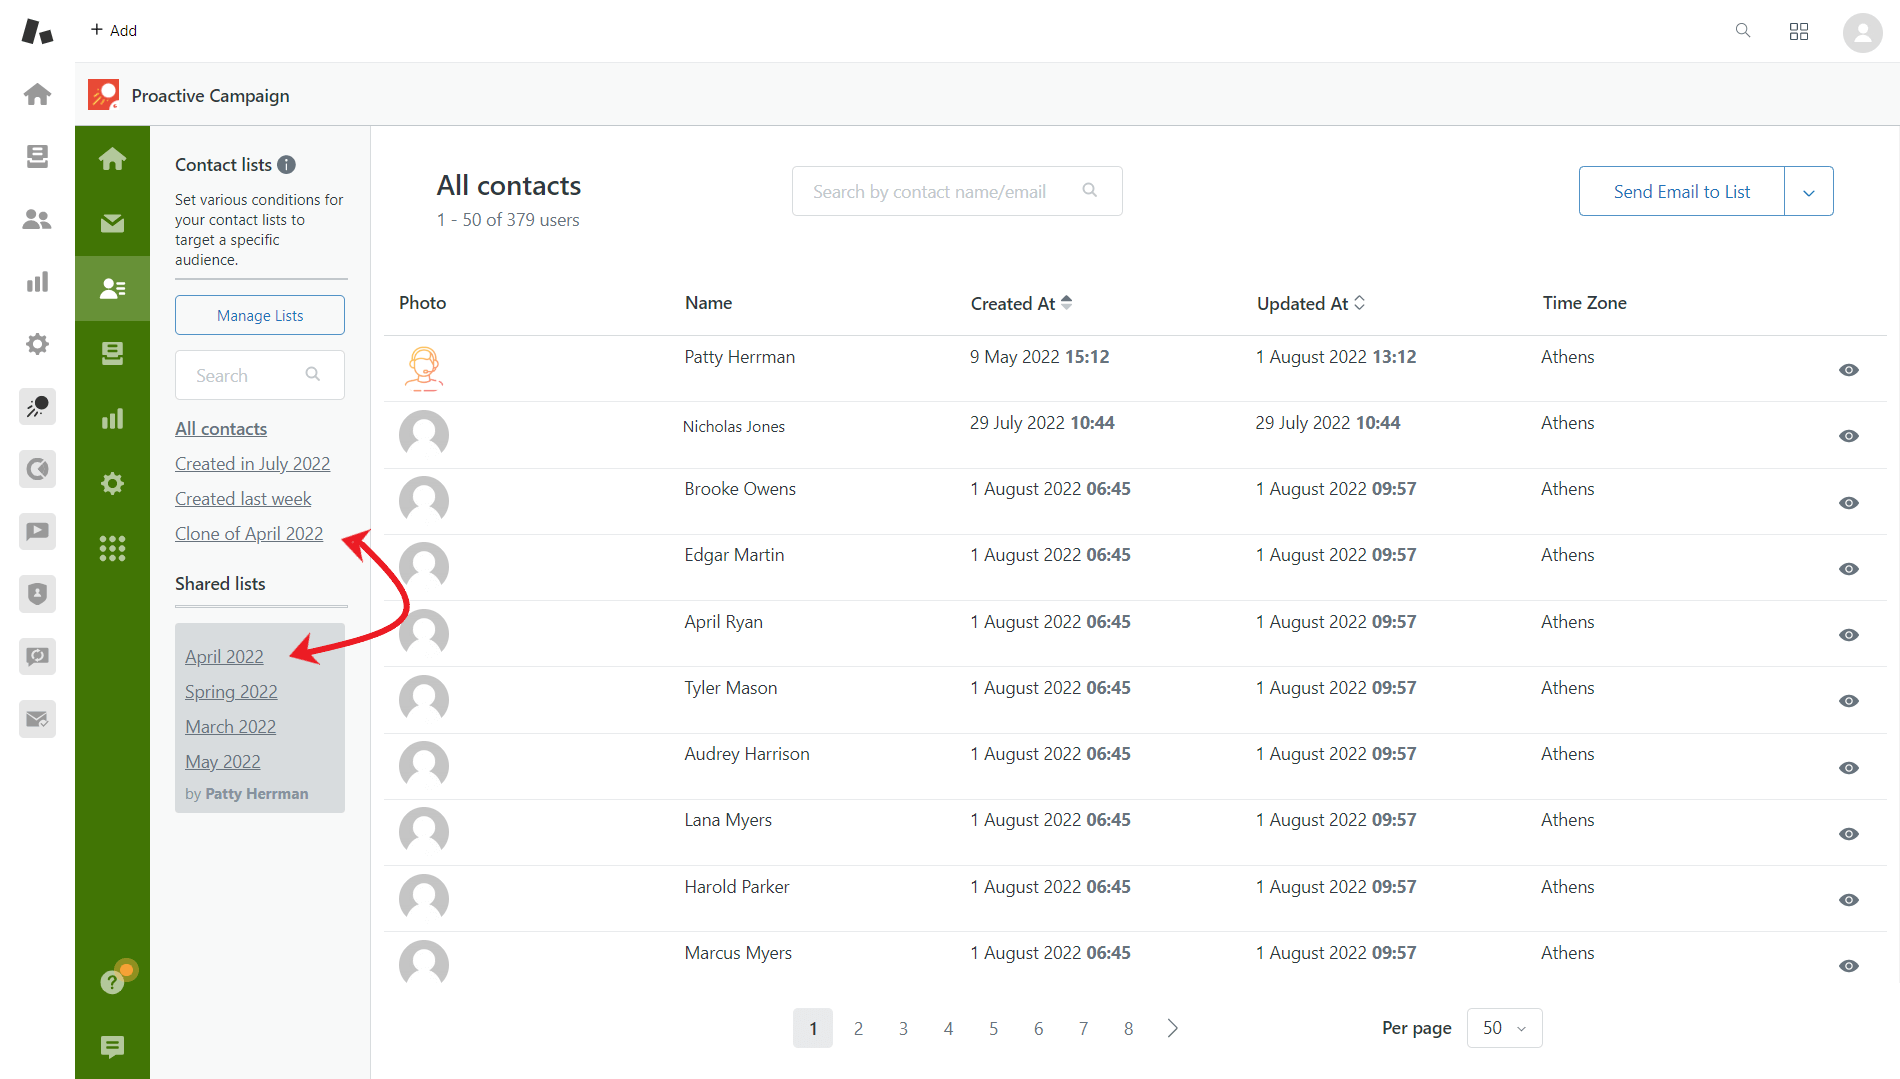
Clone the Shared List into a Regular Contact or Ticket List
Shared lists are handy when agents need to work as a team and use such collaborative materials. However, agents might feel quite limited while using such lists as they can’t be edited. Yes, in shared lists is impossible to make changes, but there is a way how to bypass it. All you need is to create a copy and use it as you want.
So, open the Settings page, go to the List Management, find Shared lists, and finally click on the horizontal ellipsis (Meatballs menu), and on the Clone button.
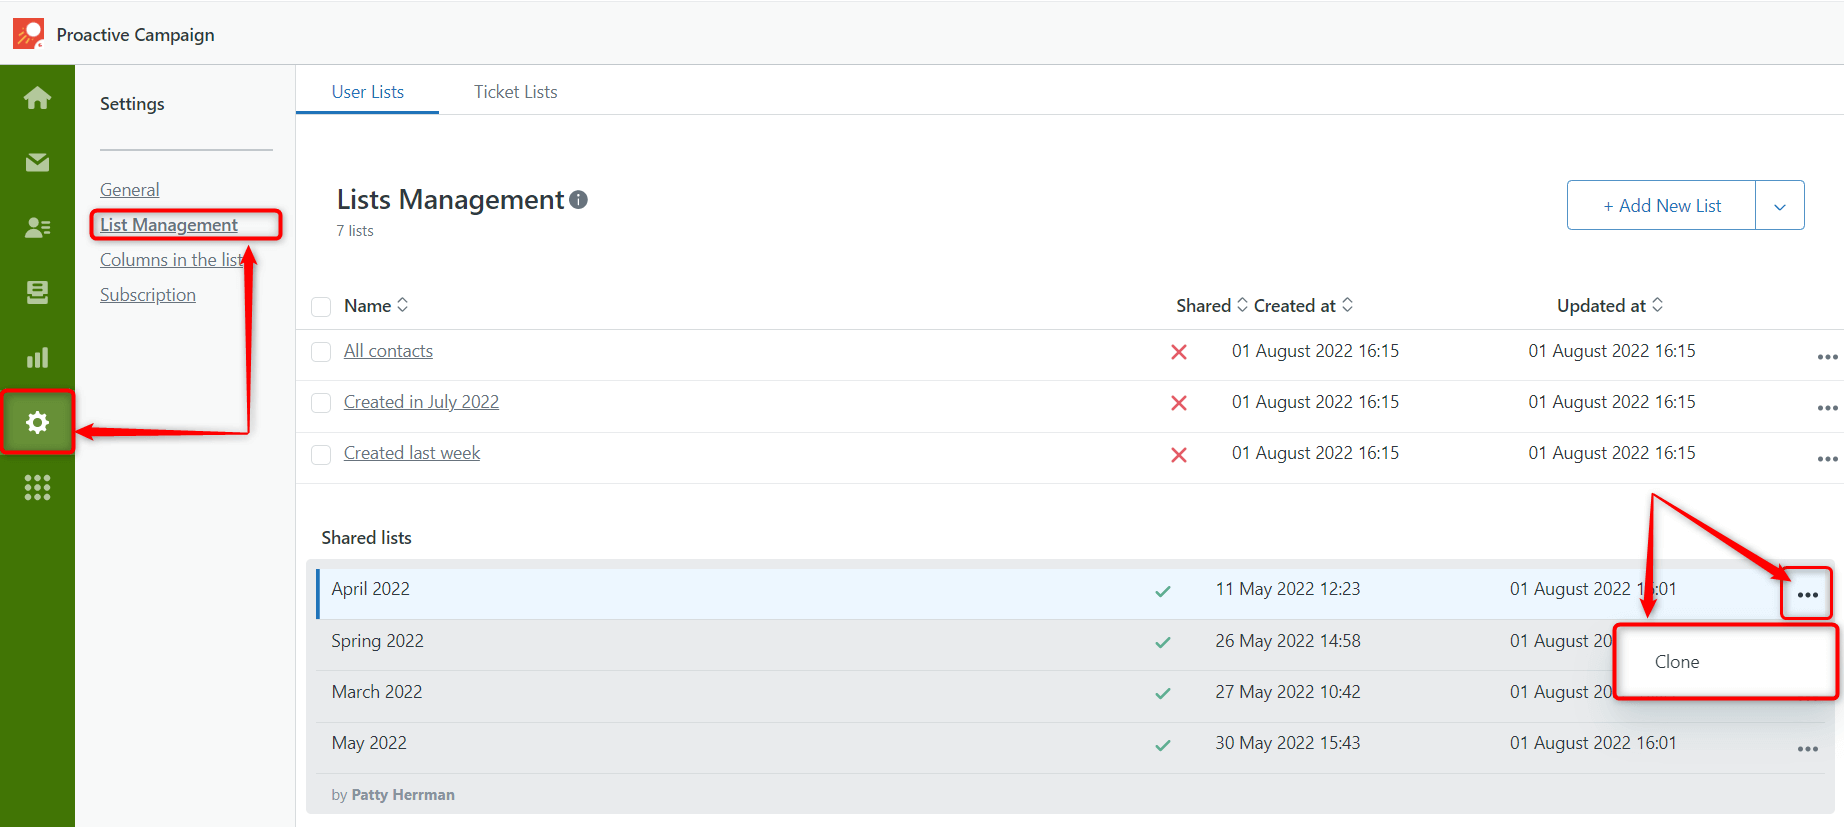
After, you will see the cloned list you can edit. Thus, do appropriate actions and Save changes. Then, watch a result on a lists page.
Upload HTML Templates
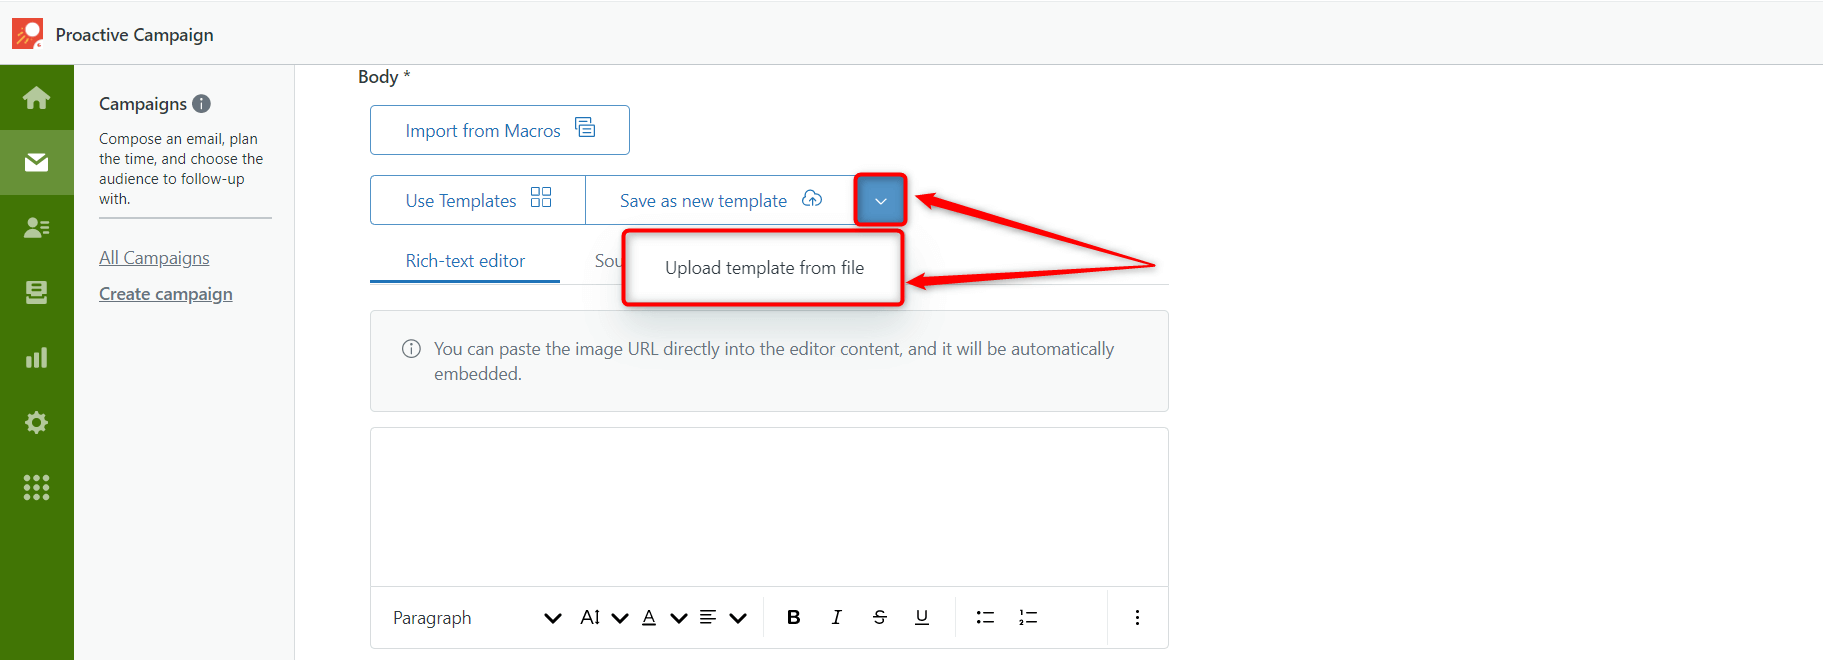
At our customers' request, we added a new feature. Now you can upload your HTML templates into the Proactive Campaigns Editor. So first, click the arrow button near the Save as new template on the third stage of campaign creation. Then, select the Upload templates from file.
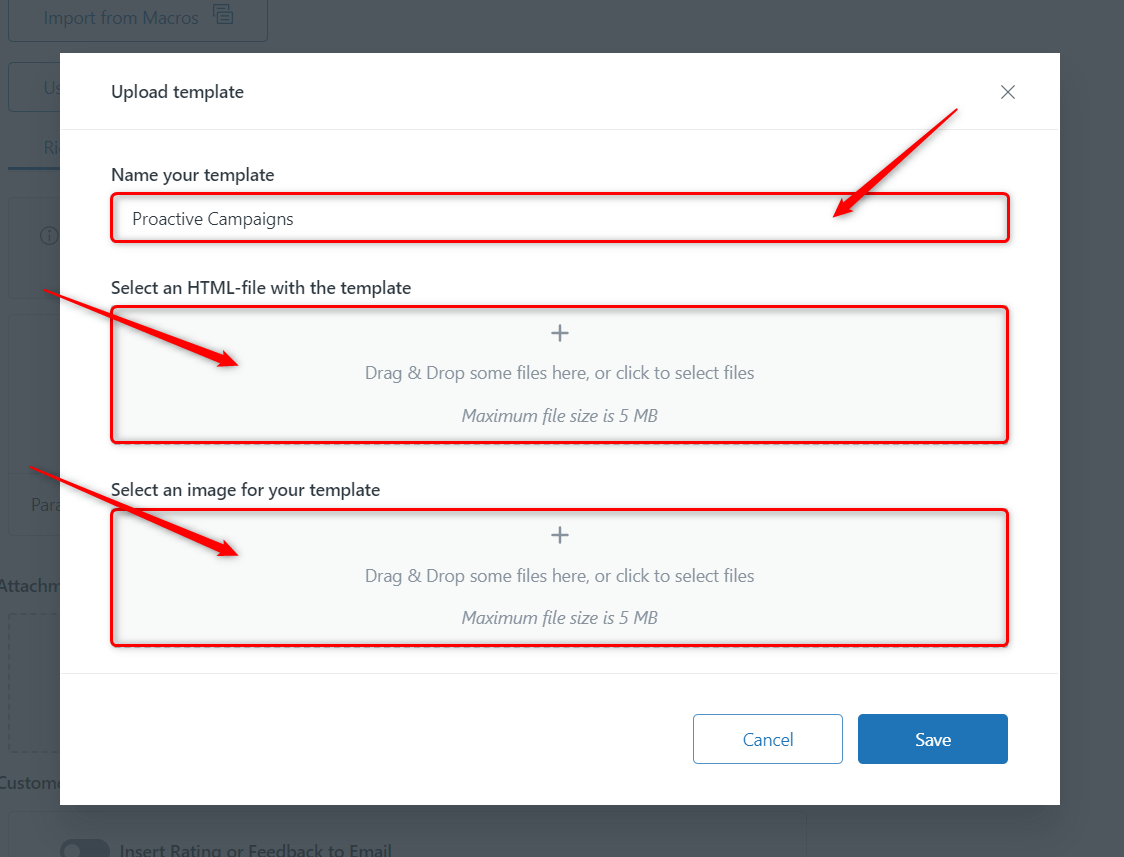
When the modal window has been opened, name your template, select an HTML file and upload an image (it’s optional. Use it if you want to differentiate your templates easily).
The template will be opened in the Source code editor so that you can change or leave it as it is.

Send Follow-ups to Seen/Unseen Tickets (with Email Tracking)
We deepen the integration between Email Tracking and Proactive Campaigns to use the advantages of each app to reach the best results in your email marketing and customer support. For example, previously, you could send follow-up campaigns only for those who didn't reply. However, together with Email Tracking you can also track seen/unseen emails directly in the particular campaign and send follow-ups.

Besides, you can switch toggles to modify your contact list and include exactly what you need. For instance, we created a follow-up list only with seen and replied tickets.

Possibility to Send an Email on Behalf of the Other
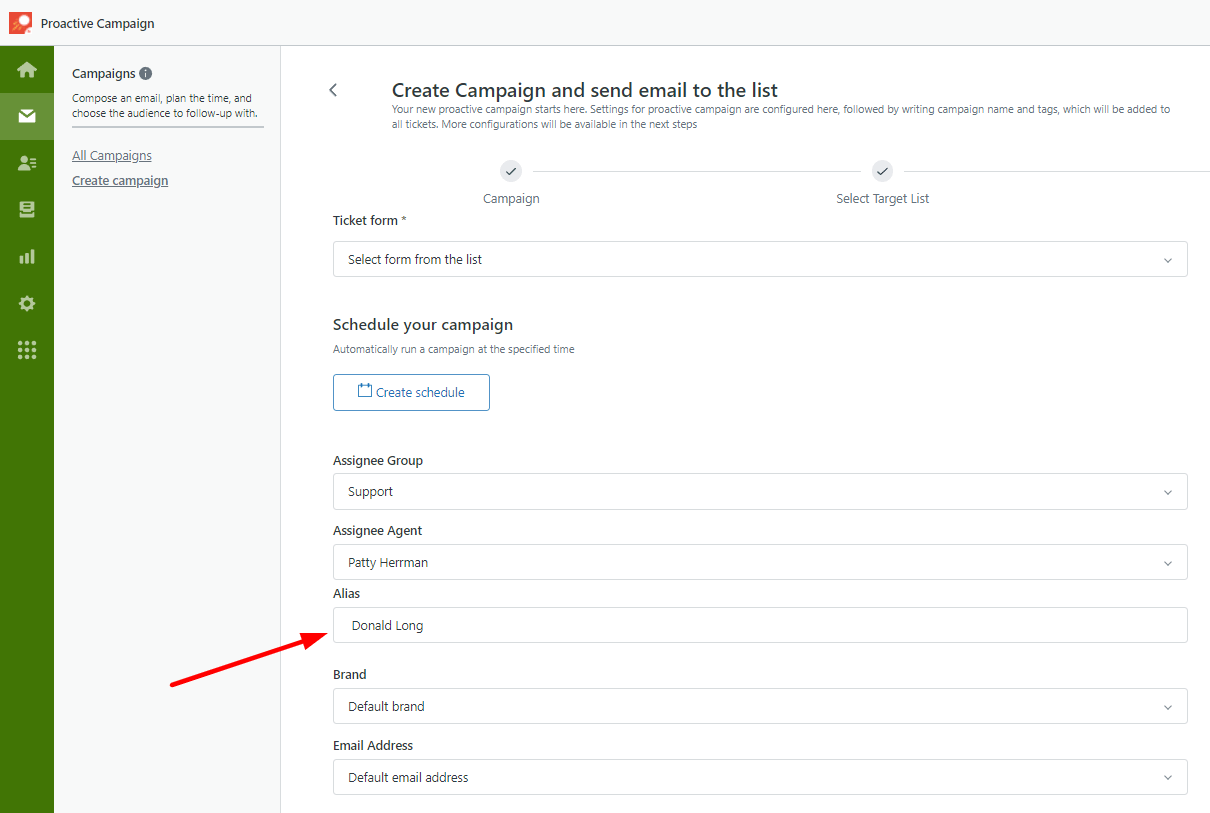
Sometimes you need to launch your mass email campaigns on behalf of the other agent or even an imaginary person. For that purpose, we have created an Alias field to type the name so that the end-user will see that name, but the reply will return to the agent. Take into account that admins can choose an alias for any assignee and agents can do it only for themselves.
Test Your Email Campaigns
Proactive Campaigns allows you to create lists from Zendesk contacts, and theoretically, you could compose a list with test emails. However, that is unnecessary work and you also need to waste time creating the list, and then delete those emails from Zendesk. Nevertheless, the spam filters become more advanced with each passing day, so sending emails without testing can harm your business. We found the way out, let's see.
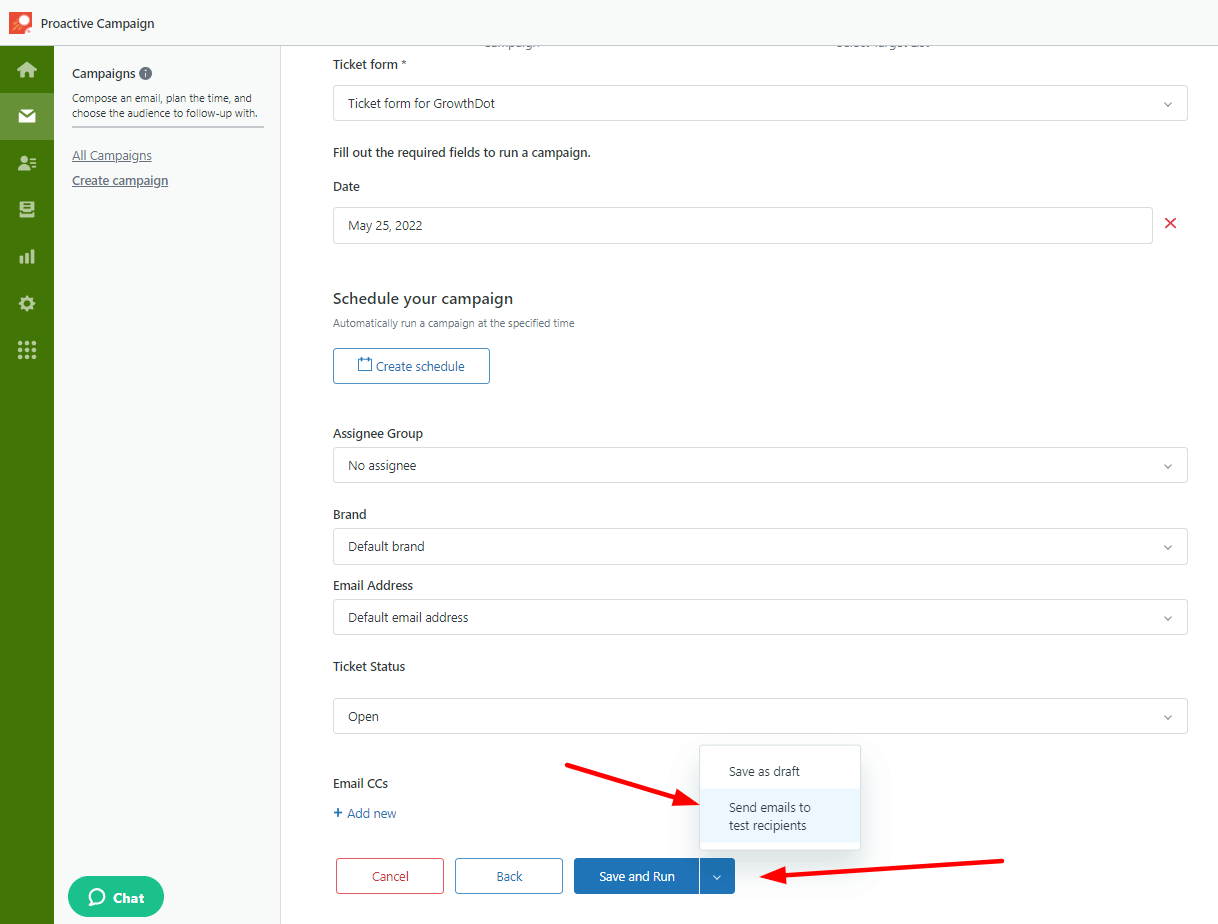
So, when you are on the final stage of creating your bulk email campaign (Ticket configuration) you can click on the arrow button near Save and Run and select Send email to test recipients.
Then, you'll see the window where you need to type test email addresses and click on " + " to add them to the list. Then click on Send to test recipients or hit Send to me only if you need to send to your address.
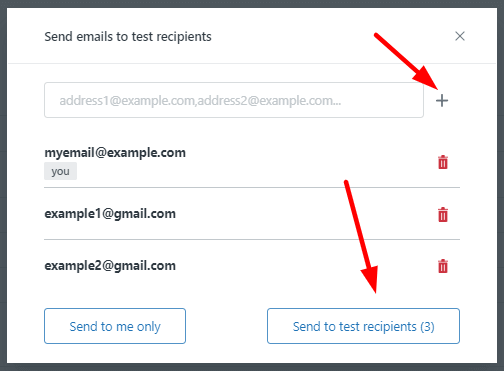
Finally, check email's destination in testing tools or check out your emails to know where your letter is.
Try our other apps
According to the customers’ reviews, our Proactive Campaigns app and Email Tracking boost your efforts in Email Marketing. However, we suggest you increase your sales (CRM and Deals), improve messaging (Video Reply), and comply with privacy standards (GDPR Compliance). Also, try our themes and services. We also have customers' favorite apps for Jira and Freshdesk.


